
Lisa Lagaly's Blog
May 17, 2024
Create Eye-Catching Book Titles with GIMP: Step-by-Step Guide
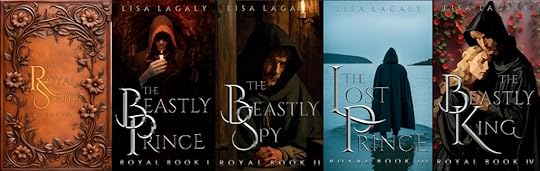
I finally finished editing my Royal Series and putting the individual books on Amazon. No reviews yet but I’m hoping my fancier covers will entice some readers (The picture below should be linked to the first book). If you’re interested, it’s a clean, roughly historically-based shifter fantasy with elements of romance, mystery, alchemy, natural science and…
“We don’t care about your books! We just want to make fancy letters!” you say.
Understood. Let’s get to it then.
I used Cinzel, which is a free font I downloaded off the internet several years ago. The first letters are size 600, the smaller letters are 200, and the ‘THE’ is 100, or they were when I started. I shrank them down to fit my book covers.
Download and install GIMP if you don’t already have it. It’s free. https://www.gimp.org/Install G’MIC-QT https://gmic.eu/download.html. This is free collection of filters for GIMP. I don’t remember how I installed it, but it was pretty painless.Restart GIMP if you had it open while you were installing G’MIC. G’MIC-QT should now appear at the very bottom of the long list under the filter tab in GIMP.Choose a font and arrange your letters the way you like. I found this a lot easier to do in PowerPoint than in Gimp. Make your font BIG, 100 at least (it is better to shrink than enlarge in GIMP), and color them medium gray.After you have your title the way you want (in Powerpoint), copy your letters and in GIMP go to EDIT->Paste As->New Image. You should see your letters with a transparent (light and dark squares) background. If you make some letters really big the way I did, I found it was better to do the next steps on the big and small letters separately. I also found it was very helpful to paste my entire title from PowerPoint as an image in GIMP to serve as a template. You can paste the modified letters on top of the template image in layers which can then be moved around independently.Select the letters in your text image by putting your cursor over the little picture next to the name of your pasted text layer, probably “Pasted Layer”, and hitting alt-click. A dashed line will appear around the edges of your letters.Click Filters->Generic->Distance map (The letters will look faintly beveled)Click Filters-Distorts->Emboss. (this makes your letters look like metal, but choppy)In the Emboss pop-up window adjust the options below, then hit OK. Example values are in parenthesis: To the right of Azimuth, adjust the arrow in the little circle to point to where the light is coming from on your cover.Elevation (40) and Depth (20)Blending options (replace or merge)opacity (90)Click Filters -> G’MIC -> Repair-smooth [Anisotropic] (this smooths out the metal). I adjusted the following.Amp 100Anisitrophy=1Sharpness <1Gradient Smoothness (increase for smoothness, but you can oversmooth. Larger for larger letters)Iterations 2Click Colors -> Curves. In the pop-up window click and drag the slanted line in multiple places to make it look wavy (3 waves is good). Sometimes it helps give the letters a more metallic look and sometimes it doesn’t.Click Colors -> levels. Playing with the options here might help as well.Making the flat, shiny letters is even easier.
Choose the letters like beforeBlack and white foreground and background colors (if you haven’t picked a new color this should be the default)Choose the Gradient toolWith your cursor, click in between the middle of your word just below the top of your letters and drag the cursor down while holding down the shift key to make a vertical line between the letters that starts near the top of the letters and ends just before the bottom of the letters.You can adjust where the bright part of the gradient is by using your cursor to move the little ball on the arrow you just drew.Choose another tool to get out of the gradient option.Play with the Colors->Curves and Colors->Levels as needed.To put your title all together (if you did it piecemeal),
Copy a shiny letter image. Paste the letter into your template image using Edit->Paste As->New LayerOnce you get all your letters placed properly, click the little eyeball next to your bottom layer to hide the templateUse the rectangle select tool (type ‘r’) to draw a box around your text Edit->Copy VisiblePaste your title onto your book cover.Have fun!


March 16, 2024
Adventures with AI
It’s been a while since I posted anything, but that’s because I’ve been working on a story.
I finally got it done! Well, not done, done, but I know how it ends…maybe.
Now comes the hard part – book cover design. So far, designing a great book cover has not been my strength. I think of scenes and ideas I want to portray on my covers but quickly run into limitations based on models and lack of costumes and how much effort I’m willing to put into a book cover I’m likely to hate in a month.
Which leads us to my great idea for this month, and the purpose of this article…AI. Recently I’ve been seeing beautiful pictures of characters on Facebook book ads which are generally not what’s actually on the cover. They could be though. That’s why, despite my artistic teenage daughter’s protest, I decided to give AI a try. This article is a quick summary of my adventure.
Finding an AI GeneratorFirst, I googled “AI art Generator” and played with some of the things that popped up like Crayion and Imagine AI Art Generator. They say they’re free, but only for a few images.
After playing with Img2Go for a while, I looked up more about AI art descriptors and making images. There are many articles out there, but the one I read [https://www.fiverr.com/resources/guides/graphic-design/5-ai-art-ideas] had a lot of useful tips and pictures and lists of different styles, color schemes, etc. The article listed some AI generators but I wasn’t completely clear on how to use of them, for example, I think DreamWeaver was the one who told me to get a Distiller account, but once I was there, I wasn’t sure what to do. Yuck. I just wanted a browser with a place to type in my descriptor.
After more searching, I found OpenArt and eventually Playground. Img2Go, OpenArt, and Playground all have a place to type in a prompt and choose how many images to create and what filters to use. I decided to try a bunch of different things using basically the same prompt and compare them. I liked Playground best, not only because the images were better (it automatically adds helpful descriptions to the prompt!), but you get 100 images free every 24 hours. Below are my prompts and some AI-generated pictures. If you see something you like, I might still have a copy and I can send it to you. Overall, AI got the sex, clothing, and hair-color/texture correct. It wasn’t great on emotion or poses. For some reason it decided I wanted close, close-ups of faces, but in the end, that’s okay, because I found 7 images I could use for my upcoming books.
My story is a Young Adult, contemporary fantasy that starts with the main character, who is 14, running for her life – thus my prompt.
Img2GoI started with Img2Go using the prompts below: The prompt #’s match the Try#s in the first figure.
Prompt 1: Close-up girl with curly brown hair, looking over her shoulder, scared, running. City background. Colorful. Results: it is a girl with brown curly hair and it’s definitely colorful and in the city, but she is not looking over her shoulder and not really scared.
Prompt 2: close-up girl with curly brown hair, big green eyes, 14, looking over her shoulder, scared, running away. Jeans, T-shirt, backpack. Colorful City background. Results: Girl looks younger and is dressed appropriately. Still facing forward and those eyes!!!
Prompt3: I changed green eyes to dark green eyes. Results: FINALLY, she’s looking over her shoulder in one picture. The other just gives me her back. This really wasn’t the style I was going for though.
Prompt 4: I added ‘Close-up’. RESULT: Running toward me again and this one has 3 legs! My daughter knowingly nodded when I pointed that out. Apparently it’s a common AI problem.
Prompt 5: I hit ‘Surprise Me’ and it made this prompt: “photorealistic an oriental female humanoid with freckle cheeks, cyber neon lightings, futurism, cyberpunk high fashion, elegant profile pose, intricate details, crispy quality, digital photography, trending in artstation, trending in pinterest, no watermark signature, cinematic, 4 k ultra hd, art by artgerm, art by greg rutkowski, art by pascal blanch”
That’s when I realized how lacking my prompts were and looked up the article I mentioned above.
Prompt 6: removed ‘Close-up’ and added ‘Hyperrealistic, ultrarealistic, photorealistic’. RESULT: pose achieved except for the emotion. Dull though.
Prompt 7: removed ‘Hyperrealistic, ultrarealistic, photorealistic’ and tried watercolor painting. RESULT: pretty, but more styles to play with.
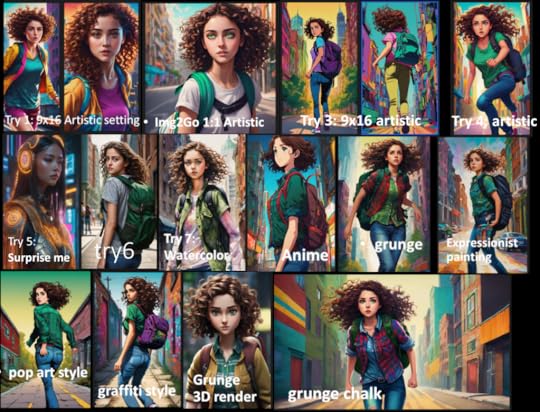
Figure 1: results from prompts above plus some of the styles I tried out, which I’ve noted on the image. All of the later pictures use pretty much the same prompt.
OpenArtThe pictures weren’t doing it for me, so I tried a different AI program called OpenArt. Using the same prompt, I tried different filters in OpenArt and put them together in Figure 2.
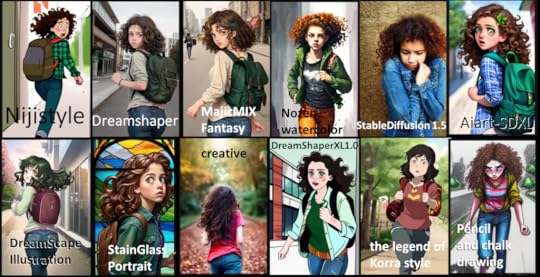
Figure 2: openArt Images. Again, not really what I was looking for.
PlaygroundThe third AI software I tried was Playground. Playground has lots of videos to follow and you get 100 free images every 24 hours and if you go over that (believe it or not, I did), you just have to wait 35 seconds to do another image. There were a few times on Thursday night when I couldn’t get in because the queue was so long, but I only had to wait a few minutes. Playground also has a Canvas tab which allows you to extend your pictures as I learned in one of the videos.
I plugged in my simple prompt and the results were suddenly a lot better. Playground helpfully added stuff to my prompt that happened to be just what I was missing.
The new stuff went something like this: “Unreal engine, greg Rutkowski, loish, rhads, beeple, makoto shinkai and lois van baarle, ilya kuvshinov, rossdraws, tom Bagshaw, alphonse mucha, global illumination, detailed and intricate environment.”
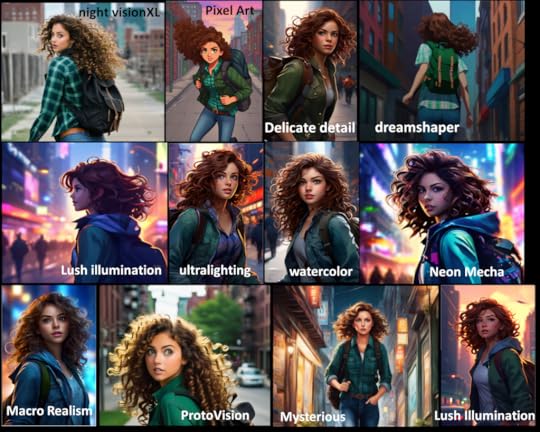
Figure 3: results from Playground on day 1. I think Playground must change the prompts a little with every attempt, although after over 100 tries, I don’t think they have very many models since most of my brown-haired girls look similar.
The next day, I sat down, ready to try and make similar covers for all the books in the series using Playground and Playground started spitting out closeups of faces on the filters I liked. Even when I put ‘Head shots’ in things to avoid, it still did it. I ended up mainly using two filters – Macro realism and Neon Mecha but I still tried some others, because, why not?
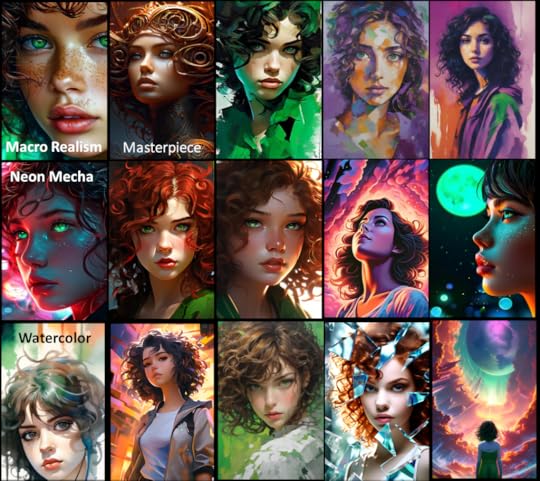
Figure 4: Day 2 attempts in Playground. I didn’t keep track of all my filters or prompts this time. I did try adding color words like ‘purple’ and ‘green’ and noting that my character is Italian and also included ‘impressionistic’ in some descriptions. If you’d like any of these for your own use, let me know. I didn’t post the ones I plan to use except for below.
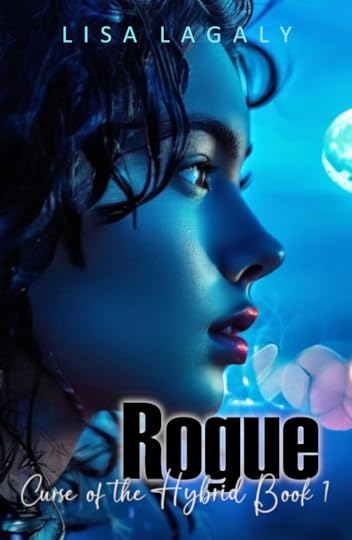
Figure 5: Cover reveal! One of my AI creations came out blue and I loved it! My sister, on the other hand said it made her think of Avatar and Botox. Sigh. I asked my daughter what genre and targeted age this cover portrayed and she got it right, but then she’s been hearing about this story for a while. What do you think? Good or not?
ConclusionI was able to make over 150 images in about 3 evenings. After all my previous failed attempts at making covers I like, with each attempt taking several days, it was wonderful. AI was not good at following drama cues, and had issues with limbs. Some of the images I made had smeared noses and ears, but in general, the faces were nice. AI was also not good at more than one person at a time. As a test I tried using Playground to make a cover with five friends and described each friend (height, sex, hair and eye color). It ended up give me 2 friends with a combination of the descriptors I input. In other words, my African-American character was suddenly wearing glasses. It’s really amazing that AI can make such beautiful images. Even if the images are not perfect, AI is an excellent tool to brainstorm and provide starting images to create the perfect cover.
June 13, 2021
Another New Book!
I have a back-log of stories I’ve started but haven’t finished. I find posting them chapter-by-chapter on Wattpad helps me with editing. I really enjoyed writing this one and it’s the first one I’ve done in first person, which was challenging. It’s roughly set in the 1600s, but since it’s fantasy, I took some liberties. Take a look. Let me know what you think of the cover and the story. There’s a link under excerpts on the home page and here as well:
https://www.wattpad.com/myworks/273182598-the-beastly-prince
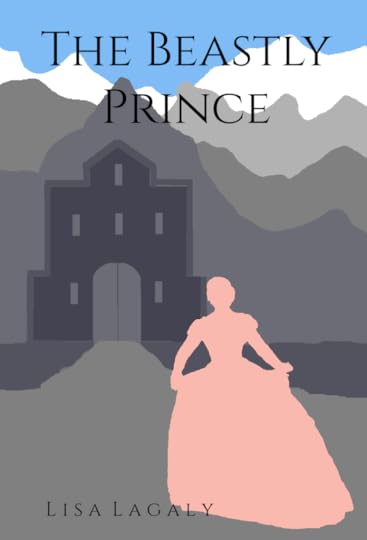
Just to clarify, this story is finished in that it has an ending (it’s actually a series), but it still needs editing and book titles and covers and … work.
April 27, 2021
New Book!
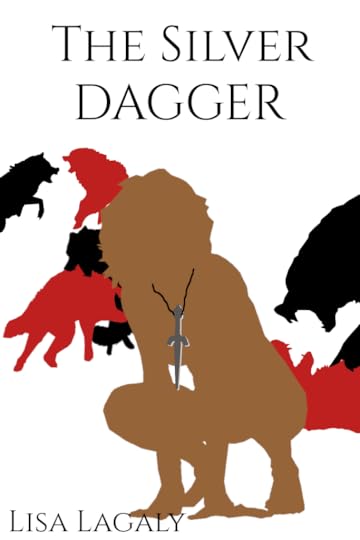
I’m putting another book up on Wattpad. I started getting a lot of advertisements for werewolf books where the poor girl is rejected by her mate and horrible things happen and it inspired me, mainly because I didn’t like the apps where I had to go to read those. I also discovered a lot of the books on those apps are available for free on Wattpad and since I already had an account there, I thought, why not? Of course, once I started writing, the story started changing. No wimpy female characters for me! Anywho, drop by and check it out. Let me know what you think. I just have a couple of chapters up right now, but I have the story written. I’m editing as I post. The cover was fun to make too, although I’m not opposed to suggestions.
https://www.wattpad.com/story/266481422-the-silver-dagger
In researching for this book, I came across a very nice quote:
“The main characteristic of an alpha male wolf is a quiet confidence, quiet self-assurance. You know what you need to do; you know what’s best for your pack. You lead by example. You’re very comfortable with that. You have a calming effect.”
This is by someone called McIntyre in reference to real wolves. I found it here: https://www.artofmanliness.com/articles/how-to-really-be-alpha-like-the-wolf/
April 9, 2021
A Brazen Curiosity
I signed up for BookBub a couple of years ago, and while there have been a few books that were so good I was enticed to read the next one in the series, this is the first that has enticed me to write a review. A Brazen Curiosity by Lynn Messina is about a twenty-six year old woman who is slated to be a quiet, polite, and timid old maid until she discovers a dead body in the middle of the night at the feet of another man who could well be the murderer. There’s also some romance – good clean romance – which is a major plus in my book(s).
Typically, I don’t read mysteries, not because I don’t like them, but because there are so many other things I do like out there. This book however, was not just a mystery, it was hilarious – I’m sure my family thought I was nuts as much as I was laughing at my Kindle – and it was written in Victorian English. I was very impressed with how well the author threw classic words and phrases around. As the main character says, “I’ll bring the pedantry, you bring the dinner rolls.”
There are seven books in the series so far. The eighth is expected this spring. All seven were good (yes, I’ve already finished them. I think I read three books in one day – I was on vacation). I even signed up for Kindle Unlimited for the month so I could get them a little cheaper.
The only note of caution I have is that the characters tend to have a lot of thoughts. If I had that many thoughts while trying to hold a discussion, the person I was speaking to would probably wander off before I got around to answering.
![A Brazen Curiosity: A Regency Cozy (Beatrice Hyde-Clare Mysteries Book 1) by [Lynn Messina]](https://i.gr-assets.com/images/S/compressed.photo.goodreads.com/hostedimages/1618520978i/31185243.jpg) [image error]
[image error]
May 18, 2020
Project ‘Ask a Scientist’
This weekend I read a book that irritated me so much I’ve decided to offer my services to spare other readers the same irritation. In my other life I am a scientist. Most books that have a science-related plot get close enough, but that one…I’m not even going to name it. The story line was fine, but you cannot kill a deadly virus with antioxidants from someone’s spit…antioxidants, I might add that came from a diet that person stopped eating light years ago. A simple fix to the plot would have been the bacteria found in her spit – it’s at least in the realm of possibility considering all we’re learning about the microbiome. So, if you are an author and have a science question related to viruses, DNA, RNA, or protein, ask me. I can at least tell you if it’s going to drive someone like me to post blogs like this.
March 14, 2020
Banana Bread Muffins, CoV adaptation
Due to the Coronavirus, we are isolated at home, or supposed to be, so I’m running low on ingredients. I saw two brown bananas instead of three and an old apple and thought I could make it work, then I realized I was also out of eggs and chocolate chips. I am not one to give up, especially after I have already peeled the bananas, so I got creative and it turned out really good, except a bit flat, but still fluffy.
Oven: 375
Bake Time: 20-25 minutes for muffins
Recipe
2 (medium/large) ripe bananas
1 apple
½ cup butter, mostly melted (I used salted)
~1/2 cup honey
2 eggs if you have them, I used key lime Greek yogurt – a serving size
1 ½ cup whole wheat flour
1 tsp baking soda
¼ tsp salt
1 tsp cinnamon
1/4 tsp cardamon (optional)
zest from one orange
½ cup shredded, sweetened coconut
Nuts for decoration (optional)
Turn on oven to 375 F.
In a small blender, add one or both bananas, the peeled, chunked apple, and melted butter. Blend till fluffy.
In a medium bowl, mash the other banana if not blended. Add the blended mixture, honey, and yogurt or eggs.
Sprinkle on salt and seasonings, mix.
Stir in flour, baking soda, and coconut or nuts.
Scoop into the muffin tin. Decorate with nuts if you wish.
Bake for 20-25 minutes. It’s done when a toothpick comes out clean.
Notes:
The honey wasn’t quite 1/2 cup because I had melted crystallized honey and aliquoted it out into some small glasses so I wouldn’t have to remelt the whole Costco container every time. Since it wasn’t quite a 1/2 cup, I didn’t feel the need to adjust the recipe to take into account the sugar in the yogurt.
If you use eggs, I think they will prevent the muffins from deflating like mine did, however I also think the key lime flavor went really well with the coconut and fruit. Perhaps a better solution would be to add a little more flour and just one egg.
You may have noticed I didn’t do the mix wet, mix dry, then add them together technique. If you can get away with it, it means one less bowl to clean.
February 14, 2020
OneChapterStrong
Yesterday I had an idea.
Today I’m putting it out there for the world to see.
First, some background…I started publishing books a few years ago. Like many authors, I’ve discovered it is very difficult to actually sell them. There are a lot of sites that will help you for a fee or even for free, but there is so much out there it’s overwhelming. My son, who published his own books online when he was in the 5th grade and thus inspired me, is now interested in marketing with Instagram and other social media. I was trying to think of something we could work on together and came up with this.
This what???
An idea to market books, but keep it from being overwhelming.
Here’s the plan:
Build up a following on Instagram. I’m hopeful my contacts on my author site can help me out with this.
After I reach a good number, say 1000, begin featuring one author a day…Perhaps different genres each day. A feature would be a cover and a link to the first chapter of the book either on Wattpad, or Amazon, or even a PDF that I make available on the webpage I’m going to build. Links would remain available for one week. The goals are feedback (Wattpad) and reviews/sales (Amazon or favorite retailer)
I’m still deciding whether the chapters should be pre-screened for quality. Maybe if the site becomes popular I’ll ask for some volunteers.
What do you think? If you’re interested, please follow OneChapterStrong on Instagram and tell your friends. I’m going to design a WordPress page to go with it when I get a chance.
December 15, 2019
Overnight cinnamon rolls
My mom came up with a recipe I call mom’s bread that she uses for everything from cinnamon rolls to plain bread. I don’t know if it’s the flour where I live, but the bread always comes out drier for me than for her. Lately though I’ve discovered how to make tender, tasty cinnamon rolls and substitute in some of my favorite ‘healthier’ ingredients. Not that my mother’s recipe is unhealthy. She is allergic to milk so uses water as the liquid. I luckily do not have that problem. However, I do have three athletic teens or almost-teens whom I’m trying to nurture with lots of protein and fiber, thus I try to add whole wheat flour and yogurt whenever I can. Other than that, this recipe is full of sugar and butter – yummy.
The night before you wish to have rolls for breakfast, in a medium bowl, mix
1/4 cup warm water
2 tsp yeast (or 1 package)
After the yeast dissolves stir in with a whisk
1 tsp salt
1 Tbs of sugar or molasses or honey
3 Tbs oil. My mom says a ‘gluck’. I don’t know what that is.
1 egg
1/2 cup whole yogurt mixed with 1/2 cup milk warmed 1 minute in the microwave (less if yours is powerful) Make sure it’s not too hot (
1 cup of whole wheat flour (or white)
After the batter is smooth, use a spoon to stir in
2 cups of white flour
Add and knead in flour as necessary until dough is smooth and bounces back when you poke it. Usually a couple of minutes. I always knead my dough directly in the bowl by hand. I find it faster and less messy.
Cover the top of the bowl with a flat pan (I usually use a cake pan). Allow the bread to rest for 10 minutes or rub some oil on the top to keep it from drying out and let it rise for an hour.
Melt 4 Tbs butter in the microwave for about 30 seconds. Meanwhile, sprinkle some flour on a clean surface and roll out your dough. I usually do this on my largest cookie sheet which is 14×15 inches. Spoon or pour the butter over the dough and spread it to the edges. Sprinkle on cinnamon. I never measure this, but I’m sure it’s a couple of tablespoons. I’ll have to take a picture next time. Sprinkle on brown sugar – several handfuls. Add nuts or raisins or cranberries or whatever else you’d like to try. Roll the dough into a log shape and stretch it just a little so that the roll is evenly sized and fits diagonally on your cookie sheet. Cut it into 1 inch rolls and place in a greased 13x9x2 inch pan, or thereabouts. Cover and put it in the refrigerator.
The next morning, pull the rolls out of the refrigerator and turn the oven to 350 F. If you have time and the rolls don’t look like they’ve risen at all, as they might do if you skipped the first rising step, you may want to let them rise for about thirty minutes. I’ve done it both ways. This last time I did not skip the first rising step and put the rolls into the oven even before it was fully heated (yes, I’m a bit impatient.) They turned out fine. They took about thirty minutes to bake to a nice tan/brown color. This makes 14-15 medium rolls. I only took a picture of 4 because the rest were gone before I got around to it.
If you want to add frosting, here is a simple recipe
1. melt 1 Tbs butter in a glass cereal bowl for 10 seconds
2. add 2 Tbs cream cheese and microwave another 10 seconds. It may pop and complain loudly.
3. stir well.
4. add heaping tablespoons of powdered sugar and milk until you reach the amount and consistency you want. I usually use 3-4 heaping (as in peaked) spoonfuls and 1-2 Tbs of milk. Optionally, you could also add a tsp of vanilla for more flavor. If you don’t have cream cheese, just use 2 Tbs of butter and melt for 20 seconds.
October 6, 2019
Pictish horns or tankards?
The biggest problem when writing something historical is the details. For example, if my main character invites a bunch of hungry people over after dinner has been served (a) what will they eat, (b) how long will they have to wait for it, and (c) what will they do while they’re waiting? I’m guessing they’ll have a drink but (d) of what and (e) from what? Will they pass around whatever they’re drinking or does everyone carry their own cups? What would the cups be made of – wood, metal, horn? Maybe they have tankards.
A) What would they eat?
Here is a link on iron age food (https://www.ancientcraft.co.uk/Archaeology/iron-age/ironage_food.html) There’s nothing that can be prepared quickly though, except the bog butter which would be ready to eat. Bog butter made me wonder if they had cheese.
This link (https://www.academia.edu/1488019/Celtic_and_Romano_British_Foods_from_the_Isles-_a_General_Approach) says they had skinny cows in Scotland but said there was little evidence for cheese. However, it also mentions souterrains (underground rooms) which may have been used to store cheese. Some have been found in Scotland. While rather long, the article did contain a lot of interesting information. I hadn’t realized cranberries were native to the UK or that they made alcoholic beverages from them in the iron age.
B) How long would they have to wait to eat?
In my situation: late in the evening, twenty or so surprise guests who’ve been traveling all day, I’m going to go with flatbread and maybe cheese as appetizers, then, because they had a lot of domestic meat (at least the Celts did) some roast meat – perhaps chicken or duck because it would be faster. A larger animal would take hours.
C) What would they do while waiting?
Drink, tell stories, play games?
D) What would they drink?
I’m guessing beer or ale. Heather ale was associated with the Picts, but the British food link above lists several kinds of ingredients that have been found in beer and ale.
E) What would they drink from?
Horns were apparently popular in Ireland and Celtic lands (https://alehorn.com/blogs/blog/ancient-irish-drinking-horns) and that stone that shows a bald guy on a horse with a horn to his lips that’s got a face on the tip – he’s apparently drinking from it, not blowing into it like I thought, at least that’s what the alehorn link says. Another link went into how to make the drinking horns and states the ones from the Highland cow can hold a liter each (https://www.nms.ac.uk/collections-research/our-research/featured-projects/early-medieval-scotland/bringing-the-past-to-life/drinking-horns/). Although I found pictures of historical re-enactors carrying their horns, the horns don’t look very travel-friendly. I haven’t seen any with lids and I can imagine they slide out of leather bands easily. Most pages implied the horns were for ceremonial purposes. It is possible to carry horns – I’m thinking of the powder horns people used to used to load guns, but I think it’s more likely that people carried canteens – perhaps made of skin. Jesus mentions wine-skins in the Bible several hundred years before the period I’m writing about, so I’m certain they existed.
Another option is tankards. Well-crafted tankards of yew wood (which is toxic!) that date from the late iron age have been found around Britain, but none have been found in the Scottish highlands so far (https://www.academia.edu/17869940/Tankards_of_the_British_Iron_Age).
The Picts also had clay and metal vessels, so those could have been used too. It’s not impossible to imagine that a small clan could have twenty-something clay or wooden or metal cups laying around, especially if they ate together every day. If they used a ceremonial horn they probably shared it, but if they had enough cups, I’d guess not.


