
General Craft & DIY discussion
Wood, Functional & Art
>
Toys & Kid Stuff
date newest »
 Children's Toys And Furniture is another great reference. My review is here:
http://www.goodreads.com/review/show/...
I made this elephant head out of the plans from one of the two books I posted earlier.
The black lines are drawn with a permanent black marker. It's attached to the wall with a couple of black drywall screws through the black area of the ear & eye, so it is quite secure.
The kid toy that I'm proudest of is the Breyer horse barn I built for my daughter 20 years ago. Except for the paint & the roof, it is all built out of scraps that I salvaged. The floor & walls are plywood subfloor that was left over from the last custom home I built. Most of the rest of the wood is ripped out bits of 2x4's that were left over from the wall studs, since we put in a 9' ceiling.
The roof lifts off & the loft floor opens up. It is 1/4" Luaun plywood with hinges made from canvas that is glued & stapled on. The center piece, which covers the aisle way, is hinged, but also comes out completely.
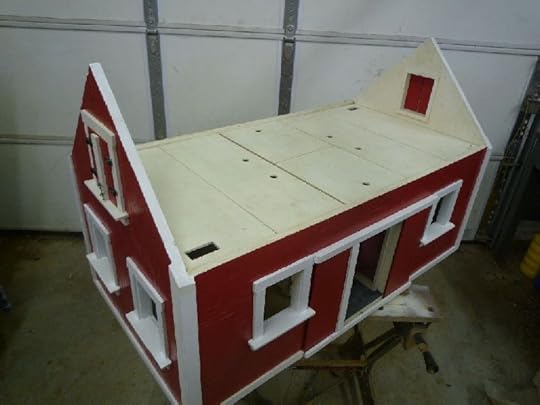
The two side pieces have the ends tacked down, but half of the 3 stalls & tack room are accessible.

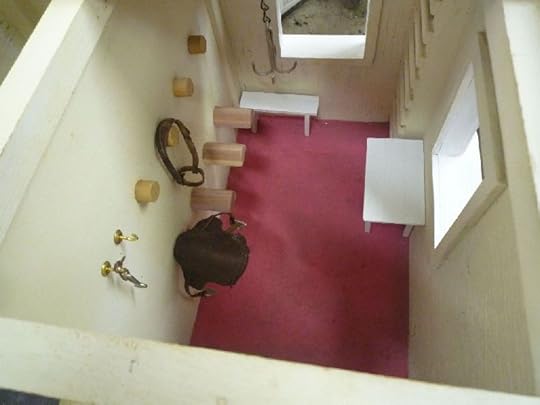
Pink was Erin's favorite color, so the tack room has a carpet of that color made from felt.
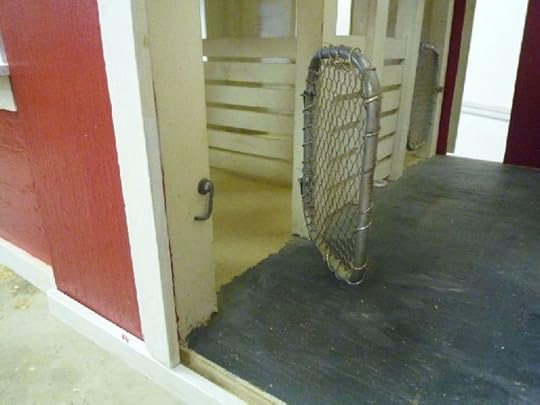
The stalls are closed off with 'Stall Guards' that I made from 1/4" copper pipe & the grids are leaf guard for gutters. I painted them with the silver touch up paint I had left over from installing the real thing.
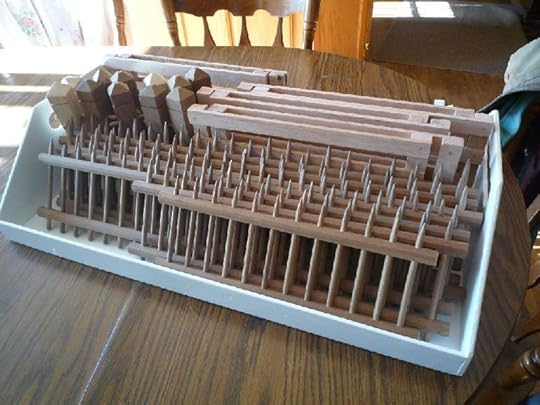
Of course, jumps were needed. I cut a bunch of small branches to make jump rails.

To keep all the jumps together, I made a tray that fits in the loft & holds them all. Perhaps the coolest thing here is the brown picket fence. It was made by my mother's Uncle Sven for her when she was a little girl. Those fence pieces are roughly 70 years old. I've had to repair them a bit, but they've held up surprisingly well.
Here's a Breyer horse in one of the stalls.

 Jim wrote: "The kid toy that I'm proudest of is the Breyer horse barn I built for my daughter 20 years ago. Except for the paint & the roof, it is all built out of scraps that I salvaged. The floor & walls a..."
Oh, wow! That is really incredible, she had to have been delighted with that.
The one Christmas gift I remember best was from Montgomery Wards, a heavy cardboard barn that you put together, plus a number of heavy rubber farm animals. My Dad made corrals from willow 'switches' and I remember playing with that summers and winters for several years.
Instead of cutting 'paper dolls' out of the catalogs, I begged livestock magazines from everyone and cut out pictures of cattle and horses to add to my herds.
Thanks, Sharon. It was a labor of love & she is delighted with it. We spent some hours this year cleaning it & retouching some of the paint. I made a few more items for it, including a rocking chair.It's funny how some kids seem to be destined for animals, like you obviously were. My daughter proved early that she was going to be a horse nut. Twice, before she could walk, she crawled out the dog door & into the ponies' paddock. We found her clinging to the leg & tail of one of our Shetland mares. It scared us to death, but for years we always knew where to find her - with that pony. Half the time she'd be asleep on her back.
The weirdest thing was that we caught that pony wild when she was 4. The first time I went into a stall with her, she leaped at me like a shark & took a chunk out of my hand with her teeth. I proved to her that wasn't a good idea & Marg gentled her down the rest of the way, but it's still pretty amazing just how gentle she got.
 Great Barn Jim! I bet you had as much fun building it as your daughter did playing with it!
Thanks! I sure did. Making scale stuff like that is kind of like eating potato chips, though. That's how I wound up making a rocking chair, of all things.
Great Barn Jim! I bet you had as much fun building it as your daughter did playing with it!
Thanks! I sure did. Making scale stuff like that is kind of like eating potato chips, though. That's how I wound up making a rocking chair, of all things.;-)
I'm working on a block set for the grandmonster similar to the one I did for my kids. They had a HUGE block set since I could pick up a lot of 2x4 scraps. The basic measurement of 1.25" lets me trim down both sides of a 2x4 for a smooth finish & get twice that (2.5") width for the bigger blocks. I also make 5/8"x1.25" blocks & all are in 2.5" length increments.A 1/4" blade on my little bandsaw is perfect for cutting out the semicircle openings & the 10" blocks have 2 of them. Out of two 2x4-8's, I've gotten about 60 blocks so far. I've bought quite a few for projects over the past few years & these two had warped up badly, so were useless for anything else.
I really want to get a stationary belt/disk sander. I got rid of mine when we moved because it never tracked right & I needed to save weight in the POD. I've missed it a few times since then, but never so much as with kid toys like these blocks. Hand sanding them is awful. I used some putty to fill up any cracks.
I primed them all on all sides at once. I got a few of those 2'x4' grids they use for ceiling lights in drop ceilings when they did some changes at work. The grids are PERFECT to paint on. The tables I'm using to support them used to be our old dining room table. I turned the two extra center pieces into the tables & the main parts into drop leafs so they store in less space. I pulled them out & put plastic over them. Each held one of the 2x4 grids just fine.
I spray painted them in green, yellow, red, blue. I really like the new spray paint that doesn't require turning them upside down to clean them. It works pretty well, although green gives the worst coverage, yellow the best. Weird. I can't do all sides at once & it takes about 4 coats to really cover everything well.
 Those are really nice Jim. I particularly like the grasshopper and the duck puzzle.
Your grandmonster is a lucky kid to have you !
Thanks, Jaye! They were fun to make. I thinned the paint or used food coloring & covered it with polyurethane. Both let the grain of the wood show through pretty well.I found the best spray paint at our local hardware store. I can't think of the name right now (senior moment) but the nozzle never has to be cleaned & it even sprays upside down. Fantastic stuff.
Please let us know when you remember the name of the paint.(senior moments are abundant here too. The other day I called shampoo "hair detergent" because I couldn't bring out the word shampoo right at that time.)
Since I seem to have the memory span of a gnat with dementia, I walked out to the shop & checked the name. It's FixAll Spray Enamel.Now, if I could just find bright enamel colors in pint sizes. I need to stop by the Sherwin Williams store & see if they have any. I haven't even seen a decent selection of Testor paints around. I really don't need even a pint with the way I thin them down.
I just went on the web site for the FixAll paint and found there are no retail distributors within 75 miles.I guess I'll have to use another brand because I need to paint soon if it's going to be dry by Christmas.
That's a drag. There are a lot of other good paints out there. Hopefully they'll all have that nifty nozzle soon.
I'm making torsion catapults again. A GR friend wants to get into woodworking, but he lives a long ways away, so I built one & will write up instructions for him. He can do the final sanding & finishing. The catapult actually holds together very well without any glue at all, just a couple of screws holding the ammo cup on. I came up with a new way of doing the ammo cup & the tensioners on. You might be able to see them in this picture:
https://goo.gl/photos/VtH7tyY4j6LSTNB89
The cup is a lot easier to make now & by making the top a separate piece, it can be turned to create different lengths. The one in the picture is either on or off, but I made up another that does 4 different settings. Between that, where the arm is stopped, & the tension, the catapult has a huge range now. It's really interesting.
I've made lesson plans for various reasons over the years:
- Erin taught an oven tool during student teaching.
- A home schooled kid built a 3 legged stool for an Industrial Arts credit.
- I sold the plans & pictures for making a reproduction of a stool my great grandfather made for my grandfather to a magazine years ago. They folded before buying & publishing it, though. All I got was the kill fee.
I like keeping such plans around. They come in handy for others occasionally. They're a lot of work to write up, though. It's amazing how many steps I'd forget if I didn't write each one down as the project is built. I also don't use a tape measure very often. Most measurements are based on the stock or done using a scribe.
I bought some 1/4" brass rod with the idea of making some yoyos for Xmas. They're tough! I've only made one rough one so far, but it's obvious that both sides have to be exactly the same or else it wobbles. I'm not very good at that nor sure how to do it.
I tried again this morning. Less wobble, but still an annoying amount. I started with 2 pieces of KY Coffee Tree wood exactly the same size this time. Last time I had to worry about the width & didn't this time. Well, I'll try again later.
Yoyos are very difficult to make since both sides have to be exactly the same size, shape, & weight or they wobble. Typically, I don't want the axle not to go all the way through, but that means turning one side at a time on the lathe. That allows for more error & makes any shaping more difficult since it is prone to error. I think the fix for me is going to be to drill the axle hole all the way through both pieces & turn them as one. I'll just finish the axle flush or cap it on some of them. Of course, that will require different length axles since I don't want the center too wide.I made one out of KY Coffee Tree scraps yesterday starting with a 3/4" wide finished pieces & it's darn close even turning them separately, but still vibrates. I think that because of the grain, though. Wood that has a pronounced grain won't work unless it's finished enough to present a smooth inner face & extremely smooth on the inner edge. I could use epoxy, but that can easily unbalance it, too. It doesn't always soak in the same amount even on very similar wood & it weighs a fair amount, relatively. Probably easiest just to use a wood like Osage Orange or Black Locust. They're even better than maple for finishing hard & smooth.
It's fiddling stuff & a good lesson for me. I'm not very good at making identical anything, but this will force me to practice that. At one time, I was pretty good with a yoyo, so once I work out the technique, I should be able to come up with some nice ones that still work well. I'll make butterfly & various wood ones. I can change the type of wood that caps the axle for contrast, too.
 I finished up the shields for my nephews earlier this week. I decided on painting them with chalkboard paint. The kids liked them, and quickly set to decorating the shields for battle. Their mother was nonplussed. It is good to be an uncle.
https://www.goodreads.com/photo/user/...
Excellent! Love the idea of the chalk board paint. It is good to be an uncle or a grandfather. We can get away with a lot without too much nagging.:)
My youngest nephew will be celebrating his birthday in a few weeks. I'm thinking about making him a either a flail or a great helm, to go with the shield that I gave him for Christmas.
I think I'd go with the helm before the flail. ;)
I just finished a flipping clown. He does flips as he rolls along a very gradual slope - kind of like 2 rockers held up by 4 small dowels. Now I'm working on a snail puzzle. It's a big snail cut up into 10 puzzle pieces that spiral in on a piece of 1" pine about 10" square. I'll be painting them different primary colors.I'd like to paint or burn in numbers on them, but I'm awful at doing letters & numbers. Anyone know a good way to make them? In the past, I've had some success printing out what I want on paper & tracing it, but I think these will be too small. Any ideas appreciated.
I still can't find Rustoleum paint in yellow or orange in small cans for a decent price. I don't know why.
If they don't need to be perfect, you could try stamping them. You could cut the numbers out of cheap sponges, if you want them to be disposable. Or cut the stamps out of scrap wood, if you want something longer lasting.You could also reverse the thought process. What if you painted the pieces the in the color/s of the numbers first. Then masked off with cheap numeral decals, and painted the color/s you want the fields to be. You would then peel off the cheap decal to reveal the number, and clear coat the pieces.
Good ideas. I kind of like the stamp idea. I just read a book on them. Not sure if I'm up to that sort of work, but it would be interesting to try. The other thought was using a stencil. Not sure I have one that's small enough, though.
You could try googling numeral type sets. Download a pic you like. Then play around with the print scale. Just cut out the number with an exacto knife, and you'll have both a positive and a negative stencil.
That's sort of what I meant in my initial post when I said I had some success printing things out. In this case the numbers will be pretty small, so I'm not sure how well it will work.
Sorry, I sometimes overlook things.Aside from buying stencils or freehanding it with a paint pen, I can only think of one other diy method, ink transfer. If you have an ink jet printer it should do the job. I've included a link to an Instructable.
http://m.instructables.com/id/Image-T...
Oh! That's a cool idea! I don't have an inkjet printer here at home, but we do have one at work for printing color 11x17 circuit board drawings. I might be able to use that for some smaller projects that I can just bring in & do first thing in the morning. Thanks!I found some card stock that I can turn into a stencil, too. Regular paper is too thin & tends to tear, move, or curl especially on small pointy pieces. Cardboard, even the dense stuff like I get from the back of a legal pad is too porous & thick for the printer, but this card stock is glossy, like big index cards. It should take the numbers via the printer & make a good stencil. Word's word art letters are often a good size & thickness, but my graphics program, Irfanview, has some good fonts too.
I finished the snail puzzle & a tumbling clown. Pictures here:https://www.facebook.com/media/set/?s...
There's some other stuff in there, too. I'm pretty pleased with the way the snail puzzle came out overall. I wound up using a commercial stencil I had for the numbers. I used a Sharpie to put the numbers on originally & then painted over them. It took 2 coats for the white. My freehand numbers aren't quite as crisp as I'd like them, but not awful.
I wasn't happy with spray paints for the parts, although the overall look is acceptable. Even with a sanded primer coat, the end grain inside the locking pieces didn't get proper coverage. I used spray paint because I hadn't been able to find 1/2 pint cans of yellow or orange enamel paint at a decent price. I finally did last night at Walmart online, so it shouldn't be an issue in the future.
I'm working on a tool box now. I've turned into 1" diameter maple screws & bolts with nuts to hold wood together into a toolbox. I'm going to cut up more scraps to put together. I've also made a wrench & a screwdriver. No hammer planned.
I finished up the grandmonster's toolbox today. I posted some pics in this woodworking album on FB.https://www.facebook.com/media/set/?s...
I also finished up the baby blanket I've been working on for months. I'll never do another of those. Boring!!!
The grandmonster is now 4 & I haven't been able to think of a thing to make him this year for his birthday or Xmas. :(
I had a wonderful day in the shop yesterday. It was nasty out (cold & rainy) so I spent the day working on Xmas presents & did some modifications for the tablesaw that I've been meaning to do for ages. It was a thoroughly relaxing day; no rush since I've got all next week off. I'm working on Quoridor games for each kid's family. I've never played it, but it looks like a neat game & I like to do some sort of toy or game each year. I'm making these out of maple boards made from a tree I cut down at my daughter's house. I'm going to mount each as the top of a box with a drawer in it to hold the pieces & instructions. It's coming along well.
Here's a couple of pics of the Quoridor games I made up. It's a fascinating game, far more complex than I originally thought. I made up the game boards as the top of a box to hold the pieces. 20 walls & 4 game pieces are needed for each, so it would be easy to lose them.
Here are most of the game pieces I made up. Obviously, I went a bit overboard. Painting them was the most difficult part for me.
 A few years ago I made a toy tool set for my grandson out of hard maple. It included a lot of 3/4" & 1" nuts & bolts. I started making another, but never finished it. I finally got around to that recently & had a terrible problem with the bolts; the threads kept chipping off on the smaller ones. I also have a 1/2" set, but that was hopeless. I had the same problem tapping into the end grain of wood.
I did some experimenting with various substances to stabilize the wood. I use the thin, fast drying Minwax glossy polyurethane for finishing & thin super glue a lot, so I tried painting both of those on. Both helped, but weren't great with 1/2" threads. I tried thinning the poly with an equal amount of paint thinner & that was better. 2 coats didn't help much. I really needed to get the poly deeper into the wood.
I found that soaking the blanks for at least an hour & then letting them dry for a day worked pretty well. Letting them soak for a day & dry for a day really does the trick. I made up some soaking tubes: a spray paint cap with a paper towel tube with a plastic bag stuck in it. I filled it 3/4 of the way & stuck the blanks in without covering the tops. I could see the poly wick in & slowly the top also became full. That could be as little as 2 hours, but often I let them soak over night. I let them dry a day or two & then cut the threads. Even the 1/2" came out about perfect.
Tool handle mix (1 part boiled linseed oil to 1 part turpentine with a splash of Japan drier.) is great for soaking ½” blanks for threads, too.
It’s not worth trying to go all the way to the end of a blank with the die. Cutting off the square ends is OK since I can gain another inch, but even with super glue on the end, the final thread tends to splinter the end. So just go up until there is resistance & then back off enough to use the bandsaw to cut off the last 1/8”.
Here's picture of the latest tool set made out of Sugar maple. It's kind of a wooden Erector set with 2 different size threaded bolts, screws, washers, & nuts (3/4" & 1") plus 2 wrenches & screwdrivers all made from wood. The toolbox itself comes apart to provide material. More scrap maple turned into a block puzzle. It's REALLY hard, although simple enough to make with a good dado blade & following instructions from Woodworker's Journal.
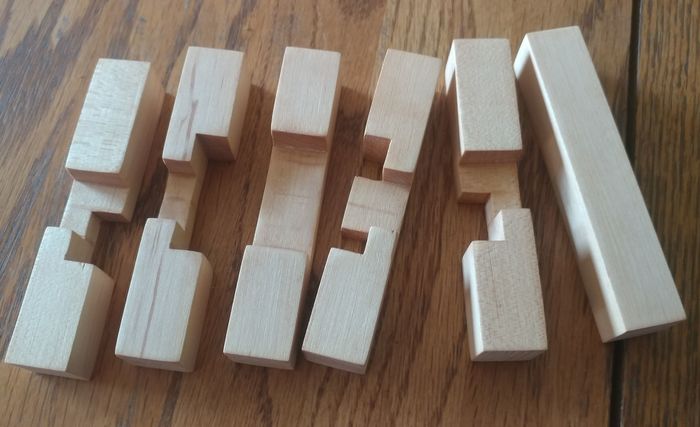
Here's the block puzzle all put together. Yes, those are instructions next to it. I can't do it without them. (I have trouble even with them!)


General Craft & DIY
Books mentioned in this topic
Children's Toys and Furniture (other topics)Children's Furniture (other topics)

Since we ride horses, the kids needed a place to store & clean their tack. I made them saw horses with a shelf underneath. A cut-down cheap mop on one end made a tail. A couple of 2x4's at the other end made a neck & head - more giraffe-like than horse, but it was close enough. A dowel through the head gave them a place to hang their bridles & halters from.
A couple of my favorite idea books were by Sunset. They have books on a huge range of subjects here on GR:
http://www.goodreads.com/author/show/...
One of my favorites of theirs, now falling apart, is Children's Furniture. I have a toy book of theirs, too. I didn't see it here on GR & it's out in the shop now, but I'll try to post it at a later date.
What books & projects have you used for your kids & grand kids?