
General Craft & DIY discussion
Metalwork
>
Welding
 Sherri posted this video from the Tested website where Jamie Hyneman, one of the Myth Busters, talks about welding with 1" square stock to make shelves & such.
http://www.tested.com/videos/328199-j...
I found it interesting that he loves MIG welding & calls the stick welding I do 'old school'. He has a point. My old arc welder is one my father bought back in the mid 60's. It still works great. I'm even using his old face mask.
I do agree with him about the 1" square stock. Back when I was a remodeler, I made the ladder racks for my pickup truck out of it. I cut the tube to size with a metal blade on my radial arm saw. It is light & strong. Very handy. I love the nested tables. They really do look handy.
After watching this, I REALLY want a MIG welder, though. Love the idea that his is portable. I also want an autodarkening mask. Mine is always dark. It also has a crack in the headband, so I lose a few hairs every time I take it off. i don't have that many to spare any more.
;-)
When it comes to tools, I always have plenty to lust after, although most would think my shop is pretty well loaded already. That's the nature of fiddling, though.I will go through the Tested site some more. Thanks. I'd never heard of it before now.
Horse shoes are one of the things I weld up all the time. I get old ones from the blacksmith & have done all sorts of odd projects with them. One was a mailbox stand at our old house.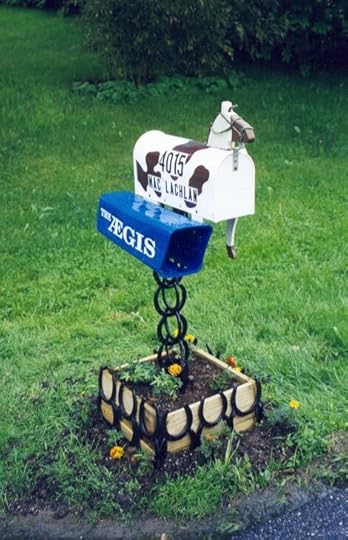
I wish I could weld aluminium since I have quite a few shoes made of it, but I can't. I've tried welding it with my oxy/acetylene torch & can't. It just never sticks together, although I can weld steel that way. I think it's mostly a temperature thing. It's not hot enough & then suddenly, it's too hot. I've spent hours fiddling with it, too.
That's what makes a TIG welder so cool. The setup seems a bit fussy, but once you have that done, even I can weld aluminum with one. Unfortunately, they seem to start at about $1000.
 I added the book Welder's Handbook, RevisedHP1513: A Guide to Plasma Cutting, Oxyacetylene, ARC, MIG and TIG Welding. I got it when I was considering adding TIG capacity to my Inverter and the book really hits all the major points succinctly.
 While it's cheaper "Fourney Invertor $100, Tig handle and tips $100 and a tank of argon $140, it couldn't do aluminum which requires ac. I got the dc invertor is to do small things (5 t0 100 amps) that were too small for my stick welder (30 to 250 amps)
I'll probably try learning more finesse with low amperage stick welding before I invest more money in TIG welding as the lastest vision involves welding steel wire. Sometimes I can stick it and sometimes I burn right through it.
I guess it's like the book says... practice practice practice!
Great mailbox! Mine is just mounted on a maple post, but then, it's survived seven years and one car accident.
Hey Jim, an auto darkening helmet makes welding so much easier. (you've heard that before I bet!) I got mine for $40 from some ebay store. What a difference being able to see when you strike the arc makes!
I always thought if that mailbox got any more horsey it would fertilize & water itself.;-)
The book I have on welding is an old school text. I don't think it even has wire welding in it. I should keep an eye out for a newer one or yours.
I was looking into auto darkening helmets a little & noticed there was something about how dark they got & how fast, but never figured out what were good figures for either. Any tips, Foxtower? I'd hate to spend $40 on a piece of junk that didn't protect me properly.
The mailbox is great and so in keeping with your farm! My pieces are are also made out of of old farm equipment in keeping with a farm that does gardens.Most helmets are adjustable according to what you are doing. More amps might need a shade 15, while less amps might need a shade 10. The difference seems minor but it does make lower amperage work easier to see while working if adjusted properly.
Must use common sense, and use the recommended setting! As in the "Welders Handbook", if you welded exclusively you might need a very high quality (Fast switching) helmet as there is some UV exposure in that 1/1000 of a second before the faceplate darkens.
My helmet is a flat black Auto-Helm which darkens in .000033 seconds and adjusts from shade 9 to 16 while only costing $40. The only shortcoming is that the helmet doesn't like to stay in the "up" between welds. I just remove it instead.
It's solar powered, which means someday the ni-cad button batteries might need replaced. You could pay a lot more for a helmet with a fancy paint job and no more protection!
I make a lot of things out of horse shoes since they're easy to collect; hangers, boot scrapers & pullers, candle sticks, & even a door mat. That's great info on the welding helmet. Thanks. There are some days I do a fair amount of welding, but generally I just do a bit here & there as needed. I think a cheap one will be fine & I certainly don't want anything fancy.
My eyes have gotten so bad at close work now that I'm concerned about making them worse, but apparently it is just an age thing. I actually have to wear reading glasses for anything within 2 -3 feet constantly now. It drives me nuts. I've always had perfect vision, far better than normal, I guess. What the doctors seem to think is acceptable just sucks.
Tell me about getting old and blind... and yet I paint better now because I can't be so picky!Reading glasses will fit behind the welding helmet, though I see better in bright light and with the arc I seem to see well enough without glasses when I weld sculptures.
Unlike horeshoes, old farm equipment parts can be rare. I can spend a year thinking about what to make before I'm confident it's a good use of the material.
Did I mention that I have a friend who makes metal sculptures out of odd parts he finds? There's a 10' Tyranasaurous Rex in front of his mother's house. It's mounted on an old log & much of the body is an old wire fence tangle. It's fantastic. He also made a rooster that he can actually sit in & make walk. It's 14' tall. He has a whole warehouse of old parts laying around plus another acre or so outside. He's still constantly scrounging for parts & often piles them & stares at them for a year or more, too. I often start projects, then set them aside for months or longer as I try to figure out what goes well. I guess it just goes with the territory.
Farm equipment is getting rare around here with scrap steel bringing such high prices. A lot of trailers piled with old stuff goes past our house to the scrap yard about 5 miles away. I'd love to get some of it.
I've been practicing welding wire together toward a rather unoriginal but instructive project, hopefully one of those wire snow men outlined with lights. (I don't do xmas, but Wintry decorations are fun) Today I got nine out of ten test welds to stick neatly, both end to end and end to side ( a "T" basically). The wire is 1/8 inch thick and I'm using a 1/16 6013 rod at 20 amps. I clamped the wires down to a copper plate to draw off excess heat and made nice clean good small welds. The arc is very small!
I could get a tiny arc at 5 amps but it wouldn't melt into the wire.
I thought i'd figured it out, but then had difficulty trying to make a circle with six wires coming off it (think crown or basket). I think it's because the circular shape wasn't clamped close enough to the copper backing as it either didn't make a good weld or burned through. May have to bend the copper to fit the circular shape and try again.
That sounds like very delicate work. The copper plate is precious. I'll bet it would break the bank to actually buy it. Another junkyard find?I use the base of an old office chair with a thick (1/2") piece of iron about 16"x2' as the 'table' top for welding. It's short, only 16" tall or so, but that actually works quite well. It's a good height for squatting. (Yes, my knees still do this!) When I need a bigger table, I have a 3' round piece of steel (3/16"?) that I roll out from beside the bench & just lay it on top of the chair base. It still rolls around pretty well & is stable.
I just bought 10 lbs of 1/8" 6013's at the hardware store earlier this week. I have one welding rod container just for them. The other has a mix of other types, but those are my standard.
I use 1/8 6013's for most things, but have the smaller sizes for sheet metal repairs and delicate work like wire which maybe someday I'll get good at. When welding the wire goes right it takes half a second with one careful swipe. (I brace my hand to keep it steady) Of course, when it goes wrong I spend far too much time trying too fix it and seems to just make it worse!I had a fish tank stand made of angle iron I used for a while which worked great. Lots of clamping surface and easy to get at stuff, but then my ex wanted it back so I built a low wooden stand with an angle iron top. She then decided she didn't need the tank stand so now it's back and I have my small stand and the large tank stand.. at least until she changes her mind again...
The coppper is just a leftover bit of pipe from who knows where, cut and flattened, but it helps mitigate heat buildup really well.
Didn't do any welding today. I found a cool flashing orange lite (bubble gum type) at the local surplus store so I was inspired to add it to a tractor as well as install the cab and snowthrower on it... just in case!
Welding thin metal is tough, beyond me. My cousin welded new pieces on to the body of his '57 Chevy with a stick welder, so I know it can be done. He's a lot better welder than I'll ever be, though.He just had his house flooded during Sandy. Worse, a few days later his brand new car was totaled as some moron blasted through an intersection & broadsided his son. Not good times out there on the island.
Ouch! I've been broadsided... no fun at all! Never been flooded, but that has got to be terrible having to clean up the mess! Practiced welding today but mostly failed... better keep precticing....
Enuf with the darn practicing.. even though I've learned about another little trick that might help, I needed to make something rather than just melt rods.I went out to the metal pile yesterday and grabbed an old air tank, a link of giant chain, a hand wood splitter head and a twisted bar... time to make a decidedly unoriginal but fun animal sculpture!
Spent the day cutting and grinding and fitting so next comes figuring out how to clamp projections to a round object.
I'm thinking to drill a hole, like in the neck base, insert a nail and then insert it into a drilled hole in the tank, then let gravity do the rest...
Darn books never tell you the tricky parts!
That oughts work. right?
Good luck! It will be fun to see the results. I use magnets for holding things together a lot of times. Those I salvage out of old hard drives are very strong & handy, but I also have a couple around for picking up nails.
I forget about magnets. I have tons of them but haven't had much luck using them for welding. I tried magnets today but flat magnets on a round surface just kept moving. The pin idea worked for the neck and tail, and I did the legs with a jig and a rope clamp. I tried a new trick, heating up the 7014 rod first on a scrap which did make it easier to start on the real weld. The 3/32 7014 is ssupposed to be less penetrating for sheet metal, and seemed the right compromize for welding heavy steel parts to the thin metal tank. When I did a fairly decent arc (usually by accident) between the thin metal and heavy metal it worked pretty good, though I tried it on a bit of tank metal scrap and at 62 amps it vaporized the thin metal instantly.
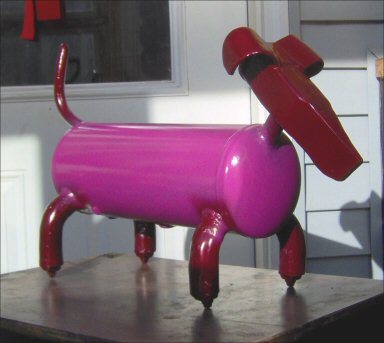
At least today I accompished something! While there's still a lot of work smoothing out my sloppy welds and painting, now I have another whimsical addition to the farm!
 Very cool! Are you going to paint the dog or let it turn brown?
I sometimes put a C or spring clamp for the magnet to hold onto, too. It's always a try, though. Sometimes it works, sometimes not. I've been very tempted to use some of my wood clamps at times. They'd grip better, but I never seem to have enough at the best of times. Being used for welding is often a one way trip.
I was able to borrow a car today, fortunate because my new embroidered work coat was done! Woo Hoo.. I may not work but it looks like I'm working between the farm logos on the new coat and the hats I got a few months ago!I was also able to stop in at the Auto Store to see what coating systems thay have. If I don't paint the weenie dog the thin metal body would soon succumb to rust. Scupltures made from older heavier metal tend to be more elegant and lend themselves to getting rusty and lasting a long time. Not so with the whimsical weenie dog!
They auto parts store can provide expoxy primer ($50 a quart) and have old fashioned enamel paint in stock, as well as the cleaners and reducers needed. Unfortunately I don't have a big warm space for spray painting this time of year, but I did get some of their rust neutralizer to test on the weenie dog.
Practice towards the day I hope to repaint an old car... now I'm wondering if I can use the trick I learned on weenie dog to weld sheet metal???
I use whatever clamp works! I have accidently welded c-clamps, but a little grinding will bring them back in shape. I've never destryed a clamp welding.. there's plenty of other ways to destroy them, but hey, you can't make a cake without breaking eggs!
Unlike clamps the wood jigs I make are sacrificed... usually by catching fire, though I had one where I used it to hold some flower stems in place forgetting that once the stems were welded at the angle required the jig couldn't be removed without hammering it to pieces!
The three stooges got nothin' on me!
There's a way you can stabilize rust that actually stops more from occurring, but I'm not completely sure of the process. I first saw it when a friend in high school was making a black powder rifle. He was doing Civil War reenactments & browning the rifle was historically accurate. It had something to do with acid, then sanding with some oil in layers. Derek, the guy I know that does metal sculptures, has done something similar to them, but I've never even seen him do it. Can't imagine he does it as painstakingly as my friend did that rifle.
My book Paint Your Car: A Step by Step How-To Guide suggests either phosphoric acid that eats the rust off (and will eat soft metal)and creates a protective coating in the process if the part is small enough to dip. I dunno if oxcalic acid, the removes rust from stone will also work but it might be worth a try. I'm taking an alternate route as the book also suggests for larger pieces (like weenie dog) using a "rust converter", which chemically reacts with the rust and changes it to a coating.
That sounds like a plan. Let me know how it works. Will it strip off the paint that was still on the cylinder?
No, none of the acids mentioned react with paint, so I need a coating system that goes over old paint... I am NOT sanding or sandblasting off all the old paint from anything!
The whimsical nature of farm sculpture lends itself well to Winter. In the Summer this life size figure made of old carraige springs looks like it's playing ball with a slightly smaller figure across the blueberry patch. Now it looks like me if I stray off the trails...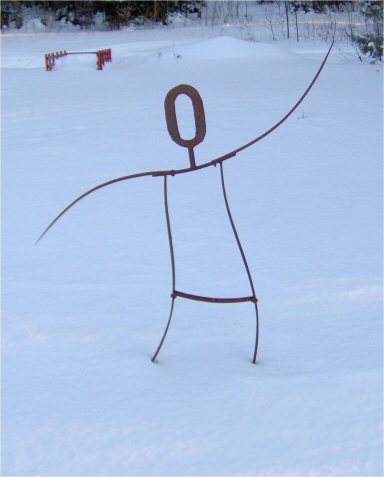 Very cool! It really does stand out against the snow.
With the warm weather I finally got a chance to finish weenie dog after smoothing it out with an automotive spot putty.
Very cool! It really does stand out against the snow.
With the warm weather I finally got a chance to finish weenie dog after smoothing it out with an automotive spot putty.Gee, I was hoping for more of a purply color to offset the pink, but at least it looks like the edges have been fried!
 Foxtower wrote: "With the warm weather I finally got a chance to finish weenie dog after smoothing it out with an automotive spot putty.
Gee, I was hoping for more of a purply color to offset the pink, but at leas..."
Cute! and the dog food bill is very attractive as well, I'm sure!
Not only the dog food bill but cleaning up behind it is a snap!It's not really on tippy toe, but it has aluminum feet glued on to keep it up of the ground and slow rusting.
A nice warm suny day! It hit 80 in the greenhouse and thanks to fast drying paint I got all the welded tractor implements painted plus a few additonal projects. The sleeve hitch frame is red, the implement brackets yellow and of course the actual implements of destruction like the furrowers and buzzard wings basic black. Looks cool!
With another sunny day forecast for tomorrow the new criter, now primed, spot puttied, and primed again is ready for finish painting!
Glad you got it done. We're in for a storm that just blew through the plains & wracked up a lot of snow. We're supposed to be warm enough for it to just be rain here, but the drive in to work tomorrow morning might be rough.
Just finsihed today! We're due for a few days of precipitation, though the last two "six inch" snows were only 1/4 inch...I did NOT want to plumb my ex's house, unfortunately all the plumbers gave her ridiculous estimates.. $1700 to $2000 per fixture for two sinks and a toilet on one wet wall, without the sinks and toilet! (in southern Maine I had a basement water heater, utility sink and washer hookup as well as two sinks, a shower , a toilet and a gas line on the a third floor plumbed for under $4000, so $5000 to $6000 for three fixtures was insane!) Consequently I did the plumbing.. and it even passed inspection! Yet three years later it seems the metal plumbers tape I used to mount the expansion tank collected the condensation and the expansion tank developed a pinhole. Well, since the ex could buy 70 or 80 more expansion tanks with the money she saved hiring me I didn't feel guilty, though I didn't charge her for labor to put in a new tank (simple screw in job!). And the old tank? Poor plumbing produces plump pink piggies!
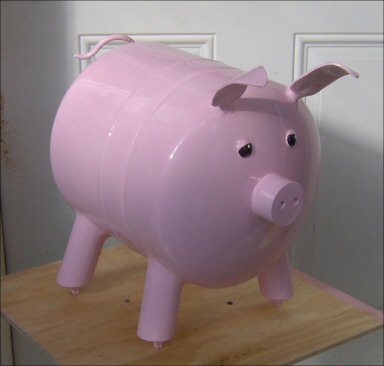 Excellent pig! That is a crazy price on the plumbing. I guess that's why I do my own, too. I hired one when I first got to this house to repair the tub - it has jets & such in it - & he didn't do much for $250 or so. Just messed up the drain that he was supposed to fix. Worthless.
I was finishing up a small piece today, and after I finished I realized one part was way off! Had to saw it apart and try again, but them here it was the end of the day, just trying to get it done and I was hurrying a bit. Of course thats when it gets you! I started the weld WITHOUT my helmet down!
Excellent pig! That is a crazy price on the plumbing. I guess that's why I do my own, too. I hired one when I first got to this house to repair the tub - it has jets & such in it - & he didn't do much for $250 or so. Just messed up the drain that he was supposed to fix. Worthless.
I was finishing up a small piece today, and after I finished I realized one part was way off! Had to saw it apart and try again, but them here it was the end of the day, just trying to get it done and I was hurrying a bit. Of course thats when it gets you! I started the weld WITHOUT my helmet down! I was seeing spots for about five minutes...
..there's a lesson here I'm sure... first time I ever did that! Guess I'm getting too confident!
Ouch. I hate that. My helmet is too sticky now to nod it down any more, but that's caught me a couple of times.
First time I've made that stupid mistake. It sure makes an impression! Good thing I was using 1/8 rods... it was no worse than looking at the sun for ten minutes!
My cousin is a welder - high steel. Has his own company. He's did his eyes in that way once supervising. Looked a little too long & woke up in the middle of the night with his eyes swollen shut oozing crap. Not something to fool with.
Today I went to weld a simple axle for a new greenhouse cart, 3/4 inch round to 1 inch angle iron, and I'd run out of 6013 rods. The only 1/8 inch choices were low hydrogen, which is really just for hardened steel (and a bear to use!) and these odd (amd expensive) stainless rods I'd bought when I started welding which have ended up sitting around for four years.They're blue and say "312-16 EASY All Steel".
Turns out they needed "reverse" DC voltage, which always confuses me since I'm not even sure of the polarity of the 220 Volt farm welder, but it's NOT "reversable", so I used the Inverter which normally uses a negative ground.
The Inverter being 110 volt only goes up to 100 amps, though with such heavy steel I would have preferred using the max 110 amps for the rod. Once I'd set up I found it worked equally well with either polarity, but since it did manage to weld the test piece I was too lazy to drag out the big welder for an extra ten amps (that goes to 250 amps or so.
The 312-16 were "easy" to start, took some convincing to consistently penetrate the steel (really should of used the bigger welder!)and the slag chipped off very nice, leaving rainbow colored welds. The only real problem was that between welds I found the blue coating didn't melt as fast as the rod so it had to be chipped back where it was hollow to expose the rod to start again. That may have just been because the Inverter didn't have enough amps, but it did work good and the 312-16, being easy to start, will be interesting to try next time I encounter hardened steel.
And everytime I remembered my mask!
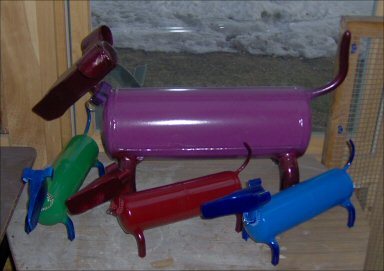
I'm usually so consciencious about spaying and neutering my pets. But when it came to Weinie I figured, what the heck, shes steel!Boy was I wrong.... introducing Meenie, Miny and Moe:
Welded the very thin propane tanks with 1/16 6013 rods at 35 amps, catching the thin metal first than quickly transferring the rod to the heavier metal and laying on a couple inches of rod to penetrate and make a good bond.
LOL! Wonderful!!! I have friends with Dachshunds, so I had to post your picture on FB for them. The Bluegrass Terrier Club has a division for them. Fun watching them race after the Jack Russells.
Thanks! They came out pretty cool! Of course, now I'll never need to discard another tank of any kind!
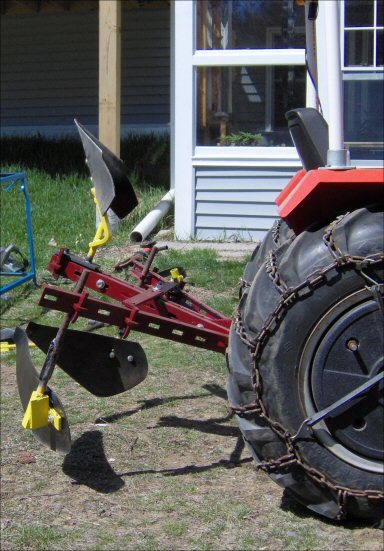
Moment of truth.. will my implement designs created in the Winter work now that it's Spring? The object is to be "wiser" in my old age, and accomplish labor intensive garden tasks with the tractor. First I'll furrow an eight inch deep trench to add fertilizer, second I'll start to build up the bed, third I'll do a four inch trench for the irrigation line, and finally I'll bury the line while building up the bed even more. Such are the best laid plans....
First when I was testing the deep furrower the sleeve hitch weld gave way. A couple hours to fix that. On about the third attempt I finally got the height set for the furrower and then welded supports (a planned event) on it to keep it from twisting.
Then I had to figure out the buzzard wings... and right away I discovered the shafts were way too short. More welding. Finally I got those working and discovered I didn't really need the small furrower as the wings, set up just so, will leave a nice trench for the irrigation line. Anybody need a six inch furrower now just collecting dust in the shed?
Finally it all came together and I figured out how to set the buzzard wings to build up a nice raised bed.
Here's the final buzzerd wing configuration with the furrower added for weight.
And heres a perfect 100 foot raised bed... without a hour of killing meself with a shovel and hoe!
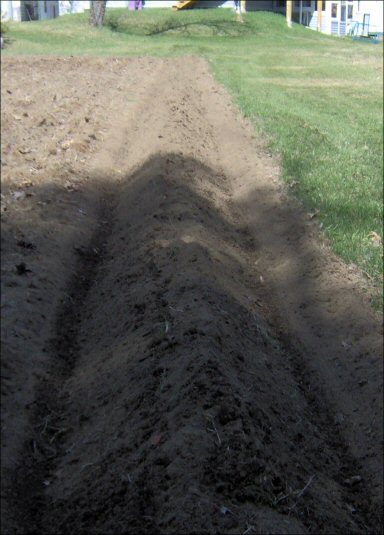
Mission accomplished.. even if it did take all day!
Awesome! That's a big garden! What do you grow?
Between the 800 sq. ft. East garden and the 2000 sq. ft. West garden I produce about 400 pounds of organic produce, from all the basic veggies to sunflowers and grains. Not enough to sell, and the food banks don't want fresh produce (preferring boxed mac and cheese), so I fill my and my ex wifes freezer and feed the wild critters.
That's a lot of work. Well, it probably keeps you from getting into too much trouble. Do you save your own seeds?
The secret of successful farming... it's a lot of hard work (and a little science)!I figure since I'm stuck on the planet anyway I might as well contribute what I can, and food sems like a good thing to produce even if Americans don't want it... the critters do and I save on grocery money.
Some seeds I save... I'll never buy another soybean or sunflower, but most I buy, especialy like versions of corn and beans that get cross pollinated.
I salvage a lot of my flower seeds & rebroadcast them on banks & different areas. I'm hoping to cut down on mowing eventually. I know a lot of plants won't reseed now due to the tinkering that goes on.

General Craft & DIY
Books mentioned in this topic
Paint Your Car: A Step by Step How-To Guide (other topics)Welder's Handbook: A Guide to Plasma Cutting, Oxyacetylene, ARC, MIG and TIG Welding, Revised and Updated (other topics)

Does anyone else have any sort of welder? I've always wanted a TIG so that I could weld aluminum, but can't justify the cost. My son tells me I should get a MIG welder because the wire feed is a lot easier to use, but I do too much heavy stuff & probably wouldn't use it often enough to justify it, either.