
Stef Ferrari's Blog
May 9, 2013
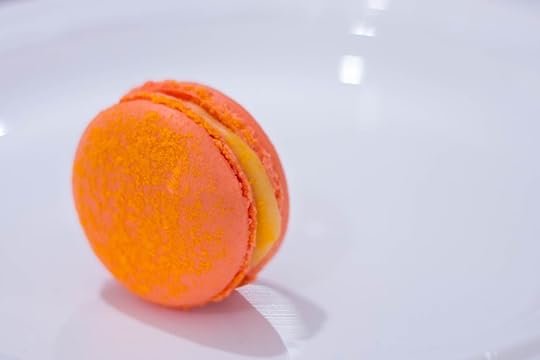
Mint Grapefruit Bars with Blueberry & Oatmeal Crust

It has been an awfully long time since my last blog, but I swear I have a good excuse! I’ve been in transition and then in transit for the last month or so. We’ve been in the process of packing up our northeastern home and setting out for the beginning of a bicoastal living situation: 6 months in LA, 6 in NY. And now here we are in Hollywood, and rather than being dazzled by big screen celebrities and stars around every corner, what I’m mostly impressed by is the unobstructed access to all kinds of fresh produce.

Southern California is known especially for their citrus (i.e. Orange County, etc.) and some of my friends even have fresh lemons and grapefruits just dangling from trees right outside their front porch, begging to be a part of some baking project or refreshing cocktail.

With that as inspiration, I took a stab at creating some Mint Grapefruit Bars. Lemon bars are among my favorite desserts and I thought a little twist would be a welcome change. And while fresh blueberries are just as bountiful, I opted for the freeze dried version because I really enjoy their texture in the finished product. Plus it’s just fun to snack on astronaut food, am I right? I got these at our friendly neighborhood Trader Joe’s, but if you can’t get your hands on them then fresh will work just fine as well.

In place of a traditional crust, I used rolled oats and a dash of cinnamon and honey. I like the way that the little bit of spice creeps up on you when you think you’ve counted all the flavors (grapefruit, mint, blueberry…what’s that now?) and believe it or not it gets along nicely with both of the fruits.

For a first go at whipping up a new snack on the west coast, I feel pretty good about these. They are a little bit tart, a little bit sweet, and really packed with a lot of different flavors that compliment each other rather than compete. The grapefruit itself was so fresh and perfect; I would say you can definitely expect a few more experiments with Cali citrus in the coming months!
For the Crust:
1 Cup Oats
3/4 Cup All-Purpose Flour
1/4 Cup Honey
3 Tbsp Butter (melted)
1/4 Tsp Cinnamon
2 Tsp Sea Salt
Mix together the ingredients; a few pulses in a few processor works well but you can also just do this by hand.
Set aside a small handful of the mixture to sprinkle over the top of the filling before baking. Press remaining mixture into a 9 x 9 greased pan and bake at 375 for 12 minutes or until golden-brown.

For the Bars:
3 Eggs
1 1/2 Cups Sugar
1 Cup Flour
Juice of 1 large grapefruit (about 1 cup)
Zest of 1 large grapefruit (about 2 Tbsp)
1 to 1.5 oz. freeze dried blueberries (fresh also works)
8 Mint Leaves
In a bowl, mix together the eggs, sugar, flour, juice, and zest. Once well combined, add in the mint leaves and beat them into the mixture gently. Allow the leaves to sit in the mixture for about 5 minutes, and then remove.
Gently fold in the freeze dried blueberries and pour on top of the crust. Sprinkle the remaining oat mixture over the top of the filling and bake for 25 – 30 minutes at 350 degrees or until the filling has set.
Cut into squares and serve cool.


April 3, 2013
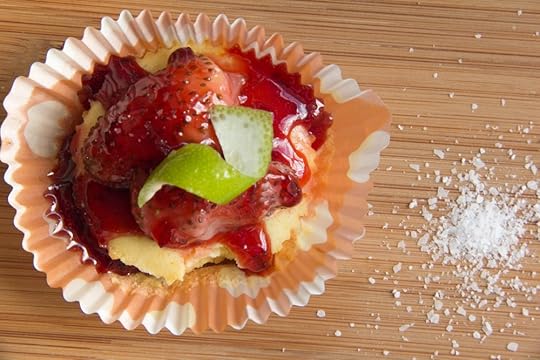
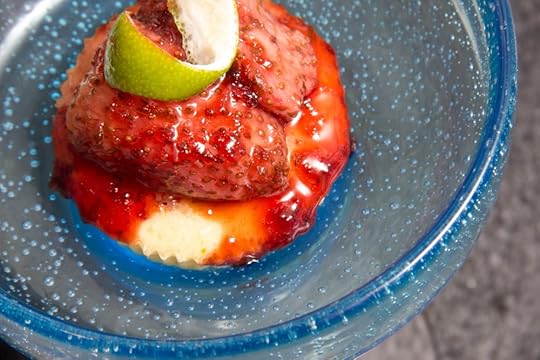
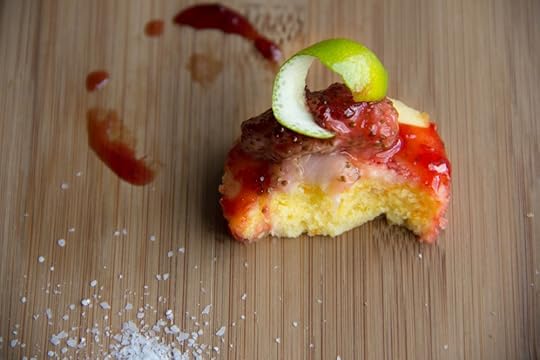
Tequila-poached Strawberry Margarita Cakelets

This is a recipe for your friends. These are not confections to carry off to some office dinner party to meet your boss’ wife or to a potluck for people you don’t really know. Why? Because that’s some perfectly good tequila in there and it should be appreciated by and shared with only true friends. True friends, by definition, deserve good tequila-based treats. These are words to live by.
For this reason, when I was invited over to my best friend’s house for dinner recently, I happily offered to bring dessert.
I knew this couple would appreciate a boozy baked good, and we have a history of tequila-based cocktails in the backyard so this recipe seemed natural. Now let’s consider the components of the Strawberry Margarita:
Tequila
Lime
Agave
Triple Sec (or other orange liqueur)
Salt
And of course, strawberries…

It was with those ingredients in mind that I forged ahead into formulating this recipe. To really infuse the margarita character, I poached the strawberries in a tequila/lime/agave/salt liquid combination. This turned out to be especially enjoyable because when you begin the simmering process, the whole house fills with the aroma of a summertime bliss. In other words, your house smells like a giant margarita. And there is nothing wrong with that.

To mimic the orange liqueur, I decided to make orange-flavored cake using freshly squeezed juice and grated zest. When finished, these treats are almost shockingly packed with the cocktail’s classic flavors and have a mouth-puckering tartness balanced by the sweet, spongy cake. I’m calling them “cakelets” because they’re not really cupcakes, and they’re not really tarts; they’re somewhere in between.

Before serving them after dinner I topped them off with a little bit of sea salt and a twist of lime. For the full experience you can even serve these in a signature margarita glass! Your true friends will truly love it.

For the Tequila-Poached Strawberries
1 Quart of Strawberries
3 Cups of Water
1/4 Cup of Tequila (good tequila)
1/4 Cup of Agave
1/4 Cup Lime Juice
Zest of 1 Lime
1 Tsp of Salt
Simmer the strawberries in the liquid mixture for about 10 minutes, or until tender to the fork. Remove the strawberries and continue to simmer the liquid until reduced by half, or until it becomes a syrup.
For the orange cakelets:
Preheat the oven to 325 degrees.
1 Egg
1/4 Cup of Sugar
1/2 Cup of Flour
1/4 tsp salt
1/4 Cup of Orange Juice (Freshly Squeezed, if possible)
1 Tbsp of Orange Zest
1/4 Cup of Butter
Whip together the egg, sugar, salt, orange juice, and zest for 3 minutes or until light and fluffy. Incrementally fold in the flour, and then the butter.
Separate into cupcake cups, filling only halfway.
Bake for 15 minutes.
Assembly:
Separate the strawberries out over the cakelets and drizzle your syrup over each. If the syrup has become a little too thick to work with, the fix is simple – follow another one of life’s great mantras – add more tequila!!


March 27, 2013
Pistachio Cake with Meyer Lemon-Mascarpone Frosting & Fresh Raspberries
 In New England, we are in a perpetual state of suspense once Punxatawney Phil peaks his furry little head out of a Pennsylvania hole at the beginning of February. We sit at the edge of our seats, always hoping for the mercury to ascend past the 50 degree mark, never feeling completely safe from the threat of a spontaneous snowstorm. The creation of this cake was akin to an anti-rain dance. If we build a spring-like dish, it will come. Soon.
 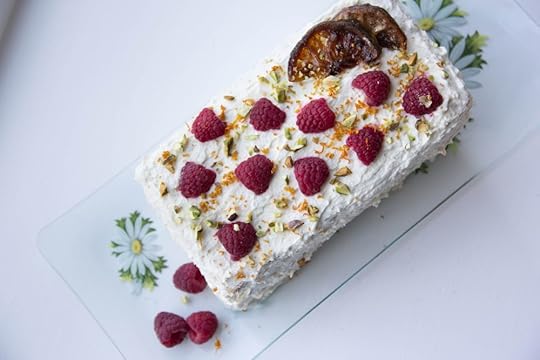 If you’re in need of a sweet something for an early spring birthday, or to sympathetically celebrate a late winter baby who has always wished for a warmer weather DOB, this cake is packed with what we would refer to as “bright” flavors: lemon, raspberry, fluffy. And yes, we do consider “fluffy” to be a flavor in our house.
  The base of the cake is a traditional pound variety – equal parts for most ingredients. In an earlier version of the recipe, I attempted to substitute a significant portion of the cake flour for ground pistachio in a pseudo gluten-light iteration. I do not recommend doing this EVER. Ground pistachio is considerably oily, and the resulting cake, once cooled, tasted like a day-old overfried pistachio hush-puppy. (Hmm…pistachio hush puppies…there’s a thought). Nevertheless – not welcome here.
  In the end, the winning recipe employs equal parts flour and ground pistachio. This balances the natural oils for a dense, perfectly moist pound cake with a really robust pistachio flavor profile (that doesn’t feel as if it’s spent a day soaking in the fryolator. That’s not nice.) The mascarpone provides a sharp tartness that compliments the sweet, seasonal lemons, and the cottony frosting is a nice foil for the weighty cake. A few fresh red raspberries sandwiched in between layers are texturally pleasant, and they happen to be old friends of the pistachio as well. A full bite that grabs a little of everything – you know the kind, that perfect bite – really demonstrates how much the major components enjoy each other’s company. I’m absolutely planning on pounding this one out again when the weather is even warmer and we all need a place to stash the freshly picked fruits of the season. I should warn you though, in the interest of full disclosure, not two days after the baking of this cake our front lawn got a frosting of its own – 6 inches of fresh powder. We enjoyed the leftovers of our first taste of spring after digging out the driveway…hopefully for the final time.
  Pistachio Pound Cake: 1 Cup of Sugar 2 Sticks Slow Churned Butter 4 Eggs 1 Cup Cake Flour 1 Cup Ground Pistachios 1 Tsp Salt Preheat oven to 325 Degrees. Sift together flour & salt and set aside. Cream together the butter and sugar until light and fluffy (3 – 5 minutes) with an electric hand or stand mixer. Add eggs, one at a time until well integrated. Beat in the flour mixture slowly, followed by ground pistachios. Once the mixture is combined well, bake for 1 hour.
  Meyer Lemon Mascarpone Frosting:
  1 Cup Heavy Cream 1 Cup Mascarpone 3/4 Cup Powdered Sugar Juice & Zest of 2 Meyer Lemons (set aside a sprinkling for garnish) 1 Cup Raspberries (set aside a handful for garnish) Combine heavy cream, mascarpone, lemon juice & zest, and powdered sugar in a bowl. Beat until well mixed and fluffy with an electric or stand mixer. Gently fold in the fresh raspberries.
  To assemble, slice the pound cake loaf lengthwise into three planes, trimming the sides for uniformity. Set aside one cup of the frosting for the top and sides, and mix the raspberries into the remaining mixture (saving 4 or 5 for garnish).
  Once the fruit has been gently folded into the frosting, evenly distribute over the first two layers and stack, as shown. Once the top layer is in place, proceed to frosting the entire cake with the rationed cup.
  Garnish with halved raspberries, Meyer lemon zest, and roughly chopped pistachios. I candied a few lemon slices at the last minute; they really aren’t critical but they add a little something if you have the time to spare.
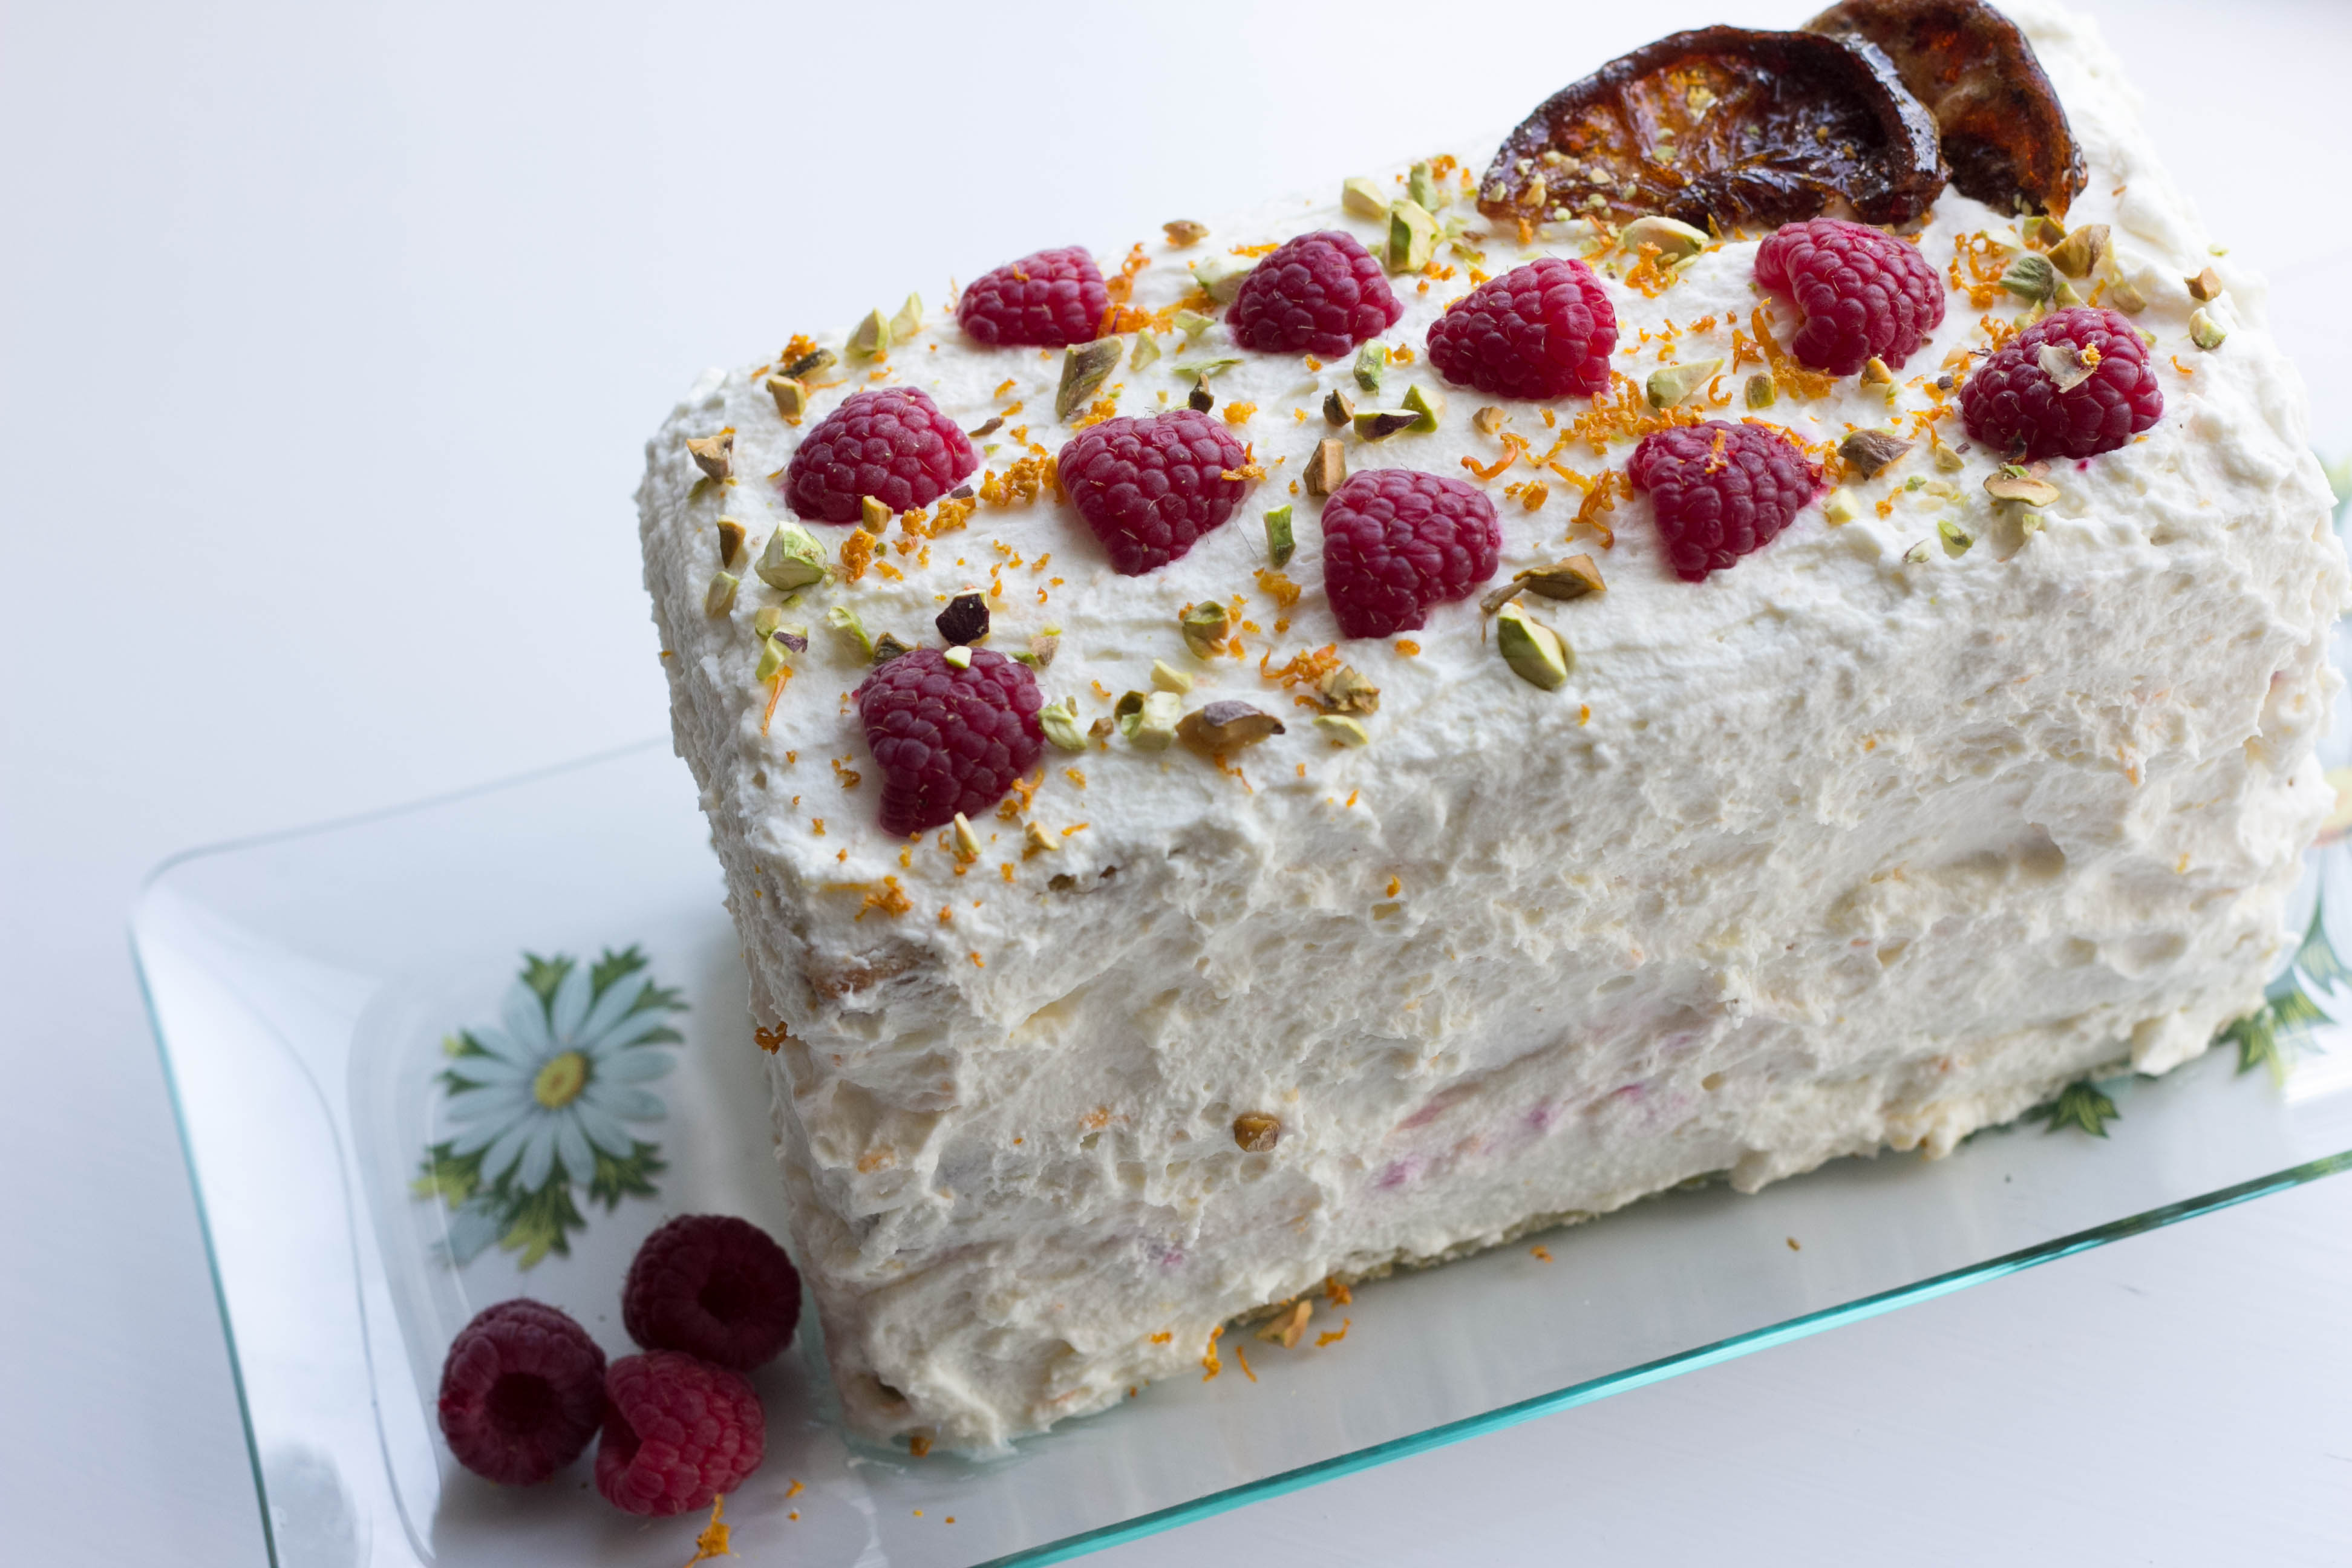

March 25, 2013
All the kids say…
So, in honor of the absolutely ridiculous viral videos circulating that feature “singing” goats, I want to discuss some other bleaters that I think deserve a bigger cut of the action. If you’ve just watched the video, I’ll wait for you to finish laughing before I continue…
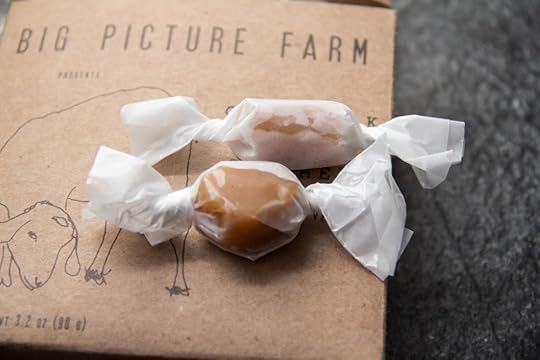
All set? Ok, great. The goats to whom I’m referring are the special ones that help Big Picture Farm produce the most intensely, uniquely delicious caramels I have had – the Chai Goat Milk Caramels.

Their resemblance is striking, don’t you think?
While traveling through Vermont one crisp, sunny day last fall, we stopped for a sign that read “Brewery, Cheese Samples, and Ice Cream.” A mirage, I wondered? Surely there can’t be a highway stop that covers all of my favorite things. But guess what? It was so totally real.
I sampled cheeses, drank a beer, and had a mouthful of maple soft serve ice cream. It was as if heaven had found a home in rural New England, and I was moving in.
On our way out the door, I stopped short. A small box in the impulse buys section of the checkout counter caught my eye. Chai Goat Milk Caramels. What in hell…I mean heaven…? One box grabbed, scanned, paid for, and torn open later, life had suddenly changed.
The caramel itself was flawless; chewy but not gummy, sweet but not cloying, and all that creamy, rich and buttery flavor was fantastic. But beyond the fact that these goats really can make a caramel was the unexpectedly complimentary flavors of black pepper, cardamom, cinnamon, cloves, and all the beautiful chai flavors announcing their presence through the subtle black flecks floating throughout. And just when you think it’s over, you get a hint of that funk from the goat’s milk.
And that’s why I wanted to give a shout out to the Big Picture Farm goats. Because they may not be the have the honor of being Taylor Swift’s backup singers, but they seriously know how to make a farm-fresh caramel sing.

March 20, 2013
Caramel Macchiato Cupcakes with Coffee & Goat Cheese
My mother-in-law’s birthday was back in January, and unfortunately, the perpetually insane schedules we keep in our house coupled with the distance factor (we’re about 4 hours apart) have prevented a celebration from taking place for the last eight weeks.
And that is precisely why we’re making up for it in style. We’ll descend upon Atlantic City this week for a reunion-slash-birthday extravaganza that will include indulging at a few of the famous resorts’ fine dining establishments (a little something here, a lot of something else there…), a bit of gambling, and no doubt a cocktail or two.

It’s not that I’m trying to earn brownie points, but I naturally felt compelled to present a stellar dessert for the occasion. This is the first time I’ve ever had a mother-in-law with a birthday! Though to be fair, this is the first time I’ve had a mother-in-law at all…coincidence, I guess.
During many a family gathering over the last year, we’ve spent time swapping stories while sipping macchiatos and sharing some kind of salty-sweet snack. And, well, goat cheese is sort of a family obsession for my in-laws, passed down through the generations like an heirloom necklace. So those were my inspirations for these little cakes – and of course their size makes them easier to conceal while we hit the casinos
March 13, 2013
Experiment: Caprese Two Ways

A wise chef once shared with me this mind-blowing bit of insider culinary information: tomatoes and strawberries are relatively interchangeable. What??? How can that be?! One is primarily used in savory dishes, and the other sweet. This changes everything. What about the space-time continuum!?!? Marty, don’t do it!
It seemed just plain dangerous to mess with the mold like that, but after examples of some ingredients mutually appreciated by the two red fruits I began to open my young grasshopper eyes and see the light. And that was the inspiration for this experiment: Caprese Two Ways.
The obvious is the classic, of course. Tomatoes, mozzarella, basil, and bit of balsamic drizzle. For this go-around I used Campari tomatoes, which are a bit larger than a grape tomato but still small, juicy, and sweet. Love them.
The switch-up in this attempted reinvention is that it is starring…(drum roll) The Strawberry!! In a fit of whimsy, I went and swapped out the mozzarella for homemade marshmallow and the sprig of basil leaves in favor of a dollop of fresh basil-infused whipped cream. I know…I’m mad! Don’t try to talk me off this ledge – it ain’t gonna happen.

Since it was my first stab at making marshmallows, I simply adapted the Smitten Kitchen recipe. No need to be a hero tonight and pour over the proper recipe development of the ‘mallow – that’s a later lesson.
I halved the ingredients and spread it out over a 9 inch springform pan; I wanted to produce very thin marshmallows that could be cut to resemble a circle of mozzarella, rather than the thicker, more traditional blocks. I followed the recipe to a productive and very tasty end that yielded the kind of faux mo’ cheese that I needed, and then used the top of a pint glass to carve out the proper size and shape. It wasn’t even the sticky, sugary mess I’d originally been prepared for (turns out I didn’t need the poncho, gloves, or safety goggles – though I did look super cool).

12 or 13 basil leaves submerged in a half cup of heavy cream, brought to a simmer, and then left to infuse for thirty minutes or so at room temp made a perfect base for the freshest, most herbaceous whipped cream to come out of my kitchen. I made a quick balsamic reduction, and then the rest was in the assembly.

Not surprisingly, the strawberries really do share the tomato’s affinity for basil and balsamic. While the preparation was a bit different, you can really appreciate the fact that these fruits are really just family from another plant seed.
So what do you do with this? Endless possibilities, my friend! Blind taste-tests! Side-by-side comparisons! Bookend your next dinner party offering with Caprese as both the salad course and the dessert course (they’ll be so confused by the menu)! Dazzle your friends with this mind-bending flavor swap! And watch the shock and awe as you pass on this secret knowledge to another non-believer.

March 7, 2013
The Handful
I had a little fun with a slightly modified version of The Mouthful; in a smaller, more compact cake for those of you who need your munchies on the move. I proudly present, The Handful.


A whole palm-full of chocolate peanut buttery goodness, now in a convenient snack cake size!!


February 24, 2013
A Macaron Bender in the Big Apple

Last month, I had the pleasure of spending three nights in Paris. Three leisurely, indulgent, and inspiring nights lounging around in the city of light. Three nights of gorgeous views, evening strolls on the Seine, and most importantly – three glorious nights of access to authentic French macarons.
The almond flour-based meringue cookies are all the rage stateside these days and I’ve tried them from an array of artisanal American vendors, but for me, the opportunity to enjoy them in their natural habitat was an enjoyable and educational treat. When I say that we sampled dozens of macarons over the course of three days, I want you to know that there is no exaggeration in that statement. I will prove this by letting you know that the shop supporting our habit had a minimum purchase requirement of 10 at a time. We visited no less than once a day. Because we kept running out.
We practically had the shakes from macaron withdrawal upon our return home, so by the time we were directed to the Macaron Parlour in St. Marks Place in NYC’s East Village, we were practically breaking down the door to get a fix.
In addition to classic flavors like strawberry and hazelnut, you can find some more decidedly American additions like the Elvis (peanut butter & caramelized bananas), and Party Time (salted milk chocolate & dulce de leche). After careful consideration, we settled on four flavors: Candied Bacon with Maple Cream Cheese, Caramel Apple Cider, S’mores, and…wait for it…
Cheetos.
Oh yeah, you read that correctly. That is a Cheetos macaron. I wasn’t kidding about that American part – can you imagine a French patisserie creating such a thing?! But I so admire the Macaron Parlour’s bravado. They show some serious guts in the fillings of their treats. And I, for one, could not stop eating the confounding combination of cheesy, salty, and sweet in the strangely delicious Cheetos version.
As for the S’mores, Apple Cider Caramel, and Candied Bacon – all tasted as deliciously avant garde as they sound.

And it wasn’t just the macarons, the whole place was sweet! Crazy cool exposed brick and ceiling beams – really one of those NY spaces that reminds you of just how cozy, chic, and inviting the tiny city storefronts can be when properly nurtured.
The owners were incredibly gracious and friendly; they were genuinely interested in our enjoyment as we sat at one of the small tables and chowed down. And a huge bonus for me on a freezing February day was a hot cup of Blue Bottle Coffee, straight from their pour over system.
I freakin’ loved this place – I hope you can check them out! Find them in the East Village – Macaron Parlour at 111 St. Marks Place, NYC http://www.macaronparlour.com If you’re not in the NYC area – they ship!!

February 22, 2013
Chocolate Peanut Butter Cookie Dough Crumble Pie. AKA: The Mouthful.

Along with individual names, bedrooms, and godparents, when my sister and I were growing up we were also assigned individual birthday cakes. I’m not sure how it happened. I don’t remember a point at which we were presented with specific options and instructed to choose, but I know that somehow over the years evolved a staunch tradition that on our birthdays, our mother would make each one of us our “very own” cake creation.
Mine has been, and always will be a beguiling concoction of ice cream, brownie, and Cool Whip layered to perfection in a springform pan. For my sister, it was the Chocolate Chip Cookie Cake, which is a lot like it sounds – a spongy, whimsical bundt cake with chocolate chips that resembled giant cookie wreath. The custom was always a comforting annual favorite for me; in addition to balloons and presents, I had my special cake to anticipate!
This year however, for circumstantial reasons, I found myself taking a crack at creating a dessert that would commemorate the latest change in my sister’s age. I didn’t dare attempt to fill my mother’s bundt pan with a cake that I knew I couldn’t do proper justice, so I apprehensively decided I’d whip up something new. She has recently become a mother, so I thought it’d be a good time to give birth to some new traditions (see what I did there?).
Rummaging through my recollection of shared childhood snacks, I remembered that the classic collaboration between chocolate and peanut butter was always a hit for her. Whether it came in the form of cookies, ice cream, or cake, we clamored for anything that came in creamy-salty-sweet and were always on alert for that signature Reese’s orange. Yes, that would definitely be the path to pursue.
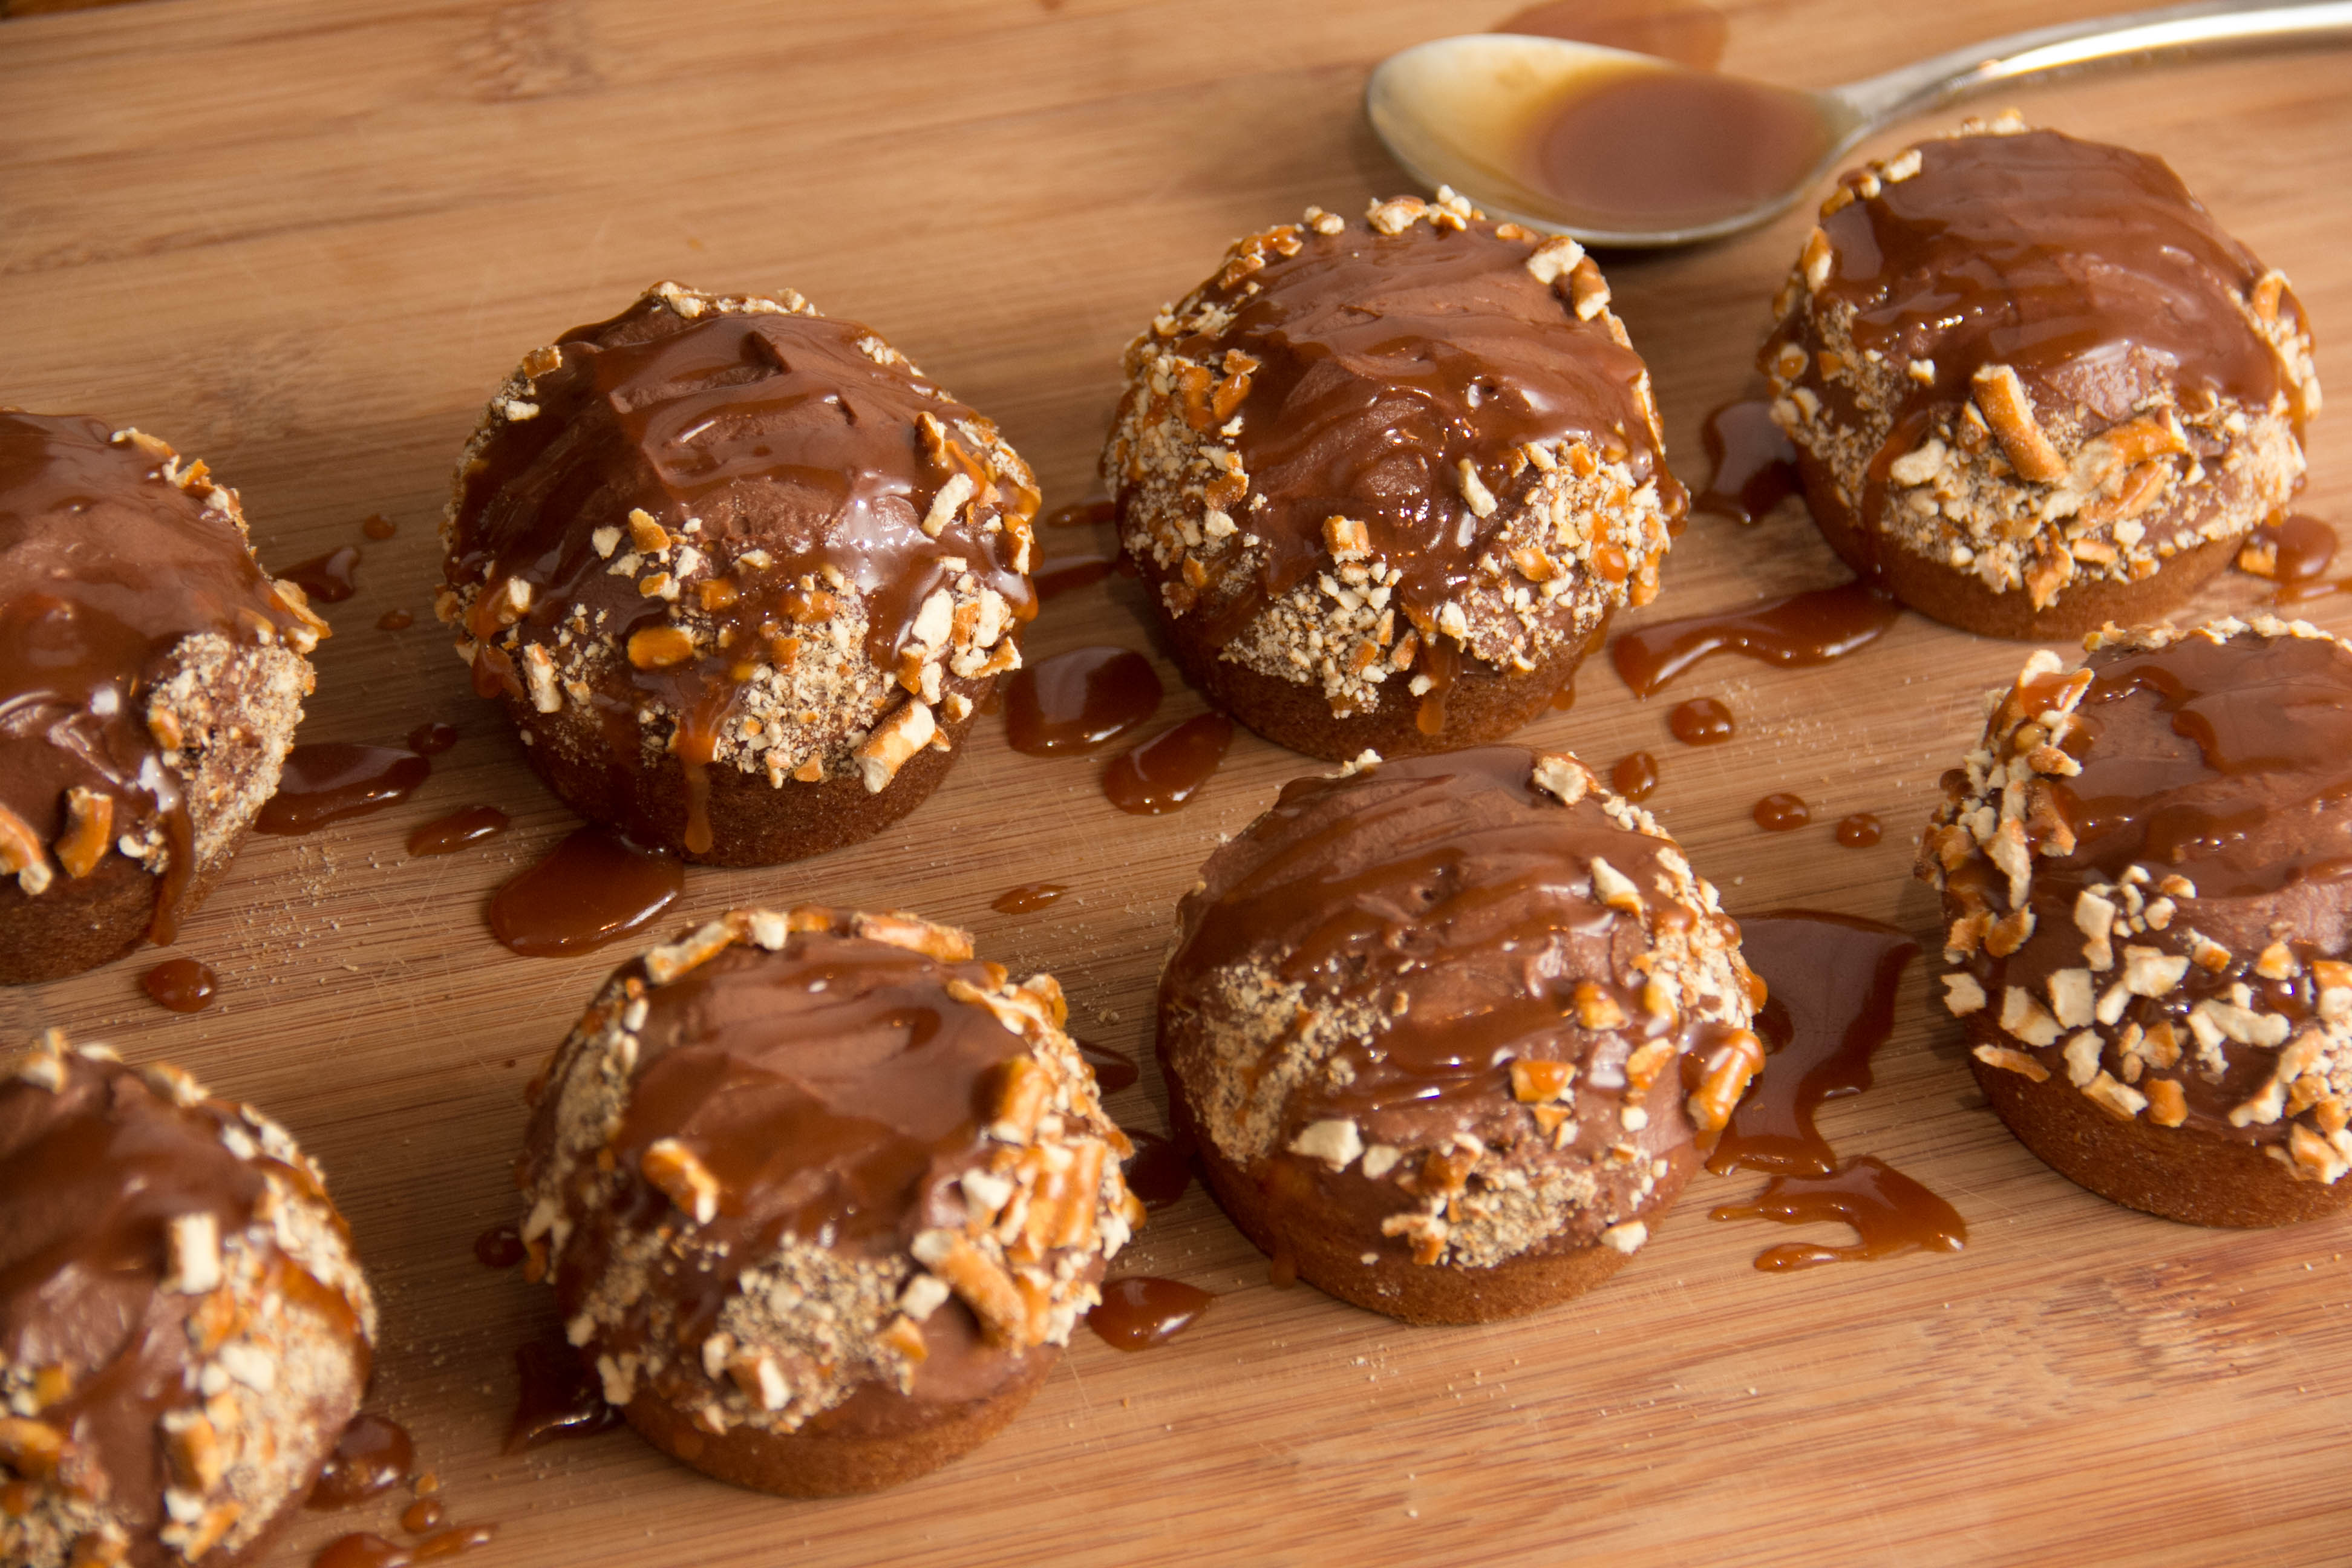
Ok. Flavor profile established. My ice cream maker is in storage due to a recent move, so that’s out. What else could I come up with? I wanted something that I can stick some candles in, and I was looking to add as many of her favorite things as possible. I started with a list: chocolate, peanut butter, caramel, cookie dough. I went shopping with those items bouncing around my brain, and this is what I wound up with – The Mouthful. Named as much for the amount of ingredients as it is for the fact that a mouthful is what you’ll be repeatedly reaching for while you’re enjoying this crazy thing. And otherwise, we’d have to call it something like Chocolate Peanut Butter Salted Caramel Cocoa Pebble Cookie Dough Crumble Pie. Like I said – it’s a Mouthful.
For the crust of the pie, I wanted real crunch and I didn’t want to sacrifice any opportunity to infuse chocolate or peanut butter. I grabbed a box of Cocoa Pebbles, crushed them up and added some peanut butter and baked it off. Crust accomplished.

I layered on some homemade salted caramel for contrast and to give it a goo factor, and then mixed up what would be the filling: a mixture of peanut butter, cream cheese, and powdered sugar to which I gently folded in a bit of whipped cream, freshly made on the fly. I opted to leave the cream unsweetened, for fear that I might overdo the sugar factor in the overall dessert.

Originally, I had wanted to make peanut butter cookie dough chunks which would decorate the top of the pie. For texture, I changed my mind and instead created the crisp, lightly baked peanut butter cookie dough crumble.

Instead of just topping the pie, I worked it into the filling and spread it on before adding another floor of salted caramel.
Once the layers were stacked (Cocoa Pebbles crust, salted caramel, peanut butter-cream cheese and crumble filling, salted caramel, cookie dough crumble), I chopped up a Ghirardelli bittersweet bar for a drizzle-worthy chocolate-peanut butter ganache.

Here’s a shot of the naked pie, pre-ganache attack.

And all dressed up…

The result falls somewhere between a cake and a pie, and is absolutely packed with PB & C. No component was left behind in the quest to address my sister’s love of peanut butter and chocolate. Did I overcompensate? Maybe a little. But I’m thinking my niece may need a signature birthday cake someday, and I just may be in the running to provide such a thing.

Here’s the rundown in case you ever find yourself in a position to assign someone a birthday cake.
Or just in case you’re in desperate need of a chocolate-peanut butter blow to the head.
For the crust:
6 Cups Cocoa Pebbles Cereal, crushed. You can use a blender or food processor or even a rolling pin, but I prefer to just get in there and use my two hands. Playing with food is the best.
1 Stick Melted Butter
2 Tbsp Peanut Butter
Combine the ingredients until well integrated. Press the mixture into a 9 inch springform pan and bake for 10 min at 350.
For the Salted Caramel Sauce:
You can use a salted caramel sauce if you have one on hand, but if you have the time and gumption to make your own…
3 Tbsp Butter
2 Cups Sugar
1 Cup Heavy Cream
1/2 Tbsp Flaked Sea Salt
Cook the sugar until deep brown. Slowly stir in the heavy cream very carefully as the combination will boil up like an angry volcano! Add vanilla, butter, and salt, while stirring and allow the mixture to cool. If it is too thick to spread, add 1/4 cup water to thin out the sauce. For the purposes of this cake, you want it to be spreadable but not runny.
For the Filling:
1 Cup Powdered Sugar
1/2 Cup Cream Cheese
1/3 Cup Peanut Butter
1/2 Cup Whipped Cream (I made my own unsweetened whipped cream here, but Cool Whip or the like will work as well)
Using a hand mixer (if you’ve got one. If not, then “Using elbow grease”) cream together the sugar, cream cheese, and PB. Gently fold in your whipped cream until light and fluffy.
For the Cookie Dough Crumble:
1/4 Cup Sugar
1/4 Cup Brown Sugar
1/4 Cup Butter
1/4 Cup Peanut Butter
3/4 Cup Flour
1/4 Tsp Salt
Cream together the sugar, brown sugar, butter, peanut butter and salt, then slowly begin adding the flour until mixed well. Spread the crumbly mixture on a baking sheet and pop it in the over for 12 – 15 minutes at 350, or until it has a nice firm texture. About halfway through the baking time, turn the mixture through with a spatula, allowing it to crisp evenly.
For the Chocolate Peanut Butter Ganache:
1 Large Baking Chocolate Bar, Finely Chopped
1/2 Cup Peanut Butter
1 Cup Heavy Cream
Heat the heavy cream over medium heat until simmering, and then pour over the chopped chocolate and peanut butter. Stir carefully until mixed well.
Assembly :
Once you have your components, it’s just a layering job. I took my time and popped the whole pie in the freezer in between layers to help each one set; this helps to keep the sections separate.
Spread a layer of salted caramel sauce over the crust, saving half for a later layer.
Mix about 1/4 of your cookie dough crumble into the filling, making sure it’s evenly distributed, and spread it over the caramel layer. Then pour on the remaining caramel and sprinkle the remaining crumble.
Finally, drizzle your ganache over the top.
I did not say it was quick or easy – I just said that it was delicious!!
This baby keeps best in the fridge or freezer, due to the fluffy, creamy filling and ganache. Serve with additional whipped cream or just by its beautiful self!

Stef Ferrari's Blog

- Stef Ferrari's profile
- 4 followers

