Simon Harrer's Blog
December 21, 2020
You copy-pasted quite some content from https://gitops.tech
You copy-pasted quite some content from https://gitops.tech in your article without linking to our website and without making clear that you copied that. At least be so decent to add a link to our website...


December 20, 2020
Have you tried out https://mob.sh for the Git handover?
Have you tried out https://mob.sh for the Git handover?

December 2, 2018
Yes, but the difference is the headline, meaning that first, you only show the code, second, you…
Yes, but the difference is the headline, meaning that first, you only show the code, second, you give the audience their task, and third, you offer the name you came up with for the comparison.
The name itself isn’t improved on the slides itself, but when playing that game with an audience, everybody tries to find a good name, and you listen to the suggestions by all the other developers, discussing which name the whole audience thinks is best.
I hope this clarified the game a little bit.
Best,
Simon

November 23, 2018
Comparison Jeopardy
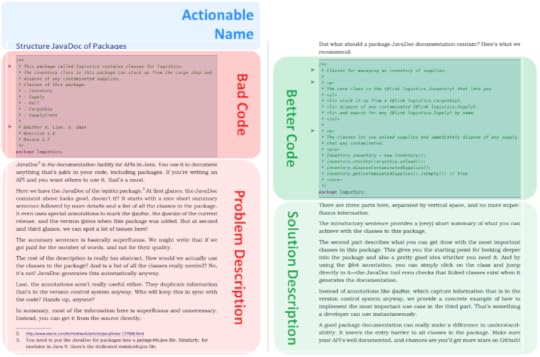
 Photo by chuttersnap on Comparison with bad code on the left and better code on the right.
At first, you show a comparison. Here’s an example of a comparison with bad code on the left and better code on the right, taken from our book Java by Comparison. Be sure to align the code listings so that any participant can compare it easily. Also, check that you use code snippets that aren’t too large and still readable when projected on the wall. We put a lot of effort into making the code snippets in our book concise, leaving out things like visibility modifiers like “public” if they didn’t add value. We advise you to do that, too.
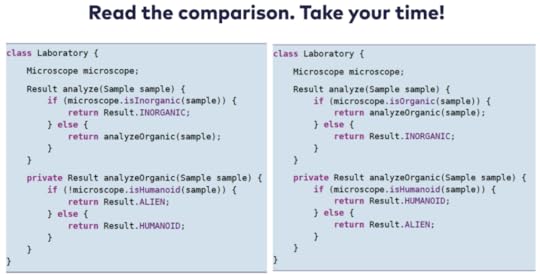
We gave the audience some time to read the code, typically a minute or two, so they could ponder on the comparison. During that time, you shouldn’t say anything and really let the audience read and think. We recommend setting a timer to make sure you give the audience enough time. You may take your time now reading the code above, so you can experience the game as well!
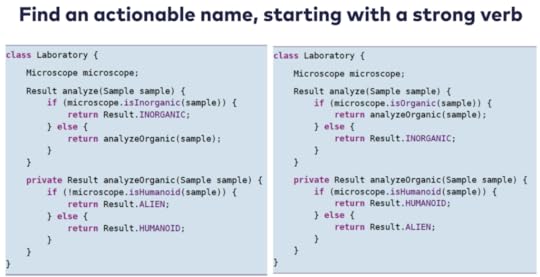 Tell the audience to find an actionable name for that comparison that starts with a strong verb.
After a few minutes of silence, we asked them how they would name that comparison. The only restriction we put out is that the name must start with a verb, preferably strong verbs. Tell them to try to stay away from weak verbs like “avoid”, “use” or “do”. We discussed each name whether it would really convey the meaning of this comparison with the audience. Make sure to take your time here, because this is the most interesting part. And be prepared that they come up with way better names than you had in mind for the comparison, which is a good thing!
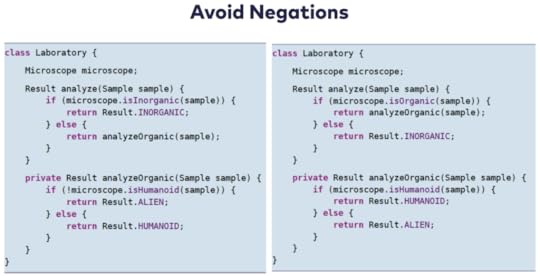 Comparison including the suggested name
Last, show them the name you’ve chosen as shown in the example below. From our experience, normally, our name was simply acknowledged as very good. Sometimes, however, it fuelled yet another short but interesting discussion.
Don’t forget to write down the suggestions of the audience, especially the ones that were better than your own name. For that, it’s best to moderate the game with two “game show hosts”, so that one can participate in the discussion and the other can just follow the discussion, taking notes when necessary. We typically take turns, so that it’s fun for both hosts.
Tried and TestedLinus and I have tried out the game three times already, each time in a different setting using up to ten comparisons from our book:
At university with studentsAt a meetup with students and professionalsAt an internal company meeting with professionalsAnd each time, we got very positive feedback. We hope to play that game at some other meetups and companies in the future as well. We’ll update that site here if we learn more about how to play “Comparison Jeopardy” even better. Stay tuned!

November 8, 2018
How to learn Java
 Photo by John Schnobrich on Unsplash
Quite often, I’m asked: Hey Simon, how to learn Java? Here are the top five resources I typically recommend. Happy reading. Happy learning!
Top 1: Head First Java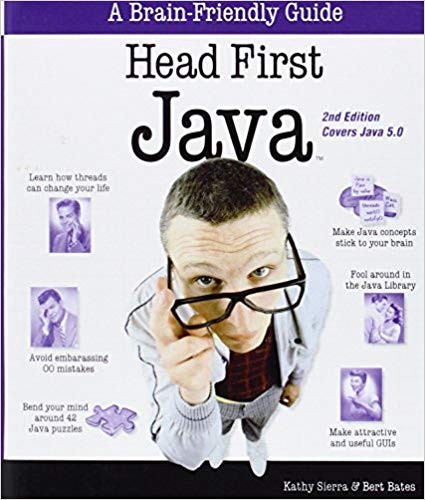 Head First Java by Kathy Sierra and Bert Bates
I’d recommend starting with Head First Java. I did the same 13 years ago and I still think this is the best book to start learning Java. It’s not your usual textbook, so be prepared for having actual fun learning Java. Be surprised how much you’ll know after having worked through that book.
Top 2: Java by Comparison Java by Comparison by Simon Harrer, Jörg Lenhard and Linus Dietz
Next, I blatantly recommend reading the book I co-authored: Java by Comparison. We’ve taught Java for over six years at University, and from that experience, we’ve written Java by Comparison. Our audience in mind has been students knowing enough Java to write simple programs but lacking practice and a mentor that can guide them towards cleaner and more readable code. It features a unique before/after approach comparing bad code to better code, so you can learn step-by-step to transform code into even better code. It’s the book I wished I had when I finished reading Head First Java.
Top 3: Effective Java Effective Java: Third Edition by Joshua Bloch
Now, we move on to the book on Java, the classic item-style book that provides uncountable insights how to use Java the right way: Effective Java. Just read that. It’s simply mandatory when you want to call yourself a professional Java developer.
Top 4: Head First Design Patterns Head First Design Patterns by Eric Freeman and Elisabeth Robson
When your programs start to become bigger, you’ll start to feel pain when organizing your code in methods, classes, and packages. That’s when you need to learn about software design. I began my journey with Head First Design Patterns. It features a similar learning style as Head First Java but focuses on how to design your classes instead.
Top 5: Functional Programming Java 8https://medium.com/media/d93bb97ca61caae08c27ef12426fb3a7/hrefAnd last but not least, with more and more people adopting a more functional programming style in Java and everywhere else, I recommend watching the unique Venkat Subramaniam explaining how to program in a functional way in Java 8. Happy watching!
howtolearn.deThese top 5 resources to learn Java originally appeared on howtolearn.de. Feel free to browse all the other topics there as well.

June 14, 2018
Let’s Talk. About Problems. Less About Solutions.
The other day, I stumbled upon the following tweet.
body[data-twttr-rendered="true"] {background-color: transparent;}.twitter-tweet {margin: auto !important;}It's easy to explain "things" to people that are eager to learn. But how do you explain "things" to people that are not?
It really was thought provoking for me. And I compiled the following answer, taking full 12 minutes, rewriting the tweet over and over.
body[data-twttr-rendered="true"] {background-color: transparent;}.twitter-tweet {margin: auto !important;}@simas_ch You just don't. You have to convince them that "things" are worth learning. After you convinced them, you can explain "things" to them. Typically, the convincing part is the real challenge.
But still, the topic didn’t let my mind free. It struck me, that there’s something really really important in there. So I try to break free by writing my thoughts down in this blog post. Enjoy!
I used to teach a lot at University. The two courses I co-taught, Advanced Java Programming and Programming Complex and Interactive Systems were known to be really time-intensive and not mandatory. Hence, the vast majority of the students who ended up in these courses were really motivated to learn and they accepted the large amount of work they needed to do — despite a lot of easier courses available as alternatives! For that experience, I feel privileged. Teaching those courses typically fell into the category of “it’s easy to explain “things” to people that are eager to learn”. They were already convinced that these courses are really important for themselves and didn’t need convincing.
But that’s not the whole truth. Apart from the technology part, we put a large focus on teaching clean code through code reviews in class, of their homework assignments, and even in the oral exam. Not every student shared our enthusiasm for clean code as we lecturers did. These students were already struggling with the course workload and simply wanted their code to run correctly and get good grades. That’s fine. Nothing wrong with that attitude, however, we ended up in the other category: “explaining “things” to people who aren’t eager to learn”. We, as idealistic teachers, wanted to teach and reach every student. So we talked a lot about why some code is hard to read and what consequences this will cause. Each semester, we put more and more emphasis on why a particular code is hard to read. It payed off. We could see this quite well in the feedback we’ve written as part of the grading of the student homework over the years. It changed from talking only about the solution at first to talking about the problem and the solution in a 50:50 split, giving the problem the same amount of space as the solution. I don’t have hard data to support my argument, but students stopped complaining about clean code advice after we switched to the 50:50 explanation. I assume it was convincing enough for the students to walk that extra mile despite the extra work.
We took that experience further and wrote our book Java by Comparison according to that 50:50 share between problem and solution. For each comparison in our book, we dedicate the left-hand page to the problem alone and the right-hand page to the solution. There are a lot of books on clean code that focus on solutions, but none of them spends so much space on the problem alone as far as I know. I think this really sets our book apart and makes it so appealing to beginners and experts alike. Have a look to see it for yourselves.
Let me generalise the point here. Talking about solutions is natural to us developers who like to share what we know. We want to share that cool new framework, programming language, IDE, CLI tool, or library. We want to show how it works and how cool it feels. But we often don’t spend enough time on why we should switch from the currently used framework, programming language, IDE, CLI tool, or library. We are already convinced, often strongly convinced, that the new is simply better. But we tend to forget that others haven’t thought our thoughts, haven’t gained our experience, and may reach totally different conclusions because of their current needs.
When you read the next article, listen to the next talk, or simply attend your next meeting, think about the ratio of time spent about the problem and the solution. Do you think the article/talk/meeting would’ve been better by talking more about the problem and less about the solution? Please let me know in the comments.

June 5, 2018
Pay for Complex Code with Screen Estate
From 2011 till 2017, I taught Java to beginners during my time at the Distributed Systems Group in Bamberg, Germany. It was an awesome experience, helping those young programmers on their journey to become professional developers. I learnt a ton about programming myself and how to teach someone to program and code better — and co-wrote a paper and a book from that experience. Today, I want to talk about another idea on how to help beginners write better code that’s spooking around in my mind: Pay for Complex Code with Screen Estate, although I am still working on that term… The general didactic concept is as follows.
The more complex the code is, the more screen estate you have to pay.
Sounds strange? Let me give you an example. According to Reading Beside the Lines: Indentation as a Proxy for Complexity Metric the more indentations code has, the more complex it is. Normally, we use (read: pay) 4 spaces per indent. The more complex our code is, the more of those “4 spaces indents” we have. By paying, for instance, 8 spaces per indent, complex code becomes much more expensive in terms of screen estate. Or even 16 spaces per indent. Or, the other way round, with 2 spaces per indent (which seems to be a common option nowadays as its so compact) we pay very little screen estate for complex code. Overall, we use the following formula to calculate the amount of spaces:
indents * indent_length
Here’s the code of two different FizzBuzz implementations, both using 4 spaces as indentation. The first one uses a lot of indents whereas the second one doesn’t. Have a look at the code and think about whether the visuals of the code really hints at whether it’s easy to maintain and understand.
https://medium.com/media/b62ccf0b340664617ef8880050aa159d/hrefIn the code above, we pay the same for every single indent. Instead, I’d like that the more one indents the more one has to pay so that a beginner immediately gets the increasing costs of the next indent. So I suggest the following:
The amount of spaces increases per indent.
Let me give you an example to make this more clear. We use 2 spaces as the initial indentation and 1 space for the increase. The first indent has no increase and is simply the initial indentation of 2 spaces. The second one would be 2 spaces plus 2 + 1 spaces, resulting in a total of 5 spaces. The third one would be 5 spaces plus 2 + 2 spaces, resulting in a total of 9 spaces. The fourth one be 9 spaces plus 2 + 3 spaces, resulting in a total of 14 spaces. You can also use the formula:
indents * indent_length + sum(indents-1) * increase_length
Let me show you that in the following code. I reused the code from above that already uses an indent with 4 spaces and just added an increase by 4 spaces. Have a look.
https://medium.com/media/7ddcba8859a520a4583343759b8afe41/hrefOne can immediately see the change. But even the less complex version looks bad although it’s actually quite clean. What’s wrong? In Java, we need to put our code in classes that have methods. A line in a method already requires two indents. And when we use an if condition, a for loop or a try-catch construct, we already have three indents. We need to take those into account as well and refine the previous statement to the following:
The amount of spaces increases per indent, ignoring the first three indents.
This requires a change in our formula:
indents * indent_length + sum(indents-ignore_indents) * increase_length
I formatted the FizzBuzz implementations again, but now applying the increase starting with the fourth indent instead of the first one. Have a look at the improved version below.
https://medium.com/media/de75ac78a7da572e8da5b42f1825fad4/hrefThe less complex version is exactly the same as the original one with the “standard indentation” we are accustomed to, but the complex version clearly signals the complexity through its modified indentation.
This is a didactic concept and should not be used in production code. It’s an approach to help beginners get the concept that code indentation signals code complexity and discuss with them how to overcome that complexity through refactorings, such as extract method that encapsulates code and gives that code block a name (i.e., the method name). It’s also not something that should be enforced all of the time in an editor. Instead, I recommend to apply that formatting live in class and then discuss with the students the issues of high cognitive load.
In summary, this approach might help beginners understand more quickly why it’s better to write code without resorting to a lot of indentations. It’s just a first step towards the idea of paying for complexity directly within your code editor. Another idea is to add whitespace within complex expressions, increase line spacing the longer a method becomes, and change the font size in relation to the length of a variable name.
PostscriptThis approach can’t work in Python because this language requires a certain indentation scheme that’s contrary to the idea in this article.
I’ve written the code to generate those formats in Ruby. Because it contains a lot of indentation, it’s not well suited to be placed here. If you still want that code, feel free to contact me directly.
I use spaces throughout this article to indent code and not tabs. I don’t want to restart the war on tabs vs. spaces here. I simply use spaces and that’s why I use spaces it in the article. This approach works with tabs, too.

December 9, 2016
DNS and Sending/Receiving Emails
Sending emails that will arrive in the target inboxes is not that trivial nowadays. The DNS settings are crucial for this. And they contain some pitfalls. I want to elaborate the things I ran into. This is what I learned in the quest.
Sending EmailsSPFThe Sender Policy Framework (SPF) is used to mark which hosts are allowed to send emails for specific domains. If this setting is available, the emails will more probably land in the inboxes instead of the spam folders. The SPF record is outdated, and the TXT record shall be used instead. Be aware that only a single entry is allowed for a domain. Multiple ones would cause emails not to arrive in the targeted inboxes. To solve this, you can merge two SPF entries into a single one.
DKIMThe DKIM refers to a public key with which one can determine whether the received and signed email is really from that authorized sender. It works similar to public/private signature authentication. The public key has to be stored in a TXT record as well.
Receiving EmailsBut also receiving emails is not that simple when the DNS is not set up correct.
MX vs. root CNAMELets assume you own the domain example.com and your website is hosted at someurl.cloudprovider.com. To let the user access your website through your domain, you normally add CNAME entries. The typical rule would be of the form www.example.com CNAME someurl.cloudprovider.com and this would work without flaws. But what if the user would only type in example.com? In that case, the user will not land at the website. The first thought would be to add another CNAME entry like this example.com CNAME someurl.cloudprovider.com so that any request landing at example.com would be correctly resolved to the website. It works. And then your customer also wants to receive emails at that domain. And you will set up an MX record pointing to the email server. But no mail will ever arrive. Never ever….
The reason for this is that the root CNAME is in conflict with the MX record, and because of this the MX record will not work. This has something to do with the classic DNS protocol that specifies that a root entry can only be an A entry. . Most cloud providers do not offer actual IP addresses. There are various solutions to this problem. One being that you can set up a url DNS record that issues a HTTP 301 redirect from any subdomain to the www subdomain instead.
ConclusionI hope this helps you in your endeavor towards sending and receiving emails that will arrive in the inbox, not in the spam folder.

December 5, 2016
How to Marry SVG and LaTeX
I am currently writing up my PhD dissertation. And I use a lot of figures and graphs to describe my approach, various concepts, relationships between concepts and architectures. The problem with simply using bitmap images like PNG or JPG is that they mostly look blurred and fuzzy as they do not scale. So vector graphics to the rescue.
The thing is that LaTeX does not support SVG files natively. And I do have a lot of SVG files which are generated from using PlantUML via a plugin in Intellij, or Graphviz. All of them need to be converted to PDFs, which can contain vector graphics, either before or during the compilation of the LaTeX document.
Despite the fact that it is possible to convert the SVG files to PDF files during compilation through the LaTeX package svg, I wanted to convert them before the compilation to keep my LaTeX project simple. I already compile graphviz DOT and NEATO files to SVG. Hence, this fits my workflow.
To actually convert SVG to PDF files, I used Apache Batik, more specifically the Apache Batik rasterizer. This is a Java-based command line tool which can, among other things, can convert SVG files to PDF files. But this only works using Batik 1.7.1, as Batik 1.8 fails with a ClassNotFoundError. So ensure that you use the correct version.
Apache Batik rasterizer has be to started using Java 6 or above. I used the latest Java 8 update 101, and put it on the PATH. To convert a single SVG file to a PDF file, one has to execute the following command with file.svg being the file to be converted:
java -jar batik-1.7.1/batik-rasterizer.jar -m application/pdf file.svg
I use a modified version of the previous command to convert all SVG files within a folder to their PDF version:
java -jar batik-1.7.1/batik-rasterizer.jar -m application/pdf -d folder folder/*.svg
In LaTeX itself, I was not required to change anything as the includegraphics command will automatically use the PDF version if no PNG file exists. For this, the files should not end with a a file extension as shown below.
\begin{figure}[htb]
\centering
\includegraphics[width=0.8\linewidth]{figures/file}
\caption{My Figure}
\label{fig:myfigure}
\end{figure}
Now, all my figures are crystal clear in the PhD dissertation. And they can be in your LaTeX document as well!

September 22, 2016
Used JARs During Program Execution
Hi. In a Java project of mine, I link to the large open source project soapUI, which in turn links to approx. 50 jars. But I only use a very small subset of soapUI. And because of this, I do not want to include all the 50 jars into my own application. But which of these 50 jars of soapUI are actually used through my application? If you have had a similar problem, read ahead as I show you how you can determine which jars are actually used during a program run.
First, to get the data which classes are loaded from which jars, I had to start my program on the JVM via the -verbose:class parameter. This automatically prints out using the format [Loaded CLASS from JAR] on the console while the program is running. The following snippet shows such a line.
$ java -verbose:class -jar app.jar...
[Loaded java.io.FileInputStream from C:\Program Files\Java\jdk1.8.0_102\jre\lib\rt.jar]
...
Second, I captured the console output of my program in a text file so I can work with the console output.
$ java -verbose:class -jar app.jar > stdout.txtThird, I had to capture the lines using the format [Loaded CLASS from JAR] only. For this, I used a regular expression in the form of \[Loaded .* from .*\.jar\] and the linux command line tool grep.
$ grep --extended-regexp --only-matching "\[Loaded .* from .*\.jar\]" stdout.txt > verbose-classes-log.txtFourth, I had to extract the paths of the jars to read them. For that, I use a group \[Loaded .* from .(*\.jar)\] and extract the group with sed.
$ sed --regexp-extended --silent 's/\[Loaded .* from (.*\.jar)\]/\1/p' verbose-classes-log.txt > loaded-jars.txtLast, I sort them, remove duplicates and count the usage, as well as sort it again.
$ cat loaded-jars.txt | sort | uniq --count | sort > loaded-jars-sorted-by-usage.txtIn summary, we can do this in one step as well using pipes.
$ java -verbose:class -jar app.jar | grep --extended-regexp --only-matching "\[Loaded .* from .*\.jar\]" | sed --regexp-extended --silent 's/\[Loaded .* from (.*\.jar)\]/\1/p' | sort | uniq --count | sortHope, this helps!