
Beth Cato's Blog
October 8, 2025
Bready or Not: Dulce de Leche Pumpkin Pie
I’ve made many incredible pies. This Dulce de Leche Pie is up there with the very best.

It uses a handmade graham cracker crust and has a caramel-forward pumpkin pie filling. Everything comes together surprisingly fast thanks to a food processor. Some fancy pies can be very fussy–this one is not!

I used frozen and thawed pumpkin puree when I made this. Remember, if you’re using canned pumpkin puree and a recipe doesn’t use the whole can, the leftover will keep beautifully in the freezer!
Modified from the original recipe in Food Network Magazine Oct/Nov 2024, also available online.
 PrintBready or Not: Dulce de Leche Pumpkin PieGet ready to make the most incredible pumpkin pie in your life. This pie is sweet, luscious, and perfect in every way. Modified from Food Network Magazine Oct/Nov 2024.Course DessertCuisine AmericanKeyword caramel, pie, pumpkinAuthor Beth CatoEquipmentfood processorpie plateIngredientsCrust1 sleeve cinnamon graham crackers 9 whole crackers3 Tablespoons brown sugar packed1/4 teaspoon ground cinnamon1/4 teaspoon kosher salt6 Tablespoons unsalted butter melted and cooledFilling13.4- ounce can dulce de leche1 cup canned pumpkin puree2 large eggs1/4 cup light brown sugar packed1 teaspoon ground cinnamon1 teaspoon pure vanilla extract or vanilla bean paste1/4 teaspoon kosher saltCool Whip or canned cream for servingInstructionsMake the crustPreheat oven at 375 degrees. Use a food processor to process the graham crackers to fine crumbs; there should be about 1 1/3 cups. Pulse in the brown sugar, cinnamon, and salt. Drizzle in the melted butter and pulse to combine. (Wipe out the food processor–no need for a deep clean yet.)Transfer everything to a 9-inch pie plate. Press crumbs evenly up the sides and along the bottom of the pan.Bake until the crust is set and the edges have just started to brown, 10 to 12 minutes. Let cool slightly.Reduce the oven temperature to 350 degrees.Make the fillingTransfer the dulce de leche to a microwave-safe bowl. Microwave in 20-second intervals, stirring, until softened just enough to stir easily. This will take about 1 minute. Set aside 3 tablespoons dulce de leche for topping.Into the food processor, add the majority of the dulce de leche, pumpkin puree, eggs, brown sugar, cinnamon, vanilla, and salt. Process just until smooth–don’t overdo.Pour into the crust. Place the crust on a baking sheet and bake until the filling is just set with a slight wobble in the very center, 35 to 45 minutes.As the pie finishes up baking, warm the reserved dulce de leche in the microwave until you can drizzle it. As soon as the pie comes out of the oven, drizzle with the dulce de leche.Let cool completely. Serve with Cool Whip or canned cream. Store pie covered in fridge; it keeps for at least 4 days.OM NOM NOM!


October 1, 2025
Bready or Not: Bourbon-Date Pecan Pie
Hey, I have a book out today! A House Between Sea and Sky is officially out in the world. Let’s celebrate with a lusciously boozy pie!

This Bourbon-Date Pecan Pie is a pecan pie that has levelled up. It includes no corn syrup. Dates ate as a binding agent and additional sweetener.

The bourbon flavor is the first thing that hits the mouth with a refreshing zing. The sweet, soft dates are next, followed by the crunchy pecans. It is absolute perfection.

Yes, there is some extra work involved with blind-baking the crust and toasting the pecans. This is a pie that tastes like it involved some additional labor, though.

Modified from Bon Appetit November 2024.
PrintBready or Not: Bourbon-Date Pecan PieThis incredible pecan pie uses dates to sweeten and thicken the mix instead of corn syrup. A food processor makes the assembly a breeze. The result is dense, nutty perfection. Modified from Bon Appetit November 2024.Course DessertCuisine AmericanKeyword alcohol, pecans, pieAuthor Beth CatoEquipmentparchment paperpie weightsfood scalefood processorIngredientspie dough chilled, homemade or store-bought, enough for bottom crust2 1/2 cups chopped pecans12 ounces dates pitted if needed, chopped and divided4 large eggs3/4 cup brown sugar packed1/4 cup bourbon4 Tablespoons unsalted butter melted1 3/4 teaspoon kosher salt1 Tablespoon vanilla bean paste or vanilla extract1/4 teaspoon ground cinnamonInstructionsPreparing the crustLet pie dough sit at room temperature for 5 minutes. Lightly flour a work surface. Roll out dough into a 14-inch round. Wrap it around the rolling pin to transfer it to a pie dish. Shape it into pan, cutting back overhang and crimping edges as desired.Set on a rimmed baking sheet and prick bottom and sides all over with fork tines. Freeze for at least 30 minutes or up to 2 hours.Preheat oven with a rack in the lower third of oven. Line the frozen pie crust with parchment paper and filled to brim with pie weights. Bake for 20 to 25 minutes; check part way and cover edges with foil if they brown too quickly. At the end, the edges should look set and dry.Use parchment to lift out the pie weights onto another cookie sheet to cool. Put pie back in oven for another 20 to 25 minutes, monitoring it. If the crust puffs, use a flat metal measuring cup or similar device to press crust down. By the end, the bottom crust should look golden and dry. Let crust cool on baking sheet.Assembling pieReduce oven temperature to 350-degrees.Place pecans on a rimmed baking sheet. Bake for 12 to 16 minutes to roast, stirring halfway through. They should be dark and fragrant.Place 5 ounces dates and 1/2 cup boiling water in food processor. Let sit for 10 minutes. Process until smooth, about a minute. Add eggs, brown sugar, bourbon, butter, kosher salt, vanilla bean paste/extract, and cinnamon. Process until smooth, about a minute.Remove bowl and blade from food processor. Stir in pecans and remaining dates. Scrape the filling into the crust.Bake pie for 45 to 55 minutes, rotating halfway through. If the crust is getting too dark, protect edges with foil. At the end, the filling should no longer look shiny but be dry and set. Cool pie on wire rack and then chill at least 2 hours.Store covered with foil in fridge. Keeps well for days.OM NOM NOM!Official release date of A House Between Sea and Sky

This is the day! Amazon had the exclusive debut through the First Reads program, but October 1st means A House Between Sea and Sky is now available everywhere in all formats. Find the paperback at your local indie (or ask them to order it) or through Bookshop.org! Grab the audiobook, narrated by Hollis McCarthy and Pete Cross, through Audible! Also… ask your local library to carry the book!
Another thing to mention, too: this is a novel made for book clubs! The back includes discussion questions to make everything easier.
As always, if you enjoy the book (or don’t), please rate and review. Pass the book along to friends. Buy copies for gifts. My hope is that A House Between Sea and Sky offers brightness in dark times. That light is meant to be shared.
Thank you for your support!
Note that some of the links below are affiliate links.
Amazon: paperback | kindle | Audible (narrated by Hollis McCarthy and Pete Cross)Barnes & Noble: paperbackBookshop: paperbackBooks-a-million: paperbackSeptember 24, 2025
Bready or Not Original: Pumpkin Bundt Cake with Ginger Cream Filling
This Pumpkin Bundt Cake with Ginger Cream Filling is a winning combo of flavors: pumpkin, spices, ginger, and sweetness.

It’s a pretty cake, too, no matter what bundt cake mold you use. Filled cakes look so great when they are sliced open, like you’re revealing a present inside. And with a thin layer of glaze on top? Yum!

I’ve used this combo of ginger pumpkin before on Bready or Not. Here are some examples!
 PrintBready or Not Original: Pumpkin Bundt Cake with Ginger Cream FillingThis delicious cake contrasts pumpkin and spice crumb with a ginger-warmed sweet filling.Course Breakfast, Dessert, SnackKeyword bundt cake, cream cheese, pumpkinAuthor Beth CatoEquipment10-12 cup bundt cake pannonstick spray with flourIngredientsCake1 cup unsalted butter (2 sticks) softened3 cups white sugar15 ounces pumpkin puree4 large eggs3 cups all-purpose flour1 teaspoon ground cardamom1 teaspoon ground cinnamon2 teaspoons baking soda1 teaspoon salt2/3 cup buttermilk or soured milk, see noteFilling8 ounces cream cheese (1 box) softened1/2 teaspoon ground ginger1/4 cup brown sugar packed2 Tablespoons all-purpose flourGlaze1 cup confectioners’ sugar1 1/2 Tablespoons milk or half & halfInstructionsPreheat oven at 350 degrees. Generously coat the interior of a large bundt pan with nonstick spray with flour.In a big bowl, cream together the butter and sugar. Add the pumpkin. Add the eggs one at a time, scraping the bottom of the bowl to incorporate everything.In another bowl, combine the flour, cardamom, cinnamon, baking soda, and salt.Add the dry ingredients to the big bowl alternatively with the buttermilk/soured milk. Scape the bottom of the bowl again to make certain everything is combined.In another bowl, mix together the cream cheese, ginger, brown sugar, and flour.Scoop about 2/3 of the cake batter into the prepared bundt pan. Spoon in the filling, being careful to make sure it doesn’t touch the sides of the pan (it could possibly stick and cause the cake to pull apart). Spoon the remaining pumpkin batter on top, evening out.Bake for 65 to 75 minutes; the middle of the cake should pass the toothpick test. Let it cool about 15 minutes, then carefully invert it onto a cooling rack. Let cool completely.Make glaze, adjusting the amounts as needed to create a thick texture. Drizzle atop cake. Let set at least an hour before cutting. Store covered or as wrapped individual slices.OM NOM NOM!NotesTo make soured milk, pour a thin layer of lemon juice or white vinegar into the bottom of a liquid measuring cup. Add milk or half & half to reach to 2/3 cup amount requested by the recipe. Let sit about 10 minutes at room temperature to curdle.
September 17, 2025
Bready or Not Original: Chocolate-Swirled Pumpkin Cake
Cake is good. This Chocolate-Swirled Pumpkin Cake is very good.

The texture here is cakey and moist. And it gets moister over time, as is often the case with pumpkin baked goods. Therefore, I’ll say straight out that this is best eaten within 2 days. Not like it’s totally awful after that, but it can tend toward soggy. (Soggy and cake is only good if you’re talking something like Tres Leches.)

This is a versatile kind of cake that would work for a special breakfast or brunch, not just dessert.
 PrintBready or Not Original: Chocolate-Swirled Pumpkin CakeThis moist, luscious cake abounds in chocolate and pumpkin flavor. It is best eaten within 2 days, as the texture will become moister over time.Course Breakfast, Dessert, SnackKeyword cake, chocolate, cream cheese, pumpkinAuthor Beth CatoEquipment15×10 pan (jelly roll pan)aluminum foilnonstick spraywaxed paperIngredientsCake2 cups all-purpose flour1 1/2 cups white sugar2 teaspoons baking powder1 teaspoon baking soda1/2 teaspoon salt1/4 teaspoon ground cloves15 ounces pumpkin puree 1 can4 large eggs1 cup vegetable oil1/2 cup mini chocolate chipsSwirl1/2 cup mini chocolate chips8 ounces cream cheese (1 block) softened1/3 cup white sugar1 egg1 Tablespoon milk or half & halfInstructionsPreheat oven at 350 degrees. Line a 15×10-inch pan with foil and apply nonstick spray or butter.In a bowl, combine the dry ingredients: flour, white sugar, baking powder, baking soda, salt, and ground cloves. Add the pumpkin puree. Beat in the eggs one at a time followed by the oil. Spread batter in prepared pan.In a microwave-safe bowl, melt 1/2 cup mini chocolate chips in the microwave.In a mixing bowl, beat the cream cheese with the remaining sugar. Add the egg and milk. Fold in the melted chocolate until the entire mix is consistently brown.Spoon the filling over the pumpkin batter. Use something like a butter knife to create swirls throughout the pan. Sprinkle the remaining 1/2 cup mini chocolate chips over the top.Bake for 25 to 30 minutes, until the middle passes the toothpick test. Let cool for a while at room temperature, then put in fridge to fully chill.Slice in pan to serve, or use the foil to lift contents onto a cutting board to slice. If keeping in pan, store covered in fridge; if removing from pan, be sure to use waxed paper between the stacked layers and store in fridge. Best eaten within 2 days.OM NOM NOM!
September 10, 2025
Bready or Not Original: Pumpkin Cinnamon Bars
These Pumpkin Cinnamon Bars are pure cakey goodness. Moist because of the pumpkin, with that pumpkin flavor prominent, these are a perfect seasonal (and year-round!) treat.

I’ve got to say, I love how the pictures of this recipe turned out. They do a lot to depict how tasty these bars are.

I always look for recipes that use an entire can of pumpkin. I like using the whole thing and not worrying about a dab stuck in a bag in my freezer.
 PrintBready or Not Original: Pumpkin Cinnamon BarsThese Pumpkin Cinnamon Bars are thick and moist, packed with the flavors of pumpkin, spice, and sugar.Course Breakfast, Dessert, SnackAuthor Beth CatoEquipmentaluminum foilnonstick sprayIngredientsDough1 cup unsalted butter 2 sticks3 3/4 cups all-purpose flour2 teaspoons ground cinnamon1 1/2 teaspoons baking powder1 1/2 teaspoons baking soda1 1/4 teaspoons kosher salt1/4 teaspoon ground nutmeg1/4 teaspoon ground cloves15 ounces pumpkin puree 1 can2 2/3 cups brown sugar packed1 Tablespoon vanilla extractFilling/topping1/2 cup white sugar1 Tablespoon ground cinnamon2 Tablespoons all-purpose flourInstructionsPreheat oven at 325 degrees. Line a 13×9 pan with foil and apply nonstick spray or butter.Melt butter in microwave in microwave-safe bowl. Set aside to cool.In a medium bowl, mix together flour, cinnamon, baking powder, baking soda, salt, nutmeg, and cloves. Set aside.In a large mixing bowl, beat together pumpkin puree, brown sugar, and vanilla. Gradually work in the dry ingredients until no white streaks remain. Spread about half to cover the bottom of the prepared pan.Begin making the filling/topping by mixing the white sugar and cinnamon in a small bowl. Place about half of that mixture in another bowl; stir in flour.Sprinkle the sugar-cinnamon-flour mixture on top of the batter in the pan. Add the remaining batter on top and spread out evenly. Sprinkle the sugar-cinnamon mixture on top to coat.Bake for 45 to 55 minutes; the middle should pass the toothpick test. Let cool in pan on wire rack, speeding process in fridge if desired. Use foil to lift contents onto cutting board to slice into bars.Store in an airtight container at room temperature or in the fridge for up to 3 days.OM NOM NOM!
September 4, 2025
A HOUSE BETWEEN SEA AND SKY is an Amazon First Reads pick for September!
My next book, A House Between Sea and Sky, is officially out October 1st… but it’s an Amazon First Reads pick for September. That means that Amazon customers can get it early: Prime members can acquire it for free, and other people can get the ebook for $1.99. [promo link]
Then on October 1st, you can buy it everywhere (including your local indie!) in print, and get the audiobook narrated by Hollis McCarthy and Pete Cross (I’m so excited to listen to them!).
Thank you so much for your support!
September 3, 2025
Bready or Not Original: Sourdough Pumpkin Mini Muffins
This is a different kind of sourdough discard recipe: Sourdough Pumpkin Mini Muffins that are perfect for a breakfast, brunch, or a potluck!

I created this recipe by drastically reworking a King Arthur Flour recipe for loaf bread. The result is fast-baking mini muffins that can be eaten in just a couple bites.
The most prominent flavor here is the pumpkin and spice. The sourdough is subtle, adding a pleasant chalky tone.

My next book is out October 1st, and it’s something new and different! It’s fantasy with a literary edge, depicting a new kind of found family–one that includes two unique sentient characters: an anxious murder house and an ancient sourdough starter named Mother. I maintained my own “Mother” for book research (and still do), and therefore have tried a lot of new sourdough recipes over the past while.
Click the book cover below to preorder A House Between Sea and Sky via my affiliate link.
 PrintBready or Not Original: Sourdough Pumpkin Mini MuffinsThis Sourdough Pumpkin Mini Muffins are an absolute treat, great for breakfast, brunch, or even a potluck! The most prevalent flavor is pumpkin and spice. Note that the recipe makes a lot, about 63 mini muffins, so having at least two pans will speed the baking process immensely.Course Breakfast, DessertCuisine AmericanKeyword mini muffin, pumpkin, sourdoughServings 63 mini mufinsAuthor Beth CatoEquipmentnonstick spraymini muffin pan (2, ideally)small cookie scooptoothpickIngredientsMuffins1/3 cup vegetable oil1/2 cup white sugar1/4 cup molasses2 large eggs room temperature1 cup pumpkin puree3/4 cup sourdough starter discard (170g)1 teaspoon vanilla extract2 cups all-purpose flour3/4 teaspoon salt1 teaspoon cinnamon1/2 teaspoon ginger1/2 teaspoon cloves1/4 teaspoon nutmeg1/2 teaspoon baking powder1/2 teaspoon baking soda1/2 cup pepitas1/2 cup dried cranberriesTopping1/3 cup turbinado sugar or other coarse sugarInstructionsPreheat the oven at 350 degrees. Generously grease mini muffin pan(s).In a large bowl, combine oil, sugar, molasses, eggs, and pumpkin. Add the starter and vanilla, scraping bottom of bowl to incorporate everything.In another bowl, mix flour, salt, spices, baking powder, and baking soda. Stir the dry ingredients into the wet until evenly combined. Fold in pepitas and cranberries to distribute.Use a small cookie scoop to dole out the batter. Each well in the pan should be about 2/3 full. Add a pinch of turbinado sugar on top of each.Bake for 10 to 11 muffins; they should look set, and a middle muffin should pass the toothpick test (don’t discard that toothpick). Let muffins set for 5 minutes, then use the toothpick to gently lift each out of pan and onto a cooling rack.Store in a sealed container, with waxed paper between layers if stacking. The muffins will be moister after a day, and hold up well for a couple days.OM NOM NOM!
August 27, 2025
Bready or Not: Buttery Sourdough Buns in the Bread Machine
The full month of sourdough recipes continues with Buttery Sourdough Buns, a recipe rewritten from King Arthur Flour to work in the bread machine.

Of course, the dough can be mixed however you like. Do what works to combine everything and complete that first rise! After that, follow the instructions for shaping the buns.

These things are swirled like cinnamon rolls. A touch of paprika mixed with the interior butter adds color to make the swirl more distinct and doesn’t add heavy flavor.

I love buns like this because there is something texturally delightful about unspooling a roll to reach the buttery interior.
My next book is out October 1st, and it’s something new and different! It’s fantasy with a literary edge, depicting a new kind of found family–one that includes two unique sentient characters: an anxious murder house and an ancient sourdough starter named Mother. I maintained my own “Mother” for book research (and still do), and therefore have tried a lot of new sourdough recipes over the past while.
Click the book cover below to preorder A House Between Sea and Sky via my affiliate link.
PrintBready or Not: Buttery Sourdough Buns in the Bread MachineThis dough, of course, doesn’t require the bread machine. Use the ingredients and mix by hand or mixer, if you want, and shape as instructed below. Modified from King Arthur Flour.Course Bread, Side DishKeyword bread machine, sourdoughServings 16 bunsAuthor Beth CatoEquipmentbread machine8 or 9 inch cake pansnonstick spray or butterpastry brushknife or unwaxed unflavored dental flossIngredientsDough1/2 cup sourdough starter discard (113g)2/3 cup lukewarm water5 Tablespoons unsalted butter room temperature1 large egg room temperature1 Tablespoon white sugar3 cups all-purpose flour2 1/2 teaspoons instant yeast1 1/4 teaspoons sea saltFilling4 Tablespoons butter divided1/4 teaspoon paprika optionalInstructionsIn bowl of bread machine, place the sourdough starter, water, soft butter, egg, and sugar. Gently whisk. Add flour, placing the yeast and salt on separate sides. Start machine on DOUGH setting. Check during the mixing to ensure the process is going well, and let it complete an initial rise.Lightly grease the two cake pans. Set to one side. In a microwave safe bowl, melt 2 Tablespoons of butter. Stir in paprika; it will add color and mild flavor to the swirled bread.Transfer dough to a lightly greased surface. Roll the dough out to a 12×16-inch rectangle. Use a pastry brush or the back of a spoon to coat the top of the dough. Starting with a long side, roll it into a log.Use a sharp knife or a looped piece of dental floss to cut dough slices 1 inch apart; there should be about 16. Place 8 rolls in each pan, slightly spaced out.Cover pans with a towel or plastic wrap to rise in a warm spot for an hour. The rolls should look puffy. Near the end of the hour, start preheating oven at 350 degrees.Melt the remaining 2 Tablespoons butter. Uncover the pans. Spread most of the butter atop the buns.Bake for 15 to 20 minutes. They will remain fairly pale. A digital thermometer plunged into the center of a bun should read over 190 degrees.Remove the buns from the oven. Turn them out onto a cooling rack. Brush with any remaining melted butter.Serve hot or warm. The oven is best for reheating. Leftovers will keep sealed at room temperature for a few days. They can also be frozen for weeks.OM NOM NOM!
August 20, 2025
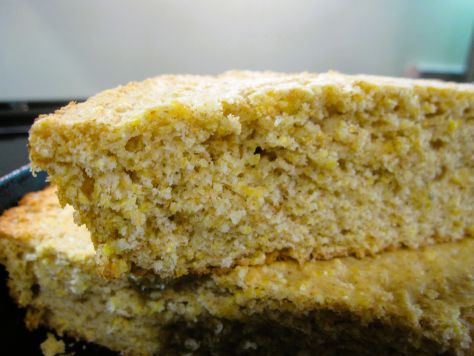
Bready or Not: Sourdough Cornbread
I’m continuing the sourdough theme, which ties into my forthcoming book, with an American stand-by that’s made even more delicious with a slight tang of sourdough: Sourdough Cornbread. A whole cup of discard is incorporated into the batter. The flavor it adds is subtle yet delicious.
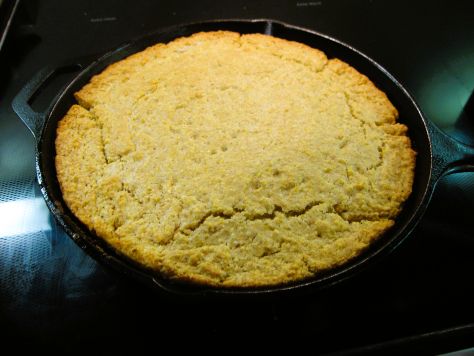
This recipe, modified from King Arthur Flour, calls for a cast iron skillet. That is essential in creating a nice, crisp crust. That said, I’ve also adapted other cornbread recipes to use a muffin pan, so that could be done here as well with a similar baking time. Just expect a softer cornbread, and use the toothpick test to make sure they are done.
My next book is out October 1st, and it’s something new and different! It’s fantasy with a literary edge, depicting a new kind of found family–one that includes two unique sentient characters: an anxious murder house and an ancient sourdough starter named Mother. I maintained my own “Mother” for book research (and still do), and therefore have tried a lot of new sourdough recipes over the past while.
Click the book cover below to preorder A House Between Sea and Sky via my affiliate link.
PrintBready or Not: Sourdough CornbreadThis is a fun twist on traditional cornbread. Sourdough discard adds a pleasant tang that complements the sweetness of the cornmeal.Course Bread, Side DishCuisine AmericanKeyword quick bread, sourdoughAuthor Beth CatoEquipment10-inch cast iron skilletIngredients1/2 cup unsalted butter 1 stick1 1/4 cups all-purpose flour1 cup yellow cornmeal1/3 cup white sugar2 teaspoons baking powder1 teaspoon table salt1/2 teaspoon baking soda1 cup sourdough starter discard (227g to 241g)1/3 cup milk or half & half2 large eggs room temperatureInstructionsPut the butter in the skillet and place it in a cold oven. Start heating at 425 degrees.In a large bowl, combine the flour, cornmeal, sugar, baking powder, salt, and baking soda. In another bowl, whisk together the sourdough discard, milk, and eggs until combined.Meanwhile, the butter is browning in the oven. When it is fully melted with a nice golden brown hue, remove the skillet and let cool for only a few minutes. Carefully pour most of the butter into the wet mixture, leaving roughly a tablespoon in the skillet.Mix the wet ingredients again to fully incorporate the butter. Add the dry ingredients, mixing to form the batter.Carefully swirl the remaining butter in the skillet to coat the bottom and sides. Pour in the batter and spread it into an even layer.Bake the sourdough cornbread for 15 to 20 minutes. It should look set and golden at the edges, with the middle passing the toothpick test.Remove from oven and allow cool briefly before serving warm or at room temperature. Cornbread is best enjoyed the day it’s made. However, leftovers can be wrapped and stored at room temperature for a day, or freeze for longer storage.OM NOM NOM!


