Steven Saus's Blog
April 22, 2026
Our Accuracy Is Even More Important The More Blatant Their Lies Are

It is important, with all the misinformation and outright lies being peddled as of late, that we hold our critiques to the highest standard of accuracy. Not out of a “they go low, we go high” attitude, but to make sure that we do not give the liars additional ways to get away with their lies and to distract from the awfulness they’re doing.
For example, this meme from a few days ago.
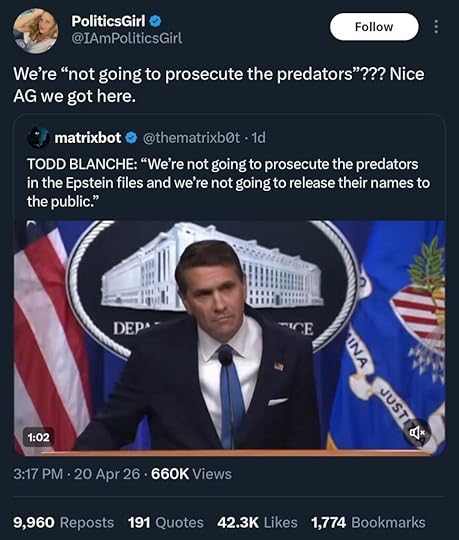
It sounds plausible, but this isn’t accurate. I wouldn’t be SURPRISED, the guy appears to be a tool, and I fully expect him to NOT prosecute any of them, but this specific claim isn’t true.
Which distracts from what Mr. Blanche did say in a Fox News interview (as reported by Newsweek), which wasn’t a whole lot better.
“The DOJ has now released all the files with respect to the Epstein saga,” he said. “To the extent the Epstein files was a part of the past year of this Justice Department, it should not be a part of anything going forward.”
Newsweek
But when we exaggerate or are hyperbolic in order to get clicks and views, it means the discourse becomes about the accuracy of exactly what he said, instead of the content of what he said, which is functionally the same. That is why accuracy matters for us.
Otherwise, we end up looking like Chicken Little even though the sky is actually falling because some detail was presented hyperbolically. And there’s no need to, either:
“New Deputy AG signals has said there was no prosecutable material in the Epstein files” makes the same point, but also is technically true, as is the meme I ended up making:

Which is horribly unfair and feels WRONG that we have to go to such extremes when they’re so blatantly lying at every turn. Why should we get raked over the coals for minor details when they’re just making shit up over there, or blatantly misrepresenting it?
I don’t have a good answer. I have just seen so many conversations derailed and distracted from the actual point over accusations of exaggeration. It keeps playing out like that over and over again, both at the interpersonal and societal level. It feeds into the “both sides are the same” narrative (1)
And if we ignore that, we’ll stay stuck in this awful cycle far longer than we need to be.
(1) Which is itself an over-generalization at multiple levels. At some levels, it’s true. At some levels and with some points, it’s clearly different.
Featured Image by from Pixabay


April 13, 2026
Cover Your Story Scaffolding, Or, Grumbling About Monarch Season 2

“Never let your readers hear the dice roll.”
It’s common advice from genre writers at gaming conventions, and it’s good advice.
It’s not a prohibition from using the framework or scaffolding of a game system — Honor Among Thieves uses initiative order and D&D’s time pacing during its combat scenes. It’s done well and feels natural even if you’ve never heard of the game before. While that stands out to D&D players, that scaffolding is not obvious, even though it is present.
The principle applies more broadly; when the scaffolding shows, the story suffers.
Plot stupidity, deus ex machinas, anything where it leads the reader (or viewer) to suddenly realize that the only reason certain things are happening is “because there has to be a plot.” (The variant “Only the Author Can Save Them Now” is definitely what I mean here.)
I’m only three episodes into season two of Monarch: Legacy of Monsters, and it seems determined to strip away the facade and show off that scaffolding.
Don’t get me wrong. I really enjoyed the first season of Monarch: Legacy of Monsters; it was nuanced, layered, and smart. While characters made occasional stupid choices, it made sense within the context of the story and the nature of that character. The hotheaded military guy is aggressive when that’s not a smart move? Makes sense. The idealistic person is blindsided by humans being awful? That tracks. The burned-by-the-system cynical character doesn’t trust anyone enough to share information? Of course not.
In season two, a world where Godzilla is known to exist, Monarch is still ill-funded and ineffectual. A few real examples from the same episode: It absolutely makes sense that corporations would try to profit from Titans (thank you Pacific Rim), but a third of a way through the second season seems like a strange place for a group you’ve never heard of before suddenly be ultra-influential and an outsized factor. Ah, there’s giant billboards showing some of your party’s faces as wanted fugitives? Let’s have them go run a simple errand instead of laying low, I’m sure it’ll be fine. Oh, you just happen to have an old “prototype” of the exact doohickey we need? How convenient.
Of course we all know that, yes, it IS convenient for the authors and writers. Those things drive the plot. You need scaffolding to give the story structure and shape. But when those convenient coincidences (or lapses in judgment or memory) are too large or too common, your readers and viewers are having to mentally duck and weave around that scaffolding to follow the story.
They are paying more attention to the structure than to the story itself.
There are outliers — House of Leaves immediately comes to mind — where the structure is very obvious, but rather than detracting from the experience, helps draw one into it. I found Choose-Your-Own-Adventure stories compelling, not because I just wanted to “win” and get the best ending, but seeing how the story changed with those decisions. Even my pet peeve of “clap for Tinkerbell” — in the stage versions, at least — increases the immersion for the young audience it’s meant for.
If you’re thinking about your work in progress, TTRPG campaign, or what you’ll write in the future, there is a fairly easy solution. You know what decision you want the characters to make. You know where the next scenario or scene should happen. You know they’ve got to survive this unsurvivable fight somehow.
All you have to do is to rationalize it. And if you can’t rationalize it right away, add small details until you can.
One more actual example from the same episode of Monarch: Legacy of Monsters:
Our protagonists are being pursued by primitive religious zealots at night. It is a poorly lit night, and in some kind of wilderness, so everyone is just fast-walking. The zealots, who are maybe 100-200 meters back, want the protagonist’s camera, but are probably going to kill our protagonists as well. Ah, take the film out of the camera! That way we can keep the film and … leave the camera on the ground which may “buy them some time”. Immediate hard cut to one of the zealots walking carefully and examining the ground…and the camera pans down to show us our protagonists crouched in a small depression only 4 meters away.
Obviously they wanted this tense, life-in-danger scene. Across three different “will they be revealed” moments it both tense and provides a character moment for one of the zealots as well.
But to get to this scene, our protagonists had to wait for the zealots to catch up. They had to just…twiddle their thumbs instead of using the time the camera supposedly bought.
It would be easy to fix.
The ditch might be the only place to hide they could get to. One of them could have the classic “twisted ankle”. They argue too long about whether or not to give up the camera. Then they have a reason to be in the situation they’re in.
The same story beats can happen. The same scenes.
It just takes a little more effort and thoughtfulness.
This may seem like a small, unimportant quibble, and to a degree it is. We’re all aware there has to be some degree of scaffolding. There will be small imperfections here and there.
It’s what I said above, though. All those examples above are from a single episode. Even if any of them wasn’t big enough to kick me out of the story completely, having it happen over and over again was just too much.
You want the ways you get the story from one scene to another, or get your characters from one location to another, to at least try to make sense within the fictional universe.
It shows that you care enough about the story to make sure the scaffolding doesn’t show.
(1) Yes, I know there are some times that is acceptable or expected, work with me here.
April 11, 2026
Compensating For (Temporary?) Hearing Loss With Linux

I got an infection in both ears this week.
It was pretty sudden; over the course of twelve hours I went from feeling a little under-the-weather to sitting in a retail chain’s clinic with both eardrums having at least a small rupture and serous (like from a blister) drainage from each of them (1), occasional dizziness, and a prescription for antibiotics.
I spent the next 36 hours pretty much in bed, and I’m still recovering as I write this. While I don’t feel as unwell as I did a few days ago, I’m still very aware that my hearing has taken a (hopefully temporary) hit.
This isn’t the first time I’ve had an eardrum blow from an infection; the prior time was just before the pandemic, but I’m still a little freaked out about the (again, hopefully temporary) loss of hearing in both ears. My hearing isn’t the best to begin with, and once you add in sensory processing issues, it was already a bit of a problem at times.
It’s not the watery “muffled” effect so often used to illustrate hearing loss; it’s mostly just like someone turned the volume knob down. But how bad is it, really? (If, fingers crossed, temporarily.)
I have a good set of over-ear headphones, so I slapped those on and headed to this open-source online hearing test with its handy-dandy online demo. (An offline tool that provides similar functionality for linux is here: https://gitlab.com/kreezxil/Linux-hearing-screen-toolkit .)
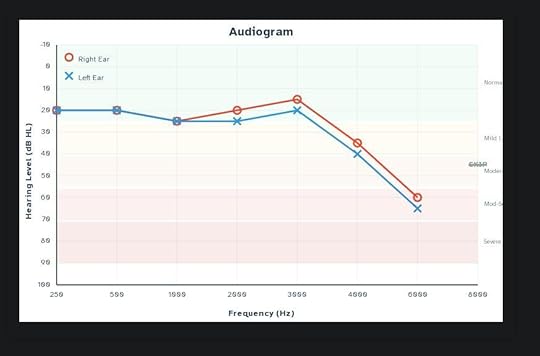
A short while later, I had this terrifying chart and a downloadable CSV file showing how badly the upper bounds of my hearing are degraded. I couldn’t hear the 8000 Hz tone at all, even though I could hear the audio channels click on to produce it! Luckily, most of the damage is above where speech typically happens, but that’s still… not great. Especially with a job hunt underway, I kind of need my ears at the moment.
Luckily for me, a lot of that can be funneled through technology — VOIP, video chats, and so on. Which means I have a chance to mess with the audio beforehand.
I used EasyEffects so that it was across my whole system and not just a single application. Using just the equalizer, I got it about right, then verified that I was on the right path (and accepted some suggested tweaks from) an LLM. I ended up with this equalizer setting; the main differences the LLM suggested were starting by turning everything down so I had more room to amplify without clipping and turning the very high frequencies back down to avoid too much hiss.
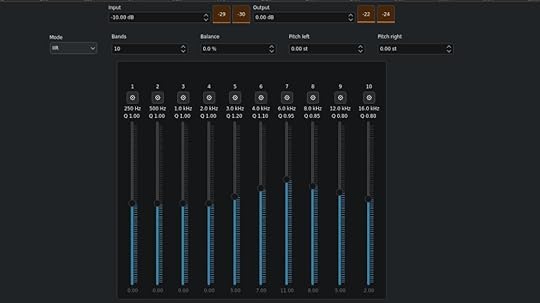
It also suggested adding some tweaks with multiband compression that I quite honestly don’t understand (“applying compression only to the upper bands to mimic hearing aid compression curves”?) but provide a small, but audible difference in quality for me.
Regardless, even without the LLM-suggested tweaks, having a system-wide user interface like EasyEffects made it pretty easy to adjust things so that everything sounds quite a bit clearer than it did before. I understand there’s even a way to build this directly into PipeWire without the nice user interface which will reduce latency, but since this will (hopefully!) not be quite so bad in a week or two, I’m not going to make any permanent changes yet.
But with hearing loss being a major risk factor for developing dementia, once my hearing has stabilized and I either have a new position with medical coverage (or Medicaid re-approves me), I’ll be able to take this data to a real professional and see how else I can cyborg my hearing back into better functionality.
(1) Any benefit from turning down the auditory stimulation is THOROUGHLY offset by the utterly squicky sensation of fluid dribbling slowly from both ears… shudder
Featured Image by Viva la vida!!! Rosa Matilde Peppi from Pixabay
March 30, 2026
You Posted It Publicly, So Who…Or What…Gets to Read It?
 There is an important distinction between objecting to your content being used to train an AI/LLM, and for one to process your content. Blurring that distinction does nobody any favors.
What rights do you have to your posts on social media?
I started thinking about this due to a reaction some users on Mastodon had to a tool designed to summarize a user’s own home feed so you didn’t have to doomscroll to catch up.
The objections were specificially about how the summarizing was being done — by an LLM.
![Screenshot of 3 posts: Laurie Voss @seldo https://zeitgeist.blue is a multi-social-network app that summarizes your feed for the last 24 hours to let you catch up with doomscrolling. Now with support for Mastodon! [Embedded link to: zeitgeist.blue Zeitgeist Summarize your Bluesky, Twitter, or Mastodon feed] Jan Lehnardt @janl@narrativ.es @seldo how can I make sure my posts are never used by this app to be sent to an LLM vendor? Laurie Voss @seldo@alpaca.gold @janl You would need to block me from following you, I suppose.](https://i.gr-assets.com/images/S/compressed.photo.goodreads.com/hostedimages/1774955384i/37669533.jpg)
I’ve been thinking about this a lot since then.
Not about the tool itself, or whether or not it’s worthwhile. But the objections.
Because the only way Jan (or anyone else) can actually prevent that is by not posting publicly.
Before I go any further: I think there’s an important difference between “my publicly posted content cannot be used to train an LLM” and “my publicly posted content cannot be see or used by certain classes of programs, people or entities.”
First, the technical aspect: Even if those who object block Voss, that won’t achieve the goal if you have any public posts. That just means that when Voss uses the tool it won’t include those posts. But if someone else does, your public posts will be included.
That’s because they’re… well, public. Public posts (or public web pages) have to get sent to the receiving computer to be displayed. We’re running up against the same problem that DRM — digital rights management — has: In order to show the content, you have to send the content to the person getting it.
Because viewing digital content inherently means copying it, we have to briefly consider copyright for simply viewing a post. (I am not a copyright lawyer, this isn’t legal advice, I’m just a mostly-knowledgeable layperson, and I’m discussing from a US perspective.)
You automatically have copyright on anything you’ve written in the US; technically you are providing a license to display your content to the social media site. But what rights do others have in regard to what you wrote?
The closest real-world analogy we have is of public photography; if you’re in a public space and do not have a reasonable expectation of privacy, then taking a photo of what you see is a reasonable expectation. Posting publicly on a social media feed is our digital equivalent to being seen in public. Taking a photograph is equivalent to displaying the post on the end user’s system. Add to that the ToS and express “right to display” that’s included, and that part is handled.
At that point, the copyright test depends entirely on the output. While your social media posts are copyrighted, that means that someone cannot replicate it. Arguably, my screencapture of the toots above would fall under this rule (although fair use clearly applies here). While a copyright holder does have the right to prepare derivative works, unless you’re discussing a summary of just your social media posts (rather than an aggregate of a timeline), that’d be a hard thing to prove.
It’s worth noting that this tool we’re talking about is utilizing other providers on the back end — either Anthropic or Copilot. So the data is being sent to them; whether or not they are using that data to train the LLM on is subject to whatever their ToS is.
That’s an important distinction — most copyright claims against LLMs is because they are substantially reproducing the style or content of the works it was trained on. That’s why I think giving the rights to use your content to train an LLM should always be opt-in only.
In contrast, the summaries this tool produces look like this:
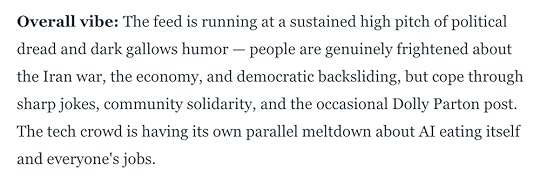
This looks nothing like a timeline feed, isn’t reproducing anyone’s original content or style, and is clearly transformative. (Although whether or not you should trust a summary by an LLM is a completely separate issue!)
Whatever rules we apply to this tool, we also have to apply to a tool that, say, creates alt text for images that do not have them… even if that tool is a human.
Those copyright tests have nothing to do with whether it is a human, program, or LLM creating that output.
So the actual objection (and demand) is not actually that there’s a summary of a social media feed. The objection is about an LLM doing it.
It’s the functional equivalent of “you can only read this post on Firefox, you’re not allowed to read it on Chrome.”
And that is entirely too close to the “shrink-wrap EULAs” for my comfort.
You know the type: “By receiving this email you agree to” and the like. Sort of like the anti-EULA that you’re now subject to because there’s a link to it in this post. They’re all bullshit, and particularly in cases like this, where it’s just one parties’ unwritten social expectation. I cannot say, for example, “all employees of this company cannot read or discuss my posts”in the posts and seriously expect that to hold water. (I’m sure you can imagine much more distasteful examples.)
Again, I think there’s an important difference between “train an LLM on my content” and “my publicly posted content cannot be see or used by certain classes of people or entities.” The first explicitly prepares the LLM to make derivative content. The second is functionally equivalent to viewing a post on your RSS reader, browser, or client.
There are real, valid concerns about AI/ML. Freaking out over an AI simply reading your public posts distracts from those real concerns.
Featured Image by Gerd Altmann from Pixabay
March 26, 2026
Watching Broadcast TV On Linux

Watching over the air television in linux keeps getting easier. (1)
I had a USB tv tuner that I wanted to see if I could get to work with my laptop, particularly with the storms coming through. I figure that even if the power and internet were to go out, I could still watch weather updates from broadcast TV.
The last time I tried was several years ago, and it was a bit of a pain or required installing a whole framework, all of which was far more work and complexity that I wanted to deal with for something I’d use fairly rarely.
Well, it’s easier now. Starting with this guide, it’s even easier since w-scan is now packaged in Debian, and you can just use VLC. NOTE: The package name is w-scan but the program name is w_scan.
sudo apt install w-scan vlcthen from the commandline:
w_scan -ft -A3 -c US -L > ../vlcchans.xspfThat will take a while; in my region it took about ten minutes.
After that, it’s as simple as
vlc ../vlcchans.xspfIt’ll automatically start playing the first entry; to get back to the channel list, stop the playing channel.
(1) Though after watching some broadcast TV, I’m reminded why this was such a low priority for me.
March 25, 2026
Google Patented A System To Let AI Change Your Page From Search Results.

TL;DR: Google patented a system that will silently swap out your page for an AI generated one if they want to. It is time to stop using Google search.
There are quite a few people who have been annoyed at Google’s AI summaries and promoted search results. To those people: You made the right choice.
If you’re still relying on tricks like adding a bit to the end of your search or an extension, this news from Forbes indicates that soon won’t be enough. (1)
A patent granted to Google on January 27, 2026 titled “AI-generated content page tailored to a specific user” describes a system that evaluates your company’s landing page in real time and, if it decides the page won’t perform well enough for a specific user, replaces it with an AI-generated version assembled on the fly. The user never sees what your team built, they see what Google’s machine learning model thinks they should see instead.
The system described is not just a summary on the search. The article says this system will invisibly change what the user sees instead of your site, changing what is presented in your browser.
That alternative page isn’t a cached copy of your site. It’s a dynamically assembled page built from the user’s current query, their search history, their account context, and whatever Google can extract from your original page. The patent describes possible elements including personalized headlines, suggested product filters, a product feed, sitelinks to product detail pages, and even an embedded AI chatbot. In other words, a complete brand experience built by Google. Not you.
This is terrifying. Even if you use a different search engine, Google is the “default” for so many people that it’s practically a common noun. This is a degree of change and control over what others see that nobody should have.
And you can stop it.
How?
Stop. Using. Google.If you don’t like those AI summaries and don’t want it to get worse, you have to vote with your (virtual) feet. That’s it. Change the default search engine, everywhere you can, and stop using products that won’t.
This is something you can do that has real results, as we can see with Microsoft’s floundering from shoving Copilot into everything and users, en-masse, simply not using it. The company is changing what they are doing as a result.
The same has to happen here.
I personally use — and recommend — Kagi for search. It’s a paid service, but their argument for why it’s worth being paying for makes a lot of sense to me, and I’m very happy with the results. DuckDuckGo is frequently mentioned, as is Brave, but there are loads of search engines that respect your privacy, and if you want, you can use (or even self-host) SearXNG.
(1) The viewpoint from the Forbes article presumes this is a bygone conclusion, and focuses on how businesses can cooperate with this, and make the web less friendly for humans and more useful for AI.
If there’s one insight we all need to focus on most, it’s this: your job is no longer to build a destination. It’s to build a parts library. And one that’s well documented so that when an AI agent re-assembles those parts for the human on the other side, the parts are put together in a way you wish to be represented.
As a technical matter, this is simply bullshit. Delivering different content depending on the capabilities of the viewer has been around since MIME/Multipart email was first developed last century. Delivering sitemaps and mobile-optimized pages is a matter of course, and has been for years.
March 12, 2026
Getting Streaming Audio, Connecting Your Soundboard, Recording Audio, And Chatbot In Jitsi Meet – All In Just A Browser Window

One of the biggest gaps when moving away from Discord — at least for me and my group — are some of the specific bots and services that can be used with our group calls.
I do NOT mean AI-powered chatbots. These are utility programs.
Specifically, there’s four things that we tend to use:
A text chat bot for die rolling and simple remindersAudio streaming from an MP3 or OGG streaming stationUsing a local soundboard (the quite excellent Kenku-FM)Audio recording (we’ve been using Craig, which is currently Discord-specific)With the exception of recording, there are not official ways to do this, and I was concerned that the processing demands of the official recording solution (Jibri) would exceed the hardware for the decade-old laptop I’m building all of this on.
I did find some scripts that had limited functionality, required adding a browser extension, or hadn’t gotten updates since before the pandemic, but found them not meeting the needs of this project in some fashion.
Using those as a base or inspiration, and with a non-trivial amount of help from an LLM (1), I developed and tested a solution for all of the above that works in your browser, without installing anything (2), and without being a huge change to your workflow (3).
ASIDE: A big caveat is that any of the audio functions effectively require you to use a self-hosted Jitsi Meet server due to the way that the public instance does shard load balancing. (4)
The quickstart? Go to the GitHub pages page for the project in a new tab https://uriel1998.github.io/jitsi-bot/. It will load all four bots into iFrames in that tab, where you can toggle them independently. Put your conference URL into the appropriate field, and click “Toggle Bot”. It’ll reload in that frame and connect; the field will change colors once it’s connected. You can also see a log if you scroll down inside the iFrame.
Don’t like the iFrame? Then load the bot you want separately:
https://uriel1998.github.io/jitsi-bot/streaming/streaming.html
https://uriel1998.github.io/jitsi-bot/soundboard/soundboard.html
https://uriel1998.github.io/jitsi-bot/chatbot/chatbot.html
https://uriel1998.github.io/jitsi-bot/recording/recording.html
The chatbot has quite a few commands; try !command to start. It includes a die roller, card shuffler and drawer, text tarot card draw, and being able to respond with text files. You can put your own text in (if you run the bots locally) to meet your needs.
The soundboard bot will accept any audio through the virtual microphone, so if you’d rather play your local music player through there instead of the streaming version, go for it!
The recording bot will record audio tracks per-speaker and as a single combined whole. It will save the audio in chunks as .webm files every few minutes, so when prompted, tell your browser to save that filetype automatically.
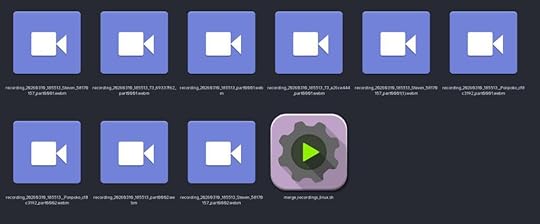 For example, you can see the various “parts” here in this screenshot, as well as the script that will combine them all automatically.
That is both to allow the script to run in a smaller memory space and to protect against data loss if something crashes. There’s a merge_recordings script in the repository for Linux, Windows, and Macs to automatically stitch them together with ffmpeg and clean it all up.
You can see the rest of these guides for moving away from Discord to NextCloud and Jitsi Meet on previous posts on my blog.
Featured Image by Alexandra_Koch from Pixabay
(1) Because I know this is contentious for some folx: I know enough to follow the structure, but I don’t know the specific syntax and commands to achieve specific goals. I also am not claiming any authorship or copyright on these scripts; any restrictions on their use is based off of the license of the code that was used for a base/inspiration. While functional, they are intended to be proof-of-concept. The idea is to maximize the public good against the use of the LLM to assist me in developing these.
(2) Okay, technically you need a virtual microphone for the soundboard bot and ffmpeg for merging recordings for the recording bot. Get a free virtual microphone without having to use OBS: Windows,Linux,Macs. Get ffmpeg : FFmpeg download page (Windows builds), FFmpeg download page (Linux packages), Homebrew ffmpeg formula
(3) I have touched base or put in issues with the dev team for both Craig and Kenku. Craig’s development team pointed me (ironically) to their Discord; I’ve not seen a response from Owlbear Studio. However, see #1 above; PLEASE use this proof of concept to do something better.
(4) If there’s a way around it without running a headless browser as a client, I cannot figure it out. If the Craig dev team, Owlbear, or any other coder want to focus on a value-add beyond these, PLEASE use this proof of concept to do something better.
March 11, 2026
How To Self-Host Jitsi Meet For Audio (or Video) Calls

If you just want to have video chat (and optionally a text chatbot helper), then using the public instance of Jitsi is easy to set up and has plenty of features. The big advantages of using the public instance of Jitsi are that it’s EXTREMELY simple, allows telephone call-ins, and that you don’t have to worry about total upstream bandwidth.
The downside is that because of the way the public instance does load balancing, that these simpler bots may (and probably will not) work on the public instance. On a public instance, adding in a separate audio stream for music or a soundboard or recording streams requires (effectively) running a whole other headless browser session for each stream.
It’s possible to use virtual microphones (or OBS) to mix in a soundboard or music stream on top of an existing speaker’s audio stream. However, OBS is not a lightweight application, and dumping extra audio into an existing speaker’s audio means that others cannot independently adjust it, problems with sound “ducking” from noise cancellation, and more.
My use case — audio-only calls and recordings for preservation and to use when writing recaps — happens to work well within the resource limits that I (and probably you) have. And because Jitsi Meet itself is just a forwarder, I can run it on the laptop already running NextCloud. Not only does this give us more control over everything, but it allows the usage of those lighter javascript bots.
Estimated time: Approximately 30-45 minutes, mostly cut-and-paste into configuration files. More if you need to install and configure a reverse proxy before beginning.
Before You BeginTake a look at my bandwidth comparisons/estimates for audio and video egress for Jitsi and make sure your upload speed can handle the demands. This is the single most important consideration… unless you add on other optional services. Because of my bandwidth and how my group works, I’m restricting it to audio-only. If you want the default video options, I’ll tell you what NOT to change below as well.
Getting StartedGet A Separate SubdomainThe other big consideration is that you will need to be able to route traffic to the right place. You will need to obtain a separate subdomain name — the same process as you used for getting a DNS name from the NextCloud guide will work perfectly — regardless of which solution applies to you below.
I am going to presume for this that you already have a reverse proxy set up, but I will also show how to configure things if you do not use or want one.
Here’s an explainer about what a reverse proxy is, and a quickstart for nginx and caddy.
If you already have a reverse proxyIf you have a reverse proxy already in place, this is relatively trivial and I’m assuming you know how to add a forwarder to whatever you’re using. An example nginx config is available. Continue to “Setting up Jitsi Meet” below.
I don’t have a reverse proxy, and I now want one.This is medium-difficulty, but is the cleanest and best way.
You’ll need to switch some things about your NextCloud AIO setup. From the Administration settings inside NextCloud, first click Open Nextcloud AIO Interface and then Stop Containers. Let that finish.
Open a terminal where your docker-compose.yaml file lives. If following my guide: cd $HOME/apps/nextcloud. Now stop and purge the mastercontainer (which will NOT delete your data):
sudo docker stop nextcloud-aio-mastercontainer sudo docker rm nextcloud-aio-mastercontainerIn your docker-compose.yaml file, open your editor and add these under environment::
APACHE_PORT: 11000 APACHE_IP_BINDING: 0.0.0.0 APACHE_ADDITIONAL_NETWORK: ""You can also optionally remove ONLY the entire lines under ports: that begin with:
- 80:80- 8443:8443Close your editor, and bring everything back up: sudo docker compose up -d
While all the containers spin back up, take that time to set up your reverse proxy to point at port 11000 for NextCloud. I personally use nginx, and there is an example config in my guide ready to have Let’s Encrypt run on it, as well as the example nginx config for Jitsi Meet here.
Continue to “Setting up Jitsi Meet” below.
I don’t have a reverse proxy, and I don’t want one.This is the quick-and-dirty-but-it-is-running-NOW solution.
If you do not have a reverse proxy and do not want a reverse proxy, that can work by specifying a port for Jitsi to use. We are going to assume 8444 here. Separate guides may suggest using 8443, but that is already being used by NextCloud AIO. You will still need that separate subdomain.
Continue to “Setting up Jitsi Meet” below.
Setting Up Jitsi Meet With DockerBecause we already have Docker set up and running from setting up NextCloud, the official instructions work pretty much out of the box, although we’re going to tweak them and the order we do them in for clarity.
Back to the terminal! We are going to change to our user’s apps directory, create required directories, and download the program files for Jitsi Meet:
cd $HOME/appswget $(wget -q -O - https://api.github.com/repos/jitsi/do... | grep zip | cut -d\" -f4) -O latest_jitsi_meet.zipunzip latest_jitsi_meet.ziprm latest_jitsi_meet.zipls -d /*The last shows you what directories exist here; there should be your nextcloud directory and one that begins with jitsi-docker-jitsi-meet, for example jitsi-docker-jitsi-meet-35879bb. Move into that directory: cd jitsi-docker-jitsi-meet-35879bb
We’ll create some mandatory directories:
mkdir -p ~/.jitsi-meet-cfg/{web,transcripts,prosody/config,prosody/prosody-plugins-custom,jicofo,jvb,jigasi,jibri}We will also copy the example configuration: cp env.example .env
And then we will let a helper script generate some strong internal passwords for the .env file: ./gen-passwords.sh
Editing Jitsi Meet’s ConfigurationUse your editor of choice to open .env. These are the entries to change, and why:
If using a reverse proxy# If you are using a reverse proxy, alter these lines:# We are going to use 8444 so the port forward instructions# are the sameHTTP_PORT=8444# Comment out this line with a hash mark like so:# HTTPS_PORT=8443# Your PUBLIC_URL line should NOT have the specified port# at the end, like so:PUBLIC_URL=https://meet.example.com# Turn off Let's Encrypt certificate generation, HTTPs, etc. That is all handled# by the proxy.ENABLE_LETSENCRYPT=0DISABLE_HTTPS=1ENABLE_HTTP_REDIRECT=0Continue to “Everybody Change these”
If NOT using a reverse proxy# If you are NOT using a reverse proxy, # put a hash sign in front of the HTTP_PORT line.# If Jitsi complains that it is commented out, # change it to something random you # are not going to use. # HTTP_PORT=8000# Change HTTPS_PORT 8444HTTPS_PORT=8444# For the PUBLIC_URL line, # put your domain, but also make sure # it has the ${HTTPS_PORT} at the end.PUBLIC_URL=https://meet.example.com:${HTTPS_PORT}# Change these lines to enable Let's Encrypt, have HTTPS working, and ENABLE_LETSENCRYPT=1DISABLE_HTTPS=0ENABLE_HTTP_REDIRECT=0Continue to “Everybody Change these”
Everybody change theseIMPORTANT : If your public IP address changes, for example, if your modem resets, you will need to change the public IP address in this file manually, then bring the containers down and rebuild them.
docker compose down && docker compose up -d --force-rebuild
We are going to fill in our public and LAN IP settings:
# Media IP addresses and ports to advertise by the JVB# This setting deprecates DOCKER_HOST_ADDRESS, and supports a comma separated list of IPs# PUT BOTH YOUR PUBLIC AND LAN IP ADDRESS HERE.# JVB_ADVERTISE_IPS=74.111.11.111,192.168.1.5,JVB_ADVERTISE_IPS=We will use the TURN server from NextCloud AIO. The TURN_HOST is the domain of your NextCloud AIO instance, you get the TURN_CREDENTIALS from the Turn Server Secret in NextCloud Talk’s settings.
# Enable TurnTURN_HOST=example.comTURN_PORT=3478TURN_TRANSPORT=udp,tcpTURN_CREDENTIALS=biglongstringofstuffJitsi is set up to be open by default. Which I don’t have a problem with, except for that whole bandwidth thing… so we’re going to require authorization to create a room, but anybody can join an existing room as long as there’s an authorized user already in it.
# Enable authentication ENABLE_AUTH=1# Enable guest access ENABLE_GUESTS=1# Select authentication type: internal, jwt, ldap or matrixAUTH_TYPE=internalThese are some changes to hide video user interface elements, since we are only doing voice calls. If that is not your use case, save the configuration file and skip to “Port Forwards.”
TOOLBAR_BUTTONS=microphone,hangup,chat,participants-pane,invite,profileHIDE_PREMEETING_BUTTONS=camera,select-background,inviteENABLE_LOBBY=0ENABLE_PREJOIN_PAGE=1ENABLE_WELCOME_PAGE=1Save the configuration file.
We’re going to also define those same restrictions elsewhere for redundancy. I also put in a resolution restriction of 320px just in case someone still turned on their camera so it won’t immediately clobber the bandwidth. Create and edit the file ${HOME}/.jitsi-meet-cfg/web/custom-config.js and put this in it:
config.startAudioOnly = true; config.startWithVideoMuted = true;config.resolution = 320;config.toolbarButtons = [ 'microphone', 'camera', 'chat', 'invite', // invite button explicitly enabled 'profile', 'participants-pane', 'hangup'];Save that file as well.
Port ForwardsThis is going to be radically different depending on the make, model, and software your modem/router is using. Here’s an existing guide which covers many varieties.
You will need to forward port 10000/udp to the computer you’re installing Jitsi Meet on, regardless if you are using a reverse proxy. If you are using a reverse proxy, it will handle everything else.
If you are not using a reverse proxy, additionally forward port 8444 tcp/udp (or whatever port if you chose something different above).
Bring It Up And Secure ItChange back to the directory where your docker-compose.yml file is, and type docker compose pull && docker compose up -d && docker compose logs -f to let you see the logs. It should reach a steady state without errors; once it has, press Ctrl-C to get out of the logs.
I only created myself as an authorized user; you only need to have the people who are creating or moderating rooms to be authorized.
IMPORTANT: TheDesiredUsername should be JUST a username; for example, bob instead of bo*@*****le.com
The commands below will enter the loaded Docker container, create TheDesiredUsername with password TheDesiredPassword, then show you a list of all registered users, then exit. Do NOT change meet.jitsi in the block below.
docker compose exec prosody /bin/bashprosodyctl --config /config/prosody.cfg.lua register TheDesiredUsername meet.jitsi TheDesiredPasswordfind /config/data/meet%2ejitsi/accounts -type f -exec basename {} .dat \;exitYou’re done! If you’re using a reverse proxy, you should see the Jitsi welcome screen if you go to just the URL. If you chose to not use a reverse proxy, you will always need to put the port at the end: https://meet.example.com:8444
You probably noticed that there are quite a few other features that you can enable here: a recording component, a transcribing component, a whiteboard, collaborative documents, and so on. I have not enabled them because we have them handled through NextCloud already or they put a non-trivial load on the system. Recording and transcription, especially if you are using video, will require much beefier hardware than the decade-old laptop everything else is running on.
Next I’ll do a full overview of the bots — including how to get per-speaker split recording — with your self-hosted Jitsi instance.
Featured Image by Alexandra_Koch from Pixabay
March 6, 2026
How To Backfill Text Channels From Discord To NextCloud
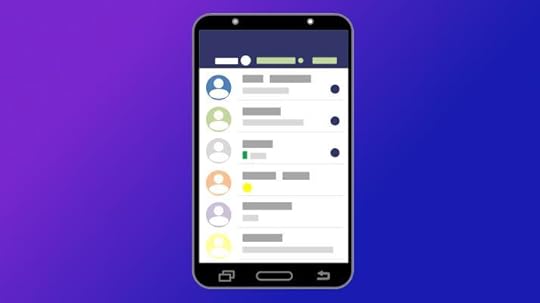
Text channels are still deeply important, and a major consideration when moving from Discord to another platform. Two major concerns are synchronizing the messages while you’re transitioning and exporting old messages from Discord and importing them into your new system (called “backfilling”).
It’s more than possible to achieve both easily with Discord, NextCloud Talk, and the help of a cross platform program called Matterbridge.
IMPORTANT: There is another program out there which is also called Matterbridge that works with some kind of home automation. You want the one at https://github.com/42wim/matterbridge
Matterbridge is a very versatile program that “bridges” chatroom messages from one service to another. It can do this for a lot of chat services, so just like NextCloud, there’s a lot of documentation, but it’s not always clear how it all fits together.
That’s why this exists.
How long this will take depends on how many channels you are bridging, and how many messages you’re backfilling; I would estimate somewhere between 30-60 minutes with this guide. Further, once you’ve set this up once, it keeps working and allows you to do some additional cool stuff.
Like my other guides on moving from Discord to NextCloud, it may seem like a lot, but I’ve done my best at making them all work as a “step-by-step HOWTO”.
IMPORTANT: You may be wondering why I didn’t use the Matterbridge integration from NextCloud. That’s because it immediately caused my instance to crash, so we’ll do it the (slightly) harder way.
You’ll need:
Old Discord ServerNextCloud server with Talk installedPython (a programming language for the importing of old messages)Create The Bot AccountsBoth Matterbridge and Python are crossplatform, but some of the specific commands may be slightly different on Windows or macOS. While there is plenty of documentation out there to cover various cases, the whole point of these guides are to get you up and running simply and quickly, so I am making the assumption that you followed my guide (or close enough to it), in which case you’re already ready, or that you have a linux host available for you to use.
In NextCloud, click the circle in the top right and choose “Accounts”. Create a brand new account, and copy down its username and password in your password manager. Optionally, log in as the bot account to set its user icon and description to clearly note that it is a bot.

Setting up the Discord side is a little more difficult, but Matterbridge already has a really good step-by-step instruction for this part. DO enable webhooks. Copy the bot’s token (the very last step) to your password manager or notes; we’ll come back to it in a bit. Make sure this bot can access all the text channels you want it to.
Prepare The Text ChannelsIn NextCloud Talk, make a new and empty Talk channel for every text channel you wish to bridge and backfill from Discord. This is both so that it doesn’t flood Discord with old messages and so that ongoing discussions in that channel are not pushed back by our backfill from Discord. It does not have to be the same name, but it will make your life easier. Be sure to give the bot account access to every channel you want it to bridge, or you will get errors later.
For each channel you wish to bridge:
Open the room and copy the end of the URL. This is the “token” for the channel. For example, it’s “thisparthere” for https://mycloud.example.com/call/this... to Discord, right click on the channel, and copy the Channel ID at the bottom.I ended up writing it down like this, the important part is copying it.
#general,12345678910,abcdefg#gaming-memes,2345678910,bcdefgaDownload Matterbridge And Create The ConfigurationOpen a terminal window on your NextCloud machine (or other linux host) and create a directory for Matterbridge to live in: mkdir -p $HOME/apps/matterbridge && cd $HOME/apps/matterbridgeDownload Matterbridge into that directory. The most recent releases live on GitHub, but as it’s been three years since one, you can (currently) just do this: wget https://github.com/42wim/matterbridge... you are NOT following my guide, select the correct release on GitHub for this step.Download my example configuration and make a copy with these commands (paste on one line):wget https://gist.github.com/uriel1998/f5c... && cp ./matterbridge.example.toml ./matterbridge.tomlYou’ll now need to edit this file. You can either use an editor in the terminal, or simply type xdg-open ./matterbridge.toml which should open the file in a graphical editor.Here’s what you need to edit:Under [discord.mydiscord] add the Discord server and bot tokenUnder [nctalk.cloud] put your server’s URL, as well as the NextCloud bot account’s username and passwordSkip down to the first [[gateway]] section. Each channel that you are bridging has its own gateway section. Each of these sections starts with the line [[gateway]]For each [[gateway]] section, put the name you want to call that gateway, fill in the Talk channel token, and the Discord channel ID. There are two examples already in there, just keep repeating [[gateway]] sections for each channel you want to bridge.Save the file.Test And Set It To Automatically RunIn the terminal, type matterbridge-1.26.0-linux-64bit. This is where you find out that you made typos and can check that it has access to everything. If there are no errors, type Ctrl-C to stop it.To get it to start automatically.If you are NOT using my guide, you might want to look at the official instructionsDownload my example configuration file from here by typing in the terminal (on one line):
wget https://gist.githubusercontent.com/ur... this file just as you did the example earlier. The only thing you need to change is to put your linux username where it says USERNAME (twice), and save the file.If you put matterbridge somewhere else, change the whole path name to point to the right location.Type sudo cp ./matterbridge.service /etc/systemd/system/matterbridge.serviceYou’ll need to put in your password for sudo commands; that’s administrator accessType sudo systemctl enable --now matterbridge.serviceThis will not only add it to start when the computer boots, but it’ll start right now as well.Import (Backfill) Old Messages From Discord
As I mentioned above, Matterbridge will automatically backfill from NextCloud to Discord, which is the opposite of what we want. But since we’ve already configured Matterbridge with all the information we need, we can use a python script I put together to pull old messages out of Discord.
Still in the terminal, type cd ~/apps to get to the main apps directory.Download and unzip the program, get rid of the zip file, and change to the right directory: wget https://github.com/uriel1998/discord_... && unzip ./master.zip && rm ./master.zip && cd discord_talk_backfillCopy your Matterbridge configuration into this directory: cp ../matterbridge/matterbridge.toml ./matterbridge.tomlCheck the script and have it auto-configure by typing python3 ./discord_talk_backfill.py --help. You should see something like the help block below.IMPORTANT: The script does not check if it has already imported a message. If you run it more than once, you’ll get duplicates. Use --dry run to test it first!
usage: discord_to_talk_backfill.py [-h] [--list-functions] [--dryrun] [--maxmessages MAXMESSAGES] [--daysback DAYSBACK]Backfill Discord messages to Nextcloud Talk using matterbridge mappings.options: -h, --help show this help message and exit --list-functions List script utilities and exit. --dryrun Print transformed payloads without posting to Nextcloud Talk. --maxmessages MAXMESSAGES Maximum number of most-recent messages to read per Discord channel. --daysback DAYSBACK Exclude messages older than this many days.Type python3 ./discord_talk_backfill.py --dryrun and make sure there are no errors and that you have channel pairs set up correctly.Type python3 ./discord_talk_backfill.py. For most use cases, you will not need to use any options.Watch the messages appear in your Talk channel. It will post 25 at a time, so it may take a little while.The script adds to the messages to indicate that they’re backfilled.IMPORTANT: When the script runs, it is going to do a bunch of things. It’s creating its own workspace (venv) to do things in and downloading the things it needs, but keeping them separate from the rest of your system. If this fails, try sudo apt install python3-venv and retry.
The one “gotcha” is that because of the way that images and attachments are handled in Discord, they may just show up as links in NextCloud in backfilled and bridged messages. The links work, they’re just not inline if they link to something on Discord’s servers.
And you’re done. Your text channels in NextCloud have pretty much the same content as your Discord channels. As your group/team/players transition to using NextCloud, they may post in Discord instead by accident; this means their messages aren’t lost.
Additional Cool StuffAs mentioned, Matterbridge is a very versatile program that can bridge between quite a few chatroom types, including Mattermost, Microsoft Teams, Mumble, Slack, Telegram, WhatsApp, XMPP, Matrix, and even (with some extra work) MINECRAFT.
In order to do that, you configure the service at the top, and then add that to the [[gateway]] section. For example, if I’d configured a XMPP (Jabber) at the top as well, and wanted to have the general chat channel show up both in NextCloud and on my Jabber server, I’d add the last three lines:
[[gateway]]name="general"enable=true[[gateway.inout]]account="nctalk.cloud"channel="nextcloud_talk_room_token"[[gateway.inout]]account="discord.mydiscord"channel="ID:123456789012345678"[[gateway.inout]]account="xmpp.myxmpp"channel="general"March 4, 2026
Comparing Jitsi Meet And NextCloud Talk For Replacing Discord’s Calls

I think that NextCloud + Jitsi Meet replicates nearly everything Discord does, but self-hosted and without the privacy and ongoing enshittification. Enough so that I wrote a step-by-step guide on how to do it with a 10-year-old PC, and an add-on about adding a layer of security in only six clicks.
I recommended using Jitsi Meet over NextCloud Talk for audio/video conference rooms, and the lack of bots to handle some functions that are possible in Discord. I’m going to explain why I made that decision, some of the considerations that went into that recommendation, what you need to consider when choosing whether to use the public Jitsi Meet instance or self-hosting it, and what I did to make it all work anyway (as well as the bot situation).
Integration And Security
TL;DR: Use Talk for the equivalent of text channels on Discord, use self-hosted Jitsi (either audio-only or limiting video, depending on your bandwidth) for conference rooms. Proof-of-concept bots now exist (and work) that run in a browser window that, with a virtual microphone, allow audio streaming and recording.
This is the post explaining why I’ve made the decisions I have, so you can see if they work for you. Later this week I’ll detail exactly how to get it set up for yourself and your group (including the bots).
NextCloud Talk is tightly integrated with the rest of NextCloud, which allows you to do all sorts of neat things with it. Embed files, control access by user groups, automatically create meeting rooms with appointments, and more. This is very neat, and I find it really useful with the text chat portion of Talk. Jitsi is designed to be open first, which is not ideal for self-hosted situations. It’s easy to add a lobby or password to an existing room, but neither is the default on the selfhosted setup. While making a room is super simple and easy, the default setup is to allow anybody who can reach the service to fully use it. Luckily for our use case, it’s possible to set up only a few users who are allowed to make rooms while still allowing anyone to join. You want this because of the next issue…
BandwidthI was surprised to find that just videoconferencing’s big demand was not CPU power or RAM; it’s bandwidth.
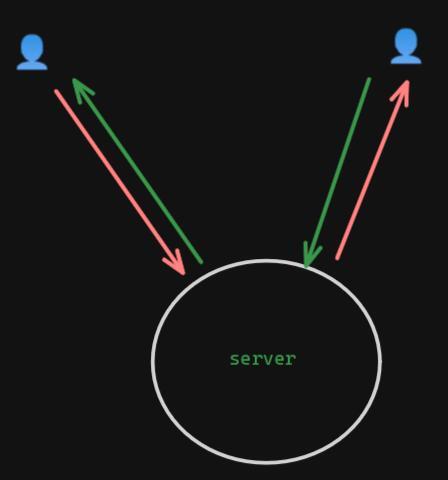
Both NextCloud Talk (with its “high performance backend” enabled) and Jitsi Meet serve as stream forwarders. If you only have two people in the call, it’s pretty straightforward – there’s a stream in and out for each participant. Two streams in, two streams out. (This is a simplification, but gets the point across.)
It’s when you start adding others that it gets problematic. Let’s say you have five people in the call and everyone’s video and mics are disabled. The server only has one stream coming in, but it has four copies of that stream going back out — twice as much as two people chatting.
And that’s with restricting everyone else. If you have two people with incoming streams, it gets even worse: two streams in, eight out. That number starts getting a LOT higher the more people you add to the call.
 1-1
1-1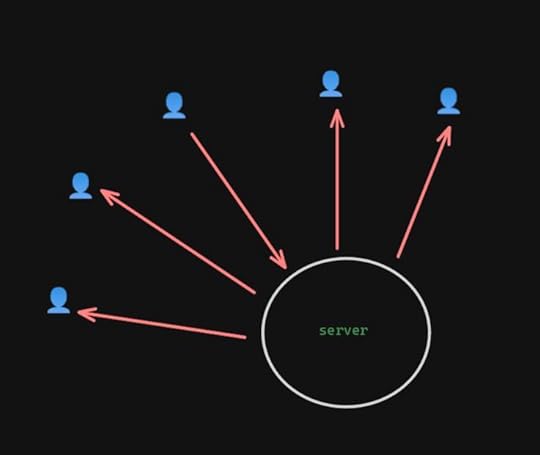 1 person seen
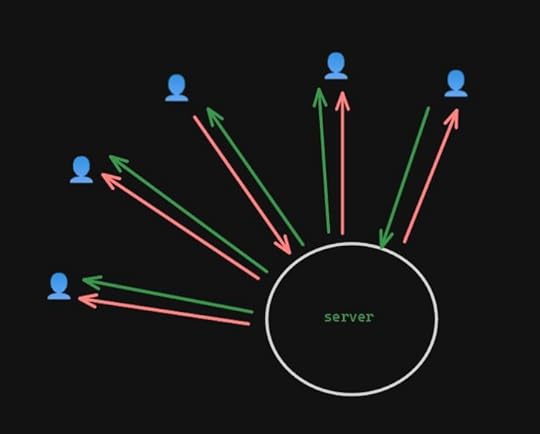 2 people seen
This means that as a practical matter, if you are doing video with your conference calls, you need to have not just good incoming bandwidth, but outgoing as well. Jitsi recommends:
For a friends/small organization server, 1 Gbits/s will often be enough but for a serious server 10 Gbits/s is advisable.
As of June 2024, only 70% of US customers had less than 500Mbps upstream (or half that speed). That is a serious problem if you want to use something selfhosted for more than 1-1 chats, regardless of whether you use Talk or Jitsi.
Jitsi has some ways to minimize the bandwidth by limiting the resolution of the video stream, limiting how many people are visible at any given time, or even turning off video entirely. If NextCloud Talk has similar controls, I’ve not yet found them yet. That’s a big point in Jitsi’s favor for me for group conference calls.
Recording SupportBoth Jitsi Meet and NextCloud Talk have “native” ways to record conferences through adding on other services, through Jibri and Talked, respectively. Both work essentially in the same way: they run another copy of a web browser that connects to the call just like a human would, and uses that to get the audio and video.
This part does take additional CPU and RAM power — to the point that both recommend running the recording service on another system than the one handling the call. If you need video recording (or sophisticated audio recording, like per-channel streams), this is where you’re going to end up looking. The added complexity and hardware demand is more than I’m aiming for with my guide, or that my group needs since we do audio-only calls anyway.
But if you just want basic audio of everyone who is on the call, keep reading.
Bot SupportI was looking for two types of bots: one type that interacted through the text chat, and one type that deals with audio streams, such as mixing in music, sound effects, or recording the audio.
The bot ecosystem around both Talk and Jitsi is pretty sparse. I also discovered some severe limitations on both sides. To access the audio or video for Talk’s conference rooms, it seems like you essentially have to run a headless browser. Once again, that adds complexity and hardware demands that I want to avoid. However, Jitsi’s public instance, because of the way that it handles traffic, means that the audio bots that I found can’t stay connected… and I wasn’t able to find a way around that. They do, however, work just fine when it’s self-hosted.
Making It Work AnywayRather than force either bit of software to do something it doesn’t want, I leaned into the strengths and weaknesses of each. I’m using NextCloud Talk as the equivalent of the text channels on Discord. It’s well suited for that due to its integration with the rest of NextCloud. Also, since we can have bot access to the text channel, existing bots and existing integrations can be upgraded to provide the functions I need, like responding with customizable information or a customizable stickerpicker.
Because just running the conference room is not a big load on the computer itself, I installed it through Docker as well. I only had to create an account for myself, since I’m the only one who should be creating rooms. The configuration limits it to audio calls as well. I thought about limiting the number of video streams forwarded or limiting resolution, both of which Jitsi can do, but even then it would be a lot of bandwidth.
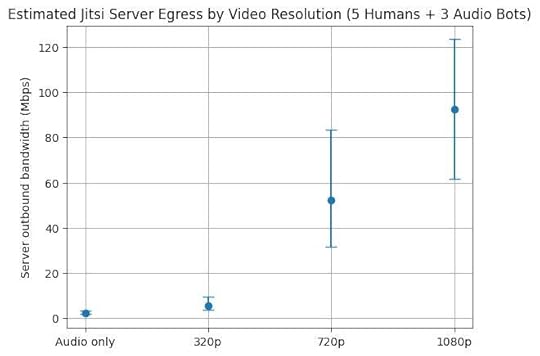
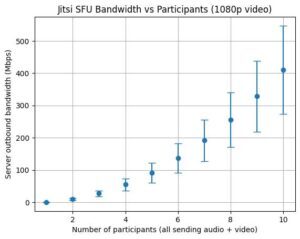
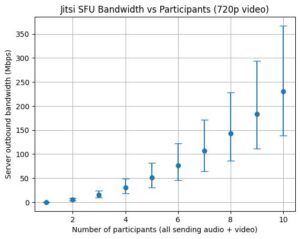
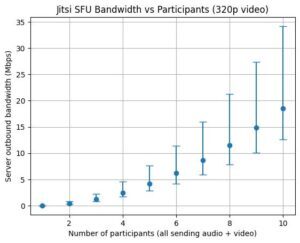
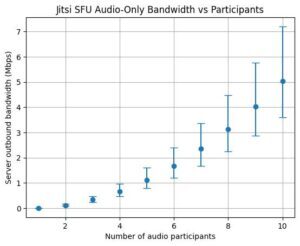
Limiting to audio means that with my table it’s estimated to average around 2.5Mbps upstream, well within my upstream bandwidth. But add 320p video and that more than doubles to an average of 5.5Mbps, and a maximum that exceeds my upstream. 720p resolution or better has even higher bandwidth requirements for the server, even if you’re limiting the number of outbound video streams. (Graphs of estimated upstream bandwidth for audio versus video resolution without any limiting are at the end of the post to give you an idea of what you might need for what you want to do.)
Luckily for me, my table does audio-only already, so that is more than sufficient for us.
By self-hosting the Jitsi server, that also means that I can use the bots I adapted to pipe in a http audio stream, connect a virtual microphone (so I can use Kenku), have the same chatbot functionality as in Talk, and record the audio stream to my local computer in a single extra browser window.
I’ll have a detailed guide later this week, but if this (plus the links in this post) is enough for you, give it a shot!
Featured Image by Alexandra_Koch from Pixabay