
Eric LeFeber's Blog
November 14, 2018
Red Sonja Custom Action Figure Art - Mythic Legions 6" Kitbash / Custom
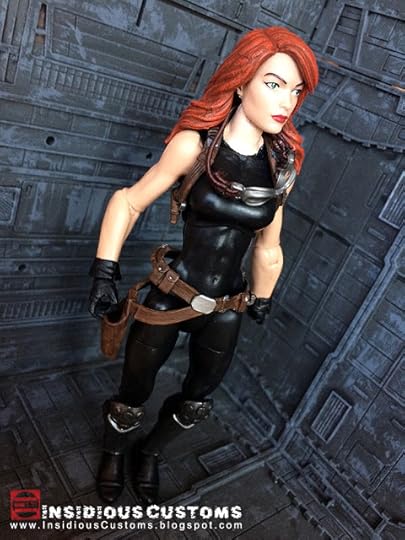
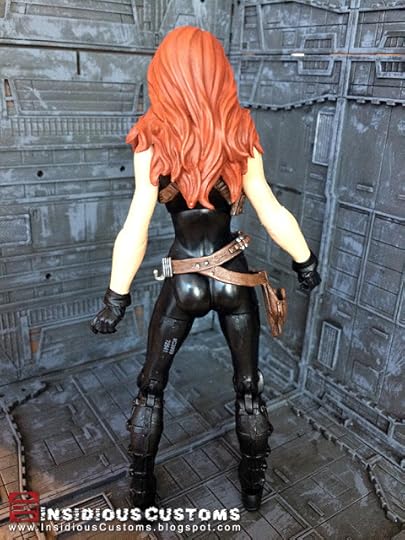
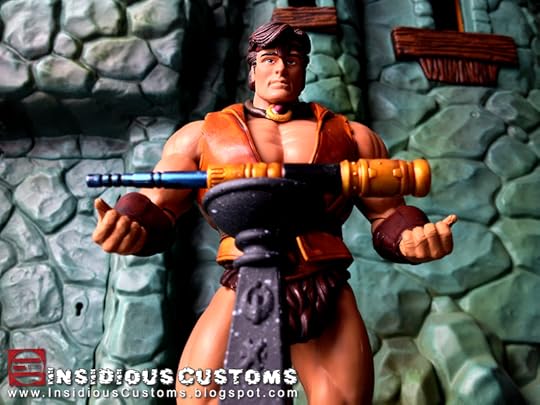
"Know, O Prince, that Red Sonja and her two companions traveled across the Vilayet Sea to the west in search of treasure...and adventure!"
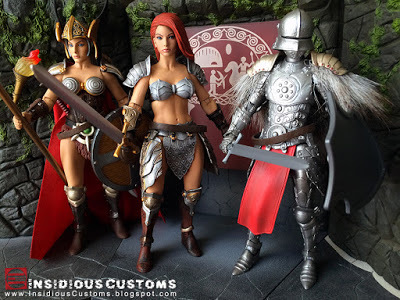
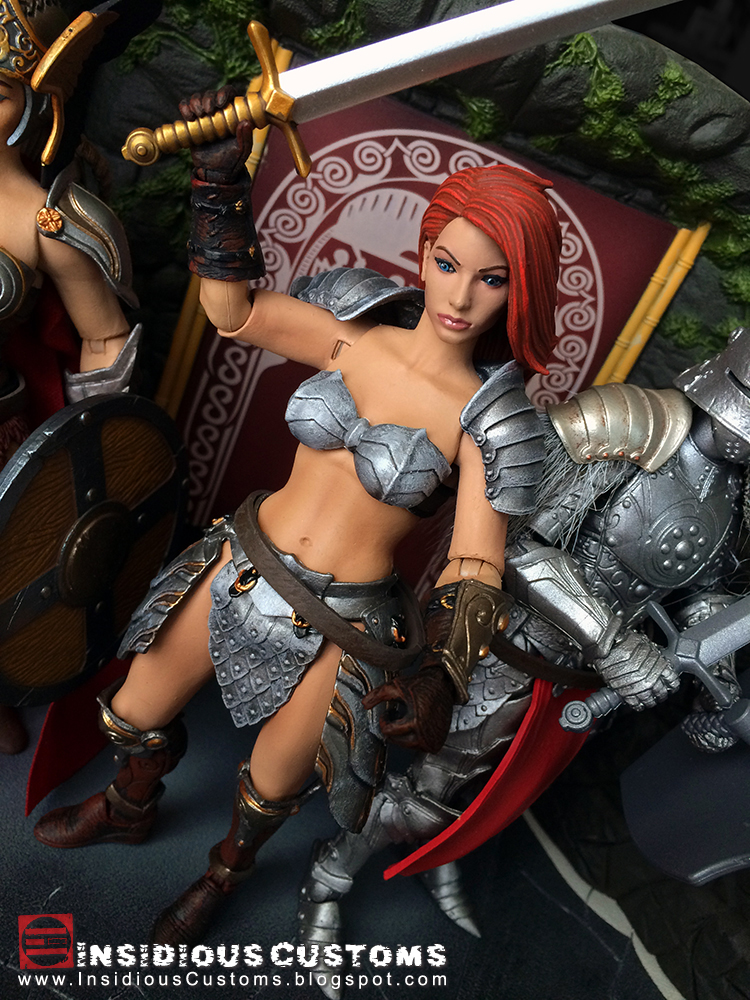
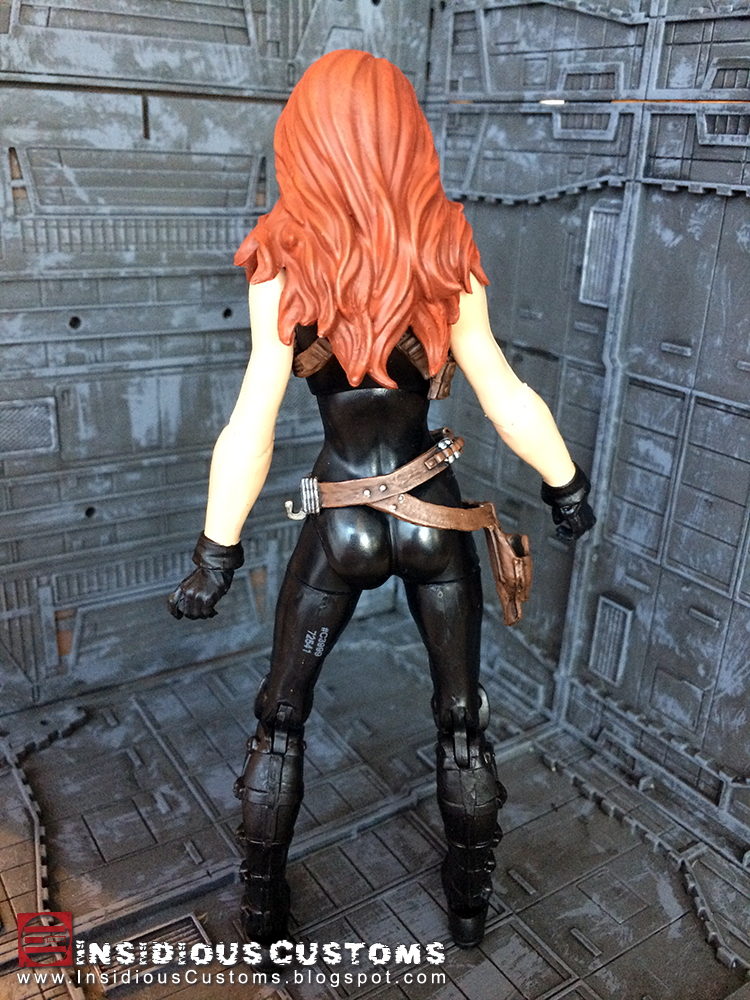
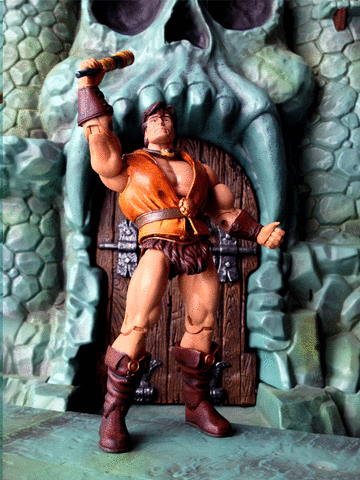
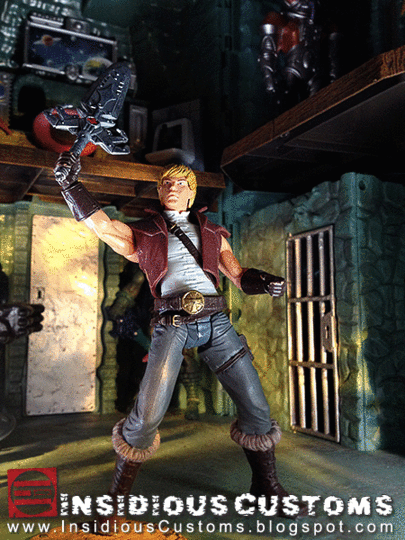
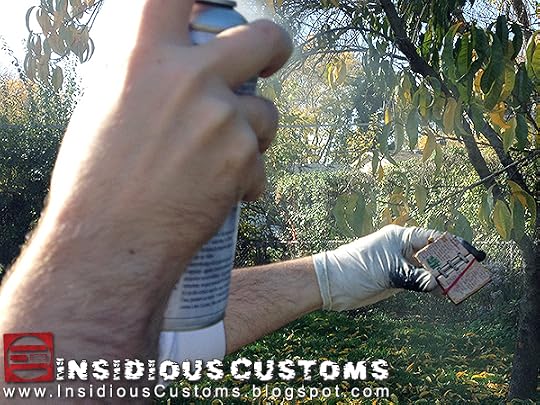
If you're familiar with the blog, you know I'm a fan of all things Hyborian from the Conan stories and movies to the Red Sonja comic books. So when the Four Horsemen announced their awesome female figures in the Advent of Decay Kickstarter, my brain immediately saw the potential in the parts they were creating. I could finally make a 6" figure worthy of the moniker, Red Sonja.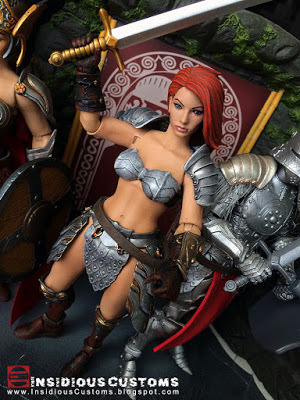 Sonja is a kitbash of (4) different figures with a custom paint job. While she's not a 100% accurate, she's still instantly recognizable. To that end, I tried to maintain a balance between savagery and sexiness by giving her armor a uniform chrome, applying multiple layers of red to her hair, and upon the advice of a creative friend, detailing the eyes to emphasize her fierceness without drawing attention away from the rest of her.
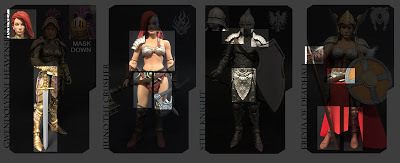
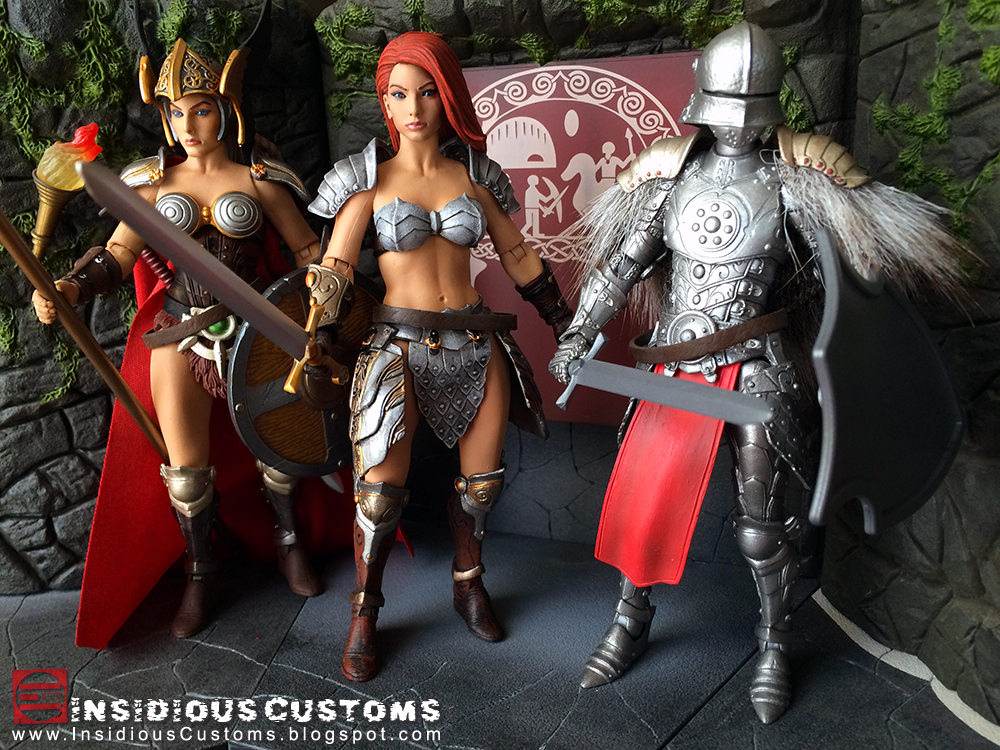
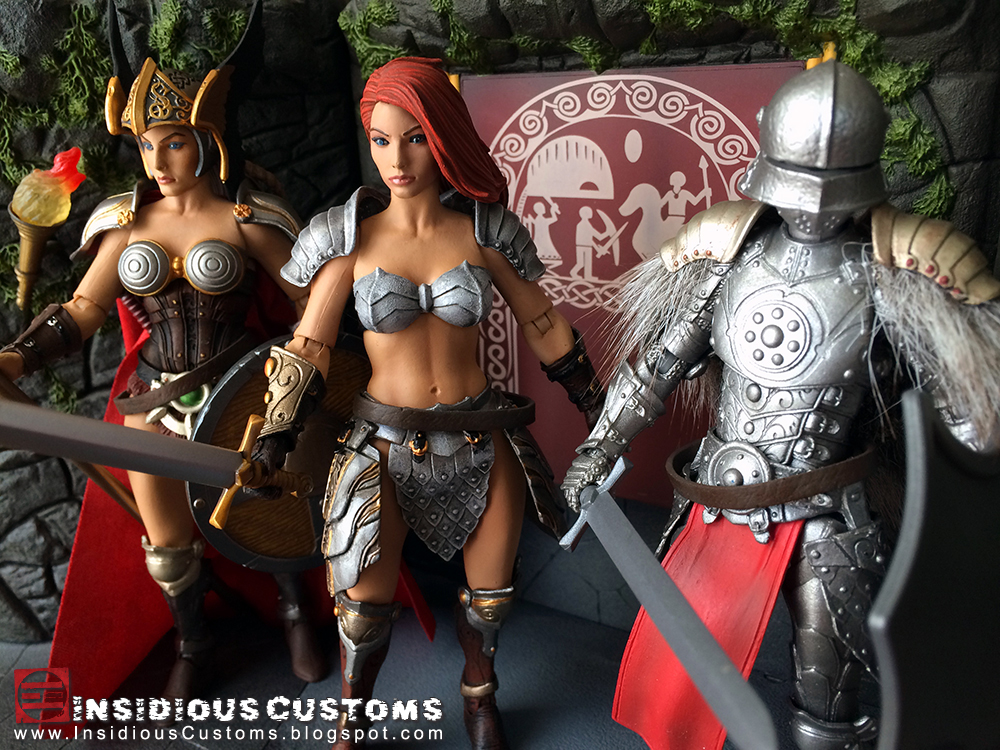
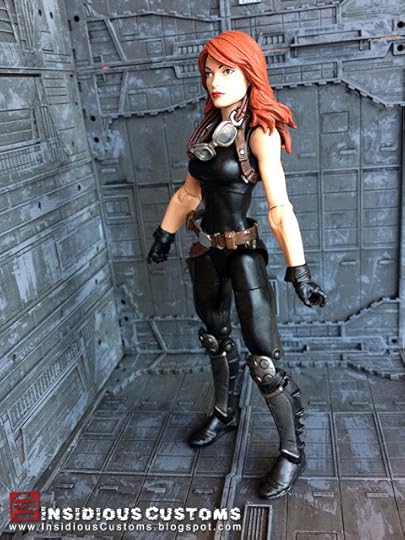
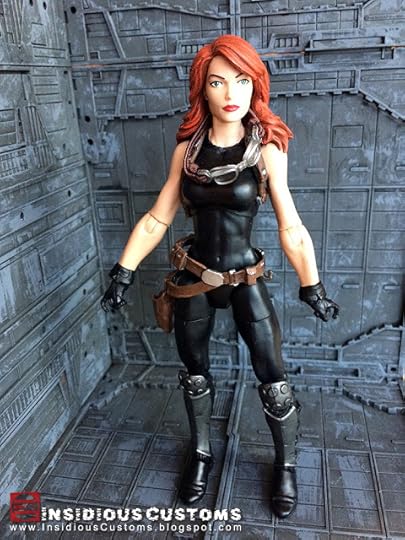
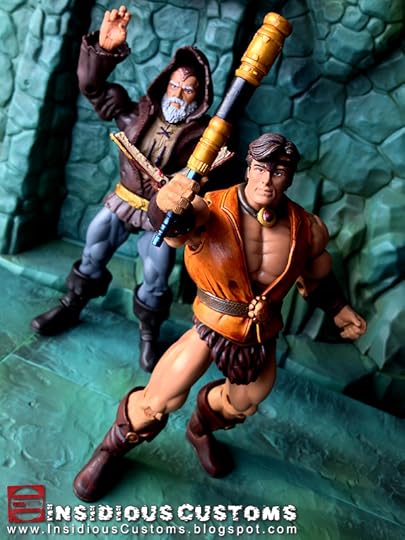
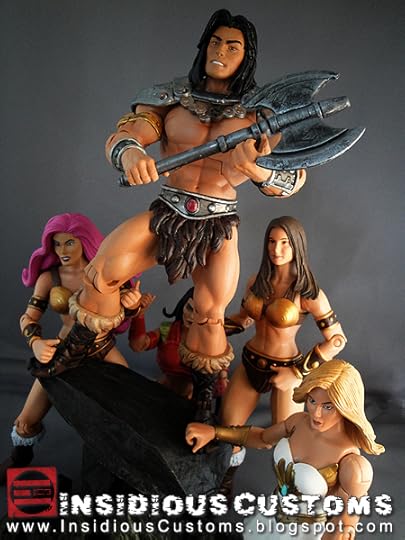
Above is the chart I created during the Kickstarter to ensure I had all the parts I needed to make her. However, I didn't expect to love the figures made from the "leftovers" as much as I do now. After also mixing some of their parts around, I think they make very worthy companions of our hero.

 I can't stress enough how much I love these Mythic Legions figures. They're beautifully sculpted, excellently engineered, and the decos are amazing. But what puts them over the top is their interchangeability of parts. They're far from cheap, but every square inch of them is worth every penny. Pick some up and see for yourself at Big Bad Toy Store or from The Four Horsemen on November 26th. Until next time, remain The Insidious One.
If you're familiar with the blog, you know I'm a fan of all things Hyborian from the Conan stories and movies to the Red Sonja comic books. So when the Four Horsemen announced their awesome female figures in the Advent of Decay Kickstarter, my brain immediately saw the potential in the parts they were creating. I could finally make a 6" figure worthy of the moniker, Red Sonja.
 Sonja is a kitbash of (4) different figures with a custom paint job. While she's not a 100% accurate, she's still instantly recognizable. To that end, I tried to maintain a balance between savagery and sexiness by giving her armor a uniform chrome, applying multiple layers of red to her hair, and upon the advice of a creative friend, detailing the eyes to emphasize her fierceness without drawing attention away from the rest of her.

Above is the chart I created during the Kickstarter to ensure I had all the parts I needed to make her. However, I didn't expect to love the figures made from the "leftovers" as much as I do now. After also mixing some of their parts around, I think they make very worthy companions of our hero.
 I can't stress enough how much I love these Mythic Legions figures. They're beautifully sculpted, excellently engineered, and the decos are amazing. But what puts them over the top is their interchangeability of parts. They're far from cheap, but every square inch of them is worth every penny. Pick some up and see for yourself at Big Bad Toy Store or from The Four Horsemen on November 26th. Until next time, remain The Insidious One.

November 2, 2018
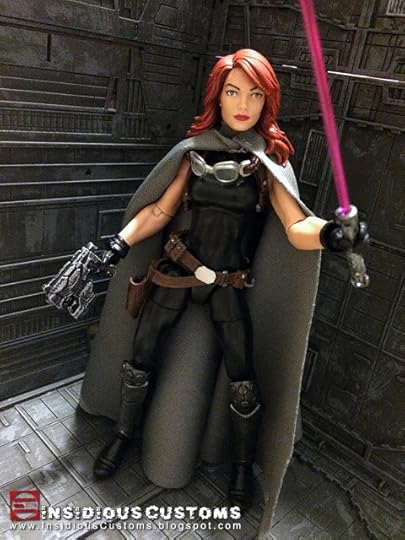
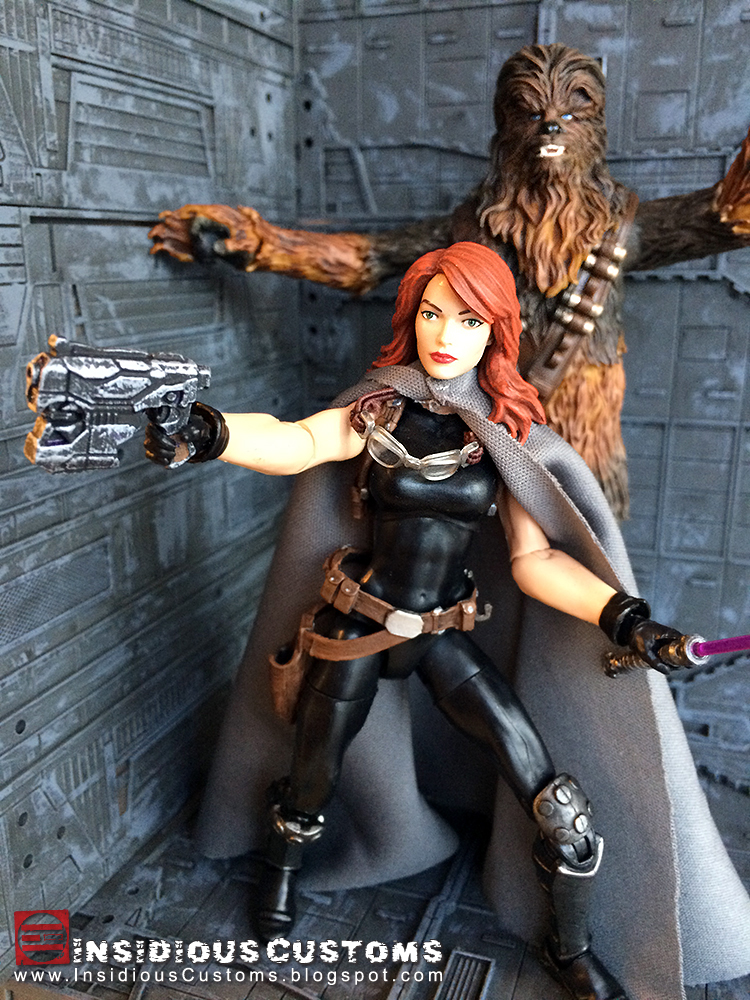
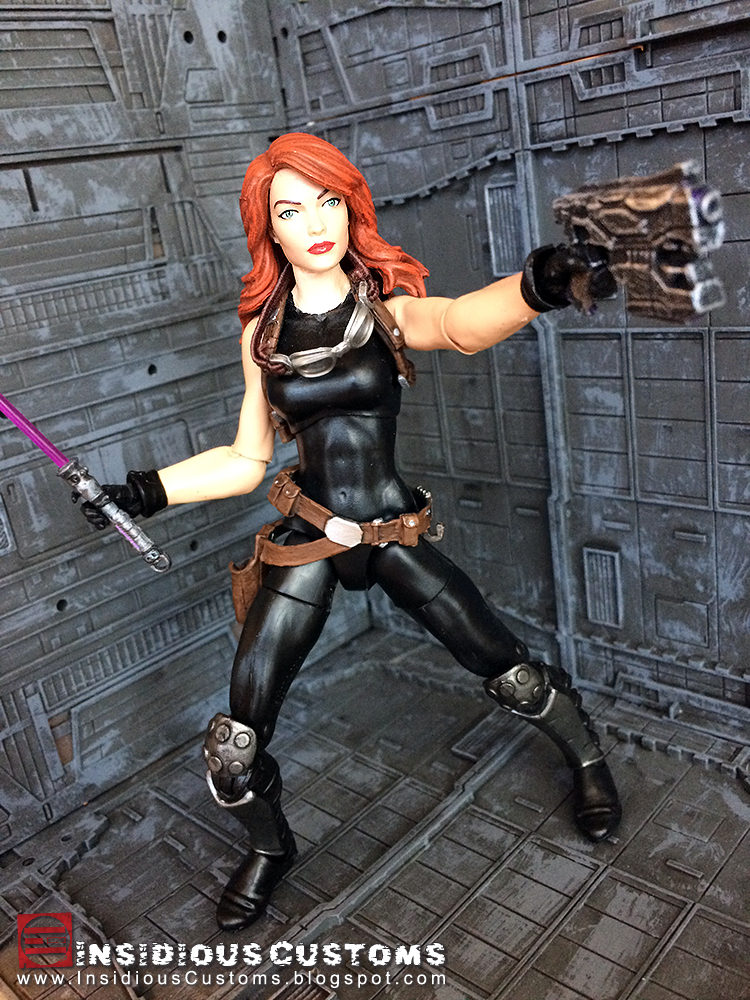
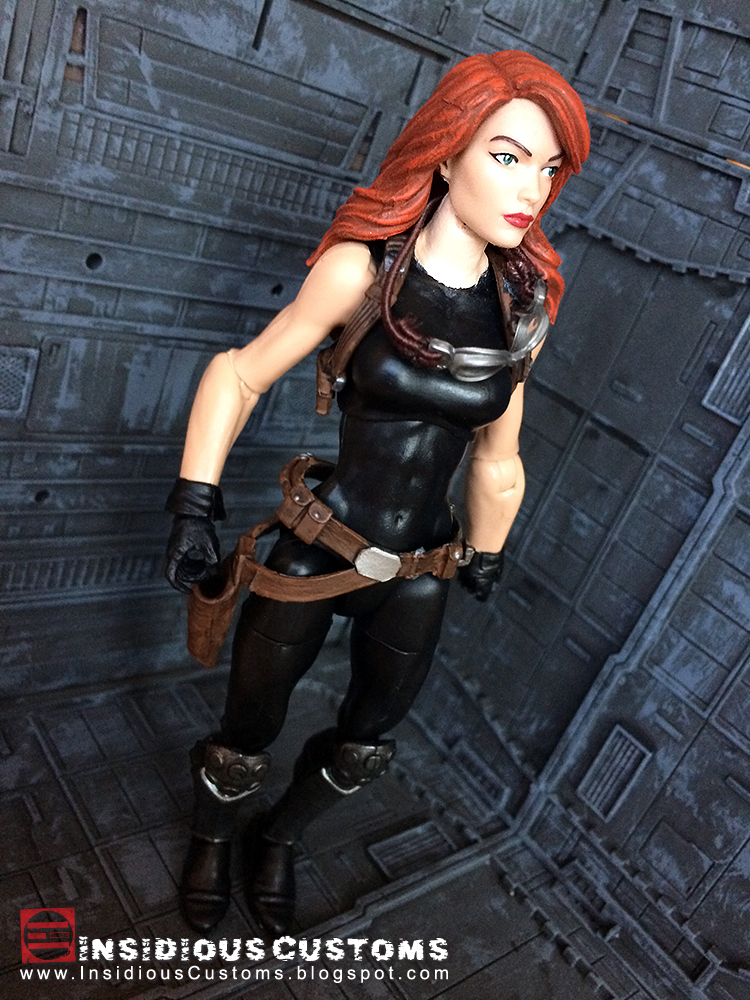
Mara Jade Custom Action Figure Art - Star Wars The Black Series 6"
With the introduction of the 6" Black Series for Star Wars, the potential to get even more detailed representations of classic and beloved Star Wars characters was finally realized. Unfortunately, with the purchase of the franchise by the Disney company, much of the focus of the line has shifted to characters from the new films. With a few exceptions like Darth Revan, Jaina Solo, and the SDCC Exclusive Grand Admiral Thrawn, the fantastic characters from EU (Expanded Universe) have been sidelined. One glaring omission is Mara Jade, one-time assassin and later wife of our hero, Luke Skywalker.

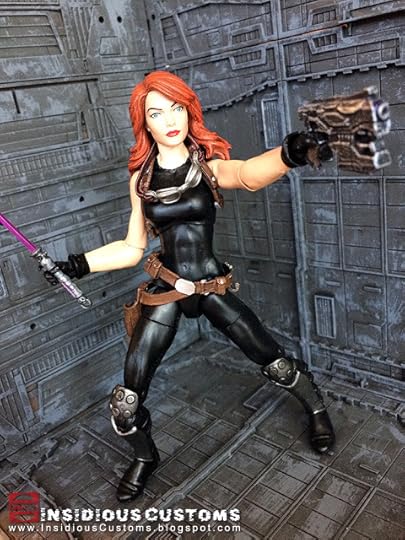
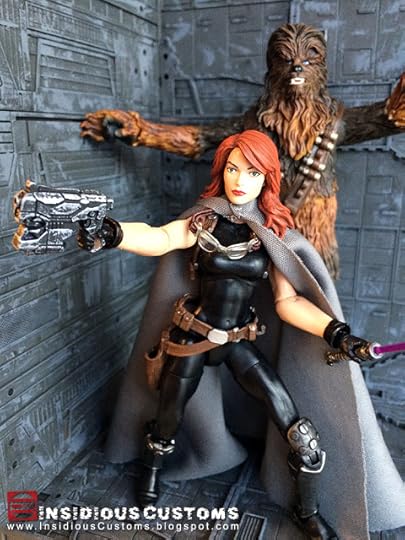 She is hand-painted to match and slightly surpass the quality and level of detail of other figures in the line. Her cape is hand-sewn form a very light and stretchy fabric which hangs more realistically than heavier fabrics at the scale.
She is one of my favorite characters but since I'm trying really hard not to collect 6" Star Wars figures, she is available on eBay right now. See the link below. Until next time, I remain The Insidious One.
See Mara Jade on eBay here!

 She is hand-painted to match and slightly surpass the quality and level of detail of other figures in the line. Her cape is hand-sewn form a very light and stretchy fabric which hangs more realistically than heavier fabrics at the scale.


She is one of my favorite characters but since I'm trying really hard not to collect 6" Star Wars figures, she is available on eBay right now. See the link below. Until next time, I remain The Insidious One.
See Mara Jade on eBay here!
January 4, 2016
Gray Custom Action Figure Art - Masters of the Universe Classics V2
Masters of the Universe Classics is by far one of my favorite action figure lines. From the integrity of the sculpting to the articulation and the accessories, each figure is a magnificent piece of art. (Yes, even stinker characters like Plundor are still excellently executed toys.) Making the line even more impressive is the massive breadth of characters. Over the last seven years, we not only got every vintage figure but new variations, unproduced figures, and even awesome new characters like Castle Grayskullman and Draego Man. Sure, we'll get a few figures next year in the "Collectors Choice" line but unlike Classics, there's no room in that line for characters who aren't at the top of the polls. One such character is Gray; alter ego of He-Ro; the most powerful wizard in the universe and defender of the people of Preternia.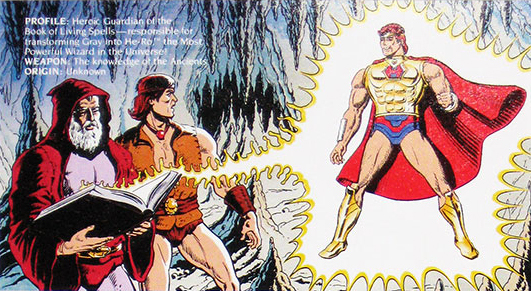
I was really hoping they'd get to him at some point, especially after they produced Eldor but with the bios embracing the King Grayskull mythos, I can only imagine that they didn't want to muddy the waters with another character named Gray. Yes, He-Ro does appear to have a more typical magic-user-style robes when he trains He-Man's son in the mini comic that came with Laser Power He-Man and Laser Light Skeletor but I think they still call him He-Ro despite the different clothing.
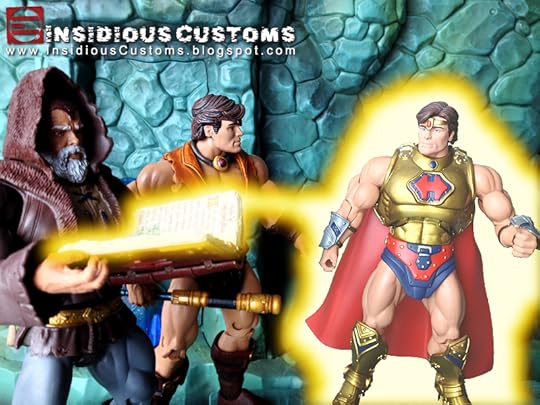
So, since I don't think we'll ever be getting him, I took matters into my own hands.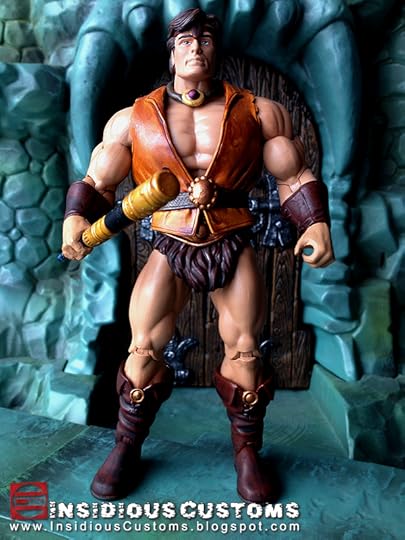
If you read my blog, you may remember that I made Gray once before. (Check him out here.) That first version was very faithful to the card back but I toned down the colors making them more brown and giving him the Power Sword. This time, I wanted to bring in more of the vibrant colors of the card back while also adding details reflecting the magi-user-style garb from the comic.

Finally, inspired by the transforming Power Sword in the MYP animated series and 200X toys, I wanted to give him his magical staff in it's "pre-transformation state."

My time for customs is extremely limited these days as I am developing brand new toys and products for my company Warpo. So if you like Gray, grab him now as I won't be making him again. He's on ebay at this link. http://www.ebay.com/itm/291651196011
Thanks for checking Gray out. You can see more of my MOTUC customs at the top of the page. Until next time, I remain The Insidious One.
I was really hoping they'd get to him at some point, especially after they produced Eldor but with the bios embracing the King Grayskull mythos, I can only imagine that they didn't want to muddy the waters with another character named Gray. Yes, He-Ro does appear to have a more typical magic-user-style robes when he trains He-Man's son in the mini comic that came with Laser Power He-Man and Laser Light Skeletor but I think they still call him He-Ro despite the different clothing.
So, since I don't think we'll ever be getting him, I took matters into my own hands.
If you read my blog, you may remember that I made Gray once before. (Check him out here.) That first version was very faithful to the card back but I toned down the colors making them more brown and giving him the Power Sword. This time, I wanted to bring in more of the vibrant colors of the card back while also adding details reflecting the magi-user-style garb from the comic.
Finally, inspired by the transforming Power Sword in the MYP animated series and 200X toys, I wanted to give him his magical staff in it's "pre-transformation state."
My time for customs is extremely limited these days as I am developing brand new toys and products for my company Warpo. So if you like Gray, grab him now as I won't be making him again. He's on ebay at this link. http://www.ebay.com/itm/291651196011
Thanks for checking Gray out. You can see more of my MOTUC customs at the top of the page. Until next time, I remain The Insidious One.
September 8, 2015
The Little Differences: MOTUC Hordak Vintage Toy Style
 Vincent: It's the little differences. I mean, they got the same $#!t over there that we got here, but it's just – it's just there, it's a little different.
*****
Everyone has been so down on Masters of the Universe Classics Buzz Saw Hordak for a number of reasons, one of which is that he looks too similar to the original release. However, this being "The Little Differences," I beg to differ. As you can see in the photo below, there are many differences between the two. Buzz Saw features a lighter color head, standard MOTU trunks (instead of the extra long 200X style seen on the original release), glossy black details instead of silver, bolder gray arms and legs, and a brighter red paint everywhere on the figure.
And this is why I dig Buzz Saw Hordak; by combining his parts with the first release Hordak, I can kitbash an almost perfect vintage toy-style MOTUC figure. (See photo below.)
I used the arms legs and torso, chest armor, and gargoyle pet from the first release and the trunks, boots, head, and cowl/cape from Buzz Saw. The bright white crossbow that matches the vintage toy color is from the Spirit of Hordak (aka: Jello Hordak) chase figure from 2013. In comparison, the kitbashed figure looks much sharper with greater contrast than the original more subdued release...especially with the bright reds.
If you dig Hordak, you may want to check out my Alcala-style Man-At-Arms kitbash that I just updated here. http://insidiouscustoms.blogspot.com/2012/07/the-little-differences-man-at-arms.html
Until next time, I remain the Insidious One.
The Little Differences: MOTUC Hordak and Man-At-Arms Improvements
Vincent: It's the little differences. I mean, they got the same $#!t over there that we got here, but it's just – it's just there, it's a little different.*****
Everyone has been so down on Masters of the Universe Classics Buzz Saw Hordak for a number of reasons, one of which is that he looks too similar to the original release. However, this being "The Little Differences," I beg to differ. As you can see in the photo below, there are many differences between the two. Buzz Saw features a lighter color head, standard MOTU trunks (instead of the extra long 200X style seen on the original release), glossy black details instead of silver, bolder gray arms and legs, and a brighter red paint everywhere on the figure.
And this is why I dig Buzz Saw Hordak; by combining his parts with the first release Hordak, I can kitbash an almost perfect vintage toy-style MOTUC figure. (See photo below.)
I used the arms legs and torso, chest armor, and gargoyle pet from the first release and the trunks, boots, head, and cowl/cape from Buzz Saw. The bright white crossbow that matches the vintage toy color is from the Spirit of Hordak (aka: Jello Hordak) chase figure from 2013. In comparison, the kitbashed figure looks much sharper with greater contrast than the original more subdued release...especially with the bright reds.
If you dig Hordak, you may want to check out my Alcala-style Man-At-Arms kitbash that I just updated here. http://insidiouscustoms.blogspot.com/2012/07/the-little-differences-man-at-arms.html
Until next time, I remain the Insidious One.
July 26, 2015
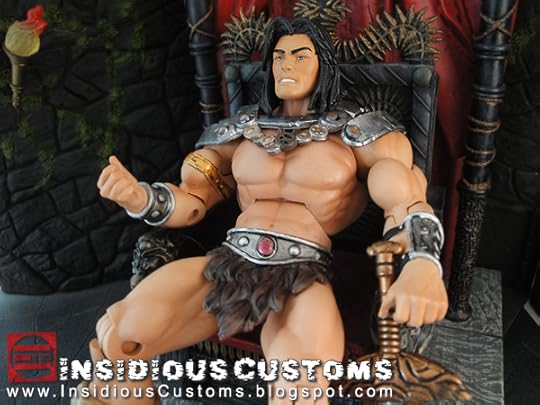
Conan the Barbarian Masters of the Universe Classics Style
As I said in my post for my custom 3.75" Conan the Barbarian action figure (See it here.), I appreciate all versions of Robert E. Howard's character...well, almost...
But even in these two examples, there are aspects that kick-ass because the source material is so good. (You gotta admit, kid Conan from the Jason Momoa movie was great.) From the written stories themselves, to Frazetta's paintings, to the Marvel comics, to Schwarzenegger's movies (Barbarian, and Destroyer), to the Dark Horse comics, even to the animated series "Conan The Adventurer", they all veer off into their own interpretations of Howard's character and each bring something special to the mix. So I tried to infuse elements of all of these interpretations into one custom Conan figure.
To that end, I gave him sullen icey blue eyes and thick black hair to be true to Howard's descriptions and Frazetta's paintings.

However, I sculpted the hair to be more "Schwarzeneggeresk," and the details of the sword to be reminiscent of the Atlantean sword from the movies. I also chose a more "movie-star handsome" portrait for his face. The trademark gold band on his arm is, of course, inspired by the Marvel comics depiction.
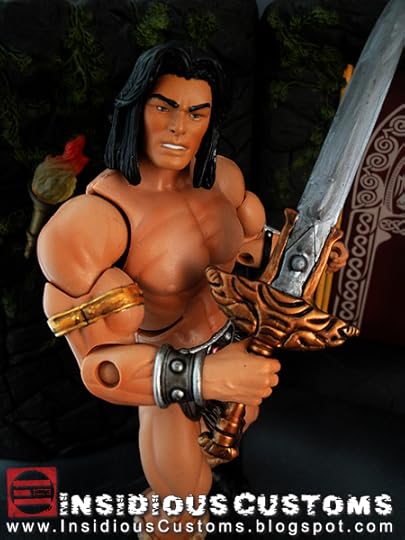
I gave him tattered armor, bracers, and a battle worn axe inspired by Cary Nord's work on the Dark Horse comics. Notice also the "Wheel of Pain" emblem pendant (and tiny leather necklace straps) around his neck inspired by the first Conan movie.
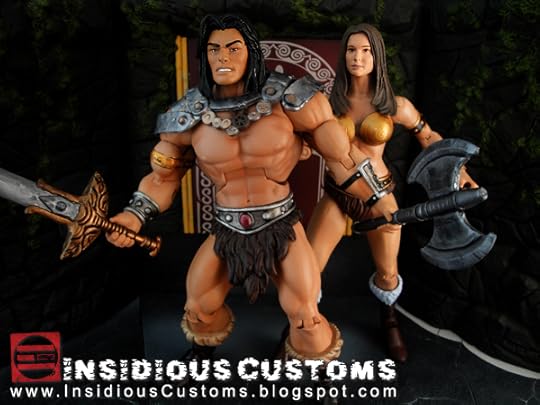
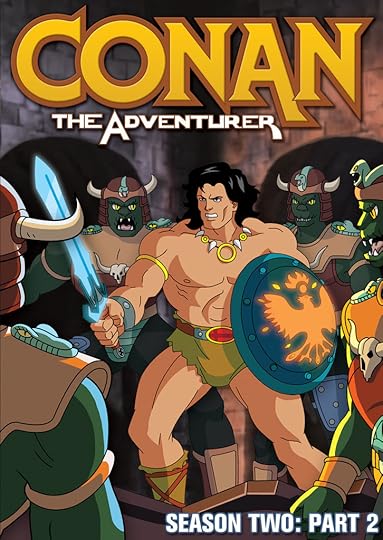
Finally, because my son loves it, I gave him a shield inspired by the Conan the Adventurer cartoon complete with Needle the Phoenix on the face.(It really is an underrated kid's version of Conan. So if you dismissed it when it first aired in the 90's and now you have kids, I recommend it as a great first introduction to the character.)

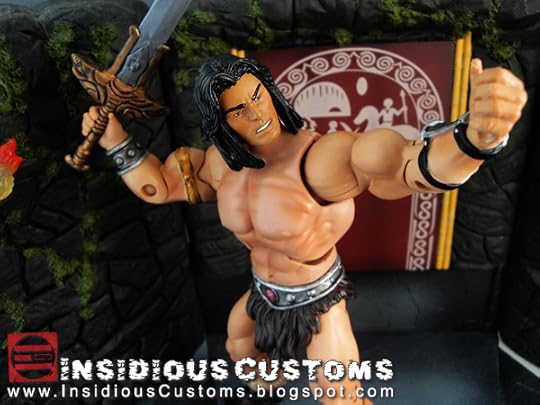
Here are a few more pics. Can you guess the inspiration for each pose?

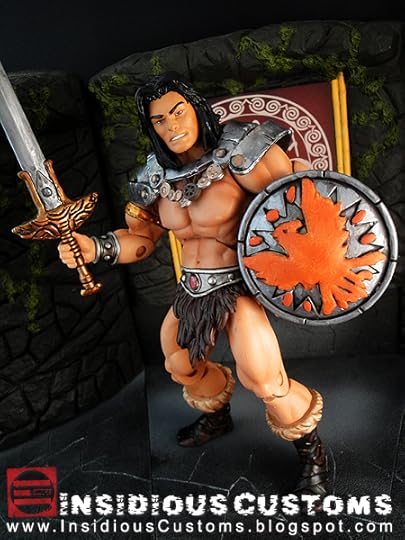
He was a long time coming and a labor of love. I hope you dig him. If you do, he's available on ebay right now. Click this link to check out the auction. http://www.ebay.com/itm/291524347567 Until next time, I remain The Insidious One.
But even in these two examples, there are aspects that kick-ass because the source material is so good. (You gotta admit, kid Conan from the Jason Momoa movie was great.) From the written stories themselves, to Frazetta's paintings, to the Marvel comics, to Schwarzenegger's movies (Barbarian, and Destroyer), to the Dark Horse comics, even to the animated series "Conan The Adventurer", they all veer off into their own interpretations of Howard's character and each bring something special to the mix. So I tried to infuse elements of all of these interpretations into one custom Conan figure.
To that end, I gave him sullen icey blue eyes and thick black hair to be true to Howard's descriptions and Frazetta's paintings.
However, I sculpted the hair to be more "Schwarzeneggeresk," and the details of the sword to be reminiscent of the Atlantean sword from the movies. I also chose a more "movie-star handsome" portrait for his face. The trademark gold band on his arm is, of course, inspired by the Marvel comics depiction.
I gave him tattered armor, bracers, and a battle worn axe inspired by Cary Nord's work on the Dark Horse comics. Notice also the "Wheel of Pain" emblem pendant (and tiny leather necklace straps) around his neck inspired by the first Conan movie.
Finally, because my son loves it, I gave him a shield inspired by the Conan the Adventurer cartoon complete with Needle the Phoenix on the face.(It really is an underrated kid's version of Conan. So if you dismissed it when it first aired in the 90's and now you have kids, I recommend it as a great first introduction to the character.)
Here are a few more pics. Can you guess the inspiration for each pose?
He was a long time coming and a labor of love. I hope you dig him. If you do, he's available on ebay right now. Click this link to check out the auction. http://www.ebay.com/itm/291524347567 Until next time, I remain The Insidious One.
February 10, 2015
He-Man MYP / 200X Custom Action Figure Art - Masters of the Universe Classics
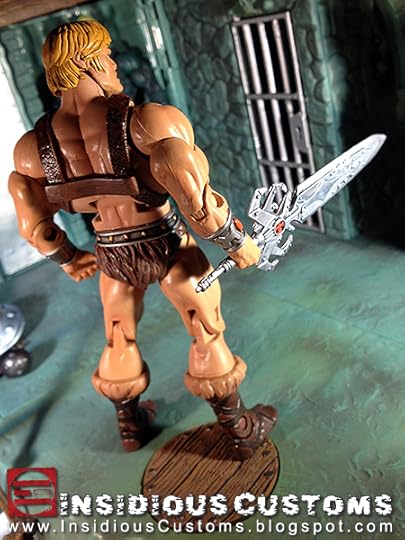
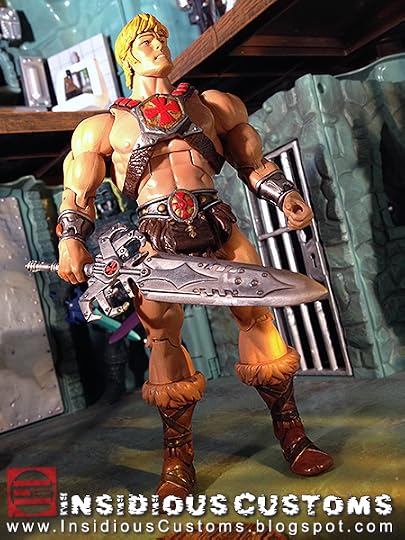
What makes a Masters of the Universe Classics figure? It's an aesthetic created by The Four Horsemen that takes all of the elements of the original MOTU figure and magnifies and realizes details that were only hinted at in the original sculpt while at the same time taking cues from other classic elements such as card art, mini-comics, and the MOTU animated series. When it comes together, it's magnificent, especially with the exceptional articulation and accessories which allow for hundreds of poses for each figure.
If you've read my other MOTU entries (See MYP / 200X Skeletor here.), you know that I'm not a big fan of MYP / 200X influences in MOTUC. However, I know there are many who relish each piece we get from Snake Man-At-Arms to Lord Dactus.
So when Snake Armor He-Man was revealed for the 2015 line-up, I knew many were thrilled that they would soon be able to make a MYP / 200X He-Man by putting his head on a King Grayskull body and giving him the extra sword that came with the original Man-At-Arms. (You can check out this combination on the theFwoosh.com.)
But after seeing what it looked like, I was very disappointed with the results. First, the overly "cartoony" sculpt of the hair (chunky and simplified) and face (my High School PE teacher would have called it a "booty face") wasn't a nod to either the animated look or the toy. Second, Grayskull's harness, trunks, and bracers were all missing essential details that are hallmarks of the MYP / 200X look.Therefore in this custom piece, I tried to combine elements from both of these sources while applying them in a very MOTUC style.
I prefer the MYP hairstyle over the 200X toy so I tried to emulate the shape of that style but adding more realistic detail and of course, ears.
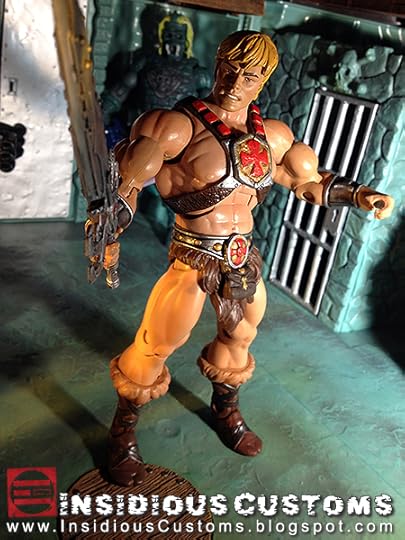 I always loved the damaged cross design of the 200X toy's harness so I wanted to emulate that here as well. I also added the shoulder details that are missing from the MOTUC King Grayskull harness. Other key details are the belt and bag. These are essential to the look and had to be included but instead of completely replacing them, I blended them into the MOTUC elements.
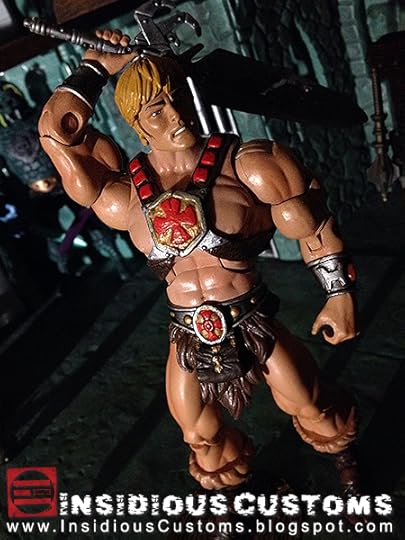 The bracers were the final touch that bring home the slightly more ornate and stylized aesthetic of the MYP / 200X design. I personally prefer matching bracers on He-Man and took the liberty of doing that here.
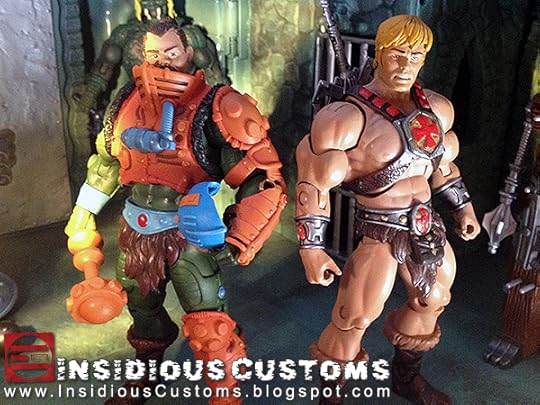
He looks pretty great next to MAA.

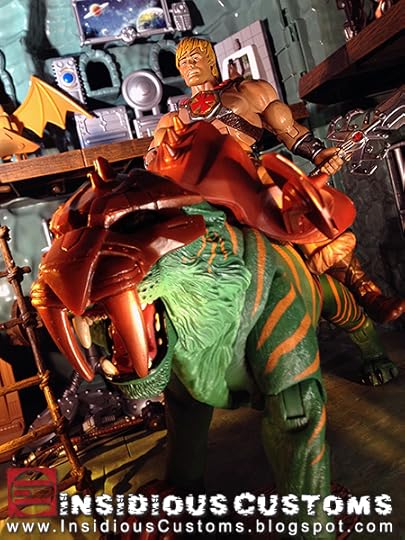
He looks especially great astride Battle Cat with Battle Lion's armor.
I hope he lives up to your 200X / MYP expectations. He's a one-of-a-kind so if you want a true representation of a 200X / MYP He-Man for your display, you can bid on him now on ebay. Click here to see even more photos. http://www.ebay.com/itm/Masters-of-the-Universe-Classics-He-Man-MYP-200X-Style-Custom-Action-Figure-MOTU/291378938056
Until next time, I remain The Insidious One.
If you've read my other MOTU entries (See MYP / 200X Skeletor here.), you know that I'm not a big fan of MYP / 200X influences in MOTUC. However, I know there are many who relish each piece we get from Snake Man-At-Arms to Lord Dactus.
So when Snake Armor He-Man was revealed for the 2015 line-up, I knew many were thrilled that they would soon be able to make a MYP / 200X He-Man by putting his head on a King Grayskull body and giving him the extra sword that came with the original Man-At-Arms. (You can check out this combination on the theFwoosh.com.)
But after seeing what it looked like, I was very disappointed with the results. First, the overly "cartoony" sculpt of the hair (chunky and simplified) and face (my High School PE teacher would have called it a "booty face") wasn't a nod to either the animated look or the toy. Second, Grayskull's harness, trunks, and bracers were all missing essential details that are hallmarks of the MYP / 200X look.Therefore in this custom piece, I tried to combine elements from both of these sources while applying them in a very MOTUC style.
I prefer the MYP hairstyle over the 200X toy so I tried to emulate the shape of that style but adding more realistic detail and of course, ears.
I always loved the damaged cross design of the 200X toy's harness so I wanted to emulate that here as well. I also added the shoulder details that are missing from the MOTUC King Grayskull harness. Other key details are the belt and bag. These are essential to the look and had to be included but instead of completely replacing them, I blended them into the MOTUC elements.The bracers were the final touch that bring home the slightly more ornate and stylized aesthetic of the MYP / 200X design. I personally prefer matching bracers on He-Man and took the liberty of doing that here.He looks pretty great next to MAA.
He looks especially great astride Battle Cat with Battle Lion's armor.
I hope he lives up to your 200X / MYP expectations. He's a one-of-a-kind so if you want a true representation of a 200X / MYP He-Man for your display, you can bid on him now on ebay. Click here to see even more photos. http://www.ebay.com/itm/Masters-of-the-Universe-Classics-He-Man-MYP-200X-Style-Custom-Action-Figure-MOTU/291378938056
Until next time, I remain The Insidious One.
October 28, 2014
The Little Differences: MOTUC Eldor Fixes and Improvements
Vincent: It's the little differences. I mean, they got the same $#!t over there that we got here, but it's just – it's just there, it's a little different.*****
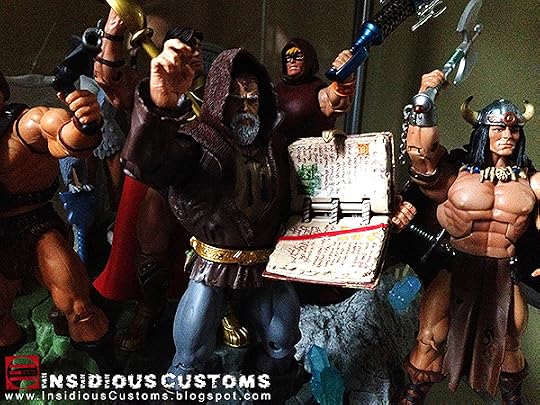
It's been a long time, gang! I've been consumed with working on Warpo's Legends of Cthulhu line of vintage-style action figures for the last year so I haven't had much time for custom work. (Be sure to enter our Cthulhu Halloween Mask Contest if you haven't already!) However, I've been waiting for October's Masters of the Universe Classics figure for several years so when he arrived with less than perfect deco and features, I was inspired to once again make some subtle tweaks to him. The figure is, of course, Eldor; Heroic guardian of the Book of Living Spells.
If you've been following my blog, you probably saw my original custom Eldor I did way back in 2011.
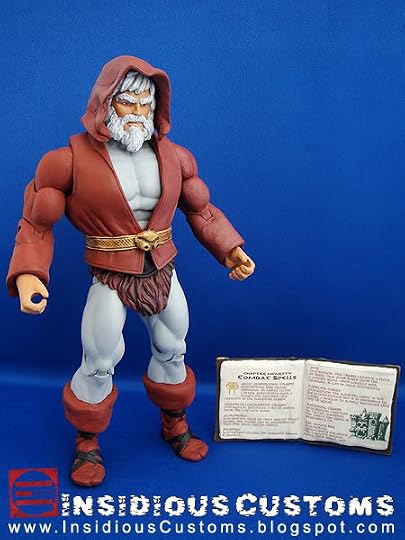
Considering the parts and photo reference I had available at the time, he still looks pretty good and fairly faithful to the original sculpt by Eddie Mosqueda. Since then, I've had the pleasure of working with Eddie and he allowed me to take some high-res photos of his prototype to see even more the details including the "snake-mouth-like" belt buckle. I started a new custom but shortly thereafter, Mattel announced their official version. And while I think the official is a great looking figure, I would have preferred one that was more faithful to the details that Eddie put into the original sculpt. I'll get back to mine sometime, but in the meantime, I made some subtle and not-so-subtle changes to the official figure that improve him greatly.
First, I replaced his hands with Bow's hands. Bow's wrist articulation and hand shapes make it much easier for Eldor to hold the Book of Living Spells in both the closed and open positions. The Bow wrist pegs are a little too small for the holes in the forearms so you'll need to use some sticky-tack or green-stuff to thicken them a bit. If you don't mind loose wrists, you can just swap them.
I also painted his trunks a dark brown to match his boots. I intended to paint them the same dark reddish brown of his shirt like the vintage prototype but then I thought the darker brown might help pull the figure together. (No old man should be walking around Preternia in a pair of gray tights with his junk hanging out!)
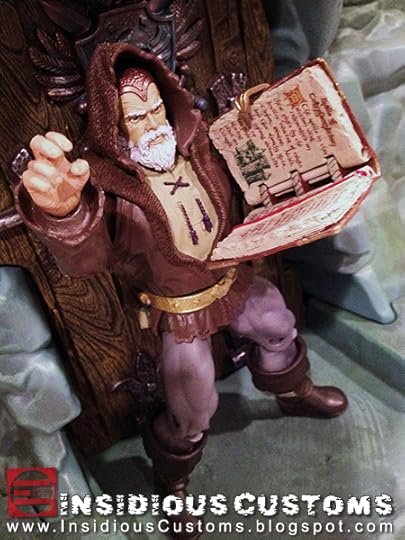
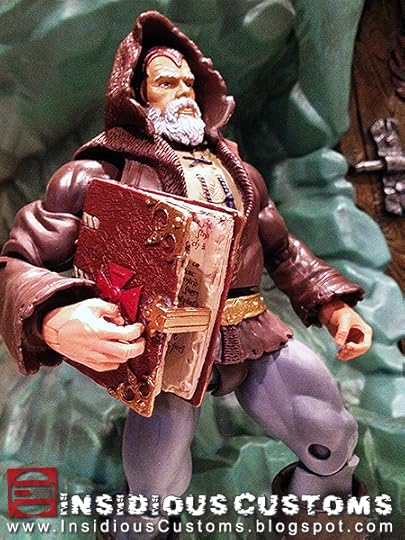
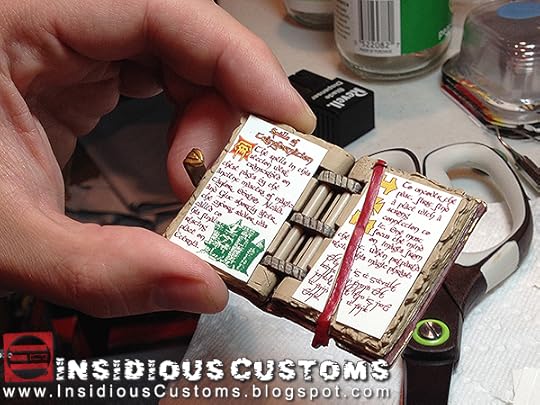
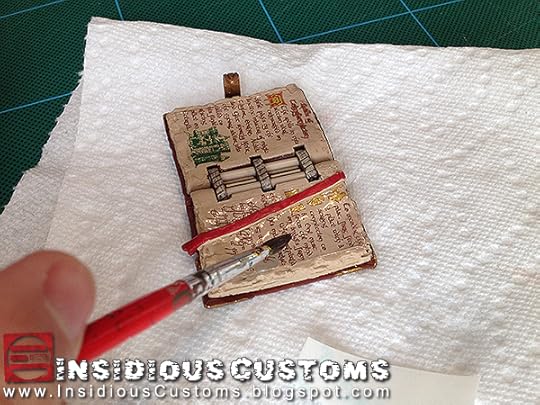
As you can see in the photo above, the Bow hands also work great for creating spell casting gestures. You may have noticed that my Book of Living Spells also has been modified. I created some custom water-slide decals so that his book is not blank. (These are the kind of decals that come in model kits.)
I hope you dig him and and see once again that the little differences can make your good figures great! If you'd like to purchase a set of decals for your own Book of Living Spells, send me an email Eric@Insidious1.com.
***
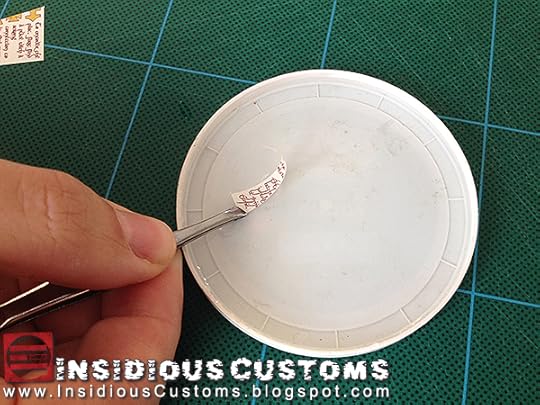
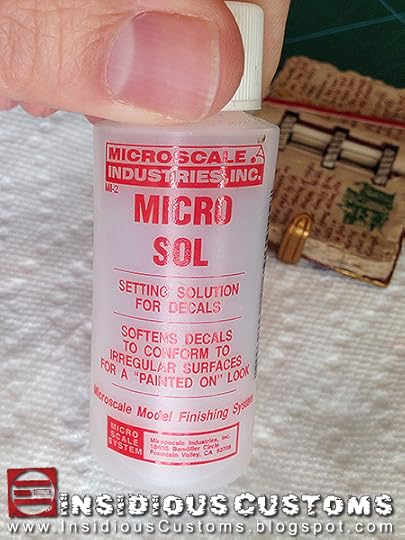
Because of the overwhelming response to the Book of Living Spells decals, I've posted a tutorial below on how to apply them. Here's what you'll need to get started...
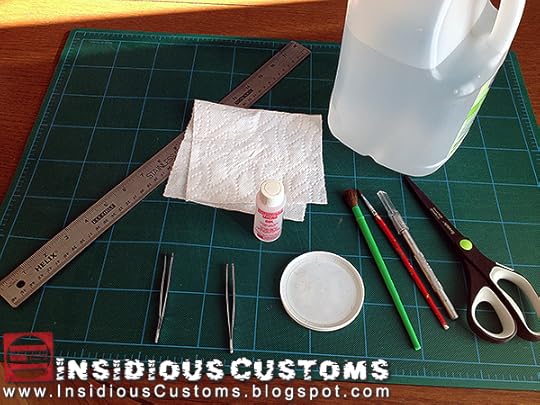
1) Bottle of Micro Sol decal solvent. You can get it at a hobby store or order from the link.This stuff will help the decal adhere to irregular surfaces like the wrinkles on the pages. It actually "melts" the plastic of the decal so you have to be very careful with it.
2) Tweezers (I always use two.)
3) New Clean Paper Towel
4) Distilled Water
5) Shallow Lid - filled with distilled water.
6) Clean Exacto Blade, Ruler, and Cutting Mat (Or new sharp scissors)
7) Two Clean Small Brushes
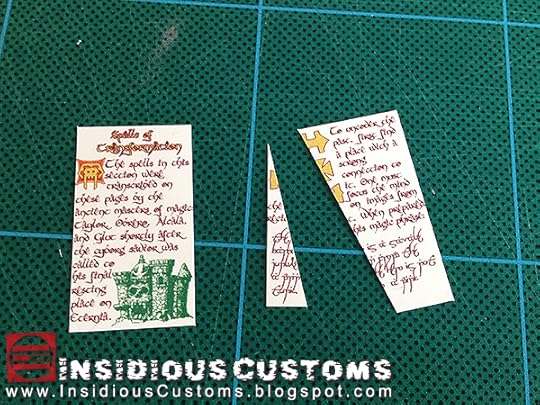
Step 1:
Cut out your decals close to the edge of the design but with enough room so you can still hold them with the tweezers without touching the printing on the decal. I printed some very thin gray guides where you need to cut. If you are using scissors, make sure they are very sharp and new. (Don't use the old dull pair that's been sitting in the junk drawer for the last five years!)
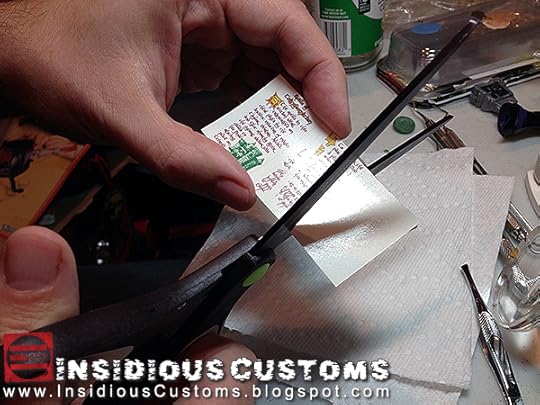
I prefer to use a new Exacto blade, ruler, and cutting mat for precision.
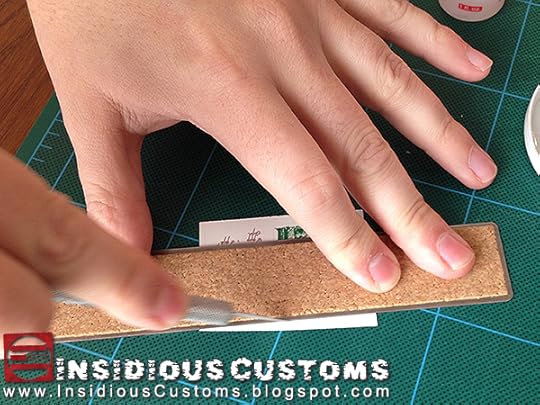
Step 2:
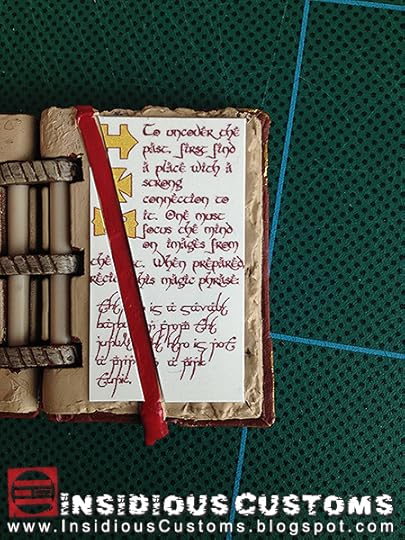
Test fit the decals on the book to make sure they will fit properly. Trim as necessary.
Take particular notice of the page on the right side as you'll want the text and symbols to line up on either side of the bookmark.
Step 3:
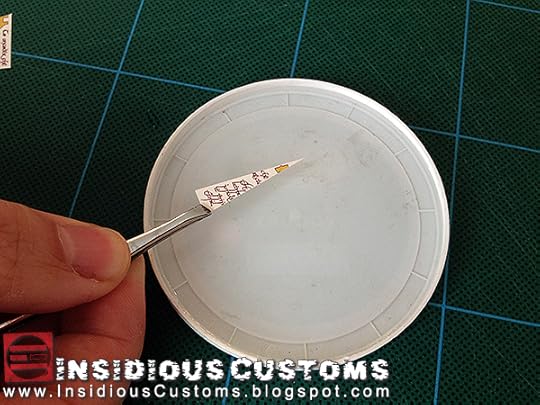
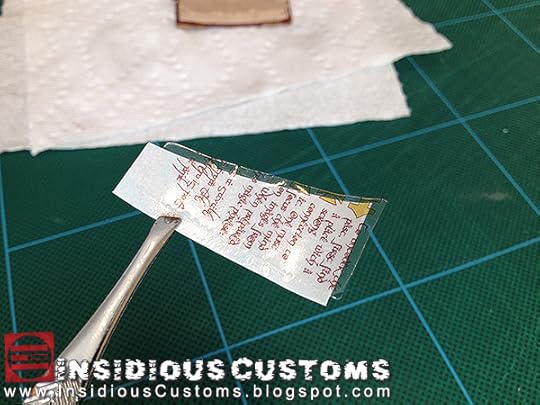
Pick up the decal with the tweezers being careful not to touch the printing. Using the tweezers, hold the decal face up on the surface of the water for 5 seconds. (DO NOT SUBMERGE THE DECAL as it can cause the colors to bleed!)
Step 4:
Place the decal face up on a paper towel and let it sit for 30 seconds. This allows the backing paper to loosen from the decal. (The larger page decals will need a little more time.)
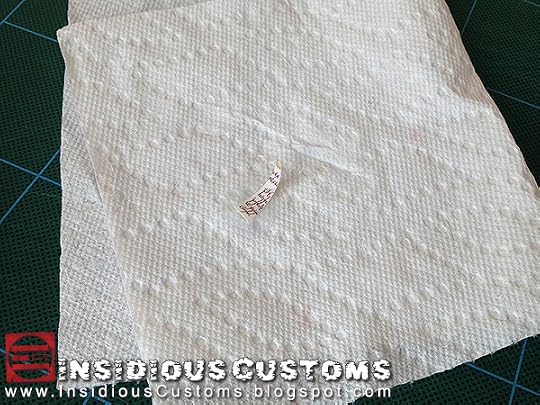
Step 5:
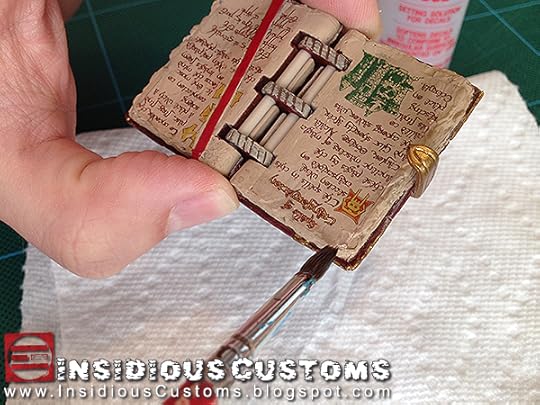
Using the tweezers, place the decal on a flat, CLEAN, surface then gently nudge the edge of the paper from the decal. For the decals on the right side of the book, nudge the paper away from the center, or bookmark edge. (See photo below for reference.)
Step 6:
Using both tweezers (or a tweezers and the Exacto) fit the decal into place. (In the case of the right side of the book, place the inside edge up to the bookmark and hold it in place.) Then, using the tweezers, slide the paper out from underneath the decal.
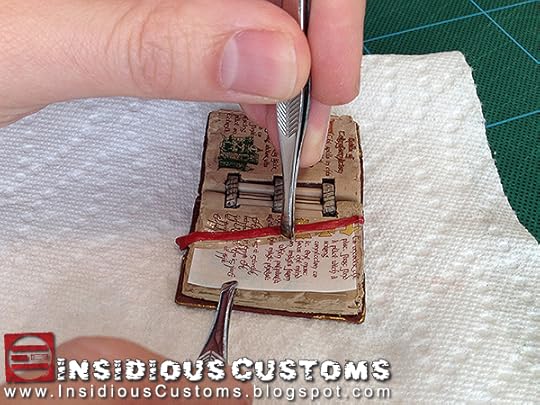
Step 7:
Use a dry brush to adjust position and flatten any airy bubbles. If the decal is not adhering, put a tiny dab of water on the brush and tack down any areas without printing on them. DO NOT put water on any printed areas.
Step 8:
To help the decal adhere to the contours of the pages, dip only the tip of the brush into the decal solvent, and gently brush a little solvent onto the recesses. DO NOT brush it onto the printing or it may remove or smudge it. Decal solvent is not always necessary.
(NOTE: Be EXTREMELY careful when using decal solvent as you only have one shot at getting it right. After you use it on a part of the decal it cannot be moved without destroying or cracking the decal.)
Step 9:
Let it dry over night.
Step 10:
In the morning, you'll notice it looks very glossy. Spray the pages with a clear-coat sealant. Many different companies make different kinds of sealant from matte, to gloss, to others in-between. I prefer a matte sealant so that he pages more closely match the paint of the book.
Whatever you choose, use a spray and apply it very lightly. I use Games Workshop Matte Purity Seal. It's more expensive than most, but the quality is the best I've found and the large can lasts a long time. Let it dry overnight. If it still looks glossy the next day, spray it again and let it dry again overnight.
Step 11:
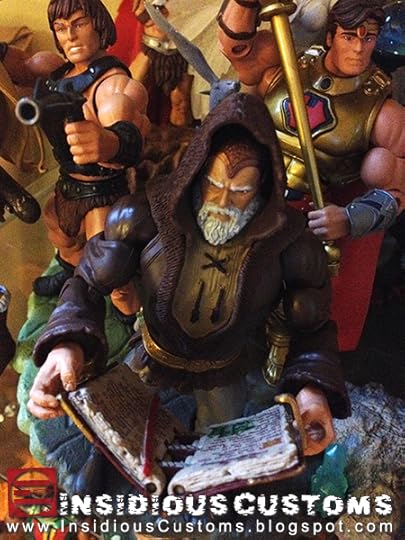
Place book in Eldor's hands, place Eldor prominently in your Preternia display, and enjoy! (Note: Once you've applied the decals, I do not recommend fully closing the book. While it should be fine the first few times, it will eventually start to wear. Or, if you live in a very humid or warm area, it could stick together.)
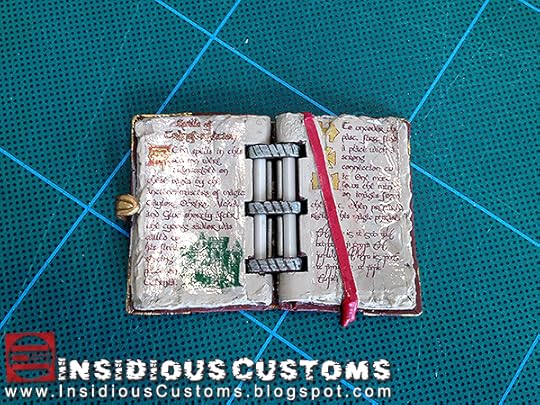
 ONE MORE THING...Take your time, measure twice, cut once, and all that. These are very fragile but the finished look is worth the effort. Also, don't get discouraged if you mess one up. I always include a backup with each set because even I mess up from time to time. (See photo below.)
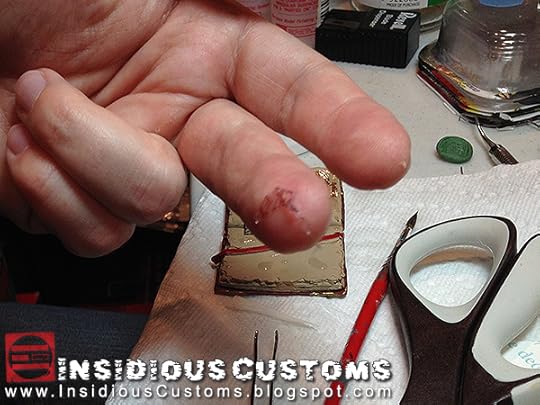
June 26, 2014
Legends of Cthulhu: The Best 80's Toys that Never Existed
Where have I been? It's a long story, but early last year, two toy buddies of mine, Bryan and Tommy approached me with an idea for a company that would make brand new toys in a style that was completely authentic to another era. These would not be re-makes, re-issues, or re-hashes of things that came before but brand new characters and licenses that could and SHOULD have existed at the time but for some reason, didn't. I loved the idea but since I was already knee deep in the development of another project, I said I would be willing to consult for them if and when they needed me.That night, I couldn't stop thinking about the concept and all the potentials that could be explored using that methodology. The next morning, I called Bryan and told him that I wanted to be as involved as he wanted me to be. He told me that he and Tommy had already discussed it even before we met-up the night before and wanted me to be part of the company. That made it official, I put my own project on hold and we became WARPO. What followed was a whirlwind of research, discussions, design, and development that manifest itself as our first toy line; Legends of Cthulhu.
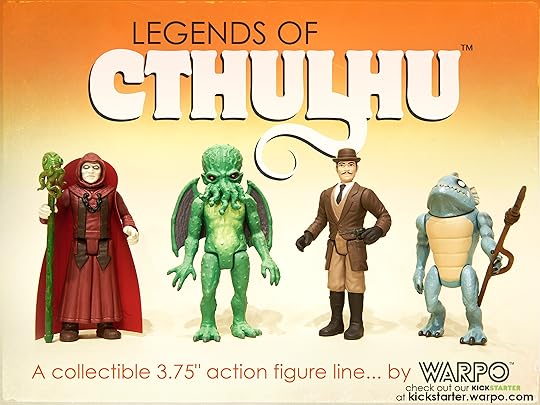 Our Kickstarter launched at the beginning of this month to rousing cries of R'lyeh from Lovecraft fans and vintage toy collectors from around the globe so much so that we were fully funded in 3 days! While our pace of growth has slowed since then, it has been a steady climb up the mountain of stretch goals including the translucent "Conjured Cthulhu" and "The High Priest."
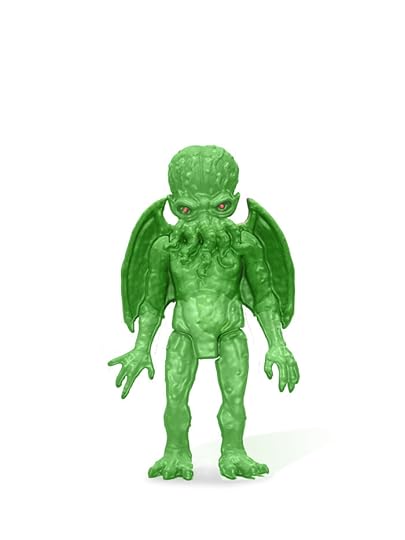
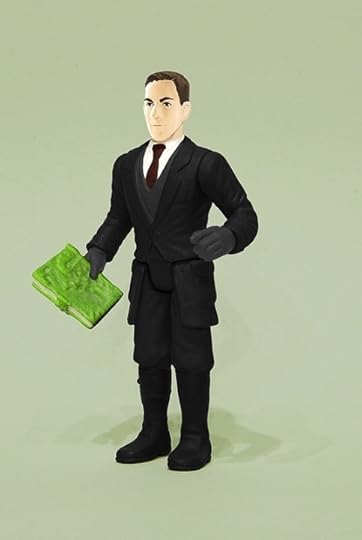
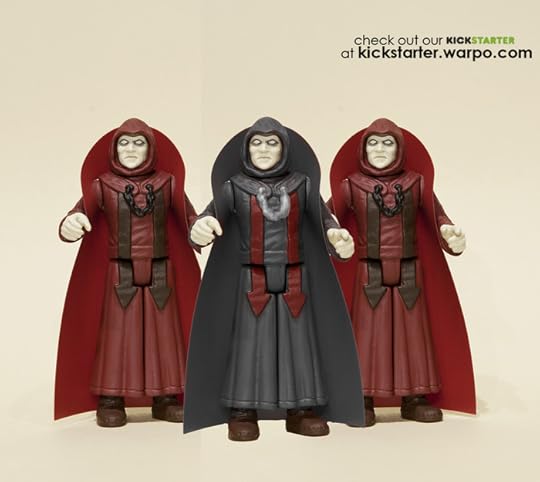 I love these two figure designs as the Conjured translucent body harkens back to the "space" themed Adventure People and the High Priest comes straight out of Dragon Riders of the Styx.We are now poised before two of my favorite stretch goals. The first is a figure that pays homage to the man whose stories made this line possible; H.P. Lovecraft called "The Author." He features Lovecraft's likeness and comes with a translucent green Necronomicon accessory.
 The second is The Great Old One: Cthulhu himself. This 12" figure was part of our line from the beginning, but we knew we would not be able to afford to produce it without the overwhelming support of toy and Lovecraft fans. He is inspired by such awesome 80's monster figures as Clash of the Titans' Kraken, Godzilla from the Shogun Warriors line, and Kenner's Rancor. At $200,000 we will unlock him and anyone who pledges (or has already pledged) at "THE CULTIST LEVEL" or higher will be eligible to purchase him.
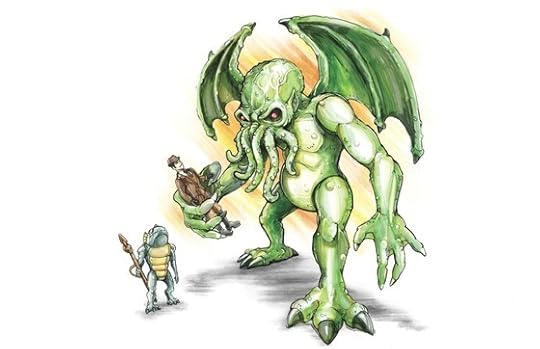 Most of my custom figure pieces have been modern style so I understand if this is not your cup of tea, however, if you remember where all this 3 3/4" "action figure madness" began, or if you just appreciate the art of the late 70's and early 80's give our Kickstarter a look and pledge. You'll get some kick-ass toys and help us make some of the (in the words of my partner Bryan) bitchingest toys that never were, today.Here's the link to our Legends of Cthulhu Kickstarter: https://www.kickstarter.com/projects/warpo/legends-of-cthulhu-retro-action-figure-toy-lineAnd here's a link to our company Warpo's website: http://www.warpo.com/ Until next time, I remain "The Insidious One."
 Our Kickstarter launched at the beginning of this month to rousing cries of R'lyeh from Lovecraft fans and vintage toy collectors from around the globe so much so that we were fully funded in 3 days! While our pace of growth has slowed since then, it has been a steady climb up the mountain of stretch goals including the translucent "Conjured Cthulhu" and "The High Priest."

 I love these two figure designs as the Conjured translucent body harkens back to the "space" themed Adventure People and the High Priest comes straight out of Dragon Riders of the Styx.We are now poised before two of my favorite stretch goals. The first is a figure that pays homage to the man whose stories made this line possible; H.P. Lovecraft called "The Author." He features Lovecraft's likeness and comes with a translucent green Necronomicon accessory.
 The second is The Great Old One: Cthulhu himself. This 12" figure was part of our line from the beginning, but we knew we would not be able to afford to produce it without the overwhelming support of toy and Lovecraft fans. He is inspired by such awesome 80's monster figures as Clash of the Titans' Kraken, Godzilla from the Shogun Warriors line, and Kenner's Rancor. At $200,000 we will unlock him and anyone who pledges (or has already pledged) at "THE CULTIST LEVEL" or higher will be eligible to purchase him.
 Most of my custom figure pieces have been modern style so I understand if this is not your cup of tea, however, if you remember where all this 3 3/4" "action figure madness" began, or if you just appreciate the art of the late 70's and early 80's give our Kickstarter a look and pledge. You'll get some kick-ass toys and help us make some of the (in the words of my partner Bryan) bitchingest toys that never were, today.Here's the link to our Legends of Cthulhu Kickstarter: https://www.kickstarter.com/projects/warpo/legends-of-cthulhu-retro-action-figure-toy-lineAnd here's a link to our company Warpo's website: http://www.warpo.com/ Until next time, I remain "The Insidious One."
November 18, 2013
The Little Differences: Vintage Figure Style MOTUC Skeletor
Vincent: It's the little differences. I mean, they got the same $#!t over there that we got here, but it's just – it's just there it's a little different.*****
Today's installment of the Little Differences is a quick, down and dirty, Masters of the Universe Classics kit-bash! I was very excited to get the more "vintage action figure style" body construction with Dragon Blaster Skeletor. However, after I had him in hand, I knew achieving the vintage figure look would not be as simple as swapping his chest armor and giving him some weapons.
First, unlike any other Skeletor figure to come before him, Dragon Blaster Skeletor's body is actually black plastic painted blue. This practice fans on He-Man.org have dubbed "blastic" was used on several figures last year. The problem with this technique is that the paint on these figures rubs off over time revealing the black plastic underneath. (This is totally unacceptable for someone who enjoys posing and displaying their figures out of the package. Thankfully Mattel has stopped doing this on subsequent figures.)
The second problem with Dragon Blastor Skeletor is that his right hand is not a Skeletor "creature" hand with long pointed fingernails. Instead, for some odd reason, they gave him a standard "human" right hand. The last nail in the coffin preventing this from being an easy swap was that the armor tassels "hanging" from his belt were painted black instead of purple.
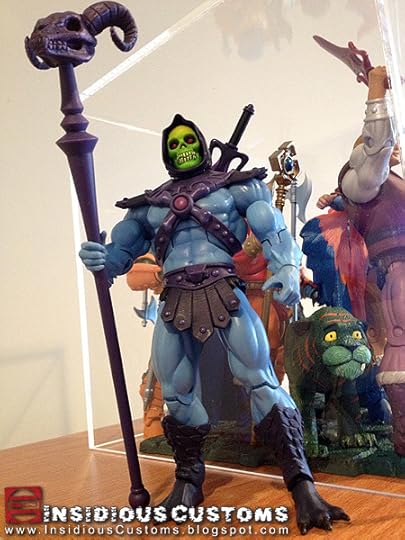
So instead of simply swapping the Dragon Blaster armor with regular Skeletor armor, I needed to put the DB forearms, boots, and feet onto a standard Skeletor! Using the tried and true hot-water technique, I swapped the arms at the biceps, hands, and boots. I was especially careful removing and re-attaching the DB parts as the paint on the "blastic" comes off even more easily when heated. Here's my recipe...
Head = Demo Man (alternate head)
Body = Skeletor (from Mo-Larr pack)
Arms = Dragon Blaster Skeletor
Hands = Skeletor (from Mo-Larr pack)
Boots/Feet = Dragon Blaster Skeletor
Armor = Skeletor (from Mo-Larr pack)
Trunks = Skeletor (from Mo-Larr pack)
Weapons = Skeletor (from Mo-Larr pack) + Fang Man
Note; the blue on the body parts are not a 100% match but they are close enough. In fact, I've seen much greater differences on factory painted vs molded color production pieces. So my decision to swap the entire arm instead of just the forearm is for two reasons; removing the complex elbow joints and re-attaching them could damage the paint on the DB pieces and I felt the biceps would be a better place to hide the color difference with the shadows created by the armor and the deltoids.
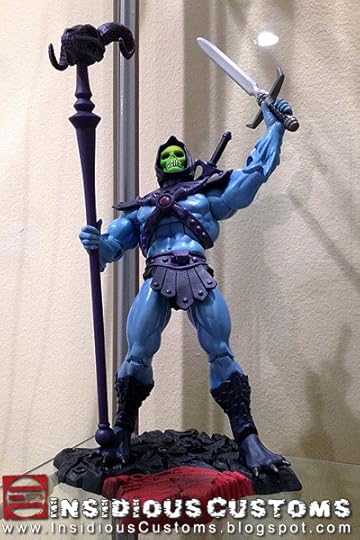
Yes, he isn't totally toy accurate with the Alcala head but it's such a wonderfully expressive sculpt that I couldn't resist using it. I also gave him Fang Man's sword as a stand-in for his "energy-blade." The skull motif on the handle suits him especially well.
So if you like your Masters of the Universe Classics with a little more vintage-toy flavor, this is an easy one to do. Until next time, I remain The Insidious One.


