Gary Zeiger's Blog
August 25, 2022
RV Refrigerator Conversion To 12v
Disclaimer: I received no compensation for this blog post, and I paid fully for all items referenced. I will have a parts list at the end of the post, some with affiliate links to fund my blogging and video efforts. Follow all supplied instructions. The following is just my notes on my experience and not intended as a step-by-step tutorial. Your mileage will vary.
I decided to move away from the LP/120v AC fridge after parking our 2014 Montana 3625RL in our brand-new barn (#1point40ish), which is about 40 minutes from our home. We plan to camp there on weekends and want to leave the fridge on most of the time. While we do have electricity in the barn, I was not comfortable leaving the fridge running unattended. Paranoid? Maybe. So, I invested in two 12v Weize lithium batteries, a new lithium converter, and a 12v DC HVAC dual compressor conversion kit from JC Refrigeration. The freezer boxes have their own compressor, and the refrigerator box has its own compressor. This is the same technology that’s in your fridge at home, so I feel much safer leaving it running unattended. On a side note: Just replacing the batteries made a significant positive difference in slide operation. The kit arrived via FedEx Freight on a pallet and was well protected with (almost) everything we needed. The self-tapping metal screws were missing. It wasn’t a big deal to me as we just finished building a metal barn and I had an assortment of said screws left over. I will say the install manual was like 50+ pages long, with lots of large pictures and very detailed instructions that were easy to follow. There were a couple of missteps in it I will point out down the way. We have a Norcold 1210. The install manual was for both the 1200 & 1210 and in one spot, it sent you to the wrong page for the 1210; I scratched my head for a few seconds looking at this and remembered there was a section for the 1210—it was a few pages further. Read through the manual at least once before starting. You can find them ahead of time on their website: https://jc-refrigeration.com/
First order of business was to remove the fridge from the alcove. According to the manual, it should only take “a couple of guys” to “gently remove” it. Well, there was nothing gentle about it. The wife and I wrangled it out (I have to say she is way more fit than I am). We enlisted the help of a neighbor as a third body to lift it and get it back in, even though I believe the 12v “guts” are lighter than the LP “guts” (it was hot out; I was tired).
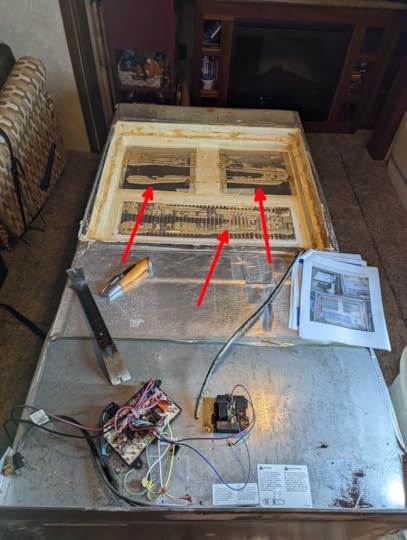
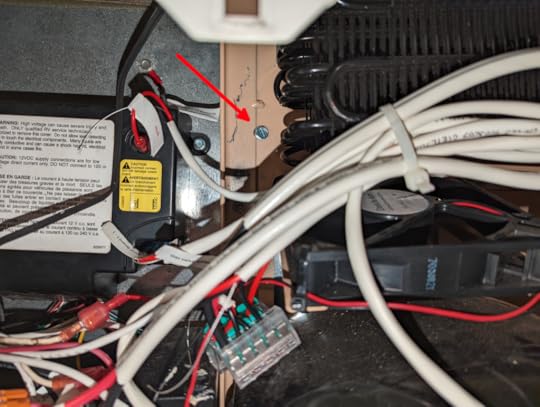
Once we removed it and put her face down (on the carpet!!), it was easy to remove the LP frame. You can see in the pic all the mastic that was left (RA [Red Arrow]). Removing the mastic with a putty knife was no problem, though it was kind of oily, sticky, and gross. Dawn cleaned it off my hands nicely.
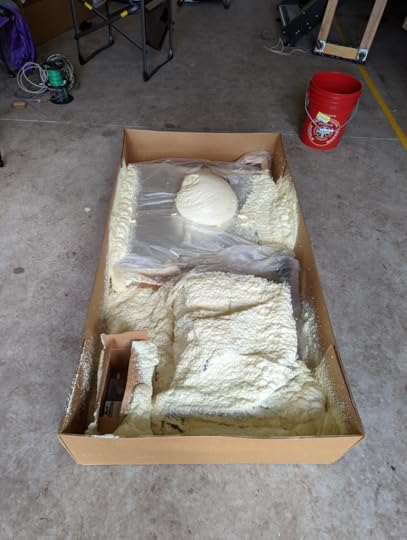
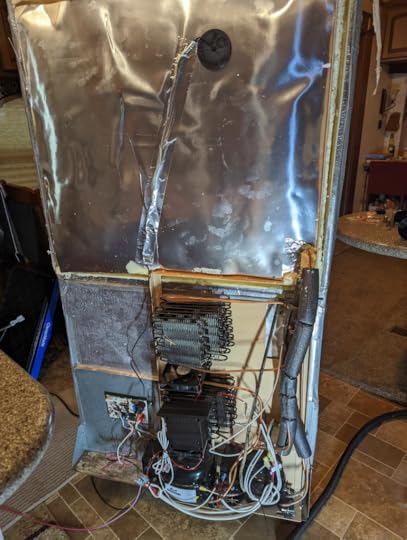
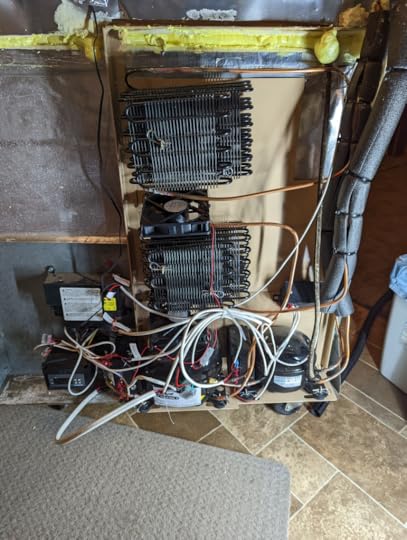
Lining up the replacement unit looked tricky, and my heart paused as I put in each of the seven screws in the freezer box. But following the directions worked. I did second guess myself the next day because there were large gaps around the edge where I could see the underlying metal (and even stick part of my finger in it). I decided to take it apart, shave some foam off, get another tube of mastic and try again. Yeah, right. That sucker wasn’t coming off. I guess it’s making contact with the fridge plates and fins. I even stuck a piece of wire in between and it didn’t go anywhere, so I believe contact has been made. Here are some shots stood-up with the new cooling system on it.
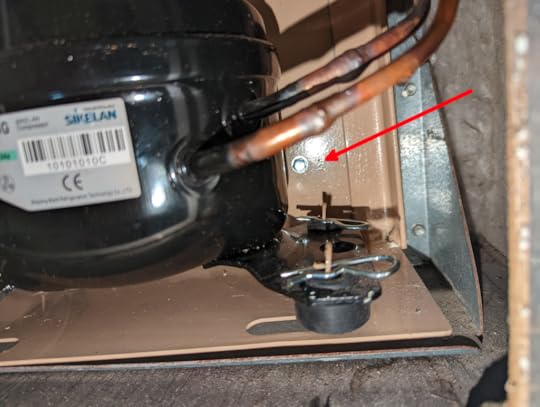
When attaching the frame, I noticed that there wasn’t a pre-drilled hold on the lower left side like the instructions said. Two #10×1 self-tapping screws later, I was able to secure it (RA).
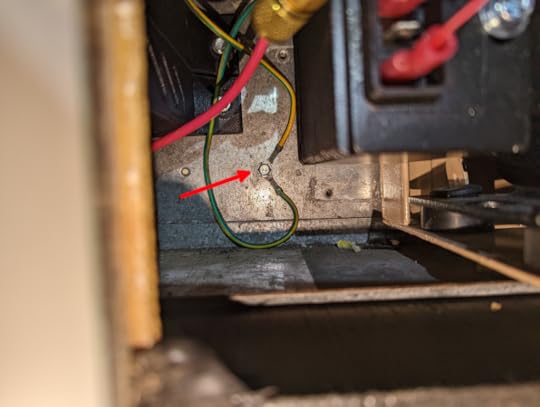
I’ll save you some heartburn here: Before you stand it up, the instructions don’t call out the two ground wires you took off. Maybe it’s part of the icemaker re-hookup, I don’t know, as I skipped that section since I don’t have an icemaker. These should be fastened now and not when you have it in the alcove and trying to do so through the small hatch. Re-use one of the machine screws and find an existing hole and fasten (RA).
Now it’s time to make the electrical connections. I decided I wasn’t going to use the existing 12ga wire connected back to the fuse panel with a 15a fuse. Instructions said, “Try it and see if it works.” I ran the recommended 10ga wire (I used red for positive) to the front with a 30a breaker (instead of a fuse) and connected directly to the hot side of one of the battery blocks. Since it has its own breaker, you don’t have to connect it to the load side of one of the main auto-breakers.
I pulled up some of the foam where the existing 12v wire ran (RA). NOTE: Don’t be like Gary and forget to come back and squirt some foam over here. It’s a big PITA to do it after the fridge is back in! Be sure to tie off the old 12v leads so they don’t short out. On my coach, these continue on to power the LED light above the stove (GA).
In my coach, I have a drawer under the stove and a slide-out pantry. Both need to be removed. They boxed in the drawer under the fridge, so the wire will come down behind the box (taking out this drawer doesn’t help). If you push enough wire through the hole, it should pop out behind the stove; otherwise, reach around to get it.
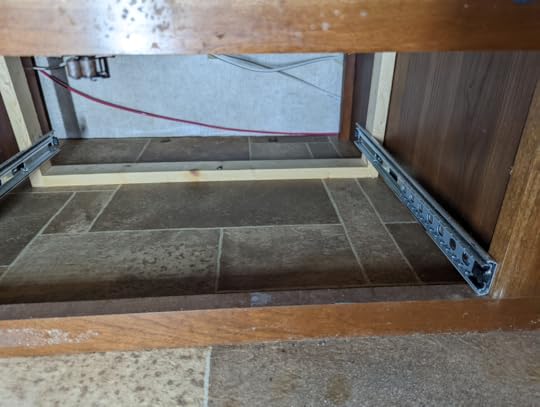
Feed it through to the right behind the pantry. There is a hole in the floor where all the wires go (RA). Stick your finger into it to feel for the corrugated plastic tubing. You want to make sure that this wire feeds into this tubing; it will make your life so much easier. Push about a foot of wire through here. If it binds, pull back slightly and try again.

Now, head outside after making sure the kitchen slide is extended. You should see the corrugated plastic tube (RA). Splitting it apart, pull the red wire out. It will be much easier to pull from here than to push it from up top. Pull enough wire out to make the arch under the slide-out and then all the way to the front of the coach, up to the ceiling level of the front storage compartment and add another five feet to make it into the compartment and down to the battery. Better to have a little more than not enough. We will cut the breaker into this later.
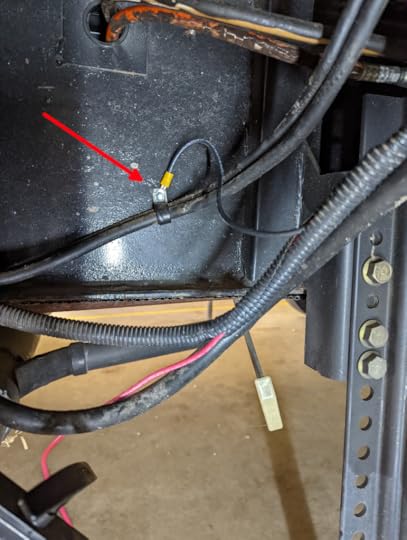
I’m going to save you some time here. I could not find a suitable place to tie off the ground wire inside the coach. And no, you can’t use the gas line because, as you can see in the above picture, the copper transitions to rubber hoses and loses its grounding capability. So, following the above process again, take a 10ga wire (I used black for negative) and run it as you ran the red wire. I got lucky and found a 20’ scrap at Lowe’s, which was plenty. There’s a hanger bracket with a Philips screw into the frame of the coach (RA). CAREFULLY, remove it with a #3 Philips head screwdriver. Allow me to repeat myself: CAREFULLY remove it with a #3 Philips head screwdriver. Run your red and black wires into the tubing (you’re going to have to snip off the three zip ties holding everything together. Take a picture before you do it and DON’T FORGET to come back at the end and re-zip tie them), with the red wire going all the way to the side body opening and the black wire coming out around where that screw was. Terminate the black wire with a #12-10 ring connector. Discard the crappy Philips head screw and use a #10 x 1” hex head self-tapping metal screw (I had a bunch lying around, but honestly, any #10×1” hex head sheet metal screw will work since the hole is already there. I like hex head for this since it is very easy to strip a Philips head in this scenario—don’t ask). Fasten the ring screw, then the bracket back onto the frame. Be careful not to over torque it and shear off the head of the screw (again, don’t ask).
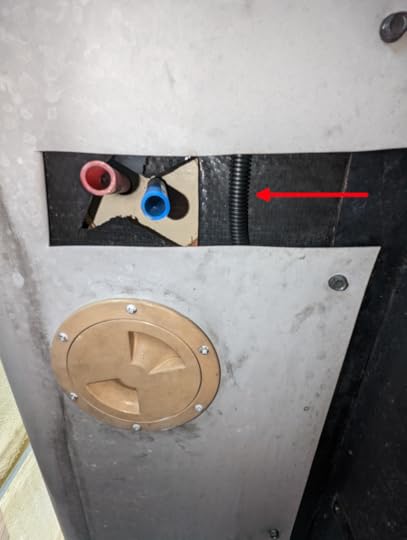
You can try using fish tape to push the wire all the way to the front, but at the convenience center there’s something blocking it. It is less frustrating to just take out all the screws on the bottom body flange (I don’t know how to better describe it) and tuck the red wire inside and re-fasten the screws. Once the red wire is run all the way to the front, up through the propane storage, and into the front compartment, I added corrugated tubing to bridge the opening where the water drains are at the convenience center (RA). Make sure it extends an inch or so in both directions.
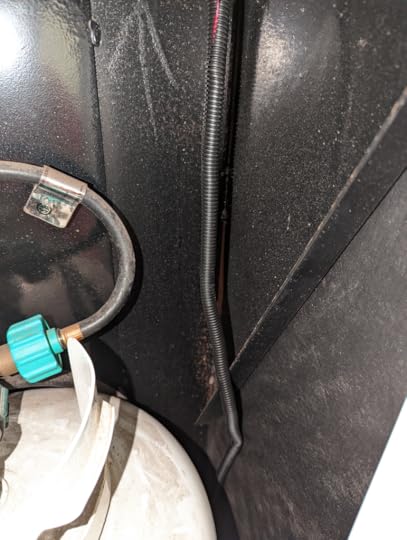
In the propane compartment, I added the corrugated tubing from the bottom all the way into the front compartment. Be sure to extend in several inches under the bottom metal piece
Inside the front compartment, find a suitable place to mount your 30a breaker and cut the red wire there. (TIP: Add a few inches in case you want to move it around). Per the instructions of the breaker, attach this wire to one end of it. Take the piece you just cut off, and again, as per the instructions of the breaker, attach this wire to the other end and mount the breaker to the wall. Make sure you trip the breaker! Take the other end of the cut piece and run it to a hot block or directly to the positive terminal on the battery. It can go on the hot side of one of the big breakers (not the load side). Once measured, cut it, or just leave it the length it was, your choice. Crimp a ring connector to the end of the wire large enough to fit on the terminal post and secure it (RA).

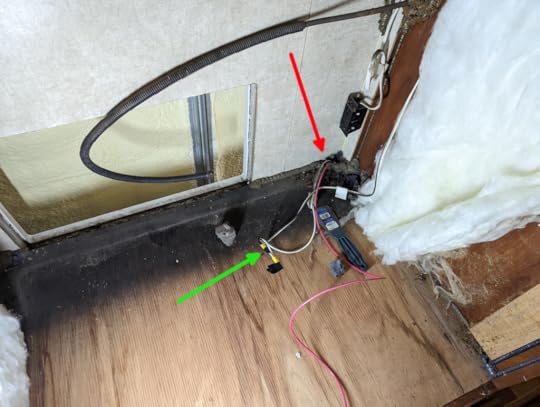
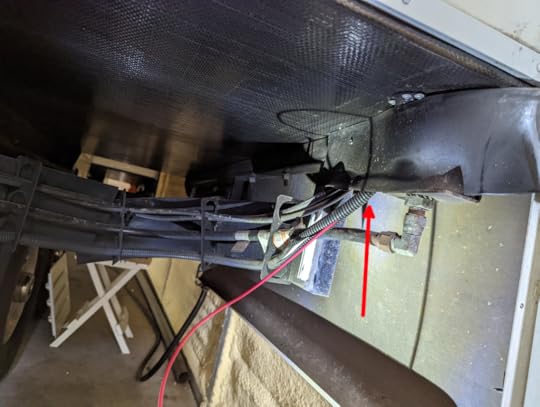
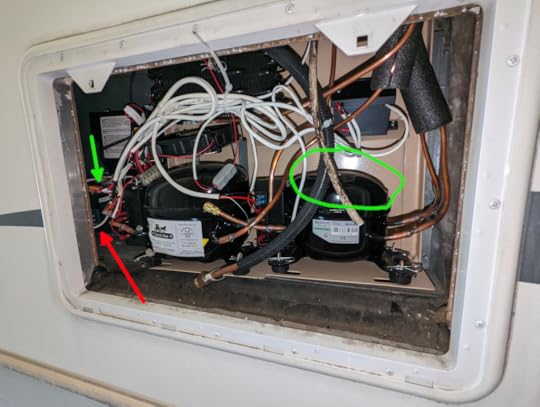
Back inside the coach, you can now cut your red and black wires and move the fridge back into the alcove. Going back outside, you can tie the red wire to the positive wire on the fridge and the black wire to the negative wire on the fridge using wire nuts or Wagu connectors (GA). And this is what the final assembly should look like (we’ll come back to the green circle and red arrow down below).
I noticed the frame flopped around a little so I added a third #10×1 self-tapping screw in the pre-drilled hole in the bottom right corner (RA).
FINAL TIPS: I do a lot of cable running, so I have a label maker and cable labels (in the parts list). It doesn’t matter how, just label the black and red wires frequently along the run. They typically use these wires in commercial 120V AC installations, and you don’t want to get confused later (or another owner of the coach) and think that these are AC lines. I labeled them, “12v 30A Refrigerator” and put them at each end, under each of the cabinets, at the chassis ground, and at the breaker.
FINAL OBSERVATIONS:
It only took a few hours to cool down.We put water bottles in the freezer, and they were ice cold in a couple of hours.For the temps, we tweaked it over the weekend and found setting 7 was the best for us, though I may tweak the freezer settings on the InkBird after an outing or two (but I’ll have to pull the fridge out a half-foot to get to it – see below).Left freezer box temp: -4 FRight freezer box temp: -1 FFridge box temp: Mid 30’s FFor the amperage draw, I took many samples over the weekend. The lowest I got was 7.5A but most of the time it was between 12.5A & 13.5A. Since it has dual compressors, they don’t necessarily always come on at the same time. Also, my timing of taking readings probably didn’t hit when it was idle (I’m in Florida and it was hot over the weekend).In hindsight, I probably should have run the corrugated tubing the entire length of the coach to avoid any rubbing on the wire and it shorting out and tripping the breaker. I’ll have to get more tubing and fix that.HEY JC REFRIGERATION:
The mounting location for the InkBird controller renders it unusable (RA—see final assembly image above). There really is no place to mount this thing that you can have access to it from the hatch.There is no room for the drain cup since this is a dual compressor model (Green Circle—see final assembly image above). Not a huge deal as I stuck the drain tube out one of the vent holes in the hatch cover.Had to add a third mounting screw. See above for details.There was no pre-drilled hole for the mounting screw on the lower left side. See further up for details.There were two grounding wires that weren’t accounted for in the instructions if you don’t have an icemaker. See further up for details.
Overall, we are quite pleased. It’s been running for a week now at the time of this post. We enjoyed frozen popscicles and fudgescicles over the weekend, something that was hit-or-miss with the LP version. I sleep better at night knowing that it won’t catch fire (or at the very least, way less probability of such).
Parts List
The refrigeration unit. Go to https://jc-refrigeration.com/ and buy the proper one for your box.Weize 12V 100Ah LiFePO4 Lithium Battery: https://amzn.to/3AzZwJCLithium converter: This will depend on your power center. I went through eTrailer.com30A breaker: https://amzn.to/3QUz5U110ga stranded wire at Lowes. 50’ spool in red and I found 20’ scrap in black. But they will cut to length. I was just in a rush.Nimbot label maker: https://amzn.to/3KaMSnCNimbot cable labels: https://amzn.to/3A9d0uh

December 25, 2020
August 4, 2020
New Covers


Stay tuned!
December 24, 2019
November 19, 2016
Cord Cutting Update – A Year Later
So it has been about a year since we cut the cord (or the beam in our case) and I wanted to give everyone an update.
During this year the Tablo has performed outstandng. We only lost a few shows due to an extended power outage during Hurricane Matthew. Even though we had back up power, our internet connection was down and it appears that the Tablo needs to phone home to get guide information so it didn’t record those shows. So for those shows we had to stream them off of Amazon at a cost since we dropped Hulu.
Speaking of Hulu, we did end up dropping it as it really added no value for the $11.99/mo. It seemed to only have shows on the major networks available the next day. The shows we really hoped would be available next day or even next week were on USA, TNT, HGTV, or SyFy. Now some of those networks have their own Roku apps, but quite frankly, it seemed there were MORE commercials on the streaming channel than on the cable channel itself and you can’t fast forward through them. Plus, you HAD to have a cable subscription to even stream them. WTF? If I had a cable subscription, I wouldn’t have the need to stream. These networks need smarten up: they should offer a paid subscription of $1.99/mo for commercial free streaming regardless of cable subscription. I’d do it in a heart-beat (but not $6.99 like CBS wants for their All Access).
During this time, my internet promotion, through Comcast, expired and they had a new one that if I upgraded from basic cable w/Internet to the next level, I also got HBO. Since the package was slightly more than just Internet, I went with it because I could then cancel the $15.99/mo I was paying to stream HBONow (because I’m addicted to Game Of Thrones) and I could switch to HBO Go for free (included with my cable). This also allowed me to stream CNN, and a bunch of the other channels that irritated me with more commercials.
I did wind up having to upgrade my wireless router to the latest and greatest to be able to support the streaming without buffering. I could have run direct CAT-6 cables to each Roku and the Tablo very easily and purchased an inexpensive switch, but I was lazy and needed some of the higher end VPN and security features of the wireless router.
Now to get to cost. In the year prior to cutting the beam, I paid around $2,000 for the year for DirecTV (HD DVR & two HD receivers). This past year we paid just over $400. And that included a season of a couple shows we had to pay for on Amazon because we didn’t get it. Plus a few episodes here and there that I screwed up and didn’t program the Tablo correctly or the aforementioned episodes lost during Hurricane Matthew. Also includes Netflix and several months of Hulu. I do not include my Amazon Prime cost nor the cost of internet, nor the router upgrade as I would have them regardless of having cable or not.
Overall, we are extremely pleased at the experience, with my wallet being overjoyed! I really think the cable and satellite companies need to wake up and embrace this new world of programming consumption otherwise they are going to go the way of the MaBell’s .
November 16, 2015
We Are Officially Cord Cutters
Or, to be more specific, Beam Bashers. Not that there was anything wrong with our service from DirecTV, having been with them since the early 90’s when they launched their first bird. In fact, when a hurricane past by a few years ago, we were watching satellite during and after the storm while cable was out for our neighbors.
But, alas, times (and viewing habits) have changed. We realized that 95% of our TV watching is programs that are available over-the-air for free. And the handful of other shows we watch are available on streaming services. Of course there was the fact that we were paying $130/month ($1,560/year) for the service; it just didn’t make sense anymore.
So I installed a Tablo 4-tuner DVR device and attached a 5TB external hard drive to it. I already had an amplified antenna on the roof from the days when DirecTV didn’t have local channels (here’s a link to a top of the line amplified antenna). The Tablo device will record and stream up to four live or recorded shows over your wired/wireless network to streaming devices like Roku (3 or 4), FireTV, or AppleTV. I opted for two Roku 3’s and one Roku 4 (for the home theater system). Additionally, you can watch on your Android or IOS device in or OUTSIDE of your home network. You can program Tablo from either the Roku app or the Android/iOS apps (the latter ways are easier & you have access to system settings).
Doing the math, I’m saving $89-$96/month — $101-$108 if we don’t keep Hulu — (after about 5-7 months of paying off the upfront costs of all the equipment). Here’s the breakdown:
$4.99/mo for the Tablo guide service (or $50/year or $150 for life; I opted for the life one);
$11.99 for Hulu No Commercials plan (though I’m not sure I’m going to keep this as we haven’t found much of anything we want to watch on it that’s not on Amazon Prime).
$8.99 for Netflix.
Say five to eight streaming shows per year (seasons) at $30/show for HD.
I did not include Amazon Prime in the calculations because I already have it for the 2-day shipping and the media is just a bonus. I also didn’t include streaming movies as we would watch them outside of satellite as well.
I did find that I had to enable 5GHz on my wireless router. The router I had couldn’t do 5 & 2.4 GHz at the same time, so several older devices wouldn’t connect. I wound up upgrading my router to a Netgear Nighthawk X6 AC3200 Tri-Band router (I have some additional security requirements so this may be overkill for most folks). You could keep your existing router on 2.4GHZ and add an additional wireless access point on 5GHz and accomplish the same thing. Another option is to use the Tablo and Rokus over wired Ethernet and then performance would be a non-issue, leaving your existing wireless at 2.4GHz.
Overall we’ve been happy with the setup. The Roku has voice search that is really cool as it searches several channel feeds for what you are looking for and presents them in a non-biased and easy to select way (I hear the FireTV search puts Amazon results up only and to see the results from other channels you have to drill down several menu options). In the next OS version 7 Search also allows you to search by Actor, Director, and another item that escapes my mind right now. My Rokus just got upgraded last night to OS 7 and they seem faster now. The Tablo is a little quirky and I wish their presentation would mimic more of a traditional guide then just the show icons. I will recommend you also get a 550VA or larger UPS just for the Tablo and antenna amplifier, so if a power outage, you can still record shows.
#CutTheCord #CordCutter #BeamBasher
January 12, 2015
TV Renewals and Cancellations
CBS has renewed NCIS: New Orleans, Madame Secretary, and Scorpion (Yay!)
USA has cancelled Covert Affairs (B00!) on a cliffhanger.
Arrow will return to CW on 1/21 sans Oliver Queen. Someone else will don the green hood. Hopefully Ollie will be back otherwise, IMHO, the show is done for.
12 Monkeys premieres and Helix returns on SyFy on 1/16. I’m looking forward to seeing what 12 Monkeys has to offer. From IMDB: “Follows the journey of a time traveler from the post-apocalyptic future who appears in present day on a mission to locate and eradicate the source of a deadly plague that will eventually decimate the human race.”
Once Upon A Time returns on 3/1 on ABC.
Game of Thrones returns on 4/12 on HBO. Hopefully the long hiatus won’t deter viewership.
Orphan Black returns on 4/18 on BBC America with a new clone showing up.
Audience (DirecTV) has renewed Rogue for two more seasons set to air this spring and 2016, respectively.
Gracepoint was cancelled after one season (starring David Tenant). All I can say is “Duh,” considering it was identical to Broadchurch (starring David Tenant) on BBC.
As we all know Longmire (starring Katee Sackhoff) was cancelled on A&E. However, Netflix has picked it up and will continue the drama sometime this year (Yay!)
Final six episodes of Continuum will air this year on SyFy. Sad to see this go but at least it will be allowed to wrap up.
June 8, 2014
Kitchen Dining Floor Replacement DAY 4 & 5
Now comes the part of going through the rest of the details. Here is our progress this weekend so far:
Step Up Into The Kitchen:
 Still needs to be trimmed out with quarter round
Foyer
Most of the quarter round is down. Just needs caulking and painting

Step up still needs some quarter round on the face

Close up of the front door matching quarter round. A lot of coping done here. Thanks to my father-in-law for popping over and
and setting me curved on this one.

Transition into the hallway closet that still has tile. This is a temporary transition pending the renovation of the closet
Hallway
All of the quarter round is down and caulked (thanks to my mother-in-law for popping over to lend a hand)


Transition to different laminate in Steph’s old room (now the grandkids’ room)

Transition to carpet into the office. Don’t like how this turned out, so I’m going to have to figure something else out.
And finally, Tonya’s creation. In the dining room we have a bay window that has a seat cushion on it that is probably older than dirt (came with the house). The dogs love sitting on it and looking out, patiently waiting for us to come home from the daily grind of going to business (as the old timers would say). We had a new piece of three inch foam made and we bought a bunch of fabric and Tonya spent yesterday and today on the ol’ Singer an made this:

And yes, I am an Amsoil dealer, so if anyone needs any high quality synthetic lubricants, let me know!
Until next time….
May 26, 2014
Kitchen Dining Floor Replacement DAY 3
All of the flooring is down except a strip under the sink and the steps. Unfortunately, my Craftsman table saw literally fell apart and crashed to the ground. Can you believe they made it out of plastic instead of metal? I guess Craftsman quality is not what it used to be. So those parts will have to wait until I get a new table saw this week (wonder what I will get…hmmm…). Also sttill need to put down the transitions and the quarter round.
Here are the progress pictures. It looks so nice once it all comes together.
Kitchen:

Dining:


Foyer:

Hallway:


Transition To Tile In Spare Bath:

May 25, 2014
Kitchen Dining Floor Replacement DAY 2
Another productive day today. Thought we blew up the stove when we moved it because it started sparking when we turned it on. But, whatever it was, it appears to have not been of any consequence.
No injuries to report, just a lot of sore muscles. The previously reference toe nail is still with us.
Progress pictures:
Kitchen:

Dining:

Apache just has to be where the action is
Foyer:

Hallway: