
Dan Reeder's Blog
November 3, 2024
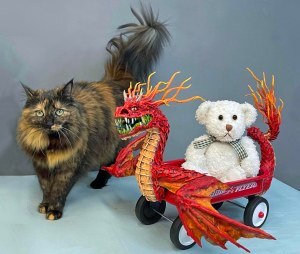
Teddy’s Little Red Dragon
Here is my latest silly dragon-like project. It is titled “Teddy’s Little Red Dragon” (although the photo also has my sweet helper, Maisie with Ted). Click on the photo if you want to see the time-lapsed video. It takes you to Youtube. Please refresh until you are passed ads. I have never monetized my videos yet these ads were added anyway against my wishes.


August 31, 2024
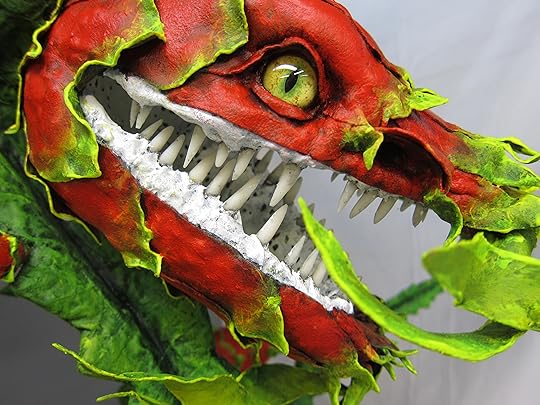
Another dragon-sort of project.
I finished another crazy dragon project. Maybe not as strange as my clown/dragon hybrid. But strange nevertheless. I called it “The Year of the Dragon Fruit-like Dragon.” Please don’t email me saying that this isn’ exactly what dragon fruit looks like. Dragon fruit also doesn’t have teeth. So I know. If you click on the photo below it will take you to Youtube so that you can see the time-lapse video.
PS. I have another crazy project started. I’ve just gotten older and nuttier I think. Stay tuned.
April 8, 2023
Yes, yes, I have been delinquent about posting
Ever since Covid hit, three years ago now, I just can’t seem to keep my website or blog up to date. So here’s a quick rundown of some projects I have made over the last year or so from most recent to less.
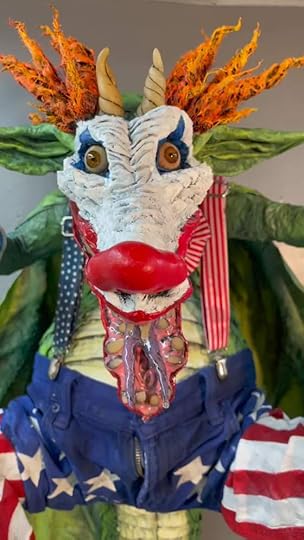
I can’t seem to get away from dragons. And this is the craziest one I have made. It is a hybrid clown/dragon. I have named it, “Ronald McDragon.” I am still working on the video to go with this project. But here’s a first glimpse.
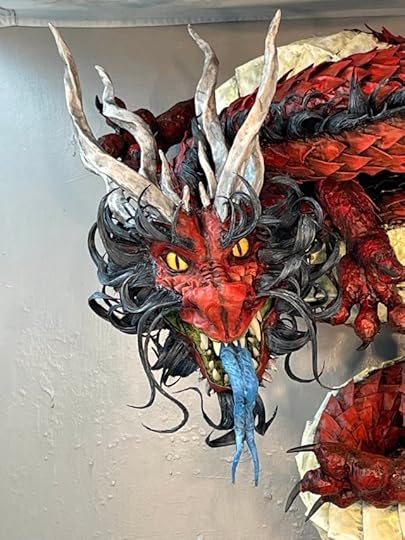
Before Ronald I made a Chinese Dragon. I’ve always wanted to make a true Chinese dragon. If you click on the photo it will take you to the YouTube video of the build. There are now ads place on YouTube videos without my permission. I do not get compensated for them. Please just refresh until the video shows. And DO NOT click on the ad even if you like whatever product they are selling. I hate the ads on YouTube!
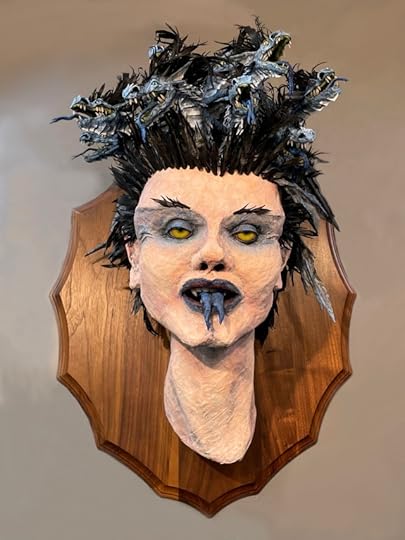
And I also made this medusa-like head. I cleverly call it “Mindful of Dragons.” Again, if you want to see the video of this built click on the photo (and refresh past the ads!).
January 1, 2023
Beware the scammers!
It is such a bummer to see scammers, all from China, using photos from my website and blog to PRETEND to sell my dragon trophies as lamps and wall hangings. These scam sites proliferate faster than I can file copyright complaints. However all the sites hosted by Alibaba, a Chinese owned company, simply pass the complaint on to the scammer! They take no action. Worse yet, these have started to show up on Amazon! Below is a photo from my website showing my version of the dragon Alduin.

Here is a screen shot of the Amazon page I just visited.

This is obviously my Alduin. It does not exist in resin form or any other form. Well, except for the ONE trophy I made, the original piece, that was purchased by a fan. Crazier yet, if you look at the bullet points for this product, they are all about STRAWS! In fact the last bullet point talks about “children’s penis!” Strange! Here is a screen shot of those. It’s kind of hard to see.

I’m writing this post after every possible attempt to alert Amazon to this fake seller. You would think that Amazon would appreciate knowing about scam sellers who will only take your money and send you nothing in return. In fact, some people who get scammed by this will get reimbursed by Amazon! Again, you’d think Amazon would allow some pathway for people like me to let them know about the scam sellers on their platform! I guess Amazon is perfectly willing to allow predation on their site. I swear this is the age of the fake product!
Thanks for reading my rant!
January 14, 2019
Paper Mache Ice Dragon – Finished!
Well here it is, with the lights on and off. I say this everytime and it is especially true with this project, but the photos just don’t capture how really pretty this dragon is in person. The camera just can’t pick up all the subtlety of the color.
I took time-lapse video of the process. I’m editing all of that right now. I’ll have a video to post in a couple of days.
This was fun!
P.S. There are flaws in this design. I already know them all, just in case you think you need to point them out! 
Paper Mache Ice Dragon – Finished!
First, the painting.
Painting this project was a lot more challenging than most. Because the paint does not easily come off the resin horns and eyes I had to take care from the beginning not to splatter paint everywhere. My “fast and furious” method of painting became slow and laborious. Don’t get me wrong, I took this as a challenge and enjoyed every minute of it.
First I carefully painted between all the horns. Then around the eyes.

On the main part of the trophy I painted first with dark blue, then while it was still wet I added some white to get a lighter shade on the scales.


Of course after the initial painting dried, I “blackwashed” the project. This is where many people who use my techniques hesitate. They fall in love with the bright colors and they don’t want to “ruin” the piece.

But it never does. It accentuates the detail and makes the colors pop even more.


As I did with the mouth, I added glitter over the entire project. I wanted it to look frosted. It’s an ice dragon after all. Still, it was risky. But I have to say that I’m very happy with the way it turned out.


I’ll add some final photos in the next post.
P.S. I must give a shout out to my little “helper” Maisie! How could I work without her encouragement. (Abbie doesn’t care about my projects, but she’ll stop by to say “hi” once in a while.)

Thanks for stopping by!
January 2, 2019
Paper Mache Ice Dragon – Final Assembly
Ice Dragon – Details
Happy New Year to you all!
I know I haven’t posted for a while, but that doesn’t mean I haven’t been working. There are parts of this project that just take a lot of time. For example, I left you last time having just finished adding all of the horns. There were a lot of them. I added cloth mache in between all of those horns.
I had to be more careful than usual because I didn’t want to get too much glue on the resin horns. It was difficult cleaning the glue off the horns once I was finished. This took a few days.
I added two rows of “frills” (not sure what else to call them…sort of a webbed mane I guess) on the top of the neck. I twisted some newspaper around pieces of wire clothes hanger and wrapped them with masking tape to make the spines.
After arranging them on the neck I draped wet cloth between them.
After the cloth dried I trimmed them using scissors and an Exacto knife. I added some holes to give a more “dead-like” appearance.
Maisie wanted to see what I was doing so I moved her cat post close to the action.
I also wanted some tattered shreds of skin (or something) under the chin and neck. I just cut some shapes out of the cloth. I painted them before hot gluing them under the neck.
I decided rather than using the triangular scales I usually make to just add some plate-like shapes on the neck and head. I did this using “paper clay”. There are many recipes for paper clay online. I just mix some toilet paper, Elmer’s glue, and commercial “Celluclay” together into a kind of thick dough.
Then I tear off blobs of the clay and press them onto the dragon.
With that I have finished the sculpting. I think I’m happy with the result. Here are photos of the project with the lights off …
…and with them on.
Next….painting! Thanks for stopping by!
December 13, 2018
Paper Mache Ice Dragon – Horns
Okay, there are a couple of things besides horns I should discuss, like how I hooked up the lighting. But I promised horns on this post, so that’s what I’m showing. I’ll do other posts later about the lights and switches etc..
I know it’s been quite some time since I last posted. That’s because it has taken a long time to put on these horns, particularly in combination with the lights. Speaking of lights, I took a big risk by adding lights under many of the horns. They are either going to look great or completely hokey and terrible.
For the biggest horns I drilled holes in the base.
I inserted the lights as I attached the horns. I used lots of hot glue for that.
I added the biggest horns first.
Then smaller ones.
At one point I stopped to add some jowls at the back of the mouth.
Then I added more horns.
And more carefully placing lights under many of them.
The trick is learning when to stop adding horns. I have to say that each horn was carefully and deliberately placed. A lot of compulsive putting one on and taking it back off went on behind the scenes. These horns were also not easy to cut. I used a jig saw with a blade made for plexiglass to cut them.
Of course I also added horns to the jowls.
And a few more.
Here is what it looks like now with the lights off. I must point out again, that 99% of the time this project will be displayed with lights off. It has to look good without lights.
I made sure that the lights under the horns were on seperate circuits from the eyes and the mouth. That way, if I hate the way the lights look under the horns I can just turn leave them off. Here is the dragon with the lights on only in the mouth and eyes.
And here is one with all the lights on.
Not sure how I feel about them yet. We’ll see after painting how I feel about them.
Either way, you’ll notice that the horns are a little hard to see in the photos. That’s the downside of icicle-like horns I guess. But I like them nonetheless. So far so good.
More later. Thanks for stopping by.
December 6, 2018
Paper Mache Ice Dragon – a little cloth mache before the horns
Okay, I know I said I’d do horns next. But I decided I wanted a layer of cloth skin on the head first. It would be a much better surface for using hot glue to apply the horns. So a quick cloth mache on the face.
I always fold the cloth to use for eyelids. I usually do under the eyes first.
Then over. The nice thing about wrapping eyes with the cloth is that wrinkles occur naturally adding a touch of realism.
I fold a long strip of cloth for lips, then fill in above them with pieces of cloth.
I push a large square piece of cloth into the nose and piddle around until I get the shape of nostril I like.
I’m very happy with the way the eyes look with the lights off. The clear cast resin with irises and pupil ground from the back with a Drumel have a nice look to them.
Okay, horns next. I promise.
December 1, 2018
Paper Mache Ice Dragon – Mount the head, add eyes and nostrils
Head Mount- Eyes and Nose
I know it’s been a little while since I posted last. But I am posting almost real time and I need to work before posting. Thank you for your patience (except for the guy who wanted to know when the video would be done.
Dan Reeder's Blog

- Dan Reeder's profile
- 5 followers


![[image error]](https://gourmetpapermache.files.wordpress.com/2019/01/6on-fixed-small.jpg)
![[image error]](https://gourmetpapermache.files.wordpress.com/2019/01/6off-fixed-small.jpg)
![[image error]](https://gourmetpapermache.files.wordpress.com/2019/01/2on-fixed-small.jpg)
![[image error]](https://gourmetpapermache.files.wordpress.com/2019/01/4on-fixed-small.jpg)
![[image error]](https://gourmetpapermache.files.wordpress.com/2019/01/1xa.jpg)
![[image error]](https://gourmetpapermache.files.wordpress.com/2019/01/2xa.jpg)
![[image error]](https://gourmetpapermache.files.wordpress.com/2019/01/3xa.jpg)
![[image error]](https://gourmetpapermache.files.wordpress.com/2019/01/4xa.jpg)
![[image error]](https://gourmetpapermache.files.wordpress.com/2019/01/5xa.jpg)
![[image error]](https://gourmetpapermache.files.wordpress.com/2019/01/6xa.jpg)
![[image error]](https://gourmetpapermache.files.wordpress.com/2019/01/7xa.jpg)
![[image error]](https://gourmetpapermache.files.wordpress.com/2019/01/8xa.jpg)
![[image error]](https://gourmetpapermache.files.wordpress.com/2019/01/9xa.jpg)
![[image error]](https://gourmetpapermache.files.wordpress.com/2019/01/10xa.jpg)
![[image error]](https://gourmetpapermache.files.wordpress.com/2019/01/11xa.jpg)
![[image error]](https://gourmetpapermache.files.wordpress.com/2019/01/12xa.jpg)
![[image error]](https://gourmetpapermache.files.wordpress.com/2019/01/13xa.jpg)
![[image error]](https://gourmetpapermache.files.wordpress.com/2019/01/14xa.jpg)
![[image error]](https://gourmetpapermache.files.wordpress.com/2019/01/15xa.jpg)
![[image error]](https://gourmetpapermache.files.wordpress.com/2019/01/16xa.jpg)
![[image error]](https://gourmetpapermache.files.wordpress.com/2019/01/20xa.jpg)
![[image error]](https://gourmetpapermache.files.wordpress.com/2019/01/19xa.jpg)
![[image error]](https://gourmetpapermache.files.wordpress.com/2018/12/1hh.jpg)
![[image error]](https://gourmetpapermache.files.wordpress.com/2018/12/2hh.jpg)
![[image error]](https://gourmetpapermache.files.wordpress.com/2018/12/3hh.jpg)
![[image error]](https://gourmetpapermache.files.wordpress.com/2018/12/4hh.jpg)
![[image error]](https://gourmetpapermache.files.wordpress.com/2018/12/5hh.jpg)
![[image error]](https://gourmetpapermache.files.wordpress.com/2018/12/6hh.jpg)
![[image error]](https://gourmetpapermache.files.wordpress.com/2018/12/10hh.jpg)
![[image error]](https://gourmetpapermache.files.wordpress.com/2018/12/8hh.jpg)
![[image error]](https://gourmetpapermache.files.wordpress.com/2018/12/9hh.jpg)
![[image error]](https://gourmetpapermache.files.wordpress.com/2018/12/11hh.jpg)
![[image error]](https://gourmetpapermache.files.wordpress.com/2018/12/12hh.jpg)
![[image error]](https://gourmetpapermache.files.wordpress.com/2018/12/13hh.jpg)
![[image error]](https://gourmetpapermache.files.wordpress.com/2018/12/1cloth-mache-under-eye.jpg)
![[image error]](https://gourmetpapermache.files.wordpress.com/2018/12/2cloth-mache-over-eye.jpg)
![[image error]](https://gourmetpapermache.files.wordpress.com/2018/12/3cloth-mache-around-the-eyes.jpg)
![[image error]](https://gourmetpapermache.files.wordpress.com/2018/12/4cloth-mache-lips.jpg)
![[image error]](https://gourmetpapermache.files.wordpress.com/2018/12/5cloth-mache-nose.jpg)
![[image error]](https://gourmetpapermache.files.wordpress.com/2018/12/6-cloth-mache-nose-finished.jpg)
![[image error]](https://gourmetpapermache.files.wordpress.com/2018/12/7very-cool-clear-cast-eyes.jpg)