
Luisa Weiss's Blog
April 24, 2023
It's Time
I started this blog in August of 2005 on a whim. Never could I have expected it to become such an important part of my life, both personally and professionally. In fact, for the first few years of blogging, I kept my identity here firmly hidden because I was sure the blog would remain nothing more than a little passion project. It is nearly impossible to remember what online life was really like in those days, but I'll always treasure the feeling of utter bliss of discovery and kinship I stumbled upon when I started blogging and found an entire community of like-minded people right on the other side of this screen.
It is hard to quantify what this blog means to me, though if we're talking numbers, there are nearly 900 posts and almost 30,000 comments collected here. Thanks to The Wednesday Chef, I have written two books and have another on the way. I wrote a monthly food column for several years. I have made countless connections and friends for life. The person I used to be is captured here for posterity, as are the memories and sensations of my former life in New York and the early years of my life back in Berlin. This is the closest I ever came to keeping a real diary. Not only are many of my favorite and most beloved recipes gathered here, but so are countless dear and tender memories, like summers in Italy over the years, the wobbly transition from New York to Berlin, the early years of life with children, and the transformation I made from blogger to book author. Now it's time for me to finally put up the "Closed for Business" sign here, though the archives of The Wednesday Chef will stay on for as long as I have any say in the matter.
You can subscribe to my newsletter Letter from Berlin at Substack now, either for free or with a couple varieties of paying options. Your support enables me to continue making a creative life. In the newsletter, I share recipes, of course, as well as deeper thoughts on books I'm reading, essays about family life and creativity, and inside peeks at the process of writing another cookbook. We can still connect in the comments there and I look forward to continuing the conversation we've been having for almost 18 years now.
I am deeply grateful to everyone who ever followed a link to find me online. You allowed me to make my dreams of being a writer become a reality. You have read along here and commented with wisdom and care and affection. You have come to my readings and events and bought my books and cooked my recipes. And you have connected to the stories I've told about the important people in my life and blessed me with your interest and kindness and appetite.
Thank you.


November 22, 2021
Susan's Spungen's Chocolate Semifreddo with Candied Salted Almonds

Good morning! Have I ever told you about the time I interviewed to work in the test kitchen at Martha Stewart Living, back in the fall/winter of 2000/2001? I had recently left Paris behind me and was hoping to get a job in publishing in New York. My sights were set on book publishing, but I couldn't resist applying to this magazine job anyway (Martha Stewart! The magazine! The test kitchen!). I interviewed at a lot of places in that period, many that I don't even remember anymore, but bits and pieces of this interview have stuck with me all these years later. The desk in the test kitchen that had a view of the Empire State Building, the blue suit I was wearing, the way the light shone through the window behind the desk of the person I was meeting with, my interviewer's striking dark hair. That person was the food director of the magazine, a lovely woman named Susan. We had a really nice conversation and then...I honestly can't remember what happened next. Did I get the job offer I was hoping for from Simon & Schuster before she could get back to me? Did she go with someone else?
That part is forever lost to me, but Susan (because yes, that Susan turned out to be the Susan Spungen) always stuck in my mind. She was so charming and fun to talk to and the interview had been actually enjoyable. Over the years, Susan's stature in the food world grew and grew - she left the magazine, wrote a cookbook, became a food stylist for blockbuster movies, wrote more books, became a New York Times contributor and creator of the world's most beautiful cookie assortment and most recently started a great recipe newsletter called Susanality. These days, Susan and I are Instagram friends, which feels very full circle indeed.
Anyway, I realize it is Thanksgiving week and you probably need a chocolate recipe like a hole in the head, but I've been meaning to tell you about this semifreddo from one of Susan's newsletters since the summer, so I'm just going to go ahead and do it, especially for the rest of you who aren't planning on immersing yourselves in turkey wings, roasting squash and exploding cranberries for the next five days. (By the way, Susan's newsletter is currently 20% off, just in case you're looking for a sweet little gift for someone or want to treat yourself - it is very much worth it.)
Alright, first things first. Semifreddo. Do you know what it is? Just in case you don't, the short answer is that it's a frozen Italian dessert. There are a million variations out there, because it's such an easy dessert to riff on, but the basic concept of semifreddo is a whipped and creamy custard that is poured into a loaf pan, frozen until solid, then unmolded, sliced and served. This summer in Italy, my mother invited friends over for dinner and asked me to make dessert. Since Susan had just written about the semifreddo, which she made with malted milk powder and vanilla bean, and a crunchy shower of salted candied almonds, I couldn't resist trying it.
But cooking in my mother's house in Italy is a bit like cooking in a vacation rental. Despite the fact that she has plenty of pots and pans and utensils, everything's a little...weird? The knives are all dull. The whisk is from a thrift store in Berlin and probably older than me. The scale is from a thrift store in Berlin and definitely older than me. The wooden cutting boards all smell like garlic. Basically, it's not my kitchen and doing anything besides the usual mealtime prep in it feels a bit like tightrope-walking. But armed with Susan's recipe, pared down to the absolute essentials (bye-bye vanilla extract and malted milk powder, silicone baking mats and flaky salt), I felt as prepared as I was going to be.
And despite cutting every conceivable corner and armed with really only the most basic kitchen things, the semifreddo was a show-stopper. The definition of a perfect recipe! Silky-smooth, rich and dark, with the gorgeous bittersweet crunch of the candied salted almonds against the velvety slick chocolate cream, it rendered everyone at the dinner time speechless, which is always the nicest feeling. And listen, if I could do it at my mother's house, you can most definitely do it wherever you are.
Below I'm going to put the recipe the way I made it (more or less). For the original, make sure you head to Susan's newsletter, linked below. (If you're in Germany and looking for malted milk powder, you can find it at Indian grocery stores, keep an eye out for the Horlick's brand.)
Note: This post includes affiliate links and I may earn a commission if you purchase through them, at no cost to you. I use affiliate links only for products I love and companies I trust. Thank you.
Chocolate Semifreddo with Candied Salted Almonds
Adapted from Susan Spungen's Susanality newsletter
Serves 6 to 8
For the salted candied almonds:
2 teaspoons unsalted butter, plus more to grease parchment
�� cup/70 grams whole raw almonds, very roughly chopped
�� cup/50 grams granulated sugar
�� teaspoon flaky sea salt
For the semifreddo:
1�� cups/350 ml whole milk
6 ounces/170 grams extra bittersweet chocolate (70%)
4 large egg yolks
7 tablespoons sugar
3 large egg whites
Large pinch of salt
1. To make the candied almonds: Butter a piece of parchment paper, foil, or a silicone baking mat and lay it on the counter. In a medium (10-inch) skillet, combine the butter, almonds and sugar. Cook over medium-high heat, stirring occasionally, until the almonds are toasted-looking and the sugar is liquefied and has turned a deep amber color, 5 to 7 minutes. Pour out onto the parchment and, using a metal offset spatula, press them down to a single layer, but don't spread them out too much. Immediately sprinkle with the flaky salt and let cool. When cooled, chop into smaller pieces (leave half of the almonds a little chunkier and store in an airtight container; these will be for the top).
2. To make the semifreddo: Line a standard (8�� x 4�� x 2��-inch) loaf pan with a large piece of plastic wrap. Leave enough excess so it can be completely folded over once it's filled.
3. Put the milk in a small saucepan and heat slowly over low heat. Meanwhile, chop the chocolate into small pieces and place in a medium bowl. Set a fine-mesh strainer on top of the bowl with the chocolate. Set aside near the stove.
4. Combine the egg yolks with 2 tablespoons of the sugar and whisk until liquified. When the milk is steaming and bubbling around the edges, slowly whisk it into the eggs and return the mixture to the saucepan. Cook it over medium heat, whisking constantly, until slightly thickened, 4 to 8 minutes. If the mixture starts to curdle, briefly remove it from the heat. You���ll know it���s almost done when the foam starts to subside and the mixture begins to thicken. At this point, turn the heat down to low to avoid scrambling the eggs, and cook until shiny and smooth and thick enough to coat the back of a spoon. The consistency should be similar to heavy cream (rather than a thick pastry cream). Whisk in the vanilla extract and immediately pour it into the strainer over the bowl of chocolate, leaving any curdy bits in the pan. Push it through the strainer using a rubber spatula. Stir the two mixtures together briefly, let sit for 5 minutes, and stir again until smooth and the chocolate is completely melted. Set the bowl in a larger bowl of ice. Stir occasionally until cold, then remove from the ice.
5. Heat a large saucepan with a few inches of water in it until simmering. In the bowl of a stand mixer (or just a metal bowl if you are using a hand mixer), combine the egg whites with the remaining 5 tablespoons sugar and the salt, and set it over the simmering water. Whisk constantly, hand-holding the whisk attachment until the mixture is hot to the touch and the sugar is completely dissolved, about 2 minutes, then attach the whisk attachment to the mixer and beat the egg whites until stiff and glossy. Be careful not to overbeat, as you���ll want the meringue to be smooth and silky so that it folds easily into the chocolate.
6. Fold the meringue into the chocolate mixture: Using a rubber spatula, stir ��� of the meringue into the chocolate mixture to lighten it, then gently fold the rest in until no streaks remain, taking care not to deflate the mixture.
7. Use the rubber spatula to nudge about half the chocolate mixture into the pan. Sprinkle with the more finely chopped half of the candied almonds. Top with remaining chocolate mixture. Fold the plastic over to wrap completely. Find a flat, level surface in the freezer and freeze overnight.
8. When ready to serve, tap the semifreddo out of the pan, unwrap, and place upside down on a serving platter. Top with the remaining almonds. Slice and serve immediately.
November 15, 2021
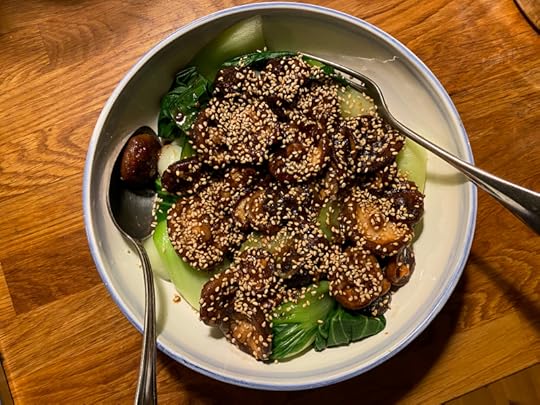
David Tanis's Glazed Shiitakes with Bok Choy
Let me set the scene for you. It is 5:16 pm on Monday evening. It is very dark out. I am still wearing my pajama top under my sweater, because I never got around to showering today. The boys had to stay home from school and Kita today and you know how these things go. Mom's personal hygiene is always the first to go unless Mom insists on showering, everyone else be damned, and sometimes that small indulgence ("indulgence") is just a hill too far. (Is that the right metaphor? I'm tired.) (Also, "Mom"? Sigh.)
The boys are watching a movie. They watched a movie yesterday too. And the day before that too. I no longer really care that they're watching a movie a day multiple times a week. I mean, objectively, I know it's not great? But I don't care anymore. I'm sitting here next to them, making pretend that we're spending time together and that I'm present, but I'm typing away here, trying to work, trying to achieve something. ("Achieve." Sob.)
Choosing the stupid movie was a struggle. Voices were raised. Tears were shed. Rooms were left. The older child doesn't want to watch what the younger child wants to watch and the younger child sometimes just wants to get its way and one of them is intractable and the other one is mostly agreeable and I try to be fair and balanced and sometimes I end up getting so mad about the stupidity of all of the arguing and complaining and anyway, wasn't acquiescing to a movie about me trying to practice some form of self-care and now it feels like it's backfiring and omg get me out of here, no, really, I need to leave the house, but I can't and also, I'm wearing yesterday's underpants and ten-year-old sweatpants.
(If it sounds like I am on this parenting experience solo right now, well, I am, because despite the fact that the poor man has worked from our utility room since March 2020 and basically never leaves the house anymore, Max had a positive PCR test last week and has been in masked isolation in a separate room in our apartment since Thursday evening (THURSDAY EVENING), which basically feels like a benevolent yet still hungry-three-times-a-day ghost has moved in and my husband has moved out. Mercifully/miraculously, the boys and I are negative!)
But! Let's focus on good things, shall we? This recipe! Which I first made several weeks ago, not thinking much of it, just needing to use up some wilty bok choy and funny-looking shiitakes that I'd bought as a special at the grocery store and then forgotten in the fridge for nearly a week, urgh. I even declined to take a photo, just in case, because I just figured it would be whatever, and then it went and straight up blew our minds and I didn't see that coming at all!
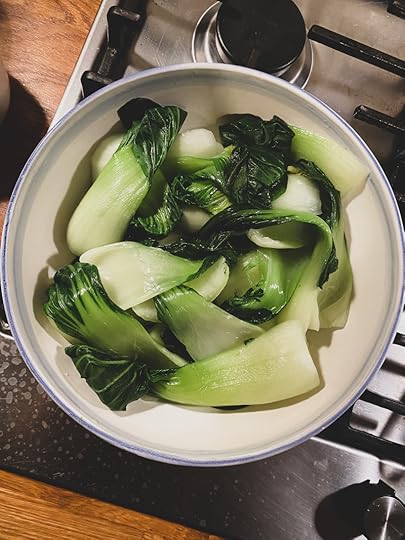
To make it, you first blanch some bok choy. Before blanching, you cut off the ends of the bok choy so that you're left with individual leaves rather than little bulbs. You drain these and let them cool, then arrange them in a serving dish.
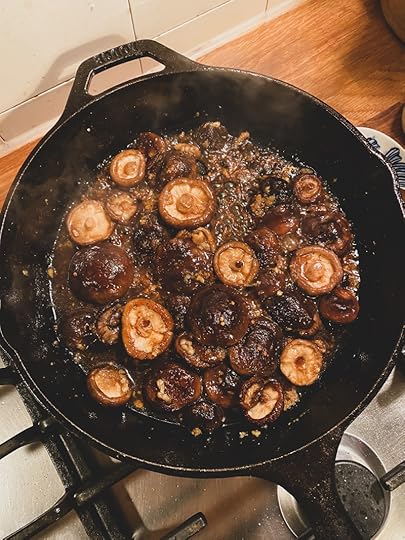
Next you deal with the mushrooms. You stem the shiitakes, but leave them whole, and fry them together with some kind of chile (the first time, I used one hot fresh Turkish chile, which was delicious; the next time I used one tiny dried Calabrian chile and it was also delicious - but in both cases, one chile was plenty for making this fiery enough that small children wouldn't be able to eat it and grown-ups would get a runny nose). Then you add minced garlic and ginger and what seems like a lot of soy sauce as well as sugar and sesame oil. This boils down, glazing the mushrooms and making them incredibly savory and delicious.
This mixture is scraped over the blanched bok choy and then topped with sesame seeds (and scallions, if you like, but I find it richly flavored enough without the scallions adding another layer of allium flavor). You need to serve it with rice to soak up the delicious sauce and provide a bit of soothing balance to the punchy, moreish flavor of the mushrooms.
Most thrillingly, if you, like me, have a grown person in your household who thinks they hate mushrooms, this will possibly be the dish that finally makes them change their mind. Yes, really! I don't know why this feels like such a triumph to me, but it does. For years, I've been trying to find a way to change his mind and this finally did it.
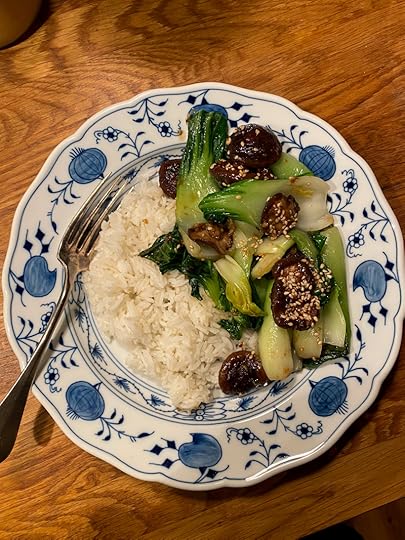
The nicest thing about the whole thing is that it's so satisfying and delicious that you don't have to make anything else for dinner (besides rice, yes, and fried eggs and toast for your children who refuse glazed mushrooms and bok choy no matter how wonderful they are). Win win win.
But now it's 6:14 pm and the movie is over and the boys are bickering again and it's even darker outside than it was before and once more I don't know what to make for dinner! Off I go...
David Tanis's Glazed Shiitakes with Bok Choy
Adapted from the New York Times
Serves 2 as a main course with rice, or 3 to 4 as a side dish
1-2 pounds baby bok choy
2-3 tablespoons vegetable oil
1 small dry red Calabrian pepper or one fresh red chile pepper
1 pound shiitake mushrooms (about 4 dozen), stems removed
Salt and pepper
4 garlic cloves, minced
1 tablespoon grated ginger
1 tablespoons sugar
1 teaspoon sesame oil
3 tablespoons tamari or soy sauce
6 scallions, sliced diagonally, for garnish (optional)
1 tablespoon roasted sesame seeds for garnish (optional)
1. Bring a large pot of water to a boil. Cut off and discard stem ends of bok choy. Separate leaves, rinse and drain. Drop leaves into boiling water and cook for 1 to 2 minutes, until barely cooked. Immediately remove and drain. Arrange leaves on a serving platter, then set aside.
2. Put a large wok or cast-iron skillet over high heat. Add oil and heat until nearly smoking, then add hot peppers and shiitake caps, stirring to coat. Stir-fry for 2 minutes. Reduce heat slightly and add garlic, ginger, sugar, sesame oil and tamari. Stir-fry for 1 to 2 minutes more.
3. Spoon shiitake and pan juices over reserved cooked bok choy. Garnish with scallions and sesame seeds, if using. Serve immediately or at room temperature.
November 8, 2021
Emma Laperruque's Easy Chicken Schnitzel
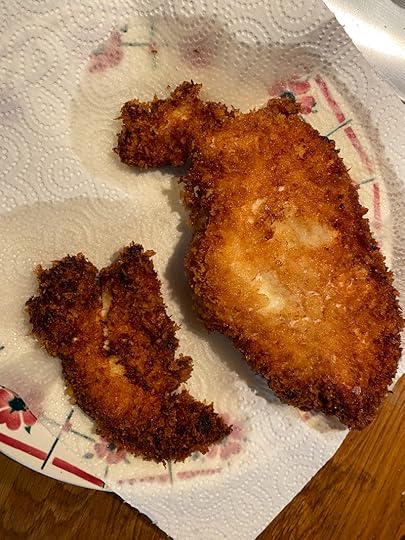
Well, remember how I said that I was still trying to figure out my way back to the kitchen on August 23rd? It's November 8th and I'm just barely getting there! September and October were mostly about survival. We ate a lot of Abendbrot and fish sticks and pasta and salad. I avoided the kitchen as much as I could. Happily, though, I did have one very big cooking revelation, which was discovering this method for juicy chicken schnitzel, in which you marinate pounded chicken in a creamy bath of mustard and mayonnaise before breading and frying it.
If you had told my eight-year-old self! My 18-year-old self! My 28-year-old self! That one day I would always have a jar of mayonnaise in my fridge! That I would fall in love with a recipe that uses nearly a cup of mayonnaise! I and my various selves would not have believed it, so great was my loathing for mayonnaise. And yet, here we are. If you are a mayo loather, I imagine you will scroll on by here, but the truth is that you can't actually taste the mayonnaise, it's really there to tenderize the meat and flavor it, along with the mustard, as well as allow you to skip a step in the breading process. The bulk of the marinade gets scraped off (as best you can) before doing the breading and frying.
So, yes, you make a marinade of mustard and mayo and plop the chicken in there to rest. The recipe says to do this up to a day beforehand, but I've never done it more than an hour before (and shh, sometimes even less than that, even though it says an hour is the minimum). Then you put a bunch of breadcrumbs in a shallow dish, clean off the chicken as best you can and dredge the chicken pieces in the breadcrumbs. I've used both regular fine breadcrumbs (that were gluten-free) and I've used panko and both work really well. So you use whatever you like.
Heat up some oil (well, more than "some" - which is really the key to a good schnitzel, not skimping on the oil) in a cast-iron skillet and you're good to go. Blissfully, pounded chicken schnitzel takes mere minutes to cook, which means that as long as you're willing to do that one marinade step in advance of dinner, dinner itself will take hardly any time at all to make.
The chicken comes out crunchy and moist and tender and delicious, and has entirely supplanted this as our weeknight chicken of choice. You probably don't need any help with sides, but it's lovely with a very simple, vinegary salad. It also makes good leftovers and is stellar in a sandwich. Hooray for kitchen revelations!
Emma Laperruque's Easy Chicken Schnitzel
Adapted from Food52
Serves 4
3/4 cup mayonnaise
3 tablespoons Dijon mustard
1/2 teaspoon salt, plus more for the breadcrumbs
1 1/2 cups peanut or vegetable oil, adjusted as needed for frying
4 chicken breasts
2 cups breadcrumbs (plain or panko)
1. Combine the mayonnaise, mustard and salt in a large bowl and mix well. Pound the chicken breasts to 1/4-inch thickness. Place the chicken in the marinade and coat all sides of the chicken in the marinate. Refrigerate for at least 1 hour or up to 1 day.
2. When you���re ready to fry, add enough oil to a large cast-iron skillet to reach about 1/2-inch in depth. Set over medium-high heat.
3. Place the breadcrumbs on a plate and season with salt. Remove each chicken piece from the marinade and wipe off any excess. (Emma's note: No need to be obsessive but it should look mostly mayo-free, otherwise it won���t crisp properly.) Dredge each chicken piece in the breadcrumbs, pressing firmly to completely coat.
4. When the oil is hot, drop a crumb in the oil - it should immediately sizzle. Fry the chicken in batches, taking care not to overcrowd the pan. Cook each piece for 3 to 4 minutes per side, until deeply browned. Transfer the pieces to a paper towel���lined plate to drain. Repeat with the remaining chicken, then serve immediately.
August 23, 2021
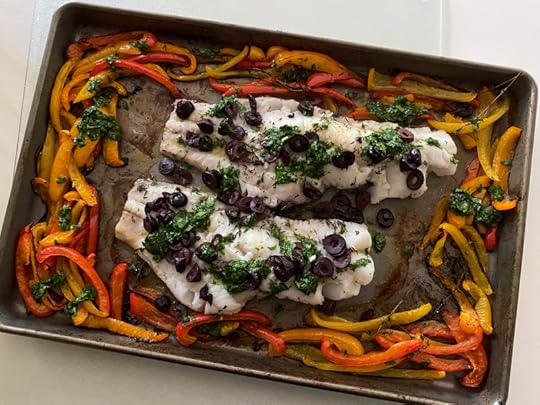
Melissa Clark's Roasted Fish with Sweet Peppers
Hello, hello!
I am sitting at my dining table eating a cold blueberry pancake leftover from yesterday's celebratory breakfast. Celebratory because it marked the end of an unexpected quarantine triggered by the fact that we sat very close to someone infected with Covid-19 on one of our flights home from Italy two weeks ago and the boys, being unvaccinated, were therefore classified as close contacts. Wait. Two weeks? That makes me laugh. Italy feels like it was months ago. Something about being stuck indoors with two little boys who very much would rather be in Kita and school will make 11 days feel like 11 weeks, right?
Anyway, the best news is, of course, that we all tested negative at the end of the quarantine. Today, in the pouring rain, Hugo set off for school with his six pounds of brand-new notebooks and freshly sharpened pencils (the pleasure I got from getting his stuff ready!) and art supplies and a new supply of ink cartridges for his fountain pen. Bruno zipped happily off to Kita, snack box under his arm. We are home alone now, Max in his office, me in the aforementioned dining room and it is very quiet which is what I've longed for, but I cannot help but feel like this is just a fleeting moment of normalcy and I don't quite know what to do with this weird, unpleasant mix of relief and dread.
Parents Are Not Okay about sums it up, yes? Yes.
Anyway. I know that I very much left you hanging with my promise to share lots of delicious food from Italy and I'm sorry about that. Italy this year was...not always easy. It was uncomfortably hot a lot of the time, I was trying to squeeze in work whenever I could and there were quite a bit of parenting difficulties which cast a pall over the holidays. Cooking was an afterthought most days. Which is very easy to do in a place where everything you buy at the market tastes like the sweetest, juiciest version of itself. Upon reentry to Berlin, it felt like I had to relearn how to put food on the table all over again.
I'm not quite back to actually looking up recipes and following them, but while I get there, I wanted to tell you about this slam dunk from Melissa Clark that I made in May when I was in Boston. My parents live not far from a wonderful fish store called Captain Marden's which was such a treat for me. In Berlin, I cook almost exclusively with frozen or canned fish. Fresh fish is a wild and rare exception. With fish as fresh as it was from Captain Marden's, you can get away with barely doing anything to the fish before eating. But if you follow this recipe, you'll be so, so happy you did.
This is a sheet-pan dinner, so it's easy, but there are a few elements to it. First, you roast a tangle of sliced bell peppers until they're starting to get soft and silky. Then you scrape them out of the way and put white fish fillets in the center of the pan, topped with thyme and olives. While this roasts, you make a sort of short-cut salsa verde with parsley, garlic, oil and vinegar. The salsa verde is served with the fish and peppers. (We ate the fish and peppers with boiled potatoes if my memory serves me, but rice would be nice too.) The whole thing was very satisfying and delicious and easy to execute. And just the thing to make when you're feeling slightly incompetent, but in dire need of something special.
Sound familiar? I'm feeling extremely incompetent these days, like I'm failing at most things in my life. Motherhood, work, being a functioning human. Everything feels difficult, impossible, really, and when I lift my head from my own stupidly privileged situation, the scope of suffering elsewhere is nearly unbearable to contemplate. I know a lot of other people are feeling this way too. If you are, consider this my sympathetic fist bump.
Melissa Clark's Roasted Fish with Sweet Peppers
Serves 4 to 5
1 small bunch lemon thyme or regular thyme
1 �� pounds hake fillets
Fine sea salt and black pepper
3 large bell peppers, preferably 1 red, 1 orange and 1 yellow, thinly sliced
4 �� tablespoons extra-virgin olive oil, plus more for drizzling
�� cup pitted, sliced black or green olives, or a combination
1 teaspoon sherry vinegar, plus more to taste
1 garlic clove, grated
1 cup loosely packed Italian parsley leaves, chopped
1. Heat oven to 400 degrees. Pull 1 tablespoon thyme leaves off the bunch and finely chop.
2. Season fish all over with a large pinch or two of salt and pepper and rub with chopped thyme leaves. Let rest at room temperature while you prepare peppers.
3. Spread peppers on a rimmed sheet pan, and toss with 1 1/2 tablespoons oil, 1/2 teaspoon salt and the black pepper to taste. Top peppers with the remaining thyme sprigs. Roast, tossing occasionally, until peppers are softened and golden at the edges, 15 to 20 minutes.
4. Increase oven temperature to 500 degrees. Push peppers to the edges of the pan, clearing a space in the center. Lay fish out on that empty space and drizzle with oil. Scatter olives over the top of fish and peppers. Roast until fish turns opaque and is just cooked through, 6 to 10 minutes.
5. Meanwhile, make a vinaigrette by combining vinegar, garlic and a pinch of salt in a bowl. Whisk in remaining 3 tablespoons olive oil, then whisk in parsley. Taste and add more salt or vinegar, or both, if needed. Serve fish and peppers drizzled with vinaigrette.
July 14, 2021
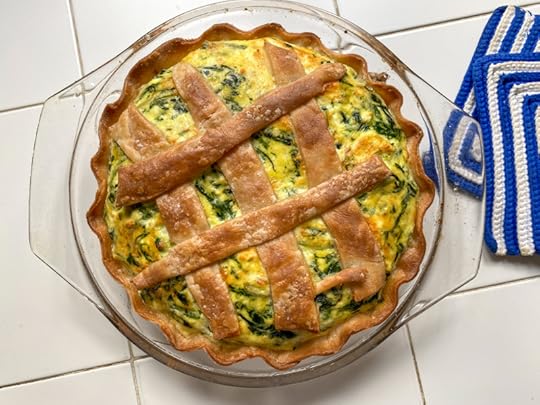
Sicilian Savory Swiss Chard Tart
Hello darlings! We are in Italy, which you probably - if you follow me on Instagram - already know. The boys and I arrived a week ago. It has been filthy hot and we have been doing the usual things: going to the beach, attempting to play badminton in the shade without collapsing from heat stroke, buying our weight in tomatoes and peaches from the market. Yesterday afternoon, while we were visiting a friend's baby rabbits and talking about the fox that stole her rooster a few weeks ago, a cold front finally came in. Last night we were able to sleep under coverlets again and not wake up with damply sweating skin. The air is clear and crisp today and I feel like gulping it in like a puppy dog.
This year, the boys are in day camp for the first time. They ride horses and play Italian games and eat two-course lunches every other day (there are sandwiches and French fries on the alternating days). Max arrives tomorrow and then it will really feel like we are on vacation. After having skipped the annual tradition of coming here last year, I am especially alert to all of the beauty and wonder of this place. Am I really here, I keep thinking. Is this really real?
When we are here, I share cooking responsibilities with my mother. This is lovely. She'll make things like lentil and calamari stew, or baked guinea fowl with peppers and potatoes. I end up relying heavily on the Sicilian cookbook that she mail-ordered from a newspaper once. It may seem improbable, but it is an impeccable source of recipes and I have rarely made a misstep cooking from it.
This torta di bietole (or Swiss chard tart) is something I make every summer. I buy a disc of tart dough at the grocery store (this particular one is gluten-free and perfect - Italians suffer in great numbers from celiac disease and the gluten-free options available at the grocery store are amazing, look at the blistery flake!), and a big bunch of the most tender baby chard. I get a quivering pile of ricotta from a cart at the market in Urbino, plus fresh eggs from our friend with the missing rooster. There's not much to the tart besides cooking the chard (first boil it, then saut�� it with oil and garlic to dry it out and flavor it a little more deeply), then mixing it with the ricotta, eggs and some pecorino for more flavor.
The delicate chard I can get here in summer has thin, tender little stalks. The chard I get back in Berlin (and that you may find wherever you are) has much thicker ribs, but as long you chop them after boiling, it'll be fine in the tart. The original recipe calls for sheep's milk ricotta, which is a rich delight, but not always easy to find out of season or out of Italy's borders. Of course, cow's milk ricotta is fine too. You could also swap out the pecorino for Parmigiano if you had to. (Sicilians rely more heavily on sheep's milk.)
All that's left to do is to fit the tart dough into the pie plate, scrape the savory filling into the pan, fiddle with a lattice crust with the leftover dough scraps and into the oven it goes. The tart is as good eaten fresh from the oven as it is the next day, when it's had a bit of time to settle, making it wonderful picnic fare. You could do the usual and serve this with salad alongside, or, if it's hot as hell where you are, just eat a wedge of it and call it a night. I love how simple it is, easy to whip up with the ancient whisk and plastic bowl in my mother's Italian kitchen, and how it isn't too rich and queasy-making, like quiche can be.
One final note: the metric quantities below are the ones I used when making this. I translated the U.S. quantities using Google and not my own equipment. I think they're all fine, but just wanted to make sure you knew.
Sicilian Savory Swiss Chard Tart
Makes one 9-inch/23-cm torta
550 grams/1.2 pounds Swiss chard
2 tablespoons olive oil
1 garlic clove, halved
300 grams/1 1/4 cups ricotta (preferably sheep's milk, but cow's milk will do, too)
4 large eggs
70 grams/3/4 cup grated pecorino
Salt and freshly ground black pepper
1 sheet/circle store-bought or homemade flaky tart dough (unsweetened)
1. Preheat the oven to 350��F/180��C. Boil the Swiss chard in salted water for 5 minutes and drain. Squeeze out the excess moisture and chop the chard roughly (especially if the ribs are wide). Place the olive oil a saut�� pan over medium heat and saut�� the garlic clove until light golden. Add the chopped Swiss chard, season with salt and pepper to taste, and saut�� for a few minutes, until the remaining moisture has evaporated. Discard the garlic clove and set aside the chard.
2. Place the ricotta and eggs in a mixing bowl and whisk until smooth. Add the grated cheese and salt and pepper and whisk again. Stir in the chopped chard.
3. Place the tart dough in a 9-inch/23-cm pie plate or cake pan. Trim off any excess dough and set aside for the lattice. Crimp the edges. Scrape the filling into the dough and smooth the top. Top the filling with the excess dough cut into strips.
4. Put the torta in the oven and bake for 30 to 35 minutes, until the dough is browned and crisp and the filling has puffed and set. Cool on a rack for at least 15 minutes before serving.
June 29, 2021
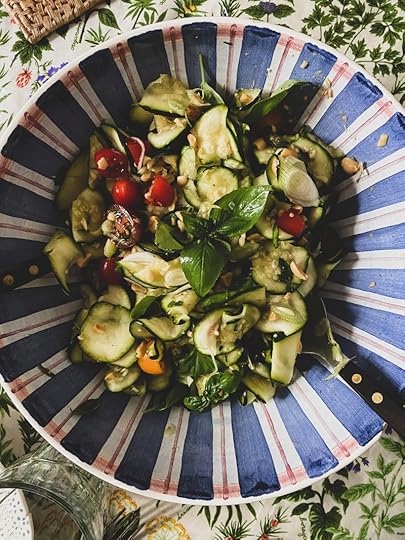
Joshua McFadden's Zucchini Salad with Tomatoes, Peanuts, Basil, Mint and Spicy Fish-Sauce Sauce
Berlin public schools let out for summer last week and the city emptied out almost immediately. The streets feel empty and quiet now, parking spots abound, rush hour is muted, the air is thick with the scent of the blossoming linden trees. The smell, heavily floral and intoxicating, hangs in our apartment too, the windows yanked open day after day in the hopes of catching a faint breeze. Hugo's school closes for summer tomorrow and next week the boys and I leave for Italy, where the heat has already scorched the grass yellow and my mother awaits us.
I am desperate to be there, itching with anticipation, actually, after having skipped our annual trip last year in an attempt to regain my sanity a little and write. These days, I feel different. I want to soak up every minute with the children, hold them close, watch them flourish in their happiest place, wild mint crunching under their feet, skin salted from the sea. I cannot wait to be where I feel most free and held, listening to the cicadas sawing away from morning til night, eating meal after meal of drippy melons and tomatoes, the rituals of summer anchoring us so firmly to that place.
Until we leave, my calendar is filled with dinner dates and lunches and a picnic and celebrations of birthdays and anniversaries. We fling our arms around each other again in greeting and to say goodbye, promising more time together when everyone's back again in August. It feels delicious and indulgent and restorative and frightening and wonderful; totally banal and strange as hell at the same time. We weren't allowed to hug for so long. Is it safe? Meanwhile, tomorrow I will have a rising fourth grader and a little one with just one year left in Kita. It is nearly July. Wasn't it just January? Time is flying. Carpe diem.
The heat means that we mostly eat things I barely have to cook. Melon and ham, tomato and mozzarella, beans and tuna, peaches gulped down over the sink. The other day, I made a wonderful salad from Joshua McFadden's Six Seasons of wafer-thin zucchini and a whole array of cherry tomatoes, roasted peanuts and spicy fish sauce. I'm not the biggest fan of raw zucchini - I really love its velvety softness once boiled - but here, the zucchini is cut so thin and then salted and left to rest for a while. The zucchini slices are silky and nicely sweet against the fiery, lusty sauce, the crunch of the peanuts, the fruity burst of the tomatoes. This is the perfect salad to be piled high into a plate and eaten for a meal on hot summer nights when appetites are low, but the belly growls and is in need of satisfaction.
Note: This post includes affiliate links and I may earn a commission if you purchase through them, at no cost to you. I use affiliate links only for products I love and companies I trust. Thank you.
Zucchini Salad with Tomatoes, Peanuts, Basil, Mint and Spicy Fish-Sauce Sauce
Serves 4
Adapted from Six Seasons
3-4 medium firm zucchini
Salt
1 pint cherry tomatoes, halved
1/2 cup salted roasted peanuts, roughly chopped
1 bunch scallions, sliced on a sharp angle and soaked in ice water for 20 minutes
1 small handful basil leaves
1 small handful mint leaves
1/4 cup Spicy Fish-Sauce Sauce (recipe follows)
1. Using a mandoline or a very sharp knife, slice or cut the zucchini into thin slices, either lengthwise or crosswise. Toss the zucchini with a teaspoon of salt and place in a colander to draw out moisture for 30 minutes. Then blot the zucchini with a paper towel to remove moisture and excess salt. Place in serving bowl.
2. Add the tomatoes, peanuts, drained scallions, basil and mint. Pour over the spicy fish-sauce sauce. Taste and correct seasoning. Serve immediately.
Spicy Fish-Sauce Sauce
Makes about 1 1/4 cups
1/4 cup seeded, deribbed and minced fresh hot chiles (mix of colors, if possible)
4 large garlic cloves, minced
1/2 cup fish sauce
1/4 cup water
1/4 cup white wine or rice vinegar
2 tablespoons sugar
Stir everything together in a small bowl until the sugar has dissolved. The sauce will keep in a bowl in the fridge for up to 2 months.
June 16, 2021
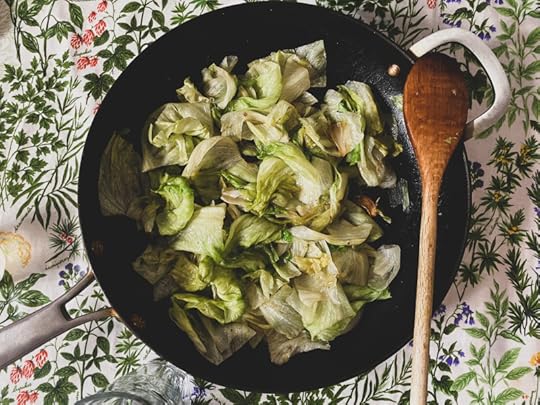
Grace Young's Stir-Fried Iceberg Lettuce
Hello, good people! It is a beautiful June day. I am drinking a glass of Apfelschorle (which is the German term for when you mix fizzy mineral water with apple juice) and it is being cooled by the most beautiful ice cubes that I make using this mold, bringing me untold amounts of joy each time I pop out a perfectly beveled little cube. Mercury is retrograde until the end of the month and thus we have been gnashing our teeth for a week straight about all the various things that have gone haywire (to name only a few: broken brake lights on one car, a busted tire on another, a child who insisted on shoving a CD into the delicate CD player mouth of a 16-year-old audio appliance while a CD while already was playing inside of it whyyyyyy), but the fine weather and good humor and fancy ice cubes go a long way in soothing the blow.
Besides, one thing Mercury Retrograde apparently doesn't affect is cooking, thank the moon and stars!
The most revelatory dish I made this week was this big old pan of hot lettuce. Yes! I know that some of you will look at those words, "hot" and "lettuce", and sail right on by. But wait! Don't go just yet! Cooked lettuce is amazing and just happens to a staple in both Italian and Chinese cooking, so you know it has to be good. And it is! (Besides, I'm just messing with you. Stir-fried iceberg sounds so much sexier than hot lettuce.)
I don't ever eat iceberg lettuce. I don't ever buy it. (Though the excellent comments on this post are all you ever need if you are iceberg curious and need some ideas.) In fact, I stopped eating salad greens entirely a few years ago because I have a hard time digesting them raw. But when I got this big box of vegetables delivered a few weeks ago, a big old head of iceberg lettuce was in the box too. I let in languish in the fridge until this week and the outermost layers had to be removed. The inner leaves and core were still fresh and sweet and crunchy.
It was just the thing to use in this recipe I'd been saving for...that one day I found myself in possession of iceberg lettuce. You chop up the lettuce into biggish chunks, and fry garlic slices and scallions in oil. Then you add the lettuce chunks to the pan and stir-fry them for just a minute. Then in goes the magic concoction of equal parts soy sauce, sesame oil and rice wine (plus sugar and pepper). You cook the lettuce, stirring well so that the sauce coats every piece, and a minute later your meal is done. Pile it in a plate with some rice alongside and you've got my ideal dinner. Sweet and savory, silky and toothsome. It is so delicious and satisfying, not usually what you'd think to describe a head of iceberg lettuce, amirite?
The recipe comes from this cookbook and Grace Young says you can use other vegetables in this exact preparation with great results. I'm going to do baby boy chop (ed: This is the funniest autocorrect of my entire life, so I'm leaving it, but obviously I meant to write bok choy!) next and then maybe romaine. Ooh. And iceberg again, too, of course!
Note: This post includes affiliate links and I may earn a commission if you purchase through them, at no cost to you. I use affiliate links only for products I love and companies I trust. Thank you.
Grace Young Stir-Fried Iceberg Lettuce
Serves 2
Note: You can, instead of iceberg, use romaine lettuce, spinach, watercress, baby bok choy, asparagus, snow peas and snap peas.
1 teaspoon soy sauce
1 teaspoon sesame oil
1 teaspoon rice wine or dry sherry
3/4 teaspoon sugar
1/2 teaspoon freshly ground white or black pepper
1 1/2 tablespoons peanut oil or other neutral oil
4 scallions, cut on the diagonal into 1-inch pieces
3 cloves garlic, thinly sliced or smashed
Half a medium head iceberg lettuce, cored, outermost leaves discarded, inner leaves torn into 4-inch wide pieces (or substitute 12 ounces of other vegetables)
Kosher salt, to taste
1. In a small bowl, combine soy sauce, sesame oil, rice wine or sherry, sugar, and pepper; set sauce aside.
2. Heat a wok or 12-inch skillet over high heat. Add peanut oil, half of the scallions (including all of the white and light green pieces), and garlic and cook until garlic is golden, about 5 seconds. Add lettuce and stir-fry until lettuce softens slightly, about 1 minute. Drizzle in sauce and cook until lettuce is just coated with the sauce, about 1 minute. Season with salt, divide between 4 bowls while lettuce is just tender and still bright green, and garnish with remaining scallions.
June 7, 2021
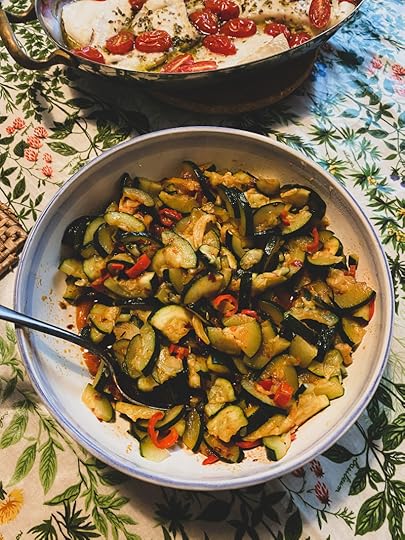
Ottolenghi's Zucchini with Harissa and Lemon
A few days after arriving back in Berlin, I was sent a huge crate of produce by Fresh Fruit Germany. Every single piece of produce was in perfect condition and with so much flavor! It was the perfect welcome back to my kitchen after nearly four weeks away. Cooking my way through the crate was so much more fun than first picking out a recipe, then going grocery shopping, then getting started in the kitchen. Instead, I had to quickly come up with ways to use up all the eggplant, zucchini, cucumbers, lettuce, potatoes and leeks (just to name a few) that were in peak condition and wouldn't last long otherwise.
I made frittata with peppers, potatoes and prosciutto from Six Seasons. I made Alison Roman's potato and leek soup with sour cream and vinegar (and yes, I left out the dill and the soup was still stellar). I made cucumber raita and Greek salad and bean salad and pasta alla Norma. But the dish that surprised and pleased us the most was this marvelous bowl of soft zucchini dressed with preserved lemons and rose harissa. The recipe comes from Ottolenghi's latest book Ottolenghi Flavor.
I cut a few corners, as I almost always do with Ottolenghi recipes. I used far less oil, just cooked the garlic for a minute or two, then added the zucchini without removing the garlic. Also I skipped the basil because we didn't have any (though I'm sure it would be even more delicious with basil). This recipe makes a pretty sizable amount of zucchini, and I fully anticipated having leftovers. But I didn't anticipate Hugo falling in love with it and eating the largest portion! He was fully obsessed. I was pretty amazed, since it's not just rather spicy, but also rather complex, between the chile, the preserved lemon and the rose harissa. But Hugo couldn't get enough. Three helpings, if I remember correctly, and then it was all gone and I was promising to make it again soon.
Note: This post includes affiliate links and I may earn a commission if you purchase through them, at no cost to you. I use affiliate links only for products I love and companies I trust. Thank you.
Ottolenghi's Zucchini with Harissa and Lemon
Serves 4
Adapted from Ottolenghi Flavor
2 tablespoons olive oil
4 garlic cloves, finely sliced
1 tablespoon rose harissa
1 red chile, finely chopped
�� preserved lemon, finely chopped, discarding any seeds
1�� tablespoons lemon juice
1 kilo zucchini, finely sliced (about 3 good-sized zucchini)
Generous handful basil leaves, roughly torn, optional
Salt
1. Place a large, non-stick saut�� pan over medium-high heat with the oil and garlic. Gently fry for a couple minutes, stirring often, until soft, golden and aromatic. Don���t let the garlic become browned or crisp, so turn the heat down if necessary.
2. Add the zucchini and 1�� teaspoons of salt. Cook for 18 minutes, stirring often, until the zucchini are very soft, but are still mostly holding their shape (you don���t want them to brown, so turn the heat down if necessary).
3. While the zucchini are cooking, stir the harissa, chile, preserved lemon and lemon juice together in a serving bowl. Set aside
4. When the zucchini are done, stir through half the basil, if using, and transfer to a bowl. Toss the zucchini with the dressing and taste for seasoning. Before serving, finish with the remaining basil, if using.
April 27, 2021
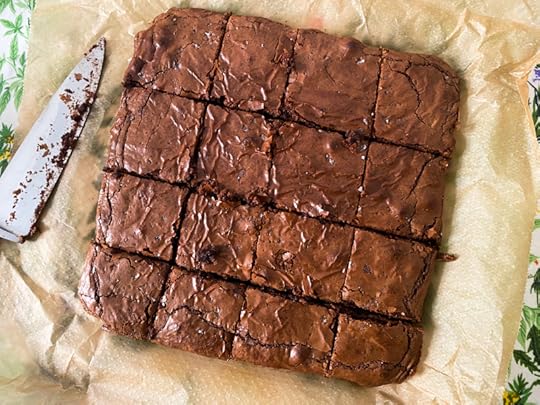
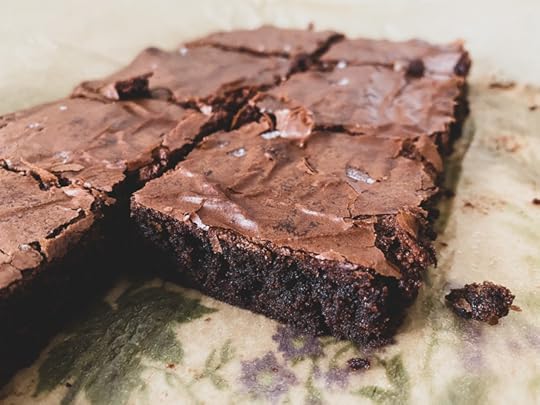
Emma Laperruque's Nutella Buckwheat Brownies
I have been feeling a little...fragile as of late. For example, this obituary made me cry. This book that I finished last night left me with the most sickening case of existential dread. I went into the boys' room this morning for a morning snuggle, but one boy was happily reading in his top bunk and the other was far too busy setting up Playmobil knights for something as silly as snuggling, so I had to start my day snuggle-less. Who cares, right? Reader, the heartache, I tell you. Sometimes I don't think I'll ever be prepared for the heartbreak of them growing up.
The sun has come out in full force this week, despite freezing temperatures at night. We're having the kind of blindingly bright, blue-skied days, still bundled up in warm coats and sweaters, that I normally associate with New England in early fall. Today, driving Hugo to school, I stopped at an intersection and the haze from the sun was so bright, I momentarily thought I was in Vermont.
What to do when one feels exceedingly wobbly? Besides going out into the sunshine for a long walk, I mean. I was thinking about that today as I cooked our lunch: an onion in hot olive oil, slivered canned plum tomatoes dropped in one after the other, the salting of pasta water, the reducing of the sauce. Laying out the plates and forks, digging out the parmigiano from the depths of the fridge. Cooking pasta with tomato sauce does seem to be one of my most foolproof therapies. The mellowing onion, the starchy fug, it all ends up being self-parenting alchemy.
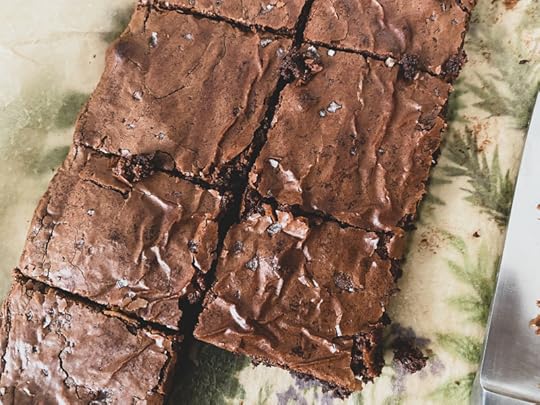
But! I am not actually here to tell you about the healing powers of tomato sauce! I am here to tell you about these 3-ingredient brownies, which���if the world is a just place���should be the next viral recipe to sweep the planet, like that baked feta situation earlier this year. The brownies are made with Nutella, eggs and buckwheat flour. That's it if you don't count salt, but flaky salt is essential to their success, so make sure you have some when you make these.
The Nutella and eggs are whisked together until smooth, then you stir in the buckwheat flour. You scrape this rather stiff mixture into your prepared pan, then sprinkle with flaky salt. The brownies emerge from the oven with that gorgeous crinkly top and the perfectly fudgy consistency. Now I have to make one thing clear: if you know buckwheat flour, you're familiar with its assertive flavor. Hugo and I love it and the combination of the chocolate-hazelnut spread and the earthy, grassy buckwheat turns the brownies into something truly unique. Hugo couldn't stop raving. "These are the best brownies ever," he eventually said (after brownie #5 or 6). They're pretty great. The other two members of our family, who are decidedly less enamored of buckwheat, didn't quite love them as much.
You don't have to use buckwheat flour. You could use teff flour, if you wanted to stay gluten-free, or regular flour, though I suspect they could end up a bit too cloying. The buckwheat adds a hearty, almost savory note. And the consistency! I didn't believe it could be possible with just those three ingredients, but it was perfect.
What do you do when you're feeling wobbly, dear readers? In case it's making brownies, well, here you go and hugs to you.
Note: This post includes affiliate links and I may earn a commission if you purchase through them, at no cost to you. I use affiliate links only for products I love and companies I trust. Thank you.
Emma Perruque's Nutella Buckwheat Brownies
Makes 12-16 brownies
1 1/4 cups (370 grams) Nutella
2 large eggs
1/2 cup (60 grams) buckwheat flour
Flaky salt (optional)
1. Heat the oven to 350��F/180��C. Line an 8-inch/20-cm square baking pan with parchment, with overhang on two sides.
2. Combine the Nutella and eggs in a bowl and stir until smooth. Add the flour and stir again until smooth. Spread into the prepared pan. Sprinkle with salt if you���re using it.
3. Bake for about 20 minutes until puffy, crackly, and a cake tester inserted near the corner comes out clean.


