Rod Shelton's Blog
August 13, 2017
How to convert an e-pub to Kindle using kindlegen
 This series of blogposts has covered everything you need to know about to make an e-pub 2.0 e-book using Sigil and then convert it to kindle. I think some sort of overview is in order, as well as the crucial instructions for actually making the kindle file from the e-pub which, I now realise have not yet been published.
I am finally looking at the new kindle and e-pub formats, and will post when I have got my head around them. I will need more of the newer e-readers and some more antique models to check how this can all be done and how backward compatibility works out in practice. On the surface of it, it seems to me that there are some promising new possibilities, and some features I wanted which will remain impossible.
I think you will want an e-pub which works on all e-readers (including older epub 2.0 e-readers) and also a kindle version. You will end up with TWO e-books, an epub 2.0 e-book and a kindle e-book. However I think both should look and feel the same, as far as possible.
Maybe I should also say that these posts cover making an epub 2.0 ebook, which will work on all e-pub e-readers and a kindle e-book which works with the older kindle e-readers. Any new features in e-pub 3.0 or kindle format 8 will NOT be backwards-compatible, which is to say that an e-pub 3.0 e-book won’t work on an e-pub 2.0 e-reader and a kindle format 8 e-book won’t work on older kindles either. The methods I have described produce a perfectly acceptable e-book, and one which is formatted according to the best practice of the print book industry, adapted to take account of the e-book format and which work on all e-pub and kindle readers in existence. It is a conservative strategy, and misses out on some of the bells and whistles becoming available in the newer formats, but it will produce an e-book which can be marketed the most widely.
As I have said, you want a kindle and an e-pub which look and feel the same. And the problem at the heart of all of this is the Kindle, which will not accept certain CSS and html and will not support certain characters. So make your e-pub using CSS, html and characters which will also work on a kindle and your task is made that much simpler. See my post on CSS which works with kindle for the information about the difficulties I have identified and ways to get around them.
Amazon provide a program, called Kindlegen, which will make a kindle e-book. It uses an e-pub file as the source and chucks out a file in a format called mobipocket (with the extension .mobi). When you upload this file to the kindlestore, it is then converted to their .azw file format complete with copy protection if you want it. Both .mobi and .azw files can be loaded onto a kindle. This post covers how to do this:
The index at the bottom of this post has links to all my posts on making an e-pub, roughly in the order in which you would need to read them if you were creating an e-book from scratch for the first time.
Once your epub is finished and has passed epubcheck, you will need to make a few adjustments to it for kindle. See my six early posts linked in the next two paragraphs for the details. YOU ARE NOW FINISHED WITH SIGIL. From this point on, ANY changes to your e-book will need to be made with an html editor, such as Komodo Edit.
This now gets complicated, so be methodical. Start with a new folder with your epub in it. Now make a copy of the epub and save it somewhere safe and make sure the folder it is in is carefully labelled as ‘epub with Kindle values’ or ‘Original Epub’ or whatever works for you. Now go back to the first folder and ‘unpack’ the epub. See my post: how to unpack an epub for instructions. Following those instructions will create a new folder with the various parts of the original epub file inside. This folder will have the same name as your original e-book file.
Now you will need to delve into this folder and restructure your html table of contents and then link the html table of contents. Next you need to delete the html cover and then finally link the cover IMAGE. You will also have to delete any <h>tags styled as invisible as described here. Click the links for how tos on all of these. This step is probably the most problematic bit of converting an epub to kindle and took me quite a lot of time to work out how to do it.
Once you are finished, you need to re-pack the folder, restoring it to e-pub format, BUT WITH THE NECCESSARY CHANGES for kindle. YOU SHOULD NOT re-open this file with Sigil, because Sigil will not like what you have done to the file and will try to change it back, with unpredictable and probably either inconvenient or catastrophic results.
How to re-pack your e-book:
In essence, all you need do is to follow the procedure for unpacking your e-book in reverse order. The results of the various processes will depend a little on your operating system, and so this discussion is deliberately vague about where the files will be created. But I would recommend being methodical about naming and storing your files.
The converted e-pub will now be in pieces in a folder somewhere with the same name as the original e-pub. So begin by creating a blank .zip file (archive). In Windows 7, right-click where you want the blank archive and select ‘new ▶ Compressed (zipped) Folder’ from the pop-up menu. Then open the blank archive by double-clicking it. DRAG the various parts of your e-book into the archive: FIRST the mimetype, THEN the META-DATA folder and FINALLY the OEBPS folder. I cannot see a reason why, but it seems to help if the files are zipped in this sequence. This is all you need to do in Windows. On a Mac, you will need to have created a new, blank, archive using BetterZip (or equivalent, see this place in my post on how to unzip an e-pub for details) and, when you have added the various parts of the e-book, save the archive using the ‘save without mac stuff’ option (important).
Now you have to change the extension of the archive from .zip to .epub and ignore the warning. The icon for the file should change to the e-pub icon. If you have not done so already, change the name of the file to the filename you want your e-book to have, and you’re done! The e-pub (converted to Kindle) is now ready to send to kindlegen. NB the actual filename is something of a convenience: e-reader software will look in the <metadata> of the file, locate the title and display this, NOT the filename, which can be different.
Now get yourself a copy of Kindlegen.
Getting Kindlegen:
You can download Kindlegen from here: http://www.amazon.com/kindlepublishing which is I hope an address which is not going to change. If it does, just google ‘kindlegen download’ and you should get to a download page very quickly.
SAVE the file which downloads to your desktop (recommended) and extract it. The folder on my desktop looks like this:

The important file inside is ‘kindlegen.exe’. Note the name of the enclosing folder: ‘kindlegen_win32_v2_8’. The version I have on my computer is slightly out of date, you will need the latest one (2.9 at the time of writing). More importantly, the filename of the folder is just ONE WORD with NO SPACES. This matters. The ENTIRE path to kindlegen AND to your e-pub MUST have NO SPACES in any component. In my case, the folder is on the desktop, so the path is: ‘C:\Users\Rod\Desktop\Kindlegen_win32_v2_8’. If you have a user name with spaces in it, then either change it or else create the kindlegen folder on an external drive (say) ‘E:\Kindlegen_win32_v2_8’.
Running Kindlegen:
Although the file is called ‘kindlegen .exe ’, your SHOULD NOT double-click on it to run it. You will need to use the command prompt (Windows) or Terminal (Mac). See here in my earlier post on using epubcheck for instructions on how to access and launch these programs.
NB this part of the post has been written quite a bit later then the foregoing and uses kindlegen v2.9 on a Windows 10 machine, rather than Windows 7 which I was using earlier. When I downloaded this new version of Kindlegen, I was a bit worried that it didn’t say ‘Windows 10’ next to the download link. Well, it is a command-line application, and worked just fine on my Windows 10 machine.
Running Kindlegen from the Command Prompt in Windows:
Firstly, open the folder you just downloaded: ‘kindlegen_win32_v2_9’ (or whatever other name the folder downloaded with). Launch the command prompt and superimpose it on top of the folder, so you can still see the icon for kindlegen.exe. Click and drag kindlegen.exe onto the command prompt window (do NOT hit return at this point!):

The filename and path for kindlegen should be copied to the command prompt:
G:\Example>G:\Example\kindlegen_win32_v2_9\kindlegen.exe_
Type a space after it.
G:\Example>G:\Example\kindlegen_win32_v2_8\kindlegen.exe _
Now open the folder with your e-book in it and click and drag the icon for your epub onto the command prompt window in exactly the same way. You need to make sure the command prompt is in the front, so click on it to give it focus. The cursor should be blinking. THEN drag the file.
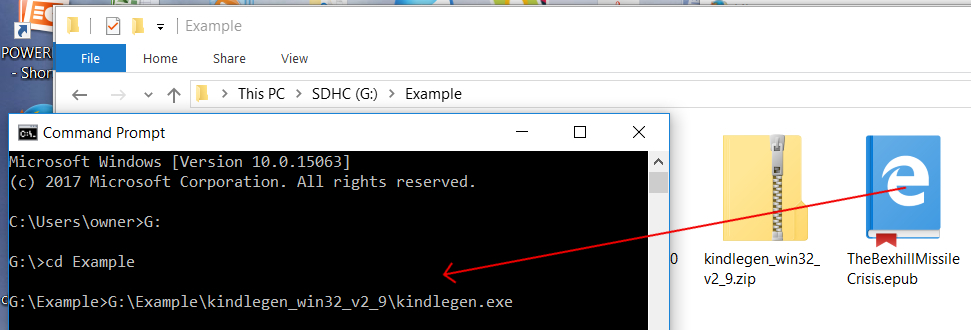
In the example, the epub I converted was in a folder called ‘Example’ which was on an SD card in my G: drive, so the filename and path was: ‘G:\Example\TheBexhillMissileCrisis.epub’. The comand prompt ended up like this:
G:\Example>G:\Example\kindlegen_win32_v2_8\kindlegen.exe G:\Example\TheBexhillMissileCrisis.epub_
Now that the command has been assembled, you can hit return, and kindlegen should run. In my case the output was:
*************************************************************
Amazon kindlegen(Windows) V2.8 build 0208-797bf75
A command line e-book compiler
Copyright Amazon.com and its Affiliates 2013
*************************************************************
Info(prcgen):I1047: Added metadata dc:Title "The Bexhill Missile Crisis"
Info(prcgen):I1047: Added metadata dc:Date "2014-04-07"
Info(prcgen):I1047: Added metadata ISBN "9781904585718"
Info(prcgen):I1047: Added metadata dc:Creator "David Gee"
Info(prcgen):I1047: Added metadata dc:Publisher "Paradise Press"
Info(prcgen):I1047: Added metadata dc:Rights "Worlwide Exclusive"
Info(prcgen):I1002: Parsing files 0000021
Info(prcgen):I1015: Building PRC file
Info(prcgen):I1006: Resolving hyperlinks
Info(prcgen):I1008: Resolving start reading location
Info(prcgen):I1049: Building table of content URL: C:\Users\Rod\AppData\Local\Temp\mbp_7DE_B_7_A_12_3_12B_12B8_1414_1\OEBPS\toc.ncx
Info(pagemap):I8000: No Page map found in the book
Info(prcgen):I1045: Computing UNICODE ranges used in the book
Info(prcgen):I1046: Found UNICODE range: Basic Latin [20..7E]
Info(prcgen):I1046: Found UNICODE range: General Punctuation - Windows 1252 [2018..201A]
Info(prcgen):I1046: Found UNICODE range: Latin-1 Supplement [A0..FF]
Info(prcgen):I1017: Building PRC file, record count: 0000104
Info(prcgen):I1039: Final stats - text compressed to (in % of original size): 53.71%
Info(prcgen):I1040: The document identifier is: "The_Bexhill_Missile_Crisis"
Info(prcgen):I1041: The file format version is V6
Info(prcgen):I1031: Saving PRC file
Info(prcgen):I1032: PRC built successfully
Info(prcgen):I1016: Building enhanced PRC file
Info(prcgen):I1007: Resolving mediaidlinks
Info(prcgen):I1011: Writing mediaidlinks
Info(prcgen):I1009: Resolving guide items
Info(prcgen):I1039: Final stats - text compressed to (in % of original size): 55.20%
Info(prcgen):I1041: The file format version is V8
Info(prcgen):I15000: Approximate Standard Mobi Deliverable file size : 0000443KB
Info(prcgen):I15001: Approximate KF8 Deliverable file size : 0001072KB
Info(prcgen):I1036: Mobi file built successfully
Hopefully the last line will be: ‘Mobi file built successfully’. If there are errors they will be listed.
NB I have NOT updated the output from the earlier draft of this post, so notice that the version of kindlegen in the graphic above is 2.8 rather than 2.9.
The mobi file is created in the same folder as the epub source file:

If you have errors and want to save them to a file for reference, you can find a way to do it in this place in my last post.
Once you have corrected any errors and built a problem-free mobi file, you can now test it on an actual kindle and with KindlePreviewer. (Kindle previewer is also available from Amazon and emulates all of the different kindles. You can download it from here: http://www.amazon.com/kindlepublishing which is the same place you got kindlegen from.) Once you are happy with it, you can go ahead and upload it to the kindlestore.
I would then go back and make a copy of the folder with the original epub file in it and give it a name like ‘published epub’. You can now edit this using Sigil and change the metadata, title page verso and if relevant the back cover barcode to contain the relevant epub values. Don’t forget to run the edited epub through flightCrew and epubcheck one final time just to be sure there are no issues with the file (click the links for details). When it passes both of these, it can be sent off to Apple or Kobo or your wholesaler or uploaded to your website for download or whatever.
It is important that you retain a copy of the original epub source file in the folder called ‘epub with kindle values’, or whatever else you decided to call it. Should you want to edit your e-book for some reason, you must make sure BOTH new versions are the same. So start with the original epub source, edit that, reconvert it to kindle and then edit the new epub source to reflect the epub metadata etc. If you do issue an update, do consider having a line on the titlepage verso with something like version 1.1 or whatever. If it is a substantial change, you may need new ISBNs.
The process for converting the epub to kindle can be time-consuming. And so you may not want to go back to the epub source and start all over again. If the changes you need to make are very specific, then you could always make them using an html editor. But I would be very careful to get this right. I hope my posts about content.opf will be helpful in this respect.
And finally, I would advise that you make a final check of the metadata wherever it appears in both the mobi and epub versions of your e-book just before hitting the send button and uploading the file for sale. The metadata is extremely important, as it is how the file is identified on computers. In particular, identifying codes, such as the ISBN can, at a cursory glance, look just fine: one ISBN looks much like another. You DO NOT want a mistake in the ISBN, so checking it should be the very last thing you do! (The epub and mobi versions should have different ISBNs! And also bear in mind that the metadata can appear in different places withing the e-book: back cover image, title page verso, content.opf, etc …, so be very thorough!)
And that is the logical end of this series of posts. I have, inevitably left out some things, and will no doubt think of others. A reference post will follow with all the markup and styles I have used. I will also post on how to embed fonts, even though I do not recommend this, just for the sake of completeness. And I will end the sequence with an introduction!
Index to ‘how to …’ posts:
How to ‘unpack’ an epub file to edit the contents and see what’s inside.
How to understand what is inside an epub
How to link the html table of Contents in a Kindle e-book
How to restructure the html table of contents for a Kindle
How to delete the html cover for a Kindle ebook
How to link the cover IMAGE in a Kindle e-book
How to clean up your MS Word file before your get started
How to markup an MS Word file to identify the formats before importing it into an epub
How to create a new blank e-pub using Sigil
How to import your marked-up MS Word file into your ebook using Sigil
How to create and link a CSS stylesheet in an e-book using Sigil
How to replace the markup with CSS styles in your ebook using Sigil
How to style an e-book so it works with the limited CSS styling available to Kindle e-readers
How to understand the syntax of CSS
How to style Small Caps in an e-book
How to split your ebook up into chapters using Sigil
How to sequence your e-book
How to phrase the copyright declarations etc. in an e-book
How to generate the logical table of contents using Sigil
How to understand toc.ncx in an e-book
How to generate the html table of contents in an e-pub
How to style the html table of contents using CSS
How to create an html cover for your epub using Sigil
How to present references and notes in a book
How to use Mark Up to link notes in your e-book
How to present a bibliography in a book
How to use markup to link entries in a bibliography with the notes section
How to index an e-book
How to use the tools in MS Word to create an index
How to alphabetise an index or bibliography
How to adapt the print index in your MS Word file for an e-book using markup
How to adapt cross-references in your print index for e-book and how to use markup to make the links
How to understand content.opf
How to understand and edit the Metadata of an ebook using Sigil
How to understand the manifest in content.opf
How to understand the spine and guide in content.opf
How to test your e-pub using flightCrew in Sigil
How to test your e-pub using epubcheck
How to convert an e-pub to Kindle using kindlegen


October 29, 2015
New version of Sigil
I'm reinstalling my software, following a system restore, and discovered that Sigil has moved and has been updated. The new download location is : https://github.com/Sigil-Ebook/Sigil/releases. Versions are available for all operating systems. Flightcrew, which is the error-checking epub2 validator has been converted into a plugin, and that can be downloaded as a .zip archive from here: https://github.com/Sigil-Ebook/flightcrew/releases/tag/0.9.0. Again, it comes in versions for all operating systems. Just select the right one for you. These links are correct at the time of writing. If the precise location of the files changes in thefuture, try deleting the final components of the path one by one to find the correct location.
Once Sigil is installed and the plugin is downloaded, run Sigil and select 'plugins/manage plugins' from the main menu:

From the dialog which loads, click the add plugin button:

From the next dialog, navigate to and then select the archive containing the flightcrew plugin (no need to unzip/extract it):
Clicking the open button installs the plugin, which appears in the list of installed plugins:

The plugins menu now has a submenu 'validation'. 'flight crew' is available as a pop-up:

Selecting this however leads to this error:
 Going back to the 'manage plugins' dialog reveals that the plugin uses either python 2.7 or 3.4:
And, with Sigil and the plugin 'out of the box', there is a space for a path to these bits of software which isn't yet set up:

Clicking on 'auto' next to the python 3.4 panel filled in the correct path:

However this didn't work for python 2.7. Clicking the 'set' button instead produced a search dialog for me to locate python 2.7 myself. Following the example from the path to python 3.4 took me here:

As is clear, I only have python 3, so I left the path to python 2.7 blank. Selecting Flightcrew from the main menu now produces this dialog:

Clicking 'start' began the verification:

And after a while the results are displayed in the usual way:

Obviously this new blank epub needs some of the metadata adding, but at least the flightcrew plugin is now correctly configured and working properly.
November 19, 2014
How to test your e-book using epubcheck
You will need to test your e-book against the industry-standard epub validation program, called epubcheck. You may well have checked it already using the tools in Sigil, called flightCrew, and that will have caught most errors. (See my post on using flightCrew to test your e-book.) And I would definitely advise you to do this first. But epubcheck is a more stringent test and may well throw up errors which flightCrew might have let through. More importantly, Apple and other resellers will run your e-pub through epubcheck and return it if there is a single error, so save yourself some heartache and make sure your e-book WILL pass. There ARE some handy versions of epubcheck which allow you just to drag and drop the epub file onto an icon and then run it by epubcheck. BUT these are made by third parties and often do not implement the latest version of epubcheck. It is better to get the pucker, latest, official, incarnation of epubcheck directly from IDPF and then you can be sure you have a valid e-book.
How to get epubcheck:
The places to download software from can change, and versions update from time to time. At the time of writing, the current version of epubcheck is 3.0.1 and can be downloaded from here: https://github.com/IDPF/epubcheck/releases/tag/v3.0.1. If that link does not work, you might try: https://github.com/idpf/epubcheck from where you should be able to find a link to the latest official download site. The first link took me to a page from where I found the download link for epubcheck-3.0.1.zip, which I clicked and saved the file to my desktop (strongly recommended). Once you have the .zip file, you should extract it by right-clicking on the icon and selecting ‘extract all …’ from the pop-up menu. Select the desktop as the destination of the file from the dialog and click the ‘extract’ button (Windows). If you have a Mac, just double-click on the .zip file and it should extract itself automatically. For some reason, I ended up with a folder called epubcheck-3.0.1 containing another folder with the same name:

So I dragged the inner folder to the desktop. You may need to use a different method, depending on your operating system. What you want is ONE folder on the desktop containing these files:

How to get Java:
The important file is the one called epubcheck-3.0.1.jar, which, unfortunately, is a java program. To run it, you will need the latest version of the java runtime environment installed on your computer. This can also be confusing, but the simplest way to get java would be to go to this website: http://java.com/en/download/installed.jsp from where you can check whether you have the latest version on your computer and download/update it.
But you are not yet done. Epubcheck, like kindlegen is a command-line program, and to use it you will need to find and run the command prompt interface (Windows) or the Terminal (Mac). This is inconvenient, and will take many of us out of our comfort zone, but is unfortunately unavoidable.
Finding the Command Prompt (Windows):
Perhaps the simplest way to find the command prompt in Windows is from the start menu. Just enter ‘Command Prompt’ in the search box:

and the command prompt should make an appearance in the list of results (you want the one with the black ‘C:\_ ’ icon, at the top of the list below):

And now right-click on the icon and select ‘pin to taskbar’ from the pop-up menu:

You should then be able to access the command prompt from the taskbar at any time. Or you might want to make an alias for your desktop, which in Windows 7 can be done by selecting ‘Send to ▶ Desktop (create shortcut)’ from the pop-up:

Whether it is an alias or on the taskbar, or even directly in the start menu, just double-click the icon to launch it.
I will cover how to use the terminal to run epubcheck on a Mac at the end of this post.
Running epubcheck from the command prompt in Windows:
Open the command prompt in Windows:

You can now type instructions into the window. Be careful, as blundering around without knowing what you are doing can have catastrophic results for your computer. A brief search unearthed this resource: www.makeuseof.com/tag/a-beginners-guide-to-the-windows-command-line/ which may be helpful if you are curious about how to do stuff using the command prompt. However this post is concerned only with how to use it to run epubcheck. To do this you first need to invoke Java:
To invoke java, type: ‘ java -jar _ ’ (followed by a space: it should look as it is pictured inside the quotes) into the command-prompt window (don’t hit return at this point!):

To make your life easier, open the epubcheck-3.0.1 folder and drag it somewhere close to the command prompt window. Now DRAG the icon for epubcheck-3.0.1.jar onto the command prompt window:

This should copy the filename and path into the command line interface:

The window should say:
C:\Users\Rod>java -jar C:\Users\Rod\Desktop\epubcheck-3.0.1\epubcheck-3.0.1.jar_
Type another space at the end:
C:\Users\Rod>java -jar C:\Users\Rod\Desktop\epubcheck-3.0.1\epubcheck-3.0.1.jar _
and then drag the icon for the epub file you want to check onto the window in exactly the same way. The filename and path should be copied, exactly as before. The window should now contain this:
C:\Users\Rod>java -jar C:\Users\Rod\Desktop\epubcheck-3.0.1\epubcheck-3.0.1.jar C:\Users\Rod\Desktop\Example.epub_
Now you have built the whole command, you can hit return, which runs epubcheck and, hopefully, will display the following (you may have to wait a bit to get the results!):
Epubcheck Version 3.0.1
Validating against EPUB version 2.0
No errors of warnings detected.
C:\Users\Rod>_
The C:\ prompt returns once the program has completed. You can use the up and down arrow keys to cycle through commands you have issued, which could come in very handy if you end up testing the same file over and over again!
If you DO find yourself running epubcheck over and over again, it will probably be because you keep getting errors. In which case you may want to save the errors to a file rather than displaying them in the command prompt window, particularly if there are a lot of them! After a bit of googling around I found a way to do this:
Saving the output from epubcheck to a file:
To save the output from epubcheck to a file, you first need to change the directory to wherever you want the output file to go. The command prompt in the examples begins with ‘C:\Users\Rod>_ ’, which is my root directory. The desktop is in this directory, so if I type: ‘ cd Desktop ’after the command prompt, it will change to: ‘ C:\Users\Rod\Desktop>_ ’. To direct the output to a file on the desktop, type the following (the spaces matter):
C:\Users\Rod\Desktop>java -jar C:\Users\Rod\Desktop\epubcheck-3.0.1\epubcheck-3.0.1.jar Example.epub >output.txt 2>&1_
Hit return and a file called output.txt will be created on the desktop containing the output from epubcheck. (You can substitute any other filename you want.) It is a good discipline to routinely save each set of error messages in separate files for reference.
Perhaps I ought to add that to change the drive, you need to type the drive letter: ‘ C:\Users\Rod> E:_ ’ for example, changes to the E: drive: ‘ E:>_ ’, from where you can specify a directory on the E: drive for the output to go to. For example: ‘ E:>cd ebooks\myEbook_ ’ would change the working directory to E:\ebooks\myEbook, and the command prompt will chage to: ‘ E:\ebooks\myEbook>_ ’.(Obviously, you can specify any drive which exists: I use removable media for all my files, to keep my data safe should my operating system break. My ‘E:’ drive is the SD card reader.)
Bear in mind, though, that nothing whatever will be displayed in the window whilst the program is executing, because the output is being diverted to the file you specified. The only indication you will have that the program has completed and your output is ready to look at will be when the command prompt returns.
The results from epubcheck:
In my case, the epub file I used was an epub 2.0 e-book and epubcheck detected this (the version number is embedded in the e-book in the opening <package …> tag in content.opf) and validated it against the appropriate specification. Epubcheck 3.0.1 will be able to validate epub 2.0 or epub 3.0 e-books.
To create an error, I went back to the e-book and put spaces into a filename. Running epubcheck again produced this error message:
Epubcheck Version 3.0.1
Validating against EPUB version 2.0
WARNING: C:/Users/Rod/Desktop/Example.epub/OEBPS/Text/A Visitor's Guide to Bexhill.xhtml: Filename contains spaces. Consider changing filename such that URI escaping is not necessary
Check finished with warnings or errors
Errors like this are a bugger, because there may well be knock-on consequences of changing the filename. Sigil may well take care of them for you, like updating content.opf, but you would be well advised to check that things like links in the html table of contents etc. are also updated. Heaven help you if you have an index!!!! Find and replace may well come to your rescue!!
Once the error has been put right, you will need to run epubcheck again, correct any errors which are still there or indeed any new ones which your ‘correction’ might have generated (!) and then run epubcheck again until all errors have been eliminated.
And then you have a finished e-pub!!
Running epubcheck from the terminal on a Mac:
Firstly, download epubcheck and save the folder to the desktop, as outlined above for Windows. And also check you have the current version of the java runtime environment installed.
The Terminal is the command-line interface on the Mac, and is directly analogous to the command prompt on a Windows computer. In fact, the Terminal betrays the fact that OsX is essentially a kind of linux environment. Most of the commands you can issue via the terminal are the same as in linux. You can get a handy guide to using the terminal interface here: http://guides.macrumors.com/Terminal. As I said about the Windows command prompt, be careful what you type in here, be sure you know what you are doing! Fortunately, running epubcheck is a simple matter!
To get to the terminal, locate it in the utilities folder inside the applications folder and drag it to the dock from where you can access it more easily. Or indeed make an alias and put it on the desktop.
When you open the Terminal, you will get a window like this (top LH portion):

As described above for Windows, you should invoke java by typing ‘java -jar ▯ ’ (followed by a space: it should look as it is pictured inside the quotes). Then open the epubcheck folder and locate it close to the Terminal window. Now click and drag the epubcheck icon onto the Terminal window:

In this case, the path to epubcheck was copied including a space at the end:
Johns-iMac:~ johnkeithshelton$ java -jar users/johnkeithshelton/desktop/epubcheck-3.0.1/epubcheck-3.0.1.jar ▯
If for some reason you did not get a space, you would need to type one, as shown in the Windows example. Each component of the instruction needs to be separated from the others by a single space.
Now repeat the procedure with your epub file:

The Terminal window should now contain the fully assembled command (the paths to the various files would depend on where YOU had stored them but should copy correctly if the icon is dragged onto the Terminal window):
Johns-iMac:~ johnkeithshelton$ java -jar users/johnkeithshelton/desktop/epubcheck-3.0.1/epubcheck-3.0.1.jar Volumes/PARADISEPRE/exampleEbook.epub▯
Hit return to run epubcheck and you will get the results. In this case, the outcome was the same as for the Windows example.
To get a copy of the error messages, your life is made easier on a Mac, as you can click and drag to select the messages, copy to the clipboard and then paste them into a blank MS Word file. Alternatively there is a handy reference here: www.maclife.com/article/columns/terminal_101_piping_output on how to direct the output from the Terminal to a file. In essence, this says to add: > fiename.txt after the command to write the output to the file: filename.txt instead of the screen. (note the space before and after ‘>’ compared with just a space before in Windows).
Next Steps: Now your e-pub is complete and passes epubcheck you can send it off to resellers such as Apple or Kobo or your wholesaler or upload it to your website for download. I have already covered the necessary steps you need to take to convert your e-pub to kindle. My next post will link to these posts and cover how to download and run kindlegen to make your kindle e-book.
Index to ‘how to …’ posts:
How to ‘unpack’ an epub file to edit the contents and see what’s inside.
How to understand what is inside an epub
How to link the html table of Contents in a Kindle e-book
How to restructure the html table of contents for a Kindle
How to delete the html cover for a Kindle ebook
How to link the cover IMAGE in a Kindle e-book
How to clean up your MS Word file before your get started
How to markup an MS Word file to identify the formats before importing it into an epub
How to create a new blank e-pub using Sigil
How to import your marked-up MS Word file into your ebook using Sigil
How to create and link a CSS stylesheet in an e-book using Sigil
How to replace the markup with CSS styles in your ebook using Sigil
How to style an e-book so it works with the limited CSS styling available to Kindle e-readers
How to understand the syntax of CSS
How to style Small Caps in an e-book
How to split your ebook up into chapters using Sigil
How to sequence your e-book
How to phrase the copyright declarations etc. in an e-book
How to generate the logical table of contents using Sigil
How to understand toc.ncx in an e-book
How to generate the html table of contents in an e-pub
How to style the html table of contents using CSS
How to create an html cover for your epub using Sigil
How to present references and notes in a book
How to use Mark Up to link notes in your e-book
How to present a bibliography in a book
How to use markup to link entries in a bibliography with the notes section
How to index an e-book
How to use the tools in MS Word to create an index
How to alphabetise an index or bibliography
How to adapt the print index in your MS Word file for an e-book using markup
How to adapt cross-references in your print index for e-book and how to use markup to make the links
How to understand content.opf
How to understand and edit the Metadata of an ebook using Sigil
How to understand the manifest in content.opf
How to understand the spine and guide in content.opf
How to test your e-pub using flightCrew in Sigil
How to test your e-pub using epubcheck
TinyURL for this post:
November 15, 2014
Indexing posts FINALLY updated!!!
I have finally (?) finished working through my posts on indexing an e-book and have just posted the update to the last one. It has been a major hassle!!! Keeping the whole of the topic in my head at the same time has been a very significant task. However it is now done and I am immensely pleased with the outcome! In these posts, I take a print index and re-structure it for e-books, using links instead of page references. This requires some significant style choices. I have generated TWO models: one which uses the style of the print index as a guide and slots the links into the places where the page references were (which I have called RUN-ON) and another in which the links are dropped down onto a line of their own and set out fully (a FULLY SET-OUT style). This is in my opinion much more elegant and better suited to e-books. Along the way I was astonished to find that all the differences between Chicago and Oxford style vanished, along with the punctuation in the index. It functions entirely visually, with the level of the indent representing the relationship between one item and the next. The links thenselves can be constructed using markup in your original file and then made good in your e-book using find and replace in Sigil. Of course it is far from a trivial exercise, as anything connected with indexing is always going to be a major headache (well, it will be if you want to get it right!). As this mammoth series of posts nears an end, I am posting to draw attention to my finished contribution to indexing e-books and am actively seeking comments/discussion of the topic. If you have an opinion, please comment on the posts or/and contact me via the contact box in the right-hand sidebar.
The indexing posts begin with: How to index an e-book, which gives an overview of how to present an index, and then I go on in: How to use the tools in MS Word to create an index to explain how to use the tools built in to MS Word to do this. Alphabetising an index is far from as simple as it may sound, and so I have had to devote an entire post to the topic, which is here: How to alphabetise an index or bibliography. Then there are the key posts on How to adapt the print index in your MS Word file for an e-book using markup and How to adapt cross-references in your print index for e-book and how to use markup to make the links. These set out the styles I have developed and how to implement them using markup in your MS Word file and find and replace using Sigil in your e-book.
The indexing posts begin with: How to index an e-book, which gives an overview of how to present an index, and then I go on in: How to use the tools in MS Word to create an index to explain how to use the tools built in to MS Word to do this. Alphabetising an index is far from as simple as it may sound, and so I have had to devote an entire post to the topic, which is here: How to alphabetise an index or bibliography. Then there are the key posts on How to adapt the print index in your MS Word file for an e-book using markup and How to adapt cross-references in your print index for e-book and how to use markup to make the links. These set out the styles I have developed and how to implement them using markup in your MS Word file and find and replace using Sigil in your e-book.
November 12, 2014
How to test your e-pub using flightCrew in Sigil
Once you have a completed epub e-book, you need to test it.Proofing:
If there are any errors, they are usually because of careless typing mistakes. After all, Sigil won’t let you close your file unless the html is syntactically correct. Unfortunately, this does NOT necessarily mean your html achieves what you intended! Sigil does its best to understand what you meant, but isn’t clairvoyant. If it mends your html it will produce valid html code, but this might not display as you want it to. Careful proofing is always necesary, and I strongly recommend against clicking the ‘correct automatically’ option which Sigil offers when it finds a mistake. Go back and find the mistake and correct it manually.
So I’m assuming you have already proofed your e-book and corrected the styling and made sure there are no obvious mistakes. For instance you will need to check that italic and boldface render correctly and that any links for indexes, footnotes etc. work properly.
One possible pitfall is if your <span> tags do not close properly. The <span> tag in html just identifies a section of the text and allows you to label or format it. I have used <span> tags for the labels which links jump to and also for italic and small caps. You might have an opening <span class="italicText">, or <span class="smallCaps"> or <span id="x3"> tag, for exampe. BUT the closing </span> tag looks the same for each. Both Sigil AND the e-reader will assume that a closing </span> tag closes the <span> which immediately preceeds it. IF your closing tags are in the wrong place the results will be unpredicatble. For instance:
<span class="italicText">an example of <span class="boldFace">a mistake</span> you might make</span>
will render like this:
an example of a mistake you might make.
In this example, the <span> tags overlap, generating bold and italic in the intersection.
Any error like this will NOT be picked up by Sigil. You will have to look for this or other similar errors and correct them manually. Hopefully, if you have placed the markup in the correct places and made the replacements in the correct sequence there should not be any errors of this type.
Once your file has been proofed, you will then need to use the built-in tools in Sigil, called ‘flightCrew’, to check it. To use them, just click the green ‘tick’ button in the toolbar:
 The results of the validation are displayed at the bottom of the main Sigil window. Hopefully you will see this:
 If there are errors, then you will need to track them down and correct them. Sigil will just report on what it finds, and ONE error frequently generates TWO error messages, which can be offputting. To generate some examples, I went back to a working e-pub and made a number of deliberate mistakes:
A file is NOT referenced:
For example you might have imported a new front cover image and forgot to delete the old one. To create a similar error, I loaded a new image: ‘KindleFront.jpg’ and just left it in the images folder without using it. Sigil reported this error:

‘File: OEBPS/Images/KindleFront.jpg: This resource is present in the OPF <manifest>, but it’s not reachable (it’s unused).’
This message tells you the problem is with the file: ‘KindleFront.jpg’ in the ‘Images’ folder. It says the file is listed in the manifest, but isn’t actually used. So delete the redundant file.
The error message is displayed with a yellow background, this means it is something you might want to deal with but won’t stop the e-pub from working. It’s best practice to deal with ALL errors, however. You want an e-book which has NO issues at all. Apple and other e-book resellers will run epubcheck and send your e-book back if there are any errors, however trivial, so that’s another reason for dealing with every single error, fatal or otherwise!
Mistyped name:
If, however, you imported an image but made a typing mistake when entering it on a page, a different error will be reported. I edited the page for the front cover to change the name of ‘ebookFront.jpg’ to ‘ebookFornt.jpg’ and ran flightCrew. I got TWO messages:

The first, in RED this time, is the most serious, and will stop the e-pub from working properly:
‘File:OEBPS/Images/ebookFornt.jpg: The resource is reachable but not present in the OPF <manifest>. "Reachable" means that a reference of some kind that points to this resource exists in the epub.’
It is saying you have referred to the image in the e-book, but the actual file isn’t listed in the manifest. (That would be right, because I deliberately mis-typed the name!) When the ebook reader tries to display the page it won’t be able to find the image and will just show a question mark or a blank space instead.
The second message:
‘File: OEBPS/Images/ebookFront.jpg: This resource is present in the OPF <manifest> but it’s not reachable (it’s unused).’
is essentially the same error as in the last example: The file: ‘ebookFront.jpg’ is there, and listed in the manifest but, because the name used in the html cover was mistyped, this file is not used.
To find the error, the easiest way would be to open all the files in the e-book in Sigil and then search for ‘ebookFornt.jpg’. You can then correct the typo.
Mistyped Link:
I then edited a link, which SHOULD have been to a file called ‘Monday.xhtml’ so it read ‘monday.xhtml’ (all names are case sensitive). This time TWO RED warnings were generated:

‘File: OEBPS/Text/monday.xhtml: This OPS document is reachable but not present in the OPF <spine>. "Reachable" means that a reference of some kind that points to this resource exists in the epub’
and:
‘File: OEBPS/Text/monday.xhtml: This OPS document is reachable but not present in the OPF <manifest>. "Reachable" means that a reference of some kind that points to this resource exists in the epub.’
One error message says the file ‘monday.jpg’ isn’t in the spine and the second says it isn’t in the manifest. You will readily appreciate that a working knowledge of the structure of content.opf will be invaluable in understanding these error messages. (Refer to my posts on content.opf for further information.) Clicking the mis-typed link will not work because the file it links to doesn’t exist. Look in the manifest to find out the correct spelling of the file, search the e-book for the incorrect name and then correct it.
Note also that the filenames and everything else are case sensitive. A casual glance at your files can miss a capitalisation error such as the one in this example.
Duplicate labels:
You may recall I keep banging on that all labels used in your e-book must be unique (i.e. each one should be different). Well, I went back to the file ‘Tuesday.xhtml’ and changed a label from id="tuesdayMorning" to id="tuesdayAfternoon". This meant there were TWO identical labels (tuesdayAfternoon) in the same file. Running flightCrew generated TWO errors:

‘File: OEBPS/toc.ncx: Line: 60: This <content> element’s "src" attribute value is "Text/Tuesday.xhtml#tuesdayMorning", but an element with an ID the fragment is referring to does not exist in that file.’
and
‘File: OEBPS/Text/Tuesday.xhtml: Line: 100 ID value 'tuesdayAfternoon' is not unique.’
THIS time Sigil has helpfully provided line numbers. Double-clicking the error now takes you directly to the relevant place in the file, which is a really useful feature. The first error message is a bit scary, but is just because the logical table of contents refers to a label (or id) which no longer exists. The second message is much more straightforward and simply identifies that the label is not unique. The line reference is to the SECOND instance of the duplicate label in the file. Sigil has no idea which of the two labels is mis-typed: it can’t read your mind! All it knows is that it found the first label and then another, identical, label, which is the one it flags up as an error. In actual fact the typo I created was in the FIRST label, so you would still need to search for that in order to edit it. Correcting the label will deal with BOTH error messages. As a general rule, if you deal with the most obvious error messages first, some of the more obscure-looking ones will most likely go away by themselves.
Invalid Label:
You will recall I also keep saying to use labels and filenames which are single text strings with NO SPACES. Well, I put a space in the label for ‘tuesday Morning’, and got the following errors:

‘File: OEBPS/toc.ncx Line: 60: This <content> element’s "src" attribute value is "Text/Tuesday.xhtml#tuesdayMorning", but an element with an ID the fragment is referring to does not exist in that file.’
and
‘File: OEBPS/Text/Tuesday.xhtml Line: 20 value 'tuesday Morning' is invalid NCName.’
The last one is the most informative. Seeing this you would edit the label to remove the space and everything would be alright. (Although you would need to check it was correct elsewhere as well, after all, the label is there for a reason, in this case as the target of a link in the html table of contents. There will be knock-on effects you may need to deal with in a real file.) The first error message is just because the logical table of contents refers to a label which doesn’t exist (I just edited it, remember!).
Order of the error messages:
Unfortunately, the error messages will be displayed in the order in which they arise when Sigil goes through the file. They will NOT be conveniently paired up as they are above. You might need to go through the error messages several times, dealing with the most obvious ones first, before you have nailed them all.
Next Steps: Once you have an epub which passes flightCrew in Sigil, you are ready to check it with epubcheck, which is the industry-standard error-checking program. My next post will cover how to download and use epubcheck to validate your e-pub.
Index to ‘how to …’ posts:
How to ‘unpack’ an epub file to edit the contents and see what’s inside.
How to understand what is inside an epub
How to link the html table of Contents in a Kindle e-book
How to restructure the html table of contents for a Kindle
How to delete the html cover for a Kindle ebook
How to link the cover IMAGE in a Kindle e-book
How to clean up your MS Word file before your get started
How to markup an MS Word file to identify the formats before importing it into an epub
How to create a new blank e-pub using Sigil
How to import your marked-up MS Word file into your ebook using Sigil
How to create and link a CSS stylesheet in an e-book using Sigil
How to replace the markup with CSS styles in your ebook using Sigil
How to style an e-book so it works with the limited CSS styling available to Kindle e-readers
How to understand the syntax of CSS
How to style Small Caps in an e-book
How to split your ebook up into chapters using Sigil
How to sequence your e-book
How to phrase the copyright declarations etc. in an e-book
How to generate the logical table of contents using Sigil
How to understand toc.ncx in an e-book
How to generate the html table of contents in an e-pub
How to style the html table of contents using CSS
How to create an html cover for your epub using Sigil
How to present references and notes in a book
How to use Mark Up to link notes in your e-book
How to present a bibliography in a book
How to use markup to link entries in a bibliography with the notes section
How to index an e-book
How to use the tools in MS Word to create an index
How to alphabetise an index or bibliography
How to adapt the print index in your MS Word file for an e-book using markup
How to adapt cross-references in your print index for e-book and how to use markup to make the links
How to understand content.opf
How to understand and edit the Metadata of an ebook using Sigil
How to understand the manifest in content.opf
How to understand the spine and guide in content.opf
How to test your e-pub using flightCrew in Sigil
TinyURL for this post:
November 5, 2014
How to understand the spine and guide in content.opf
Content.opf is the most important part of an e-book. This is my final post about this file, covering the <spine> and <guide> portions. The <manifest> is detailed here, the <metadata> is covered in this post (including how to use the metadata editor in Sigil) and the sequence begins with an overview here.The spine is found between the opening <spine … > tag and the closing </spine> tags in content.opf.
Entering the ncx table of contents in the spine:
Firstly, note the opening <spine … > tag:
<spine toc="ncx">
The ncx table of contents MUST be referenced in the opening spine tag exactly as shown above, using the spine toc attribute. Like all other items in the spine the ncx table of contents is referenced in the spine by the id assigned to it in the <manifest>. In this case Sigil by default uses an id="ncx". I can see no logical reason in the specification why that particular id should be mandatory and I would have thought any other id would do, provided it matches in the opening <spine …> tag and in the <manifest>. However I cannot see any good reason for NOT using it either. Sigil does it this way automatically and it works and follows the example in the specification, so why change it? See here in my earlier post about the <manifest> for more information about how Sigil labels the ncx.
Syntax of the Spine:
The spine part of content.opf is essentially just a list of the items in the e-book which are to be displayed in order. Each item in the spine is referenced by the id given to the item in the manifest. So a typical spine would look like this:
<spine toc="ncx">
<itemref idref="Cover.xhtml" />
<itemref idref="Contents.xhtml" />
<itemref idref="Chapter1.xhtml" />
<itemref idref="Chapter2.xhtml" />
<itemref idref="backCover.xhtml" />
</spine>
The spine consists of a series of <itemref … /> tags, one per xhtml file to be displayed in the order they are to be displayed in. And so the FIRST item should be the html cover, for example. In each tag, idref= is given the value of the id assigned to the xhtml file in the manifest. Sigil has used the filename as the label (or id) in the manifest but there is as far as I can see no logical reason why some other id could be not used, provided the idref in the spine and the id in the mainfest match. Equally, I can see no good reason to mess with what Sigil has done by default. It works, so don’t fix it!
Out of Sequence (non-linear) items:
There IS a method in the epub specification to separate certain chapters from the main flow of the document. An example might be a textbook in which the author intends including the answers to questions, but does not want the reader to sneakily peek at them, chosing instead to require them to deliberately click on a link. In this case, the answer page would be listed in the spine with an attribute of linear="no". This takes the file out of the normal document flow, and the reader cannot navigate to it using the next/previous page buttons. It will still be there, but the reader won’t be able to see it unless they click on a link. Such xhtml files must still be listed in the spine and there must be some way to navigate to them within the e-book. HOWEVER NOT ALL e-readers are required to support this and an e-reader might simply display all pages, regardless of the vaule of the linear attribute. So I WOULD NOT recommend this strategy, unless strictly necessary. In the example given, I would have thought it was perfectly adequate to put the answers in a chapter at the back of the e-book and link to them as appropriate. The reader would only chance upon them by deliberately navigating to the end. As the pages have to be accessible somehow or other, nothing is really gained by placing them out of the normal flow of the text and it makes the e-book unnecessarily complicated, in my opinion.
If no value of the linear attribute is specified, it is assumed to be "yes" by default, and so for a ‘normal’ e-book in which all the pages fall in a simple linear sequence (recommended), you can ignore this section. For reference, the syntax of a non-linear item in the spine would be:
<itemref idref="file.xhtml" linear="no" />
The <guide> in content.opf:
The guide part of content.opf lies between an opening <guide> tag and a closing </guide> tag. It identifies specific parts of the e-book to make it possible for an e-book reader to conveniently access them. Like the ncx, the way an e-book reader’s software would do this would vary from one device to the next.
HOWEVER according to the opf specification e-book readers are NOT required to take any notice whatever of anything which might be in the guide. A specific exception is the html table of contents, which in a kindle MUST be entered in the guide. This is how the kindle software is set up. (See also below for specialised information about the cover in a kindle.)
But, before delving into considerations for kindle, let’s look at e-pub. You CAN enter the locations of various parts of your e-book in the guide and an e-book reader might be able to access this and make it easier for a user to find this information, but there is NO guarrantee that this will work consistently on all e-readers, in fact it probably won’t. However, if you want to risk it, here’s how:
Syntax of <guide> entries:
Each entry in the guide is in the form of a single <reference … /> tag. One tag per guide item. There is no closing tag; each tag is closed by the ‘ />’ at the end instead (the space matters). An example is:
<reference type="toc" title="Table of Contents" href="http://www.rshelton.org/2014/11/how-t..." />
Within the <reference … /> tag, type specifies the part of the e-book which is being referred to. The value must be chosen from the list below. The title part is not discussed in the opf specification and I assume this can be some informative description of the item to be displayed by the e-reader (although curiously the button on the Kindle which this particular item accesses is NOT capitalised identically with what appears in the title field). And then the href is the location of the item within the e-book. (The examples in the opf specification AND in the Kindle Publishing Guidelines omitted the path. I have added a path in in all my e-books with no ill results.)
The type field can have one of the following values:
typedescription (if not obvious)coverthe html cover title-pagetocthe html table of contents indexglossaryacknowledgementsbibliographycolophoncopyright-pagededicationepigraphforewordloilist of illustrations lotlist of tables notesprefacetextthe first page of the main text
The type MUST be entered exactly as it appears in the first column above and is case sensitive. See my post on how to sequence an e-book for a discussion of each of these parts of a book and their conventional location in the text. The type values in the table were taken by the epub consortium from the 13th edition of The Chicago Manual of Style.
IF none of the above is suitable, then you are allowed to define your own type, beginning it with other, then a full-point and then your custom type. An example would be:
<reference type="other.half-title" title="Half Title" href="http://www.rshelton.org/2014/11/how-t..." />
HOWEVER e-readers are NOT required by the epub specification to suport ANY guide items, and so, beguiling though the thought of including all the various parts of your e-book in the guide might be, I would suggest it were best to rely instead on your html table of contents to allow your readers to find the various parts of the e-book. The results of including guide items would be variable depending on the particular e-reader in use and it seems to me that you need your e-book to behave the SAME way WHATEVER e-reader your customer happens to have. An exception is the html table of contents which MUST be linked in the guide for a kindle ONLY.
Tables of Contents in a Kindle:
As I have already described, the html table of contents has to be entered in the guide in a Kindle. It should also be listed in the manifest and in the spine in the usual way. This is in addition to the ncx table of contents, which should also be listed in the manifest and, as outlined above, entered in the opening <spine …> tag.
So the complete syntax for the tables of contents in a kindle is as follows:
<manifest …>
…
<item id="ncx" href="toc.ncx" media-type="application/x-dtbncx+xml" />
…
<item id="Contents.xhtml" href="http://www.rshelton.org/2014/11/how-t..." media-type="application/xhtml+xml">
…
</manifest>
<spine toc="ncx">
…
<itemref="Contents.xhtml" />
…
</spine>
<guide>
…
<reference type="toc" title="Table of Contents" href="http://www.rshelton.org/2014/11/how-t..." />
…
</guide>
The example above uses the labels (ids) given to each item by Sigil by default.
I stress that the above relates ONLY TO KINDLE and if you are at the stage of making an e-pub you should ignore this for now. I cover this topic fully in these posts: how to link and how to restructure the html table of contents for Kindle (in that order). You may also find my posts on how to generate and how to style the html table of contents, how to generate the logical table of contents and how to understand the ncx table of contents useful.
Kindle Cover Image NOT to be referenced in the guide:
The cover in a Kindle should normally be linked rather differently from the way it is linked in an e-pub.
Amazon require an entry making in the <metadata> for the cover IMAGE. This is a proprietary variation from the e-pub specification (although with their blessing) and applies to KINDLE ONLY. I have added a discussion of this here in my post on the metadata, as it properly belongs there. You can also find detailed instructions for deleting the html cover and linking the cover image for kindle (in that order) in earlier posts.
In the context of this post, I would therefore recommend AGAINST including the cover in the guide for a Kindle; the kindle software expects to find the cover image in a different place.
Nothing in the guide:
The logic of the foregoing is that your e-pub e-book will have a completely empty guide section. This is how Sigil makes your e-book by default. In fact, when the guide is empty, Sigil uses a SINGLE self-closed guide tag like this:
<guide />
Note the space between ‘guide’ and ‘/’, which does matter.
If you DO include items in the guide, you should be careful to close it properly. When the guide is NOT empty, it should begin with a an opening <guide> tag and end with a closing </guide> tag, which is different from the blank ‘<guide />’ tag. If you get it wrong in your kindle, the html table of contents button will be greyed-out. This is an error which can be particularly difficult to spot: when I made it it took me a whole day before I realised what I had done!!
Tours:
As a final note, I should mention that it IS possible to provide a ‘tour’ of your e-book (or even more than one ‘tour’), although they are officially frowned on (or in technical language: deprecated). In the context of an e-book, a ‘tour’ is a pre-planned series of locations within the book from which the reader can freely explore the text, much like a set of pre-planned bookmarks. E-book readers are NOT required to support tours (although some might do) and for the same reasons as already given for not including non-linear spine items I DO NOT recommend having a ‘tour’ of your e-book. Sigil is NOT set up to do this and only some e-readers (if any) will implement a tour. They are a hang-over from the original purpose of the specifications adopted into the e-pub standard from those for making audio books. If you want to know how a tour should be implemented, I would refer you to this place in the opf specification (link referenced on 2 Nov 2014). You would have to use an html editor such as Komodo Edit to create a tour, Sigil will not do it for you.
Footnote:
In retrospect, much of this post has been devoted to things you should in my opinion LEAVE OUT of your e-book. I believe an e-book should be as simple as possible, and then there is less that can go wrong. With the important exception of the html table of contents in a Kindle, which is a special case, I would not include any guide items, and would restrict the spine to linear items. The ncx has to be linked in the spine as shown above, but that’s about it. Keep it simple! The html table of contents will provide a perfectly straightforward way for the reader to locate items within your e-book. And listing the cover as the first item in the spine will ensure it is the first thing in the [e-pub] e-book. It is, however, important that the content in your e-book follows the conventional sequence for a print book, as the reader will be familiar with this. See my post on how to sequence an e-book for more information.
Next Steps: Now, finally, you should have a complete e-pub e-book and you are ready to test it using the tools (flightCrew) built into Sigil and also with epubcheck. My next posts will cover how to do this. You can then begin converting it to Kindle.
Index to ‘how to …’ posts:
How to ‘unpack’ an epub file to edit the contents and see what’s inside.
How to understand what is inside an epub
How to link the html table of Contents in a Kindle e-book
How to restructure the html table of contents for a Kindle
How to delete the html cover for a Kindle ebook
How to link the cover IMAGE in a Kindle e-book
How to clean up your MS Word file before your get started
How to markup an MS Word file to identify the formats before importing it into an epub
How to create a new blank e-pub using Sigil
How to import your marked-up MS Word file into your ebook using Sigil
How to create and link a CSS stylesheet in an e-book using Sigil
How to replace the markup with CSS styles in your ebook using Sigil
How to style an e-book so it works with the limited CSS styling available to Kindle e-readers
How to understand the syntax of CSS
How to style Small Caps in an e-book
How to split your ebook up into chapters using Sigil
How to sequence your e-book
How to phrase the copyright declarations etc. in an e-book
How to generate the logical table of contents using Sigil
How to understand toc.ncx in an e-book
How to generate the html table of contents in an e-pub
How to style the html table of contents using CSS
How to create an html cover for your epub using Sigil
How to present references and notes in a book
How to use Mark Up to link notes in your e-book
How to present a bibliography in a book
How to use markup to link entries in a bibliography with the notes section
How to index an e-book
How to use the tools in MS Word to create an index
How to alphabetise an index or bibliography
How to adapt the print index in your MS Word file for an e-book using markup
How to adapt cross-references in your print index for e-book and how to use markup to make the links
How to understand content.opf
How to understand and edit the Metadata of an ebook using Sigil
How to understand the manifest in content.opf
How to understand the spine and guide in content.opf
TinyURL for this post:
November 1, 2014
How to understand the manifest in content.opf
Content.opf is the most important part of your e-book. This post covers what you will find between the opening <manifest> and closing </manifest> tags in content.opf. Earlier posts cover understanding content.opf and understanding and editing the <metadata> in content.opf. I will go on to explain the remainder of this file: the <spine> and <guide> sections.Each line of content.opf between the <manifest> tags refers to the various different parts of the e-book. Each distinct item within the e-book must be listed in the manifest (with the important exception of content.opf which should NOT be included). Sigil will create a valid entry in the manifest for you for each item as you add it to the e-book. However you WILL need to make some manual changes to the manifest when linking your html table of contents and cover image for kindle, so it is important that you understand how it is constructed.
Syntax of an item tag:
The manifest consists of a series of <item … /> tags. One for each … well … item in the e-book. Note that these tags have no closing tag, instead each tag is closed by the ‘ />’ at the end (the space matters). Here is an example:
<item href="http://www.rshelton.org/2014/11/how-t..." id="Section0001.xhtml" media-type="application/xhtml+xml" />
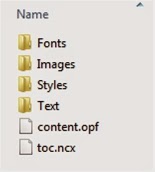
This is the entry which Sigil has created automatically for the blank first chapter of the e-book. The first thing in the tag is href="http://www.rshelton.org/2014/11/how-t...". This is the URL of the item, and tells the e-book reader where to find the file. In this case the filename is Section0001.xhtml and the path from content.opf to the file is ‘Text/’. (The ‘Text’ folder is in the same place as content.opf and the path tells the e-reader to look in that folder to find the file.) It might be helpful to include an image of the contents of the OEBPS folder at this point:
Coming back to the <item … /> tag we are discussing:
<item href="http://www.rshelton.org/2014/11/how-t..." id="Section0001.xhtml" media-type="application/xhtml+xml" />
The second thing in the tag is an id or label for that file: id="Section0001.xhtml". Notice that Sigil has recycled the filename (Section0001.xhtml) and used it again as the label, but logically the filename and label are two different things. The filename must exactly match the name of the file, whereas the label can be any text you wish. Sigil just happens to have used the filename for the label in this case. Whatever is used for the label, it must be unique (i.e. all labels should be different) and should be a single text string with NO SPACES. The names are case SeNSiTiVe.
I suppose it would in principle be possible to make the filename and label different from one another by editing the entry in the manifest, but I cannot see what would be achieved by this and have not tried to do it. And, as the label is used to identify the file in the spine, you would need to edit that as well, which is getting messy and leaves you open to making errors, which you do not want.
The final thing in the tag is a ‘media-type’ attribute, which in this case has the value: ‘application/xhtml+xml’. This tells the e-reader that the file is an xhtml file.
Media Types:
Here is a table detailing the principal media-types you will need to know about:
kind of filemedia-type to use.xhtml file application/xhtml+xml .jpg file image/jpeg .png file image/png ncx table of contents
(toc.ncx) application/x-dtbncx+xml.css stylesheettext/csstrue type font (.ttf)application/x-font-ttf
A complete list of all media-type attributes listed according to the file extension can be found here: http://reference.sitepoint.com/html/mime-types-full. NB I couldn’t find .ttf in that list! Sigil will know about all the valid media-types and so if you import a file into Sigil it will look up and enter the correct media-type for you when it creates the entry in the manifest.
Linking Images:
An Image would be linked like this:
<item href="http://www.rshelton.org/2014/11/how-t..." id="Cover.jpg" mediatype="image/jpeg" />
The syntax is identical with that used for an xhtml file, however note that the path is different: ‘Images/’. This is because the image is in the folder called ‘Images’, NOT in ‘Text’. Beware of the difference between the extension: .jpg and the final bit of the media-type: jpeg.
Linking the ncx Table of Contents:
The ncx table of contents is an important file within the ebook and is generated and linked by Sigil for you. It should be listed in the manifest with a media-type of: ‘application/x-dtbncx+xml’ This file is in the same folder as content.opf, and so no path need be specified:
<item href="toc.ncx" id="ncx" media-type="application/x-dtdncx+xml>
For some reason, Sigil has chosen to label the ncx table of contents ‘ncx’, rather than re-use the filename, which is different from the way it labels every other item in the manifest. I cannot see any explicit reason in the opf specification why the label in the manifest has to be ‘ncx’, and I would have thought another label could be used. However as this would achieve nothing, just be aware that Sigil labels the ncx differently from other items in the e-book. The choice made by Sigil follows the example given in the opf specification, but as far as I can see that is just an example. Still, best left alone. It works, so don’t fix it!
Be very careful to distinguish between the ncx table of contents (toc.ncx) and the html table of contents (named by you but let’s call it Contents.xhtml). This last file is a section in the e-book which contains hyperlinks to the various chapters within it. The ncx table of contents on the other hand is used by the e-reader to generate a completely different table of contents according to its own programming. This will most likely be accessed when the user presses a button somewhere on the e-reader, which then displays a table of contents which it has generated from the ncx table of contents file. You will need BOTH files for your kindle e-book. The html table of contents is entered in the manifest just like any other chapter in the e-book. See my posts on how to generate the html table of contents and how to generate the logical table of contents for further information.
html cover and Kindle cover IMAGE:
There are important differences between an epub and a kindle e-book for the front cover image and html table of contents and these are covered by a number of other posts. The foregoing relates only to epub. To get started converting a valid epub to Kindle click here for information on how to deal with the front cover and here for information on how to deal with the table of contents. Other information is linked from these posts.
For both kindle and epub you will have loaded a cover image, and this will be linked as indicated above, just like any other image file. For the e-pub, you will have an html cover file, and that will be linked just like any other chapter in the e-book text. It falls at the beginning of the e-book, but the location of its entry in the manifest is NOT important.
Linking Fonts:
I don’t necessarily recommend this, but should you have any embedded fonts, they will be in the ‘Fonts’ folder and will be entered in the manifest as follows:
<item href="http://www.rshelton.org/2014/11/how-t..." id="NewCenturySchoolbook.ttf" media-type="application/x-font-ttf" />
Notice again that the path to the file is different because the fonts live in the ‘Fonts’ folder. To avoid generating warnings in epubcheck, it is advisable that the names of the font files are single text strings with NO SPACES and these filenames MUST also be used consistently in the CSS stylesheet. For the sake of completeness I will post on how to embed fonts later, although I would advise against it. As I said earlier, I couldn’t find a media-type in the online list corresponding to an extension of .ttf. The code in the example above was generated by Sigil when I imported the font file into the epub and works just fine. Importing a font file into your e-book using Sigil should result in the correct media-type being entered in the manifest, whatever the type of the font.
Linking a CSS Stylesheet:
If you have a css stylesheet, it will have been linked like this by Sigil:
<item href="http://www.rshelton.org/2014/11/how-t..." id="Style0001.css" media-type="text/css" />
Once again, as this will have been created in the ‘Styles’ folder the path is different. The filename, Style0001.css, can of course be anything you like. Style0001.css is just the default filename Sigil gives it when it first created it. Renaming it in Sigil will update the entry for it in content.opf.
The stylesheet will need to be linked to each chapter in the e-book and any embedded fonts will need to be referenced in the stylesheet. See my post on how to create and link a css stylesheet for more information on how to link it. I will cover embedding fonts in a future post and link it here when it is published.
The id/label given to each item in the manifest is used to reference it in the <spine> NOT the filename and path. The order in which the items appear in the manifest is of no importance. What is important is that each item within the ebook MUST appear once and once only in the manifest and be assigned a unique id (except content.opf, which should NOT be included). It ends with a closing </manifest> tag.
Sigil will create the entries in the manifest for you but you are going to have to edit it to link the cover image and the html table of contents properly for kindle, so it is as well to be completely familiar with how the manifest is constructed.
Next Steps: My next post will complete this sequence by explaining the syntax of the <spine> and <guide> sections of content.opf. I will then go on to cover how to test your completed e-pub e-book and begin converting it to kindle.
Index to ‘how to …’ posts:
How to ‘unpack’ an epub file to edit the contents and see what’s inside.
How to understand what is inside an epub
How to link the html table of Contents in a Kindle e-book
How to restructure the html table of contents for a Kindle
How to delete the html cover for a Kindle ebook
How to link the cover IMAGE in a Kindle e-book
How to clean up your MS Word file before your get started
How to markup an MS Word file to identify the formats before importing it into an epub
How to create a new blank e-pub using Sigil
How to import your marked-up MS Word file into your ebook using Sigil
How to create and link a CSS stylesheet in an e-book using Sigil
How to replace the markup with CSS styles in your ebook using Sigil
How to style an e-book so it works with the limited CSS styling available to Kindle e-readers
How to understand the syntax of CSS
How to style Small Caps in an e-book
How to split your ebook up into chapters using Sigil
How to sequence your e-book
How to phrase the copyright declarations etc. in an e-book
How to generate the logical table of contents using Sigil
How to understand toc.ncx in an e-book
How to generate the html table of contents in an e-pub
How to style the html table of contents using CSS
How to create an html cover for your epub using Sigil
How to present references and notes in a book
How to use Mark Up to link notes in your e-book
How to present a bibliography in a book
How to use markup to link entries in a bibliography with the notes section
How to index an e-book
How to use the tools in MS Word to create an index
How to alphabetise an index or bibliography
How to adapt the print index in your MS Word file for an e-book using markup
How to adapt cross-references in your print index for e-book and how to use markup to make the links
How to understand content.opf
How to understand and edit the Metadata of an ebook using Sigil
How to understand the manifest in content.opf
TinyURL for this post:
October 25, 2014
How to understand and edit the Metadata of an ebook using Sigil
The easiest way to deal with the metadata in your ebook is to use Sigil to create it. Metadata is information about the publication, such as author, title, ISBN etc. To open the Metadata editor in Sigil, select Metadator Editor … from the Tools menu:
In a blank ebook, the metadata editor will open in Sigil with no information in it:

The Metadata Editor: Introductory:
The top of the metadata editor dialog has spaces for three key pieces of metadata: the Title, Author and Language:
In essence, all you need do is type in the title and author and select a language from the drop-down menu. The author name should be typed in the normal order: ‘Rod Shelton’. Next to the author field is another one labelled: ‘File As:’.

Type in the author’s name as it would appear in an index: ‘Shelton, Rod’, which is the order … well … in which the e-book should be filed. (See my post on alphabetising an index for detailed guidance on the conventions for alphabetising names: it’s far from as obvious as it might at first seem!)
Other items of metadata, such as the ISBN, date of publication, etc, can be added by clicking the ‘Add Basic’ button at the top left of the dialog. Add other authors, or contributors, editors, illustrators etc. by clicking the ‘Add Role’ button, which is immediately below:

Each piece of metadata you add creates an entry in the <metadata> section of content opf. ONE entry per item of metadata.
Syntax of the <metadata>:
The metadata section in content.opf begins with an opening <metadata …> tag and ends with a closing </metadata> tag.
Inside the opening tag there are links to the xml namespace conventions for the dublin core and opf specifications:
Inbetween this and the closing tag there are a number of tags like this: <dc:…> … </dc:…> or like this: <opf:…> … </opf:…> each one of which defines an item of metadata associated with your e-book.
In the case of the title, Sigil creates the following entry:
<dc:title>My Ebook Example</dc:title>
The actual title is contained within the two <dc:title> and </dc:title> tags. This is what you entered in the metadata editor dialog and should exactly match how you want the ebook title to be displayed on the e-reader. Remember that the filename can be anything you want. It is what the e-book reader finds in the metadata which gets displayed.
As described elsewhere, ‘dc:’ is an xmln namespace code which explains to the e-book software which particular meaning it should understand title to have. ‘dc:’ stands for ‘Dublin Core’ and the specification for this convention can be found here: http://dublincore.org/documents/dces/. And, yes, I know this is NOT the URL given in the opening <metadata …> tag. It was, however, the best link I could find to explain the Dublin Core protocol.
The way the e-pub specification builds on and extends the dublin core protocol is complicated, and I will explain this as it arises after describing how to use the metadata editor in Sigil for each piece of the metadata in turn.
In the case of the language, e-books use a special code, rather than the name of the language. Sigil looks up this code based on whatever you select from the dropdown menu in the metadata editor dialog. In my example, I entered UK English from the dropdown menu:

Sigil created this entry in the metadata:
<dc:language>en-GB</dc:language>
which has the correct code: en-GB for UK English sandwiched between the opening and closing <dc:language> tags.
The code is in two parts. The first part (en) identifies the langauge as English, in accordance with International Standards Organisation (ISO) standard number 639, the official website for which is here: http://www.loc.gov/standards/iso639-2/php/English_list.php. The second part is a qualifier for British English (-GB) following ISO 3166 (which can be found here: https://www.iso.org/obp/ui/#search.) The way these two standards are combined is in accordance with the guidance obtainable from here: http://www.ietf.org/rfc/rfc3066.txt. Sigil inserts the correct code for you.
A quick check showed that a very small number of obscure languages assigned a code in ISO 639 are NOT in the drop-down menu in Sigil. I would have thought in the unlikely event that your ebook was in one of these langauges you would need to manually edit the content.opf entry and substitute the ISO 639 code yourself. Luckily, Sigil will in most cases be able to enter the correct information in the metadata part of content.opf for you (and also see further comments below). It might be necessary to do this by editing content.opf manually using an html editor such as Komodo Edit, rather than in Sigil, which might possibly delete an entry if it doesn’t recognise the code. See my post on how to ‘unpack’ an e-book to edit the contents for more details of how to edit content.opf using an html editor.
So that covers the basics.
Adding straightforward metadata using ‘Add Basic’:
Most additional metadata can be added by clicking the ‘Add Basic’ button at the top right of the metadata editor dialog. Another dialog loads, from which you can select what kind of metadata you want to enter. I clicked ‘publisher’ from this list:

This adds ‘Publisher’ to the table in the bottom part of the metadata editor dialog:

Each row of the table has four columns: ‘Name’, ‘Value’, ‘File As’ and ‘Role’. The first column contains the name of the item of metadata you are adding (or editing). The second holds the value of that metadata. The last two coulmns are only relevant for certain items of metadata, and I will go into their role below as it becomes necessary.
Publisher:
Once you have added ‘Publisher’ to the metadata editor dialog, double-clicking in the value column opens it for editing:

Just type in the publisher name. I entered ‘Paradise Press’. When you close the dialog, the following entry will be created in the metadata:
<dc:publisher>Paradise Press</dc:publisher>
As you can see, the entry follows the same syntax as all the others described above. For this item of metadata, the other two columns in the metadata editor dialog cannot be opened.
Other straightforward medatata:
In the items described below, enter the data in the ‘Value’ column in the Metadata Editor dialog.
Coverage: Use this to describe the ‘extent or scope’ of your ebook. The guidance in the opf specification says this should be made using a ‘controlled voccabulary’ and directs you to the Dublin Core for suggestions. The links in the document I accessed didn’t work. Add something like ‘general readers’ in the ‘Value’ column and Sigil creates the following in the metadata:
<dc:coverage>general readers</dc:coverage>
Description: The next item is for a description of the content. This might be a way to embed a blurb in the metadata. The metadata Editor window has limited editing tools, but I was able to enter a lengthy description here. Line breaks were not possible. The entry created in the metadata looked like this:
<dc:description>Can Everton Jones find out how his father stole Emperor Bokassa’s diamonds?</dc:description>
You might want to create a lengthy entry here in MS Word and then save it as unformatted text and paste it into the Metadata Editor. Particularly so if, like me, you are picky about insisting on curly quotes which you will have difficulty entering by typing directly into the Metadata Editor window.
Format: this is for the format of the publication. The guidance suggests using the MIME-type here, which seems crazy to me (unless I’ve missed something!), because there is no mimetype code for mobi (kindle) or e-pub that I can find. And anyway, aren’t both mobi and epub files essentially just .zip archives so far as a computer is concerned and so would have the same mime type, viewed from this perspective? Furthermore the mimetypes for all the component parts of the e-book are already embedded within it. I would have thought ‘epub’ or ‘mobi’ (for kindles) were more useful, and are the only two possibilities of relevance in these posts. The entry in the metadata created by Sigil will look like this for a kindle:
<dc:format>mobi</dc:format>
Additional Language: In addition to the language you selected from the drop-down menu in the top part of the metadata editor dialog, you can specify a further language, if relevant. Simply select ‘language’ from the ‘add basic’ dialog and a row is added to the metadata editor with ‘language’ in the ‘Name’ column. Just type the name of the language in the ‘Value’ column and Sigil will look up the correct language code for you. An additional entry is made in the metatdata for the second language as outlined above. HOWEVER, if you type a language which is NOT supported, such as ‘Romany’, ‘Klingon’ or even ‘Polari’, Sigil will create a blank tag instead: <dc:language></dc:language>. If you save the file or perform another operation, this blank entry will disappear completely.
Relation: is how to specify a related publication, apparently by simply entering a suitable code to identify it, such as an ISBN. The entry which Sigil will make in the metadata will look like this:
<dc:relation>9781904585488</dc:relation>
I would have thought entering the ISBN of a sequel to a novel would make it easier for sites like Amazon to suggest a reader might want to buy the sequel if they have already bought the first book.
Rights: provides a place to enter the rights information. The entry might look like this:
<dc:rights>worldwide exclusive</dc:rights>
HOWEVER do make sure this is in addition to putting the rights information on the title-page verso (otherwise known as the copyright page) to make sure you have properly protected your rights. (See this place in my post on how to phrase the copyright declarations for more information.)
Source: is to identify any source material on which your own book is based. Most likely this would not be needed. The entry in the metadata might possibly look like this:
<dc:source>short stories submitted to the 2012 Paradise Press Short Story Competition</dc:source>
Subject: can be defined if you want to put the subject matter in the metadata. The guidance says ‘any keyword or arbitrary short phrase’ would be suitable for this purpose and multiple entries are supported. The code in the metadata might look like this:
<dc:subject>queer ghost stories</dc:subject>
Type: is where you enter ‘general categories, functions or genres’. An entry could look like:
<dc:type>fiction</dc:type>
More Complicated metadata:
The metadata above is all entered as a single value. Other metadata requies a bit more discussion and understanding of the conventions. Perhaps the next least troublesome is:
Date:
There are four possible options to choose from the add (basic) metadata dialog: ‘Date (custom)’, ‘Date: Creation’, ‘Date: Modification’ and ‘Date: Publication’. Lets say I select ‘Date: Publication’:

When I return to the metadata editor dialog, the new line in the table will look like this:

(I have hilited the relevant row by clicking on it.)
Notice that the current date has been pre-loaded in the ‘Value’ column, and ‘publication’ has been pre-loaded in the ‘File As’ column. Closing the dialog will add the following entry in the metadata in content.opf:
<dc:date opf:event="publication">2014-09-12</dc:date>
The first thing to point out is that the value: 2014-09-12 is the date in reversed order. Then note the bit which says opf:event="publication" in the opening tag. This is how the epub consortium decided in their wisdom that it should be communicated to the e-reader that the value represents a publication date.
To change the publication date in an e-pub, just open the metadata editor and alter the entry in the value column. The date will be updated in the metadata automatically.
Of the other three possibilities, creation and modification dates work in exactly the same way. Sigil enters ‘creation’ or ‘modification’ in the ‘File As’ column and opf:event="creation" or opf:event="modification" respectively in the metadata.
Selecting ‘Date (custom)’ enters ‘custom’ in the ‘File As’ colum and, if you leave it as it is, will enter opf:event="custom" in the metadata. However you can type anything you want in the ‘File As’ column. So, for example, let’s say you want to enter a date for a major revision. Just change the entry in the ‘File As’ column from ‘custom’ to ‘revised’ and the metadata will contain:
<dc:date opf:event="revised">2014-09-12</dc:date>
HOWEVER, according to the e-pub standards, you MUST enter ‘revised’ as a single lower case text string, with NO CAPITALS or SPACES. The same goes for any other ‘custom’ date you enter.
As I have said, the date is in reverse order. At least a year must be entered as four digits. The month by itself can be added or else the month and day can be added if you want to. If a month or day is included each must have two digits. Include leading zeroes for values below ten, as indicated in the example above.
Coming back to that opf:event= statement, this an xml extension defined in the opf specification. It was devised to extend the Dublin Core, to allow different kinds of dates to be associated with the e-book. On the face of it, it’s a rather untidy way of doing this but, as it builds on existing conventions, it is the most logical way of achieving the flexibility required for creating rich metadata in e-books.
I should add that Sigil has a habit of editing/adding to the date metadata as you go along, so sometimes I find it has added or updated a modification date in the metadata after I have been editing the file. I would advise checking the metadata just before commencing the conversion to kindle and also just before publishing the e-pub, to correct anything Sigil did behind your back.
Identifier:
The way Sigil deals with identifiers is similar to how it deals with dates. To enter an ISBN as an identifier for your e-book, just select ‘Identifier: ISBN’ from the ‘add basic’ dialog. In the metadata editor, ‘ISBN’ is pre-entered in the ‘File As’ column and all you need do is to type the ISBN in the ‘Value’ column.
Entering an ISSN (International Standard Serial Number, used for periodicals) works in exactly the same way, just select ‘Identifier: ISSN’.
Another identifier in use in the computing world is a ‘digital object identifier’ or DOI (the website for which is here: http://www.doi.org/). If you want to associate a DOI with your e-book, enter it in the same way, by selecting ‘Identifier: DOI’ from the ‘add basic’ dialog.
Finally, you can enter a custom identifier. Just select ‘identifier (custom)’ from the ‘add basic’ dialog and proceed in the same way as for custom dates. Sigil enters ‘customidentifier’ in the ‘File As’ column. You should replace this with the kind of identifier you want to include and enter the value for it in the ‘Value’ coulmn. See immediately below for an example.
ASIN:
One custom identifier you might consider using is the ASIN, or ‘Amazon Standard Item Number’, which is assigned to your e-book by Amazon after you have uploaded it to the kindlestore. This could be an alternative to the ISBN if you have decided to publish kindle-only without buying an ISBN. You would have to upload your e-book to the kindlestore, find out what ASIN has been assigned to it by Amazon and then edit the original file to include the ASIN as an identifier and re-upload the e-book. The ASIN should remain the same after you have re-uploaded your e-book.
The code for adding an ASIN as a custom identifier would be:
<dc:identifier opf:scheme="ASIN">B008EDNN1S</dc:identifier>
UUID:
When Sigil makes a blank e-book, it creates an identifier for it using a scheme called a ‘Universally Unique Identifier’ or UUID. This is a long string of characters which is generated by your computer according to an alogorithm which is intended to produce a unique string of characters. Of course, it isn’t entirely foolproof, but the high likelihood is that the UUID will be just that … erm … unique.
For the curious, there is an online UUID generator here: https://www.uuidgenerator.net/, which has a brief description of how a UUID is generated. References to the actual specification can be found by consulting Wikipedia.
If you think about it, Sigil would have to have done something of the sort when it created the file. It is compulsory that there be at least one identifier for the e-book, and Sigil cannot know in advance what the ISBN or other identifier will be. By entering a UUID in the meantime, Sigil ensures that the blank e-book which it creates complies with the e-pub standard.
In the metadata, Sigil enters this item:
<dc:identifier id="BookId" opf:scheme="UUID">urn:uuid:b25e5002-0004-4435-ba01-52ec365266ea</dc:identifier>
Within the opening <dc:identifier …> tag, opf:scheme is an extension defined in the opf specification to specify which identification scheme (ISBN, ASIN, UUID, DOI, etc) the entry describes. In this case Sigil has entered opf:scheme="UUID". Other identifiers would follow the same syntax: opf:scheme="ISBN" etc.
In the example, b25e5002-0004-4435-ba01-52ec365266ea is the UUID generated by Sigil when I created the example file. It is prefixed by urn:uuid: which is telling the e-reader software that what follows is a ‘uniform resource name’ using a universally unique identifier.
Unique Identifier:
Apart from opf:scheme="UUID", the other thing inside the opening <dc:identifier …> tag above is id="BookId". This labels the identifier. At least one identifier needs to be listed in the metadata and one of these has to have a label. The label is used in the opening <package …> tag to mark that identifier as the unique identifier to be used for the e-book (see here in my previous post for details). Sigil has used "BookId" as the label but, logically, it could be anything you wanted, PROVIDED it matches in the <metadata> and the <package>.
Other identifiers entered by you (for example for an ISBN) will follow the same syntax, only minus the label:
<dc:identifier opf:scheme="ISBN">9781904585441</dc:identifier>
Using an ISBN as the unique identifier:
IF you want to use the ISBN as the unique identifier instead of the UUID, then just copy the label id="BookId" into the identifier tag for the ISBN:
<dc:identifier id="BookId" opf:scheme="ISBN">9781904585441</dc:identifier>
and delete it from the identifier tag for the UUID:
<dc:identifier id="BookId" opf:scheme="UUID">urn:uuid:b25e5002-0004-4435-ba01-52ec365266ea</dc:identifier>.
(OR even delete the entire line containing the UUID from content.opf altogether!)
If you do this, be aware that the line in the metadata containing the unique identifier cannot be edited by the metadata editor. Making the ISBN the unique identifier removes it from the table in the metadata editor dialog.You will have to make such changes by editing content.opf directly using Sigil.
I ought to add that, as the identifiers are only seen by the software: all the reader sees is just what you have entered on the title page verso (copyright page), I can’t see any reason for changing the unique identifier. But, if you wanted to, that’s how you would do it.
Adding a Contributor or Creator (including a second author) using ‘Add Role’:
The epub specification allows very rich metadata to be added for the various people who have contributed in some way to the creation of an e-book. But this comes with a cost: the system they have chosen to employ is just a bit complicated!
Somewhat conterintuitively, Sigil requires you to click the ‘add role’ button to add another author or other contributor. The reason becomes readily apparent when you do click ‘add role’. A dialog loads with an extremely long and nearly exhaustive list of the various roles other contributors might have:

To add an author, select ‘Author’ from this list and click OK. Sigil adds a row to the table in the metadata editor dialog with ‘author’ in the ‘Name’ column and ‘contributor’ in the last column, which is now headed ‘Role Type’. Type the new author name in the ‘Value’ coulmn and then retype it as it should be alphabetised in the ‘File As’ column.
Now, if you click on ‘Contributor’ in the fourth column, you get a drop-down menu with two choices: ‘Contributor’ or ‘Creator’:
 Select ‘Creator’ for a main author or select ‘Contributor’ for a secondary author.
Proceed in exactly the same way for any of the other contributor (or creator) roles from the ‘add role’ dialog.
For a main author, sigil will add this to the metadata:
<dc:creator opf:file-as="Beckham, David" opf:role="aut">David Beckham</dc:creator>
OR, for a secondary author, it will add this to the metadata:
<dc:contributor opf:file-as="Beckham, David" opf:role="aut">David Beckham</dc:contributor>
The opening tag contains these TWO opf fields: opf:file-as, which we have already covered, and opf:role. In this case a code is specified: opf:role="aut". EACH role from the add role dialog has an associated code. There is a complete list of these here: http://www.loc.gov/marc/relators.
If a code for a role does not exist in that list, you can make one up, beginning it with ‘oth’ followed by a full point and then the text for your custom role (as a single lowercase text string). Casting around a bit for an example, I came up with ‘oth.fluffer’ for a very crucial role in the making of a certain kind of video!
Unfortunately, as Sigil enters ‘author’ and not the corresponding code (aut) in the metadata editor, you cannot enter a custom role this way. You will have to edit it in manually using Sigil. Alternatively you could use an html editor such as Komodo Edit. See my post on how to unpack an e-pub for more information on how to go about this. The code to add to the manifest would look like this:
<dc:contributor opf:file-as="Langan, Brendan" opf:role="oth.fluffer">Brendon Langan</dc:contributor>
Altering an existing entry in the metadata:
All you need do to edit an entry you have already created in the metadata is to open the metadata editor and alter the relevant row of the table. All necessary changes to the metadata in content.opf will be made for you. At a late stage of preparation, you should be able to use this post to help you edit content.opf manually using an html editor, if that becomes necessary.
As a final note, if you select a row in the table in the Sigil Metadata Window and then click the up or down arrow buttons, the item is moved up or down in the list. The guidance says that if there are multiple contributors/creators in the metadata the e-book reader software should presume that the names are in the order in which they are intended to be displayed in the ebook. As far as I can determine, all other items in the metadata section can be in any order. To delete an item of metadata, select it in the metadata editor window and click the ‘Remove’ button.
I have gone into the guts of how the metadata is specified here. In actual fact, using Sigil to do all the hard work for you is by far the best approach. In fact it makes sense to create an epub using Sigil BUT ENTER THE METADATA for your KINDLE e-book. Then convert the epub into a mobi file using kindlegen and finally edit the original epub to change the metadata to their proper epub values. That way Sigil can be relied upon to get things right for you.
A Word of Warning!!!!
Your e-book will inevitably be listed on many different websites. For an e-book with an ISBN these websites will most likely use the data supplied to the booktrade databases, such as Nielsen in the UK and I guess R. R. Bowker in the USA. The metadata embedded within the e-book may well also get picked up by the websites listing it and may not necessarily be identical with that held by Nielsen/Bowker. There could be a conflict between the two and I would advise carefully monitoring the situation and being ready to make changes to the metadata if a problem arises or/and contacting Bowker/Nielsen to rectify any problems at their end.
Perhaps it would be best to end with a note that you will have to manually edit the metadata for your ebook when you link the cover IMAGE and html table of contents for kindle. Click the links for details.
Next Steps: Now the metadata is correct, you are ready to test your e-pub e-book and proceed to convert it to kindle. I will continue explaining the remainder of content.opf and then go through how to test your e-pub using the built-in tools in Sigil and also using epubcheck.
Index to ‘how to …’ posts:
How to ‘unpack’ an epub file to edit the contents and see what’s inside.
How to understand what is inside an epub
How to link the html table of Contents in a Kindle e-book
How to restructure the html table of contents for a Kindle
How to delete the html cover for a Kindle ebook
How to link the cover IMAGE in a Kindle e-book
How to clean up your MS Word file before your get started
How to markup an MS Word file to identify the formats before importing it into an epub
How to create a new blank e-pub using Sigil
How to import your marked-up MS Word file into your ebook using Sigil
How to create and link a CSS stylesheet in an e-book using Sigil
How to replace the markup with CSS styles in your ebook using Sigil
How to style an e-book so it works with the limited CSS styling available to Kindle e-readers
How to understand the syntax of CSS
How to style Small Caps in an e-book
How to split your ebook up into chapters using Sigil
How to sequence your e-book
How to phrase the copyright declarations etc. in an e-book
How to generate the logical table of contents using Sigil
How to understand toc.ncx in an e-book
How to generate the html table of contents in an e-pub
How to style the html table of contents using CSS
How to create an html cover for your epub using Sigil
How to present references and notes in a book
How to use Mark Up to link notes in your e-book
How to present a bibliography in a book
How to use markup to link entries in a bibliography with the notes section
How to index an e-book
How to use the tools in MS Word to create an index
How to alphabetise an index or bibliography
How to adapt the print index in your MS Word file for an e-book using markup
How to adapt cross-references in your print index for e-book and how to use markup to make the links
How to understand content.opf
How to understand and edit the Metadata of an ebook using Sigil
TinyURL for this post:
October 18, 2014
How to understand content.opf
OPF stands for Open Packaging Format and is one of the standards adopted by epub. It is used to construct a file called content.opf which describes the content of the ebook. This file is the most important part of an e-book. I am going to devote at least four posts to it including this one. In the process, I will also cover how the metadata is entered in content.opf and how to edit this using the tools in Sigil. You will need to do this to complete your e-book.This post is purely informative. You do not need to change and SHOULD NOT change anything described in this post. Any necessary changes to content.opf for an epub can be made by Sigil. There ARE changes you need to make maually to content.opf to convert that epub to Kindle, but these are fully described in other posts.
Perhaps the most accessible way to examine content.opf is to open it using Sigil. This post is devoted to the header part of the file (the first two lines of the example below). In a new, blank, epub created by Sigil, content.opf looks like this:
<?xml version="1.0" encoding="utf-8" standalone="yes"?>
<package xmlns="http://www.idpf.org/2007/opf" unique-identifier="BookId" version="2.0">
<metadata … >
<dc:identifier id="BookId" opf:scheme="UUID">urn:uuid:… </dc:identifier>
<dc:identifier … > … </dc:identifier>
…
</metadata>
<manifest … >
…
</manifest>
<spine … >
…
</spine>
<guide />
</package>
(I have replaced details not covered in this post with an ellipsis (…) and the text picked out in red is like that just for the purposes of illustration within this post.)
By way of explanation, in the first line:
encoding="utf-8" tells the ebook reader how the characters are ‘encoded’. ‘utf-8’ is the most widespread system for encoding web pages.
standalone="yes" is fairly self-explanatory: the file is complete in and of itself. It IS possible to have more than one content.opf file, but this is strongly NOT recommended, is not necessary, is hardly ever done, and Sigil isn’t set up to do it.
The next line is:
<package xmlns="http://www.idpf.org/2007/opf" unique-identifier="BookId" version="2.0">
It contains a single opening <package … > tag.
Within that tag, xmlns="http://www.idpf.org/2007/opf" gives the location of the web page defining the xml namespace used in the file. Some terms in xml can have more than one meaning. An xml namespace code followed by a colon tells the e-reader which meaning is intended. An example below is dc:identifier. Here the xml namespace code dc: specifies the intended meaning of identifier. Another example in the manifest is opf:role, where opf: specifies the intended meaning of role. The value of xmlns MUST be exactly as entered above. All very technical. Leave it alone, Sigil will have got it right.
version="2.0" tells the e-reader software that the package is an OPF2.0 package.
Now to go back to the other part of the package tag:
unique-identifier="BookId"
The metadata (as shown in the example above) might contain more than one identifier for the e-book:
<dc:identifier id="BookId" opf:scheme="UUID">urn:uuid:… </dc:identifier>
<dc:identifier … > … </dc:identifier>
ONE of these identifiers has been labelled with id="BookId" by Sigil.
The statement: unique-identifier="BookId" tells the e-book reader which of these identifiers is the unique identifier for the e-book (the one with the label BookId).
The text in red must match in both the manifest and package tag. One and only ONE identifier in the manifest must be labelled as the unique identifier. There must be at least one identifier in the manifest. By default, Sigil creates a Universally Unique Identifier or UUID for the e-book. (I will explain UUID in my next post.) If you think about it Sigil HAS to do something like that when creating a new, blank, epub file, as an ISBN or other identifier cannot have been entered at that stage. In principle, you could edit content.opf so that the ISBN, once entered, is the unique identifier but, as the unique identifier is never seen by the user I can’t see the point. Best left alone.
The part of content.opf enclosed by the opening <metadata … > and closing </metadata> tags defines the metadata for the e-book, such as the title, author, ISBN etc. It is best manipluated using Sigil. How to do this is addressed in my next post, which I will link here when published.
The part enclosed by the opening <manifest> and closing </manifest> tags lists each item in the e-book and gives it a label (or id). It is explained in another post.
The part enclosed by the opening <spine> and closing </spine> tags lists the items in the order in which they will be displayed, using the labels defined in the <manifest>.
The final part should be enclosed by opening <guide> and closing </guide> tags and points to specific items in the e-book, such as the html table of contents. Note that in a blank Sigil-created epub the guide contains no entries and is entered as a single empty <guide /> tag.
The spine and guide are described in a forthcoming post, which I will link here.
content.opf ends with a closing </package> tag.
Whilst Sigil will take care of setting up content.opf for you, you will need to edit it manually when you are converting your e-pub e-book to kindle. And it is also useful to be able to make manual changes at a late stage of preparation without having to go back and re-work it in Sigil. So it is useful to have a working knowledge of the syntax of this important file.
In particular, if you want to change the unique identifier from the UUID created by Sigil to an ISBN, you will also need to know your way around content.opf. The detail of how to change the unique identifier is properly a part of my next post, which explains the syntax of the <metadata> section of content.opf and how to edit the metadata using the tools in Sigil.
Next Steps: My next post explains the metadata section of content.opf and how to edit the metadata using Sigil. I will go on in further posts to explain the manifest, spine and guide. Then, once the metadata has been completed, you will be able to go on to test your epub e-book and begin converting it to Kindle.
Index to ‘how to …’ posts:
How to ‘unpack’ an epub file to edit the contents and see what’s inside.
How to understand what is inside an epub
How to link the html table of Contents in a Kindle e-book
How to restructure the html table of contents for a Kindle
How to delete the html cover for a Kindle ebook
How to link the cover IMAGE in a Kindle e-book
How to clean up your MS Word file before your get started
How to markup an MS Word file to identify the formats before importing it into an epub
How to create a new blank e-pub using Sigil
How to import your marked-up MS Word file into your ebook using Sigil
How to create and link a CSS stylesheet in an e-book using Sigil
How to replace the markup with CSS styles in your ebook using Sigil
How to style an e-book so it works with the limited CSS styling available to Kindle e-readers
How to understand the syntax of CSS
How to style Small Caps in an e-book
How to split your ebook up into chapters using Sigil
How to sequence your e-book
How to phrase the copyright declarations etc. in an e-book
How to generate the logical table of contents using Sigil
How to understand toc.ncx in an e-book
How to generate the html table of contents in an e-pub
How to style the html table of contents using CSS
How to create an html cover for your epub using Sigil
How to present references and notes in a book
How to use Mark Up to link notes in your e-book
How to present a bibliography in a book
How to use markup to link entries in a bibliography with the notes section
How to index an e-book
How to use the tools in MS Word to create an index
How to alphabetise an index or bibliography
How to adapt the print index in your MS Word file for an e-book using markup
How to adapt cross-references in your print index for e-book and how to use markup to make the links
How to understand content.opf
TinyURL for this post: http://tinyurl.com/nls22ew
October 9, 2014
How to adapt cross-references in your print index for e-book and how to use markup to make the links
This post addresses the cross-references in an index and how these can be adapted from the print index for an e-book index, including how to make the links using markup. The topic is fairly complex, and so I had to split it out of my previous post to do it justice.In my last post on how to adapt a print index to e-book, I developed a style in which all differences between Oxford and Chicago style disappeared, and the logic for the changes was dictated by the differences between the print and e-book format. I cannot really believe it but after a lot of work and reflection, I have achieved the same thing for the cross-references in the index as well.
To present this logically, I will begin with the changes needed to Chicago- and Oxford-style print indexes and the reasons why.
THESE RECOMMENDATIONS are made only in relation to an e-book index; your print book index should still follow a suitable PRINT BOOK style.
Capitalisation of ‘See’ or ‘see’:
In Oxford style, ‘see’ is lowercase and preceeded by a comma. Keep the lowercase but delete the comma. The difference in italicisation will be sufficient to flag the distinction between the headword and ‘see’. For example:
prelims, see prelimary matter
would become:
prelims see preliminary matter
Should the index entry be italicised, for example if it relates to a work title, then use Roman for ‘see’:
Hart see New Hart’s Rules
This is essentially the same as advised by Hart (§19.5.1) albeit the other way around: he says to use Roman for ‘see’ if it preceeds italic. But because a cross-reference link follows ‘see’ in an e-book index, the link style will be adequate to distinguish the two.
In Chicago style, ‘See’ is capitalised and preceeded by a full-point. I recommend dropping the full-point for the same reasons as I gave above for dropping the comma in Oxford style. This makes the capital letter wrong, so drop that as well. Use lowercase and no full-point.
Cross-references to sub-entries:
Chicago says to refer to a sub-entry using the headword, a colon and the sub-entry, like this: ‘honorifics: capitalisation of’. I recommend following this style.
Putting this example into context, the e-book index might read:
Oxford uses a comma instead of a colon (well, the index in New Hart’s Rules follows this practice, the book itself has no guidance on the matter). I recommend using a colon in Oxford style as well.
This also avoids the difficulty that if either part of the compound reference is inverted and itself contains a comma, the cross-reference is rendered too complicated to be useful. For instance, in the index to The Chicago Manual of Style, under the heading: ‘abbreviations, specific’ there is a sub-entry: ‘genus, subspecies, and such’. Combined into a compound cross-reference this would become: ‘abbreviations, specific: genus, subspecies, and such’, which is far better than: ‘abbreviations, specific, genus, subspecies, and such’, where the two parts can’t be distinguished. Obviously there is still a problem if either part of the compound reference contains a colon, but this will be much less common than a comma. (See also difficulties with sub-sub-entries below.)
Quite apart from dealing with the difficulty explained above, the real logic for this suggestion is that the colon is used in my style at the end of a line to show that the indented entries on the line below relate to the heading. Using a colon to separate the two parts of a cross-reference to a sub-entry follows the same pattern, giving a colon in my style a single significance.
The other way of cross-referencing to a sub-entry in Chicago style is to use the formula ‘See under’. I do not recommend using this, as the method using a colon discussed above makes it easier for the reader to identify the linked entry after they have jumped to it by clicking the link (see also immediately below).
‘Reading’ from/to a sub-entry to/from a heading in a cross-reference:
Recalling a discussion here in my previous post, a sub-entry can combine with its heading to form a complete phrase which ‘reads’ from/to one to/from the other, for example under: ‘honorifics’ you might have the subheading: ‘capitalisation of’. Together, they ‘read’ like this: ‘capitalisation of honorifics’. It might be tempting to use this for the cross-reference link, without a colon. However I recommend keeping the colon and following a consistent order: ‘heading: sub-entry’. In this case it would become: ‘honorifics: capitalisation of’. This will help the reader find the item after they have clicked the link. Yes, the linked item should appear at the top of the e-reader screen, but even so it can still be difficult to identify. Particularly if the sub-entry ends up at the top and the heading is stranded on the previous screen! (And see also my footnote on readability at the end of this post.)
One imortant detail I also covered was that entries in the same block of the index (i.e. contiguous entries with the same level of indentation) should ‘read’ the same way either from the headword to the sub-entry or from the sub-entry to the headword. This nicety will NOT be possible to maintain in a block of cross-references, because the items in such a list would have been drawn from disparate parts of the index and as such will appear out of context. It is more important that the order: ‘headword: sub-entry’ be consistently applied in the cross-references so as to help the reader locate the entries than for the cross-references to ‘read’ in the same way within the same block of cross-references. Obviously still try to ensure the actual index entries, as opposed to the cross references ‘read’ in a consistent direction.
Principles of structuring the cross-reference links:
Apart from the style changes above, I recommend you structure your cross-references along the same lines as the index entries themselves, as detailed in my last post. The examples below show how the links should be formatted once the style changes are made. The examples have already had the changes above made to them. The outcome is in all cases identical whether the index began life in Oxford or in Chicago style
Consider a basic ‘see’ cross reference from a main entry:
‘see’ cross-reference from a main entry:
This is arguably the most straightforward kind of cross-reference, and also the most common. You may want to refer the reader ‘from one possible [main index] entry to a synonymous or analogous one’ (Hart §19.2.5). The reader is alerted to the cross reference by the word ‘see’ after the secondary entry:
Rod Shelton see Shelton, Rod
…
Shelton, Rod 123
In this example, the main entry has just one page reference after it and so when linking the index it would be turned into a hyperlink to that location in the main text:
Rod Shelton see Shelton, Rod
…
Shelton, Rod
The best way to make the cross-reference in an e-book is to turn the secondary entry into a link to the same place as the alternative main entry it links to (i.e. a double-entry):
Rod Shelton → links to main text
…
Shelton, Rod → links to the same place in the main text
‘see’ cross-reference from a main entry finding multiple page references:
However, if the cross-referenced main entry has two or more page references after it:
Ken Livingstone see Livingstone, Ken
…
Livingstone, Ken 457, 459
it will have been turned into two hyperlinks on new lines (the text for the hyperlink is drawn from the context):
Ken Livingstone see Livingstone, Ken
…
Livingstone, Ken:
liking for newts → links to one place in the main text
political career → links to another place in the main text
The reader will need to be directed from the cross-reference to the linked entry in the index, from where he/she can decide which of the two links to explore. SO turn the cross-reference text into a link to the main entry instead:
Ken Livingstone see Livingstone, Ken → links to Livingstone, Ken
…
Livingstone, Ken:
liking for newts
political career
NB no comma before and no colon after ‘see’, which is always lowercase. The link is on the same line as the headword.
More than one ‘see’ cross-reference from a main entry:
There might also be more than one possible ‘see’ cross-reference. In the following example one refers the reader to a main entry with just one page reference and the other to a main entry with two page references (example adapted from the Chicago Manual of Style, and modified to follow Oxford):
adolescence see teenagers; youth
…
teenagers 34, 36
…
youth 121
The entries might link like this:
adolescence see:
teenagers → links to teenagers
youth → links directly to the same place in the main text as the entry for ‘youth’
…
teenagers:
acne → links to one place in the main text
teenage angst → links to another place in the main text
…
youth → links to main text
NB once again ‘see’ is lowercase and has no punctuation before it. This time a colon follows, indicating that the links are on the next line. The links themselves are dropped onto the lines below, one per line, and are indented as though they were new sub-entries.
‘see’ cross-reference finding a sub-entry:
A further possibility is that the cross-reference relates to a sub-entry. The example below is taken from the actual index in Hart and modified according to my style recommendations (i.e. colon instead of comma):
block quote see quotation: displayed
…
quotations:
…
displayed quotations 83, 153
The obvious way to link it is to make the whole of the cross-reference text into a hyperlink:
block quote see quotations: displayed → links to displayed quotations
…
quotations:
…
displayed quotations:
layout → link to one place in the main text
quote marks → link to another place in the main text
Quite where to begin/end the link for the cross-reference is a detail I’ll gloss over at this point.
Mixed ‘see’ cross-references to main and sub-entries:
A final possibility, although rather unlikely, is that there may be more than one ‘see’ cross-reference and that some might find a main entry and others a sub-entry:
orange see colours: orange; fruit
The cross-reference would link like this:
orange see:
colours: orange → links to a sub-entry
fruit → links to a main entry under ‘fruit’
Cross-references to an entry with just one page reference after it would link directly to the main text, rather than to another place in the index.
Further Considerations and Recommendations:
Well, so far so good, the basic structure is established and the outcome is the same whether you have chosen to follow Chicago or Oxford. There remain a few other kinds of cross-references and other factors to consider. Beginning with cross-references from sub-entries:
Cross-references from sub-entries:
New Hart’s Rules makes no mention of how to style a ‘see’ cross-reference from a sub-entry, but I found one example in his index:
brackets 81–3, 281–2
…
round see parenthesis
Which would link as follows in an e-book index:
brackets:
in punctuation
round see parenthesis
in science and maths
Should there be more than one cross-reference:
brackets 81–3, 281–2…round see parenthesis; some other cross-reference
Then do exactly as above, using a colon after ‘see’ and dropping the links which follow onto new lines and indent then as if new sub-sub-entries:
brackets:
in punctuation
round see:
parenthesis
some other cross-reference
in science and maths
Chicago, on the other hand throws a spanner in the works, by insisting that cross-references from sub-entries be enclosed in parentheses and use lowercase for ‘see’:
statistical material, 16, 17, 89coding of, for typesetter (see some other cross-reference; typesetting)proofreading, 183
Which is all very well, but this presents a difficulty if there is more than one cross-reference, as dropping each link down onto a fresh line would split the parenthesis:
statistical material:abbreviations incoding of, for typesetter (see:some other cross-referencetypesetting)mathematical expressions ofprobabilityproofreading
So my recommendation is to do away with this particular convention from Chicago and go with Oxford for any cross-references from sub-entries.
(Note that in the examples above the sequence of the entries has had to be adjusted to correct the alphabetisation, as discussed immediately below.)
Alphabetisation of cross-references:
I touched on this immediately above. And in a discussion here in my earlier post I did say that it would be best to alphabetise all entries in the index from the start of the linked text. AN EXCEPTION would be for cross-references, which I think will need to be alphabetised from the start of the line. So in the example above you would alphabetise: ‘coding of, for typesetter see typesetting’ on: ‘coding of …’, rather than on: ‘typesetting’. This is because the reader would be looking for the sub-entry rather than the cross-reference. And for the same reason you would ignore ‘see’ in the alphabetisation. The cross-references which follow would be alphabetised in the usual way.
Starting/Ending links:
Links would be either to main entries or to sub-entries. In the case of a main entry, the whole entry is going to be a noun or noun phrase, and the whole of this should be linked when used in a cross-reference. For cross-references to sub-entries, as outlined above, the full reference would be given as: ‘heading: sub-entry’. IF the sub-entry is prefaced by a linking phrase, such as ‘in’ or ‘concerning’, etc. it should still be included in the link: run the link from the start to the end of the cross-reference in all cases.
Difficulties with sub-sub-entries:
These posts only consider indexes with sub-entries. Sub-sub-entries would be even more ungainly to accommodate, quite apart from not being possible to generate using the tools in MS Word. However IF you really have to include sub-sub-entries, then I might suggest either just using two colons in cross-references to them according to this pattern: ‘heading: sub-entry: sub-sub-entry’ OR else use a formula such as ‘see sub-sub-entry under heading: sub-entry’. As you can see neither method is very satisfactory and I would strongly recommend against using sub-sub-entries if at all possible. One way to get around it is to incorporate the heading/sub-entry into a number of different main entries and then make the sub-sub-entries into sub-entries under each of the compounded headings. For instance in the index in Hart, they have done this:
article, definite:
in Arabic 108, 198
…
in titles 133, 136–7
article, indefinite 133, 136, 184
with abbreviations 174
in index 362
in lists 286
Avoiding:
article:
definite:
in Arabic 108, 198
…
indefinite:
…
Generic Cross-References:
The only cross-references which are left are ‘see also’ and generic cross-references. Well, a generic cross-reference, such as:
languages see under individual languages
would be left as just plain text and the conventions are the same in Oxford and Chicago style and NB no colon after ‘see under’ (no link follows).
‘see also’ Cross-References:
A ‘see also’ cross-reference directs the reader to places where additional information about related matter can be found. It comes after all the other entries following a main index entry:
contractions 138, 167
and apostrophe 66–7
see also abbreviations
This would convert to e-book as follows:
contractions:
in bibliography
general principles
see also abbreviations
And being consistent about multiple cross-refrences, you would use a colon and drop the list of cross-references down onto a new line indented by one more level:
contractions:
in bibliography
general principles
see also:
abbreviations
some other cross-reference
Chicago says to bracket see also cross-references after sub-entries. As I have said above, this does not work if there is more than one see also cross-reference and so I recommend dispensing with this convention for an e-book index.
The need for ‘see’ (or rather why it is unwise to dispense with it):
On balance I have also resisted taking the opportunity of dispensing with the ‘see’ altogether in certain cases. Take the example:
block quote see quotation: displayed
One possiblilty would have been to turn ‘block quote’ into a hyperlink directly to the index entry for ‘quotation: displayed’. However I think this would be confusing to the reader. The word ‘see’ alerts the reader to the hyperlink jumping to another place within the index. The meaningful links which have replaced the page references should jump to the text. The only exception is a double entry, where the alternative link jumps to the same place as another, equivalent link. Treat links to the text in one way and links to cross-references in another and the reader will find the organisation of the index easier to understand.
General Principles:
So, putting all of the foregoing together in one place, this would be my recommendation for converting print index cross-references to e-book:
turn entries which find a single page reference into a double-entry linked directly to the same place in the main textturn entries which find multiple page references into a hyperlink to the relevant item in the index always capitalise ‘see’ in lowercasealways delete any punctuation before ‘see’ if there is just one cross-reference:leave the cross-reference on the same line as ‘see’hyperlink the cross-reference to the relevant place in the index ORturn it into a double entry if it finds a single page reference if there are multiple cross-references: leave the ‘see’ on the same line as the headwordadd a colon after ‘see:’ drop each cross-reference onto a new line and indent them as though new sub-entries in their own rightdispense with punctuation such as semicolons separating the cross-references, as they are now each on a separate line and do not need it turn the cross-references into links to the relevant places in the index ORif any of the cross references find a single page reference, into double entries in cross-references to sub-entries: cite the main entry, followed by a colon and then the sub-entrylink the whole of the cross-reference to sub-entriesDO NOT use ‘see under’ to refer to sub-entries Dispense with the Chicago convention of putting cross-references from subentries in brackets and treat them in the same way as for all other cross-referencesalphabetise cross-references from the start of the line containing the cross-referenceALL original punctuation in the original index is deleted except for colons in compound cross-references to sub-entriescolons are added to explain how one item relates to another where relevantthe visual presentation of the indentation and the links further explains the index structure How to make the links in your index:
Firstly note that, as the cross-references are all within the index, the links can be made at any time: no markup is added to the main text and so the page boundaries are unaffected.
It is fairly straightforward to make the cross-references. You might want to refer to my previous post on how to adapt the print index for e-book when reading what follows.
The first thing to do is to restructure the cross-references along the lines indicated immediately above.
Now you need to create the necessary markup. At the risk of some repetition, I’ll return to the examples already given:
Making a link by Substituting a Double-Entry:
Coming back to a cross-reference to an entry with a single page reference:
Rod Shelton see Shelton, Rod
…
Shelton, Rod 123
As I said above, this is best dealt with in an e-book by creating a double entry. Turn BOTH entries into hyperlinks to the SAME place in the main text:
Rod Shelton
…
Shelton, Rod
Do this by duplicating the first part of the markup from the main entry and adding it to the cross-reference and, obviously, delete the end bit:
{Ch1#67_Rod Shelton} see Shelton, Rod
…
{Ch1#67_Shelton, Rod}
You would then make the replacements I detailed here in my previous post.
If the Cross-Reference finds more than one page reference/hyperlink:
IF the cross-reference refers to an entry with two or more page references, you will need to direct the user to the main entry in the index, from where they can then choose from the available page references (print book) or links (e-book):
Ken Livingstone see Livingstone, Ken
…
Livingstone, Ken 45, 67
In this case, re-working the index will result in:
Ken Livingstone see Livingstone, Ken
…
Livingstone, Ken:
liking for newts
political career
The marked-up index would look like this:
/x/Ken Livingstone /i/see/ii/ Livingstone, Ken
…
/x/Livingstone, Ken:
/xx/liking for {Ch5#130_newts}
/xx/{Ch5#109_political career}
You will need to add additional markup to create the hyperlink for the cross-reference:
/x/Ken Livingstone /i/see/ii/ /xr/3/xxr/Livingstone, Ken/xxxr/
…
/x//xrl/3/xxrl/Livingstone, Ken:/xxxrl/
/xx/liking for {Ch5#130_newts}
/xx/{Ch5#109_political career}
And then use find and replace to:
replace /xrl/ with <span id="xri
then replace /xxrl/ with ">
and replace /xxxrl/ with </span>
and also replace /xr/ with <a href="http://www.rshelton.org/2014/10/how-t...
replace /xxr/ with ">
and finally replace /xxxr/ with </a>
(NB ‘xri’ has been added to make the label unique. Any character(s) will do. ‘xri’ is supposed to stand for ‘cross reference (index)’.)
After the other replacements have been made, this creates:
<p class="indexEntry">Ken Livingstone, <span class="italicText">see</span>: <a href="http://www.rshelton.org/2014/10/how-t..., Ken</a></p>
…
<p class="indexentry"><span id="xri3">Livingstone, Ken:</span></p>
<p class="indexSubEntry">liking for <a href="http://www.rshelton.org/2014/10/how-t...
<p class="indexSubEntry"><a href="http://www.rshelton.org/2014/10/how-t... career</a></p>
The number: 3 hilited in blue is a unique number for the cross-reference which you will have to add. It must match in the link and the label. As both the label and the link are in the same file, there is no need to include the filename in the href for the link.
The only other possibility is that the cross-reference could point to a subheading. Again, if the subheading has only one page reference, treat is as a double entry. If the subheading contains multiple page references, follow the procedure above.
‘see also’ cross-references:
‘see also’ cross-references direct the reader to closely related items in the index. They would occur as sub-entries or sub-sub-entries in my scheme. It would seem to me that these would work like the cross-references I have just described above, which direct the reader to a choice of links. Just substitute the text: ‘see also’ instead of: ‘see’.
If the ‘see also’ cross-reference finds just one page reference, then go with the double-entry method above. In this case, an example of the markup would be:
blowjob
/i/see also/ii/ {Ch5#69_fellatio}
A Footnote about readability:
The ability of the e-book to hyperlink all over the place is a great advance on print books. However following a link might not always be easy for the reader. The screen will jump to either the linked place in the main text or else to another index entry. In BOTH cases there will be no visual cue to show the reader where to look on the screen for the bit they wanted to refer to. In the process of researching this blog I have found a very elegant solution using CSS3 to hilite the target of any link [using the :target selector, information about which is here ], BUT this won’t yet work on the majority of e-book readers, just on epub3.0 e-readers. Until these are more widely available and until all the existing epub2.0 e-readers have been junked I am not sure it is worth it making epub3.0 e-books. And quite how you would achieve this on a kindle is anyone’s guess. If there is anyone out there in the interspace who happens to know of a solution which works on epub2.0 or/and kindle, then please do get in touch!!!!
And finally:
I have spent a good deal of time working through how to style and link an index in an epub2.0 e-book and have come to some fairly radical conclusions, departing some way from current print industry practice. I have tried to follow the logic of the recommendations in New Hart’s Rules and The Chicago Manual of Style, whilst at the same time accommodating the necessary changes required by the very different e-book format and also taking full advantage of the ability of e-books to include hyperlinks. I am not arrogant enough to think I’ve got everything right or covered all the angles. I do hope that coming from a print background I have thought this through properly and given it more thought than simply recommending adding hyperlinks with no regard for how the index would read or be useful to the reader. If anyone, from a print or e-book background wants to discuss this with me I would be delighted to receive comments and/or messages via the ‘contact’ form in the sidebar.
Next Steps:
The final stage in making your e-pub e-book is to enter the metadata. To do this will need a knowledge of the structure of content.opf and I will return to that in my next few posts, including how to edit the metadata using Sigil.
Index to ‘how to …’ posts:
How to ‘unpack’ an epub file to edit the contents and see what’s inside.
How to understand what is inside an epub
How to link the html table of Contents in a Kindle e-book
How to restructure the html table of contents for a Kindle
How to delete the html cover for a Kindle ebook
How to link the cover IMAGE in a Kindle e-book
How to clean up your MS Word file before your get started
How to markup an MS Word file to identify the formats before importing it into an epub
How to create a new blank e-pub using Sigil
How to import your marked-up MS Word file into your ebook using Sigil
How to create and link a CSS stylesheet in an e-book using Sigil
How to replace the markup with CSS styles in your ebook using Sigil
How to style an e-book so it works with the limited CSS styling available to Kindle e-readers
How to understand the syntax of CSS
How to style Small Caps in an e-book
How to split your ebook up into chapters using Sigil
How to sequence your e-book
How to phrase the copyright declarations etc. in an e-book
How to generate the logical table of contents using Sigil
How to understand toc.ncx in an e-book
How to generate the html table of contents in an e-pub
How to style the html table of contents using CSS
How to create an html cover for your epub using Sigil
How to present references and notes in a book
How to use Mark Up to link notes in your e-book
How to present a bibliography in a book
How to use markup to link entries in a bibliography with the notes section
How to index an e-book
How to use the tools in MS Word to create an index
How to alphabetise an index or bibliography
How to adapt the print index in your MS Word file for an e-book using markup
How to adapt cross-references in your print index for e-book and how to use markup to make the links
TinyURL for this post: