Robin Burks's Blog
October 1, 2025
Becoming Sophie from Clair Obscur: Expedition 33, Part 3: The Rest
Yes, there are only three parts of this cosplay explainer/tutorial because this has been one of the easiest costumes I’ve ever put together. With the sewing done, I had to start thinking about accessories.
First up, the wig. Finding a wig short enough was near impossible, but I settled on this wig from Amazon and then cut it. It’s not quite as short as her hair in the video game, but I didn’t want to push my luck. I also texturized it to give it a bit of a more messy look like hers. To do this, I used texturizing paste (this Bedhead stuff is awesome and I use it on my own hair) and then used my flat iron on it (on a low heat). The maroon beret is also from Amazon.

Wig and beret
Sophie wears large hoop earrings, and I just happened to have several pairs from other cosplays. I decided on a thinner hoop because they were longer and you could sort of see them under the wig. Also, Sophie wears a gold bangle bracelet, but I decided to use a bracelet I already had (it’s got x’s and o’s on it) because it has sentimental value to me.

Accessories
The last thing were socks and shoes. The Mary Janes were a lucky find through Amazon’s Vine program, but y’all. I did not expect them to be so comfortable. I did 12 hours in these shoes with a lot of standing and my feet didn’t hurt at all. I tend to have foot problems and wear mostly sneakers because of it, but these shoes were AMAZING. Because I have narrow ankles, I always use these heel protectors and they haven’t betrayed me yet. The socks were also an Amazon find. They’re nice and thin, so they don’t make the shoes feel tight. They also stay up all day.

Socks and shoes
And that’s it! The costume was complete. I wore it for the first time to West Tennessee Comic Con and it was comfy and fun!

Photo by Huffoto
Thanks for following along. I want to try to do more build process blog posts, so stay tuned!


September 24, 2025
Becoming Sophie from Clair Obscur: Expedition 33, Part 2: The Skirt
Welcome to Part 2 of my creation of my Sophie cosplay from Clair Obscur: Expedition 33. Let’s talk about the skirt. I’ll admit there’s not a lot to talk about because this was another case of having the perfect pattern and perfect fabric.
Let’s start with the fabric. I ordered several swatches from Fabric Wholesale Direct, which is one of my favorite online fabric stores. I had thought a twill might be good for the skirt, but this Ponte de Roma had such a beautiful color and drape, so that’s what I ended up going with. Even better, it’s stretchy, which makes for a better fit when you have such a wild size disparity between your hips and waist like I do.
The pattern I used was McCalls 8510, which is a basic circle skirt type pattern with a zipper. But because I was using a stretchy fabric, I decided I wouldn’t do a zipper. So yay! I didn’t do a mock-up of the skirt because the pattern would be so easy to tailor…and it was. I cut everything out, sewed everything together, and then adjusted the seams around the waist to make it a little tighter. SO easy. I also made the skirt shorter than the pattern called for, since Sophie’s is knee-length.

Raw skirt
For the waist band, I used the waist band for the pattern, but made it extra long so I could do the little overlap in the front with the buttons. However, before I added it to the skirt, I did the top-stitching. I tested a few stitches to see what would work best on the stretch fabric (a regular stitch wouldn’t cut it), and it turned out the stretch stitch on my machine was the perfect one. So I did the top-stitching, attached the waist band (leaving room for the overlap), and then added hooks to the overlap to hold it in place. I sewed on buttons, and that was that!
For the hem, I folded the skirt up around 1/2″ and then sewed that in place, and then folded it up another 1/2″ to get a double folded hem. I gathered the fabric in places on the back so that the hem wouldn’t be over-stretched and land weirdly (I wish I could describe this better).
But here’s the best part. I used silver ribbon for the trim. I used a regular glue stick (you know the purple glue?) along the back of the ribbon, and then attached it over the seam line at the bottom of the skirt and ironed it down. This is a little trick I learned from a quilting site. It will hold ribbon (or whatever you’re attaching) in place while you sew it without the use of pins. This comes in handy when you’re working with fabric that pins just aren’t going to hold well or when working with stretch or slippery fabrics.
Anyway, here’s the finished skirt.

Finished skirt
September 18, 2025
Becoming Sophie from Clair Obscur: Expedition 33, Part 1: The Shirt and Lei
So as I’ve decided to be both a cosplayer and author in my branding (or whatever you want to call it), I’ve decided to include some details about some of my costume builds on this blog. If you follow me on social media, you’ll know I’ve been working on a Sophie costume from the video game Clair Obscur: Expedition 33 (this game is EXTRAORDINARY, by the way). So I wanted to do a brief rundown of how I made the costume happen.

©Sandfall Interactive
I started with a shirt pattern I bought quite some time ago (and I’m not sure it’s even available now): Butterick B4609. It’s a simple button-up shirt pattern that I found super easy to follow (even the collar instructions were pretty clear).

The pattern
I made a mock-up of the shirt with an old sheet (and sorry, I forgot to take photos). I basically mocked up everything but the sleeves and then fitted the mock-up to my body. Once that was done, I took my mock-up and transferred those changes to the actual sewing pattern. I added some extra space at the bottom for my hips and took it in at the top.

Pattern changes
The fabric was tricky to find because Sophie has a Swiss dot pattern on her shirt. But I found some quilting fabric on eBay that fit the bill. Plus, it’s 100% cotton, so it’s nice and lightweight (but not so light that it needed a lining). Bonus: it’s totally washable (although I wash it in cold water and let it air dry).
At this point, I followed the pattern instructions, except that I shortened the sleeves and added the cuff (which I measured out to fit my upper arm) above the elbow. I also just learned how to make buttonholes with my sewing machine and ended up putting them on the “wrong” side, but I just sewed the buttons on the other side. It’s a little awkward to button up, but, hey, the shirt was complete.

The shirt
Speaking of buttons, I found them on Etsy after hunting high and low. As I mentioned, the collar instructions were pretty clear on the pattern, but I’ve never sewn a collar like this before, so I took the one other button-up shirt I owned and looked at it to get an idea of what it was supposed to look like. So pro tip: look at how other clothing pieces are constructed if you don’t understand how to do something!
I also made a quick lei by taking apart a bouquet of fake roses (which also had some smaller white flowers on it that I used) and black Halloween flowers. I used some thick thread and just ran it with a needle through each piece so I could be ready for my gommage.

The lei
Overall, at this point, I realized this costume was one of the easier ones I’ve put together. Either that or I’m finally comfortable enough with my sewing skills to make it easier. I’m very proud of the fit of the shirt and I’m glad I took the time to make a mock-up because a fitted costume looks so much better than one that doesn’t fit, am I right? Fitting my body is so complicated (overall, I’m about five different sizes, depending on body part), so learning to sew for my body has been stressful, but I’m getting there.
Next up, I’ll go through how I made the skirt.
August 15, 2025
Come see me at these upcoming events!
I’ve got some big news! I’ll be a guest at West Tennessee Comic Con on September 13th and 14th at the Carl Perkins Civic Center, in Jackson, TN. Be sure to come out and say hello. I’ll have cosplay prints and books ready to be signed!
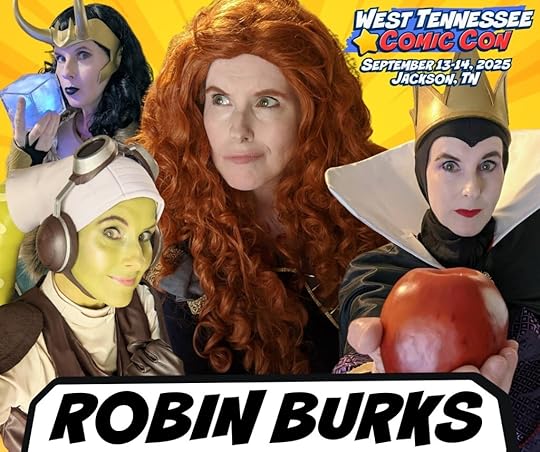
I’ll also be at Daughters of Dorkness: Ungovernable on October 5th at Rose Quartz Body Adornment in Memphis, TN. Hope to see you there, too!
March 2, 2025
Get ‘The Dream Seeker’ For FREE
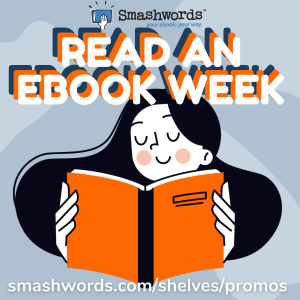 Happy Read an Ebook Week! You can find my book, The Dream Seeker, available now at Smashwords FOR FREE to help you celebrate. Grab it here!
Find my book and many more at https://www.smashwords.com/ebookweek from March 2 – March 8!
August 27, 2024
All About My Next Appearance: Daughters of Dorkness
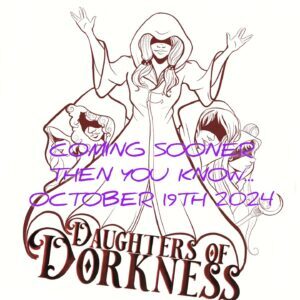 In case you haven’t noticed, I’ve been pretty quiet when it comes to appearances this year. As I’m working on a new book, I decided to take this year off to actually work on that book (although life has had a bad habit of getting in the way). However, I do have one upcoming appearance I’m super-excited about. It’s Daughters of Dorkness, and it’s on October 19th at Centerpoint Toys & Games in Millingon, TN.
This event is about showcasing women and those in the LGBTQIA+ community, which is something that needs showcasing in our area. And I get to be a part of it! So if you’ll be in the area, please consider coming out to support us.
August 6, 2024
Interview with I-Scream Queens
I recently attended the Nerds Assemble Convention in Jonesboro, Arkansas, and got to sit down for a mini interview with the fantastic I-Scream Queens. Check it out below!
March 5, 2024
Get ‘The Dream Seeker’ On Sale Now
 BIG news, everyone! For a limited time (from now through March 31st, 2024), you can buy The Dream Seeker everywhere digital books are sold for just $1.99. Here are the links to where you can purchase it RIGHT NOW.
January 2, 2024
New Year, New Me
 Happy New Year, everyone! It’s the start of a new year and that means a New Year, New Me. Okay, not really, but it does mean that I’m starting on the next book in the Children of Magic series, The Dream Maker. Yep, writing for the rough draft of the next novel has begun! It’s VERY rough, although I have outlined most of it but this is the part where I start to just throw words on a page and pray there’s a story in there somewhere. It’s utter chaos, but it’s mine.
In the meantime, if you’d like to keep up with what I’m working on and even get sneak peeks (including never-before-seen snippets from the rough draft), you can join my Patreon. Just $1/month gets you sneak peeks, exclusive cat photos (yes, REALLY!), and more!
November 7, 2023
The First 500 Words of ‘The Dream Maker’ Are Here!
 Want to read the first 500 words of my NEXT book (as in the one I JUST started working on)? Well, you can read those on my Patreon. Just $1 per month gets you access to those words, as well as many others that I’ll be sharing throughout my writing process. Plus LOTS of cat photos I don’t post anywhere else (a little something for you Anders fans, right?). So please consider supporting me at www.patreon.com/robinburks.