
Mr. Food Test Kitchen's Blog
November 5, 2020
Tasty Ways to Destress Cooking for the Holidays!
As joyous as the holidays are, there always seems to be a little underlying stress for the family’s chef. So much to make from scratch, and so much that could go wrong. We know you’ve got the turkey under control, but what about everything else?
With all those hungry people around the table, we think you deserve some easy shortcuts to help you create a feast worth being thankful for. Thanks to our friends in the freezer and dairy aisles, we’ve got a few tasty ways to destress cooking for the holidays! These shortcuts bring you that homemade flavor and feeling, without all the work.

First Course: Appetizers!
Looking for an easy way to get the party started? This appetizer tray is sure to satisfy your guests while they wait for the main course.

Our Come-‘n’-Get it Sampler has everything! Loaded with cocktail meatballs, pot stickers, and more, this tray is fully customizable and is made perfect by adding your favorite dipping sauces. You could even add in these tasty potato skins or, for a little spice, some festive taquitos.


All of these delicious options come from your local freezer and dairy aisle. That means your appetizer course is going to be totally delicious and completely painless.
The Main Course: Turkey and What?
We already know your turkey is going to be a thing of beauty. You put so much time and effort into making it perfect, and we think your holiday side dish recipes should really rise to the occasion.
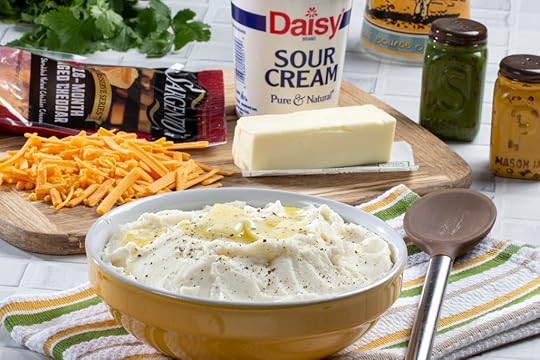
The freezer and dairy aisles are here to help your sides do just that! Make sure to add butter, sour cream, or some shredded cheese to your store-bought refrigerated mashed potatoes for a real boost. With all that extra goodness folded inside, no one will know you saved yourself the trouble of peeling and mashing.
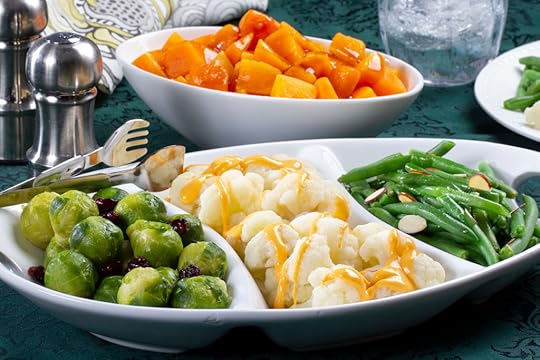
Every holiday table needs an amazing vegetable dish or two. Some traditional seasonal veggies include Brussels sprouts, butternut squash, cauliflower, and green beans. But who wants to spend time peeling and chopping on Thanksgiving Day, when you could be making memories with family?
Luckily, the freezer and dairy aisles have your answer. You can save time with their frozen veggie options! They’ve got all the freshness and crunch you could want and, with a little cheese topping and your favorite seasonings, your veggie dish is really going to pop.
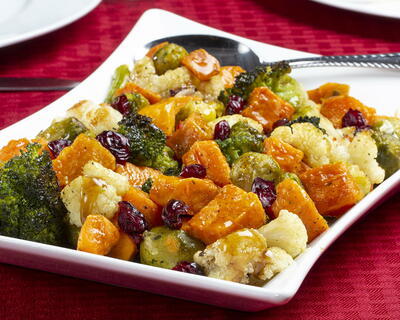
If you want a way to turn all those veggies into one super delicious dish, we suggest our Maple Glazed Harvest Vegetables. This dish packs in tons of seasonal flavor and nutrition, with hardly any prep time!
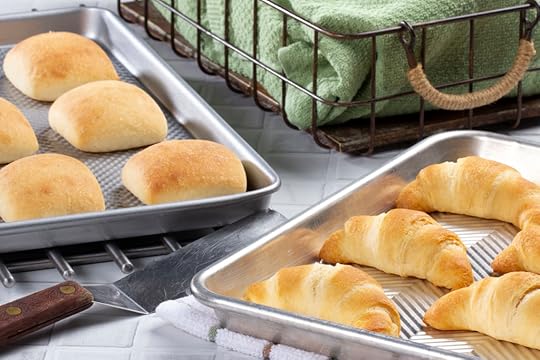
No holiday feast is complete without some type of bread option! Whether you prefer rolls, biscuits, breadsticks, or garlic bread, you can find your delicious bread side in the freezer aisle. Starting with a refrigerated biscuit means no mixing or kneading is required. Put some spreadable butter next to your bread basket and you’ll be amazed at how fast it empties out!
Dessert Course: Everyone’s Favorite!
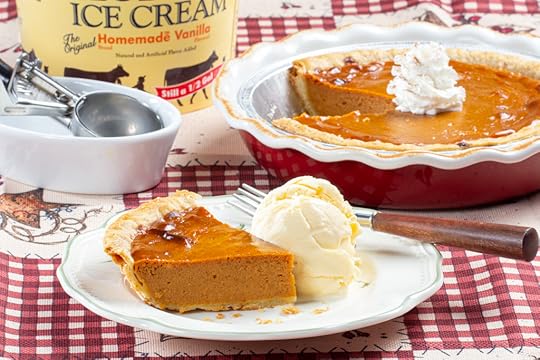
When someone says “Thanksgiving Dessert,” one word comes to mind: pie. Tasty, warm, sweet, and flakey pie! That’s what everyone around your holiday table is really looking forward to. But, making the perfect pie isn’t always easy. Homemade crust can be touchy, and mistaking salt for sugar is a real possibility. So, why risk it? Head to your local freezer and dairy aisles for the risk-free solution!
Your shortcut pumpkin pie can be topped with a delicious scoop of your favorite ice cream to give it that extra flair. And Grandma won’t believe it when you tell her that the crust on her Classic Deep-Dish Apple Pie was refrigerated just an hour ago. While everyone digs into their dessert, you can have the joy of knowing it didn’t take you much at all to make them smile.

This year, take the stress out of holiday cooking; let the dairy and freezer aisles be your Holiday Helpers! If you do, then you could have a holiday table that tastes as good as it looks. For lots of easy recipes and holiday ideas, visit EasyHomeMeals.com. You’ll be glad you did and so will everyone else around the dinner table.
From the Mr. Food Test Kitchen and Easy Home Meals, happy holidays and bon appétit!

For more great family recipes visit
EasyHomeMeals.com
This conversation is sponsored by National Frozen & Refrigerated Foods Association. The opinions and text are all my own.
Share and Enjoy !0Shares0
0
The post Tasty Ways to Destress Cooking for the Holidays! appeared first on Mr. Food's Blog.


September 1, 2020
How to Make: Beefed-Up Open-Faced Poutine Sandwiches!
If you’re stressed out about what to feed the kids when they come home from school, stop worrying! The Mr. Food Test Kitchen has got you covered; we came up with an easy, from-the-freezer answer to after-school hunger. Make our Beefed-Up Open-Faced Poutine Sandwiches! This treat is inspired by our neighbors up North, and you probably already have everything you need in your freezer. If not, a quick trip to your local dairy and freezer aisle is all you need. Let’s get cooking!
 Beefed-Up Open-Faced Poutine Sandwiches
First, you’ll need to gather your ingredients. We took the liberty of putting together your shopping list for you! You’ll need:
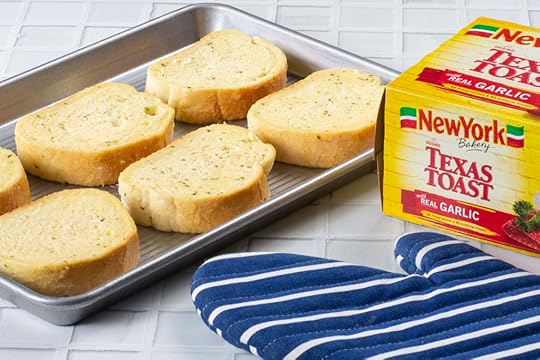
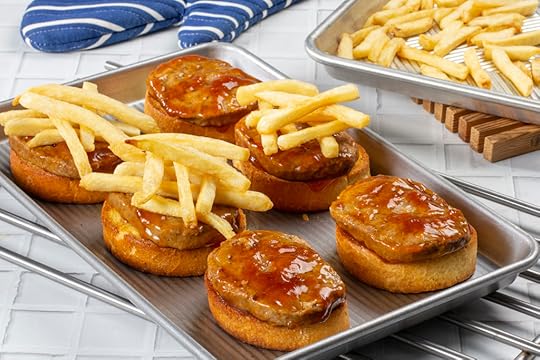
1/2 of a (32-ounce) bag frozen French fries1 (27-ounce) package frozen Salisbury steak in gravy1 (11.25-ounce) box frozen Texas Toast slices1 cup shredded mozzarella cheese
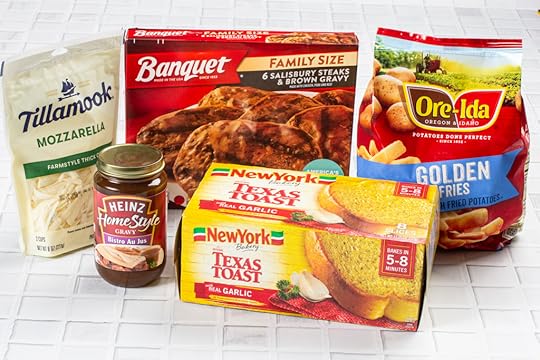
Once you’ve gathered all these delicious food items from the dairy and freezer aisle, we can get started in the kitchen.
What’s Poutine, you’re wondering?
Good question! Poutine is a traditional dish from the Canadian province of Quebec. It’s classically made by pouring delicious brown gravy over fluffy fries, and then topping that mixture with cheese curds! It’s one of our Test Kitchen favorites and we know you’ll love it too.
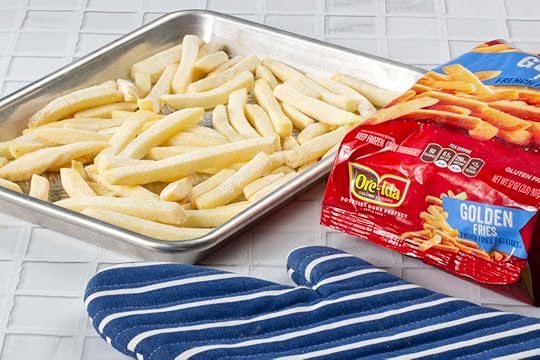
Step One: Be sure to preheat your oven to 425 degrees F. Then coat a rimmed baking sheet with cooking spray. Place your French fries on the baking sheet and bake those delicious fries for 25 minutes or until golden! That’s how you know they’re going to be perfect. Plus, these frozen fries make it so easy!
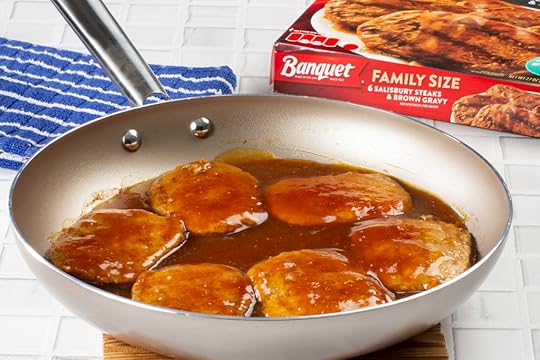
Step Two: While those fries are baking, get out your skillet! In your large skillet, over medium-low heat, cook the Salisbury steaks for 10 to 12 minutes or until they’re heated through, turning occasionally. Your kids are going to love how juicy and soft these steaks turn out. (Our mouths are watering already.)
Step Three: Now we’re moving on to the toast! Place six (6) slices of that tasty Texas Toast on another rimmed baking sheet and heat them in the oven for the last 10 minutes along with your French fries, or until they’re golden brown. Lucky you, you can save those two extra slices of toast for another time. Since they’re a delicious freezer product, you can keep them on hand for any time you get that Texas Toast craving!
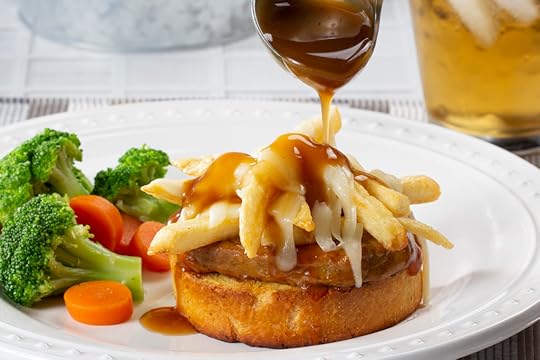
Step Four: With us so far? Good, because here comes the best part! It’s time to assemble this delicious sandwich. Top each Texas toast with one Salisbury steak, French fries, and sprinkle that tasty stack with mozzarella cheese from the dairy aisle. Then, place them back in oven for 4 to 5 minutes or until the cheese is perfectly melted. Drizzle your sandwiches with the gravy left in the Salisbury steak skillet and serve immediately to your hungry brood!
Just a tip from us to you: if you’d like lots of gravy to drizzle, like we do, simply heat a 12-ounce jar of beef gravy in a skillet along with the gravy that comes with the Salisbury steak and pour it on. No one will know the difference!
And there you have it! A fast and easy, family-friendly, straight-from-the-freezer way to feed those loveable kids as they’re coming in the door. Next time you’re in a tizzy about what to feed them, don’t forget: you know how to make our Beefed-Up Open-Faced Poutine Sandwiches! Thanks to all these frozen and ready-to-use ingredients, you’ll be ready to serve up perfection any time.
What’s your fast and easy way to feed your kids?
For more great family recipes visit
EasyHomeMeals.com
This conversation is sponsored by National Frozen & Refrigerated Foods Association. The opinions and text are all my own.
Share and Enjoy !0Shares0
0
The post How to Make: Beefed-Up Open-Faced Poutine Sandwiches! appeared first on Mr. Food's Blog.
June 1, 2020
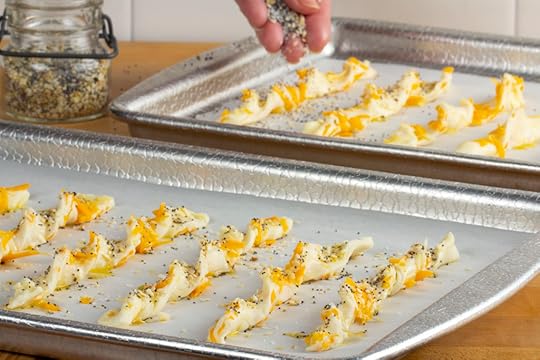
How to Make: Twirly Cheese Crisps!
Craving a cheesy snack? Or are you looking for an appetizer that’s going to add a little crunch to your meal? Either way, we’ve got exactly what you need, thanks to some easy-to-use ingredients from your local dairy and freezer aisles. Get ready to make our Twirly Cheese Crisps! They’re deliciously easy and totally cheesy.
 You can even serve them in place of a bread roll at dinner!
Gather Your Ingredients!
For this recipe, you’re going to need the following:
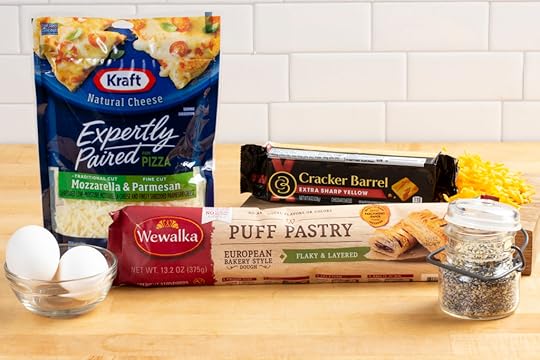
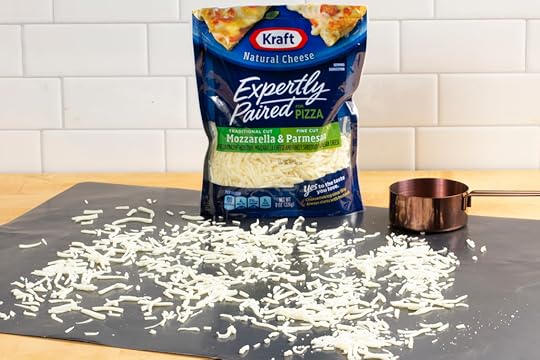
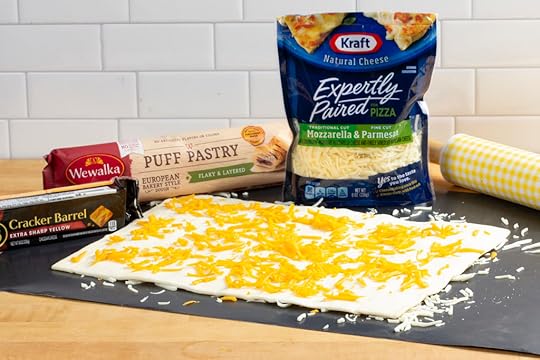
1/2 cup shredded mozzarella-parmesan cheese blend (We love Kraft Natural Cheese.)1 (13.2-ounce) package refrigerated puff pastry (The Test Kitchen used Wewalka brand pastry and it was wonderful!)1 cup shredded cheddar cheese, divided (Can’t go wrong with Cracker Barrel.)1 egg2 tablespoons Everything Bagel seasoning
Getting Started!
First things first, preheat your oven to 400 degrees F. Then, line 2 baking sheets with parchment paper and set them aside for later. Then, sprinkle a clean, flat surface with your mozzarella-parmesan cheese blend!
Step Two:
Next, unroll your puff pastry over top of the sprinkled cheese, and top it off with 1/2 cup of cheddar cheese.
Step Three:
Now, using a rolling pin, roll the pastry out until it’s 1/4-inch thick. Fold the pastry in half and roll it out again until it’s 1/4-inch thick again (about 10- x 10-inches). Finish this step by sprinkling the remaining 1/2 cup cheddar cheese on top of pastry and gently rolling it to press the cheese into dough.

Step Four:
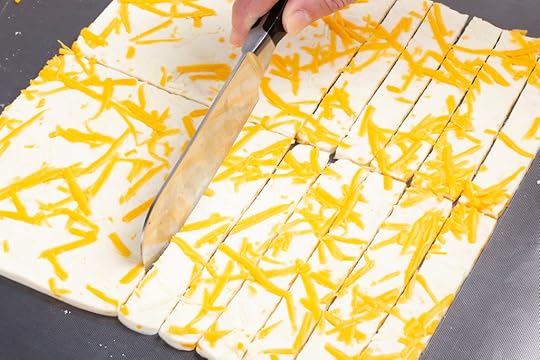
Using a knife, trim the edges of your dough to square it off. Cut the dough in half lengthwise. Then, cut each section of pastry crosswise into 3/4-inch strips (about 11 strips per section.)
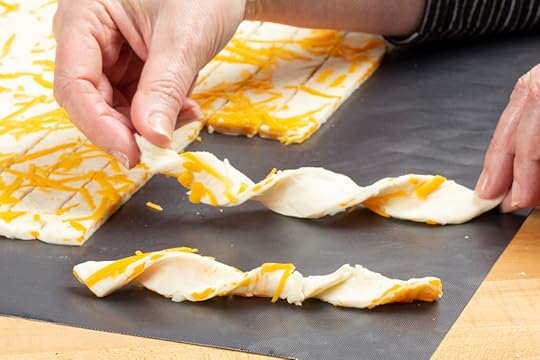
Once you’re done cutting, twist each strip into opposite directions to create a spiral look; place your Twirly Cheese Crisps onto those prepared baking sheets!
Step Five:
In a small bowl, whisk an egg and 1 teaspoon of water. Brush the egg mixture over each strip and evenly sprinkle with the bagel seasoning. Once that’s done, bake these crisps for 15 to 18 minutes, or until puffy and golden brown.
Finishing Touches!
These Twirly Cheese Crisps are going to be so delicious! Remember, you can serve these warm or store them in an airtight container. Plus, if you’re looking for a delicious dip to go along with these cheese crisps, just mix 1/2 cup of chive and onion cream cheese and 1/2 cup of sour cream together until smooth. It’s going to be super tasty!
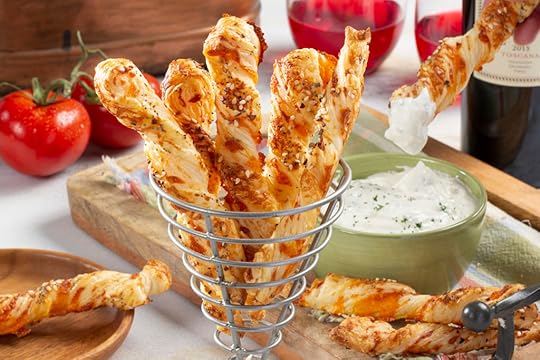
Most of the ingredients in this always-pleasing recipe for our Twirly Cheese Crisps come right from your local dairy and freezer aisles! That means you can whip them up anytime and for any occasion. Trust us–you’ll be glad you did!
What’s your favorite cheesy treat?
For more great family recipes visit EasyHomeMeals.com
This conversation is sponsored by National Frozen & Refrigerated Foods Association. The opinions and text are all my own.
The post How to Make: Twirly Cheese Crisps! appeared first on Mr. Food's Blog.
April 17, 2020
COVID-19 & Food: What You Need to Know!
During these troubling times, we know you have a lot of questions about your health and safety. Today, we wanted to answer some of your questions concerning food. This way you can be safe and worry a little less!
Question One: Can I get the Coronavirus from food?
To put your mind at ease, the simple answer is “No”. You can’t get COVID-19 by ingesting it. But that doesn’t mean there aren’t some small precautions we should be taking. When handling food, like fresh produce or bags of frozen food, be sure to wash the surfaces or peel the outer layer of your product before cooking them.
Once the virus is spread through the cough or sneeze of an infected person, droplets can rest on the surface of food the same way they can rest on a doorknob, or counter; so, washing your food, as well as washing your hands frequently, is a great way to cut down on any risk of contraction.

Question Two: Is ordering take-out still a risk?
All your local restaurants that are still operating on a take-out, drive-thru, or delivery system are still following the same food preparation and sanitation standards set by the FDA and your State’s Department of Health. This means that, as always, your risk of infection from restaurant food is very low.
However, some risk still remains when interacting with food carriers that fulfill delivery requests. Be sure to maintain at least a six-foot distance from others at all times or, our favorite, opt for contact-free delivery options and ask your delivery person to leave your food at the door.
By following these simple and easy tips, you can help yourself, your family, and your community stay as safe as possible! At the end of the day, that’s really the goal.
We hope you’ve found this little information bulletin helpful! From everyone here at the Mr. Food Test Kitchen, stay safe, stay healthy, and keep eating well!
Tell us what you’ve been cooking under quarantine!
The post COVID-19 & Food: What You Need to Know! appeared first on Mr. Food's Blog.
March 19, 2020
Solomon and Sons Earns an “Ooh It’s So Good!!” rating from Mr. Food
At Mr. Food Test Kitchen, every day we work hard to make sure we bring you and your family ways to make your lives as easy as possible. We thank you for trusting us to help you, as well as for inviting us into your home, through your TV, on a daily basis.
So when we recently needed the help of a trusted mover, we were so fortunate to meet the team at Solomon and Sons Relocation Services. Let me tell you, these guys are the-best-of-the-best. What sets them apart from other movers, is how they treated us and our belongings like royalty. If you or someone you know is in the market for a company to help you with a move, whether it’s around the corner or across the country, you own it to yourself to call Solomon and Sons Relocation Services.

What we love is that they’re family-owned and operated, just like we are. Although they’re based in South Florida, and do an unbelievable job with local moves, they also do a superbly when you’re looking to relocate or simply need pick-ups and drop-offs nationwide. We’re so happy that when we needed someone who we could trust, they not only met our expectations, they exceed them.
Click here to see Howard talk about Solomon & Sons!
When we first contacted Solomon & Sons, their staff walked us through the moving process, from start to finish. They then, set up a time and gave us a free in-home estimate. During this meeting, their moving experts took inventory of all of the content that we wanted to move, and presented us with a binding estimate. That meant there wouldn’t be any last minute surprises or additional fees. Let me tell you…that gave us the peace of mind that made our move so much less stressful. On moving day, their team arrived on time, in uniform and got to work quickly. They took care of everything with the care and professionalism, as if they were moving their own homes. And when it was time to deliver things, they were right on schedule, on budget and set-up our furniture without a hitch, making us feel at home before they drove off.
We were so pleased with them, we’re encouraging anyone who is looking for reliable mover, whether it’s residential or commercial, to call my new friends at Solomon & Sons to see how they can help you.
Some of the main moving and storage services they provide include:
Free On-Site Estimates in South FloridaPacking and UnpackingFurniture Assembly and DisassemblyShort and Long Term StorageLocal Moving and Long-Distance MovingCustomer Support in Multiple LanguagesAnd More!
At Mr. Food, we’re all about making things quick & easy—and that’s just what Solomon & Sons did for us. So, if you’re searching online for a reliable and affordable mover, don’t hesitate to do what we did, check out Solomon & Sons. We’re glad we did, and when you do, you’ll be saying what did… OOH IT’S SO GOOD!!

The post Solomon and Sons Earns an “Ooh It’s So Good!!” rating from Mr. Food appeared first on Mr. Food's Blog.
February 14, 2020
How to Make: Spring Fling Ice Cream Cake!
This time of year, everyone in the Test Kitchen is super excited about welcoming springtime! Spring means it’s getting warm enough for us to enjoy one of our favorite things: ice cream! Today, we’re showing you how to make spring’s most stunning dessert recipe, our Spring Fling Ice Cream Cake! All you need are a few shortcut ingredients from your local dairy and freezer aisle. Ready, set, go!
Ingredients: Let’s Head to the Freezer and Dairy Aisle!
Here’s what you’ll need:
1 (16-ounce) frozen pound cake4 cups chocolate ice cream, slightly softened1 cup sweetened flaked coconut2 to 3 drops green food colorAssorted medium sugar-coated candy gumdrops8 lollipop sticks
Step One: Get Your Pan Ready
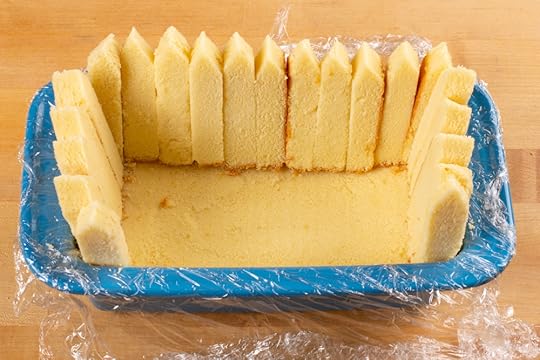
To start out, let’s line a 9- x 5-inch loaf pan with plastic wrap, allowing a 1-inch overhang. (This will make it super easy to remove from the loaf pan once it freezes.)
Step Two: Prepare the Pound Cake
First, cut about a 1/2-inch off top of your frozen pound cake and place it on the bottom of your pan. Easy!
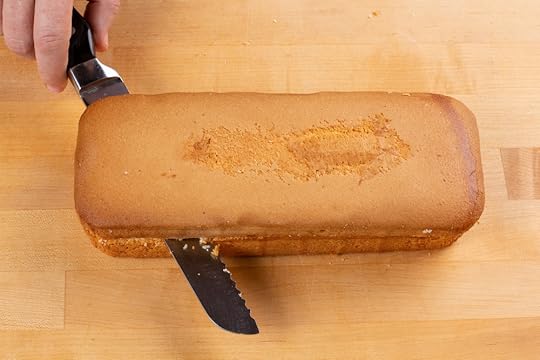
Next, slice the remaining cake into 14 equal slices. (I had to resist the urge to sneak a taste! You can do it.) Once you’ve done that, lay the slices down and cut each slice in half lengthwise.

You should end up with 28 pieces. Trim the tops of each so that it has a point (Now you can eat the scraps! Thank goodness!). The end result should look like the top of a picket fence.

Now you line the inside of the pan with the cake pieces, pointed side up. Just like that you’ve got a cute little flower bed, complete with a frozen pound cake fence!
Step Three: Ice Cream Time
Let’s get scooping! Spoon the ice cream into the pan, packing it as you go; cover and freeze for 6 hours or until firm. This is going to be the delicious “dirt” in your flower bed!

Step Four: Green, Green Grass
While our cake is in the freezer, we’re going to get to work on our cake decorations! This part is super easy. Just put your coconut flakes and food color into a resealable plastic bag; seal and knead bag until the coconut is evenly colored green. Once you’re done, just set it aside until a little bit later.

Step Five: Spring Flowers
To make these stunning spring flowers, use a rolling pin to roll out your gumdrops and, using a small flower-shaped cookie cutter or a knife, cut out flowers. Once you’re done, just attach your gumdrop flowers to your lollipop sticks.

Step Six: Garden to Table
Just before serving, lift the cake out of the pan, remove the plastic wrap, and place on a serving platter. Sprinkle your coconut grass over the chocolate ice cream “soil” and then pop in your gumdrop flowers.
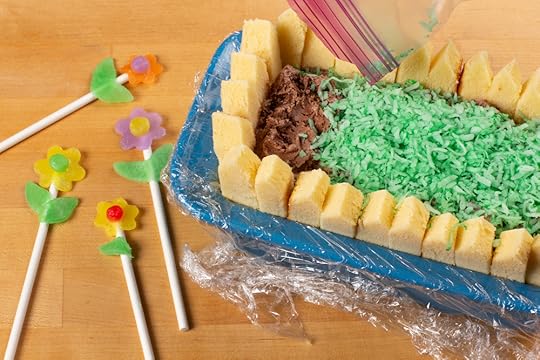
There you have it! The most fantastic and flower-filled way to welcome spring ever, all that’s to a few delicious ingredients from your dairy and freezer aisle. When you’re welcoming spring this April, we hope you’re doing it with our Spring Fling Ice Cream Garden!

Tell us how your ice cream garden turned out in the comments below!
For more great family recipes visit EasyHomeMeals.com
This conversation is sponsored by National Frozen & Refrigerated Foods Association. The opinions and text are all my own.
The post How to Make: Spring Fling Ice Cream Cake! appeared first on Mr. Food's Blog.
November 5, 2019
Holiday Entertaining: Side Dish Shortcuts They’ll Love!
Thanksgiving is almost here and Christmas is just around the corner! That means you early planners are already putting together this year’s menu. If you ask the Mr. Food Test Kitchen what really makes or breaks a holiday meal, we’d say the answer is simple: side dishes. Your turkey might be perfect, but if your holiday side dish recipes miss the mark, the whole dinner gets taken down a notch.
If you feel like your side dish selection could use a little work, take a deep breath and stay calm; the Mr. Food Test Kitchen is here to help. We’ve got a menu of holiday side dish recipes that are made with some super shortcuts from the freezer aisle! These easy recipes are going to be the right kind of delicious and will compliment your turkey flawlessly. Let’s check them out!
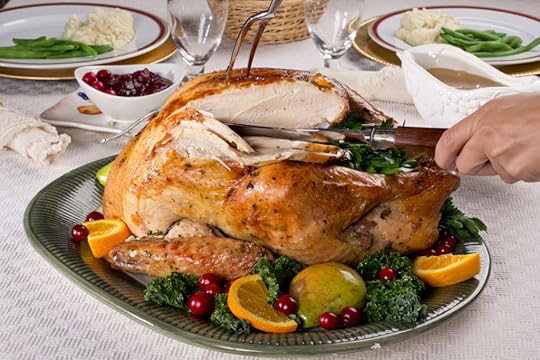 Need a stunning centerpiece? Make our Herb Butter Roasted Turkey! Jaws will drop and mouths will water.
No holiday table is complete without a pile of delicious mashed potatoes! This year, our Fool ‘Em Mashed Potatoes are going to be a huge hit. Why? Because they’re made with a surprise. This side dish recipe is part potato, part frozen cauliflower! Which means this is a lighter option for a meal that usually has everyone loosening their belts. After a quick trip down the freezer aisle, these potatoes are ready to go in 20 minutes!
 No one will see the cauliflower coming! That’s why we call these our .
September 10, 2019
Eating Our Way Around the World at the 2019 Epcot International Food & Wine Festival
 Ready to eat cuisine from around the world.
You all know Patty, Kelly, and I are passionate about what we do, which is why there’s only a few times a year you’ll find us closing up shop to take part in something truly magical. The Epcot® International Food & Wine Festival is one of those rare occasions. While it runs from August 29th to November 23rd this year, I knew we had to be there for opening day. So, we made sure the stoves were off; the dishes put away, and we headed to Walt Disney World in Orlando, Florida, to enjoy everything the Epcot® International Food & Wine Festival has to offer.
And believe me, it has so much to offer.
 Howard, Patty, and Kelly with Chef Minnie Mouse!
If you’ve never been to this Festival, let me paint the picture. It takes place at the World Showcase in Epcot® where you get to sample different dishes from all around the globe. When it comes experiencing world flavors and culture, this Festival is nothing short of magical. Of course, we wouldn’t expect anything less from the most magical place on earth.
CHECK OUT OUR DISNEY-INSPIRED RECIPES HERE.
4 First-Timer Tips for the Ultimate Festival Experience
Check out the Epcot ® International Food & Wine Festival Website. Really, this should be your go-to research with just about anything these days, but the world is a huge place—even at Epcot. Do your research and you can prioritize your day, making sure you don’t miss out on the events you’re passionate about. For instance:
Music lovers’ check out the Eat to the Beat concert series, where you can tap your feet, eat your favorite foods, and listen to music from chart-topping musical acts.
Cheese Connoisseurs will love the cheese seminars, where you can sample delicious cheeses in creative ways.
Plus, there’s plenty of stuff for the kids, like the Family Play Zone, and, for some scavenger hunt fun, check out Remy’s Ratatouille Hide & Squeak
Save the dates for any celebrity chef cooking demonstrations too. I’ve hosted a few in the past, and let me tell you, that’s the best time to taste-test your favorite chef’s best dishes. We always try to go over-the-top to make sure you have a great food experience.
It’s hot. So make sure you bring your sunblock, water, and a hat if you’re sensitive to the heat. And don’t forget to stay hydrated. Taking care of yourself during your Epcot world travels should be a high priority, after all, you want to enjoy the Festival to the max.
While technically not a tip, I highly recommend checking out the Party for the Senses. It’s a food and wine event done only the way Disney can do it. You do need a separate ticket for this event, so check the website for dates and how to reserve your tickets.
CHECK OUT OUR OLD-WORLD FAVORITE RECIPES HERE.
Eating Your Way Around the World
 Howard with his passport.
To make this an authentic travel experience, you’ll receive a Festival Passport. It lists all your travel destinations, the food and drink provided, and, just like with real passports, you can add a “stamp” so you know where you’ve been. Make sure you hang onto it, because not only is it a great guidebook, but it’s also a great souvenir to take home.
Patty loved marking up her copy as we traveled around the world, and we know you will too.
Hawai’i
 Kalua Pork Sliders at the Epcot International Food & Wine Festival
My first stop made it very hard to choose just want to try, but ultimately, I went with the Kalua Pork Slider. Made with Sweet-and-Sour DOLE Pineapple Chutney and spicy Mayonnaise, these sliders are the perfect flavor combos for a tropical treat. In fact, it’s so festive, you’ll probably want to break out the grass skirts and do the hula.
Kelly definitely did.
Australia
After we got our fill of tropical tastes, we headed over to Australia where Kelly and I grabbed two Roasted Lamb Chops—and can I say, that that they cooked it to absolute perfection? If you’ve never had lamb chops, the Epcot® International Food & Wine Festival is the perfect place to try it.
 Howard and Kelly enjoying some roasted lamb chops!
The Alps
 Ooey gooey melty cheese, right off the wheel!
The newest Festival attraction comes straight from The Alps. It’s called Raclette Swiss Cheese, and trust me when I say, it’s a cheese lover’s dream. The best part? You get to see how they melt the cheese right off the wheel and dish it up on freshly baked bread. While Kelly and Patty had their favorites, this was definitely mine.
The Journey Continues
 Howard and Chef Dave indulging in some Caribbean cuisine
Patty, Kelly, and I continued on our way, grabbing some gorgeous and tasty mimosa’s from Shimmering Sips and some amazing marinated chicken from Thailand.
And one of the best things? We got to meet some talented, featured chefs making the flavor-packed food, including Chef Dave, who is the top chef behind the Epcot® International Food & Wine Festival. We hung out at the Islands of the Caribbean where I sampled the Jerk Spiced Chicken with Mango Chutney. (It was Patty’s favorite!)
 Jerked Spice Chicken with Mango Chutney
Homecoming
By the end of the day, Patty, Kelly, and I were stuffed—and exhausted. Having adventures around the world at Epcot® takes a lot out of you. But if you don’t get to do everything on the first day, that’s okay. The Festival runs for nearly three months! There’s definitely time to come back for seconds—or firsts in other countries.
We love coming to the Epcot® International Food & Wine Festival, and this year was the best one yet! We’re back in the Mr. Food Test Kitchen, working to bring you some new and inspiring recipes. If nothing else, the Festival always gives us a few new ideas to try, and I bet it’ll do the same for you.
One thing I know for sure, is that whether you’re a first-timer or a seasoned Festival fan, after every bite, all you will want to say is, “OOH IT’S SO GOOD!!”
WHAT’S YOUR FIRST DESTINATION AT THE EPCOT INTERNATIONAL FOOD & WINE FESTIVAL?
The post Eating Our Way Around the World at the 2019 Epcot International Food & Wine Festival appeared first on Mr. Food's Blog.
August 26, 2019
Easy Family Meals: Air Fryer-Style!
The kids are going back to school, and that means that the lazy pace of summer is long gone! It’s time to jump back into the swing of homework, band practice, and soccer games. But, like any good parent, you still want to find the time to sit down to a delicious dinner with the whole family! Well, you’re in luck. We’ve got some recipes that are going to help you plan great family meals for the whole week.
Weekly meal planning has become very popular in the foodie community, but where are you going to find the time? What actually goes into it? Is it hard? So many questions! Don’t worry. The Mr. Food Test Kitchen is here to help.
To pull this off, you’re going to need two things: one, an air fryer and, two, the freezer case and dairy aisle of your local grocery store. Or, as Howard likes to call them, “The Dream Team”. The freezer case found its perfect match in the easy-to-use air fryer! If you don’t already own an air fryer, don’t worry. Once you see the recipes below, you’ll want to invest in one!
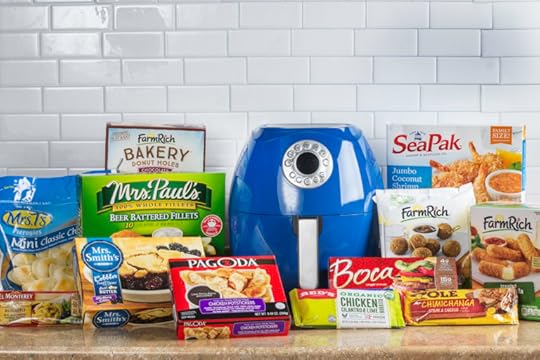 Look at all these options!
Now, how do we start planning meals for the week? The first step is to talk to your family. After all, family meals need family input. After finding out what the kiddos and your partner are craving this week, select your recipes and make your shopping list.
Mr.Food Test Kitchen Tip! To save money during meal planning, try to plan some meals with overlapping ingredients; this will shorten your shopping list. Plus, check your pantry! You may already have some of the ingredients you need in stock.
Once you’ve got your shopping list ready, head to the freezer case, and dairy aisle, to pick up some of the key ingredients in this week’s meal plan. You’ll need cheese, frozen veggies, eggs, milk, cream cheese, some refrigerated biscuits and pizza dough, and some whipped cream! Be sure to consult and follow the recipes below.
After picking up a few other things from around the store, we’re ready to get cooking. It’s that easy! Once you assign a specific meal to a certain day, you’ve will have successfully meal planned for an entire week.
Still need a little help? Let’s look at the sample weekly meal plan the MFTK family came up with just for you!
Monday: Super Stuffed Chicken Divan
Looks like Monday is a day for something classic. Our Super Stuffed Chicken Divan only takes 20-minutes to make, thanks to some key ingredients from the freezer aisle. Everyone at the dinner table is going to love this cheesy, fill-you-up family meal! Just so you know, this is one of Howard’s go-to favorites. It always leaves you full and satisfied. What more could you ask for from a Monday night meal?
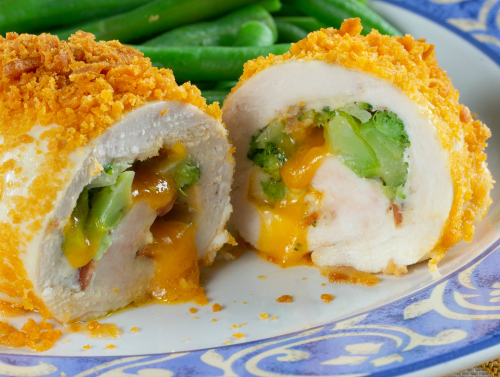 Super Stuffed Chicken Divan
Tuesday: Pizzeria-Style Stromboli
If you thought we were making a pizza when we said you’d need pizza dough, you were wrong. We’re making something better, inspired by that little pizzeria down the street! These easy, homemade Pizzeria-Style Stromboli are filled with succulent Italian deli-meat, spinach, and melty Italian cheese. Thanks to your air fryer and the freezer aisle, dinner tonight is going to be a taste of Italy from the comfort of your own home!
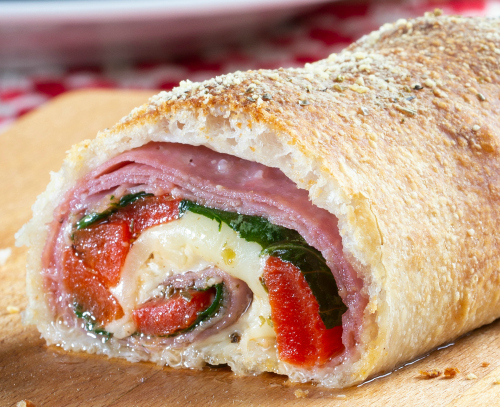 Pizzeria-Style Stromboli
Wednesday: Chicken & Veggies Shepherd’s Pie
Wednesday means you could probably use a mid-week pick-me-up. We couldn’t think of a meal that had more comfort and flavor “fried in” than our Chicken & Veggie Shepherd’s Pie. This recipe is made in individual portions, which means everyone gets their own personal serving of weeknight deliciousness. Frozen veggies are the perfect shortcut ingredient, and your air fryer will make the crust of our Shepherd’s Pie the perfect golden-brown. Yum!
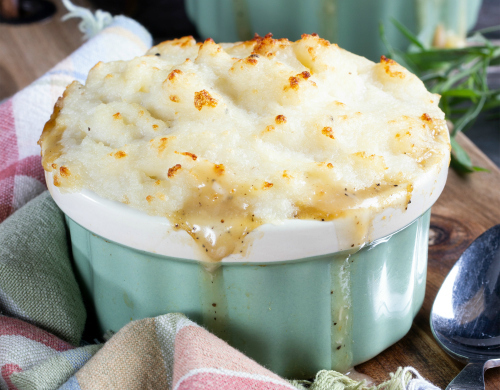 Chicken & Veggie Shepherd’s Pie
Thursday: Cracker-Crusted Mac ‘n’ Cheese
This recipe for your Thursday day is technically a side dish. But, if you serve it with a garden salad, it becomes the Thursday night main dish you’ve been waiting for! Ooey-gooey cheese, and a crispy butter cracker crust make our Cracker-Crusted Mac ‘n’ Cheese a recipe you’ll be craving more than just once a week. We don’t blame you, but try your best to stick to the plan! Maybe there’ll be some leftovers…but we seriously doubt it.
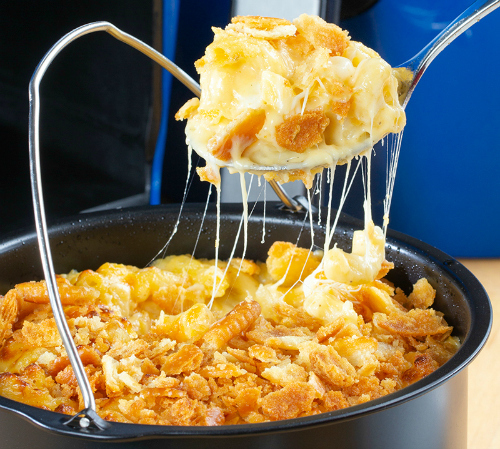 Cracker-Crusted Mac ‘n’ Cheese
Friday: Chicken Taco Salad Bowl
We’ve always thought that Friday nights were the perfect time for a fiesta! That’s why we’re serving up our Chicken Taco Salad Bowl. You’ll need your air fryer to make the taco bowl and the chicken, but everything else is pretty much ready to go. This easy family meal is light, refreshing, easy-to-make, and totally tasty. There’s no easier way to spice up the start of your weekend than with this simple Tex-Mex meal.
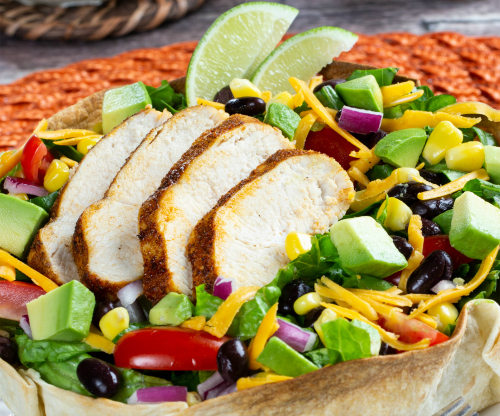 Chicken Taco Salad Bowl
No week of meals is complete without a little something sweet, right? Well, there’s no need to worry. Your air fryer does desserts too! And the freezer aisle has everything you need to give the dessert lovers in your family the perfect post-meal treat.
For the kids, we recommend our Blue Ribbon “Fried” Cookies! Remember those “deep-fried” sandwich cookies you used to get at the State Fair? These are a DIY version you can make at home! They’re fast, and the perfect size for little hands. Additionally, since they’re made in the air fryer, the kids can enjoy that wonderful flaky crunch, and you don’t have to worry about all those unhealthy oils.
 Blue Ribbon “Fried” Cookies
And for mom and dad, we’re making our Mini Cookies & Cream Cheesecakes. That’s right, you read that correctly. Mini! Which means that every adult in the house gets their own personal cheesecake for dessert. Creamy, sweet, cookie perfection! After a week of holding it all together, we’re hoping this easy air fryer dessert will help you unwind. And it should, considering its main ingredient is one of our all-time favorites: Cream Cheese!
 Cookies & Cream Mini Cheesecakes
We Told You So! Most of our meals this week were chicken based. That cut down on the amount of meat we needed to purchase at the grocery store. Plus, both our desserts are made with chocolate sandwich cookies. That’s what we call getting more bang for your buck!
As you can see, dinner’s never more than a few easy steps away with shortcut ingredients and a quick kitchen gadget. Your air fryer and your local freezer case and dairy aisle, are all you need to feed everyone delicious meals every night of the week! The best part? These recipes take almost no time at all. Every day, no matter how busy your schedule gets, you’ll get to enjoy a family meal with your loved ones. It doesn’t get better than that.
For more great family recipes visit
EasyHomeMeals.com
This conversation is sponsored by National Frozen & Refrigerated Foods Association. The opinions and text are all my own.
What’s your best weekly meal planning tip?
The post Easy Family Meals: Air Fryer-Style! appeared first on Mr. Food's Blog.
June 10, 2019
How to Make: Orange Chocolate Cheesecake
I love throwing and attending parties during the summer. I’m always ready for any chance to spend time with family and friends! Plus, backyard cookouts and summer potlucks are the perfect chance for me to show off my baking skills.
With June being the real start of summer, and National Dairy Month, it seems only fitting that I make my first fantastic baked good of the year something dairy-filled and delicious! So, I chose to make a crowd-favorite: cheesecake. Chilled, creamy, dessert perfection.
I was ready to knock it out of the park with my traditional cheesecake recipe. But, my friend Laura (my baking-rival on our potluck-circuit) came to me with a challenge that really made me step up my baking game. “We’ve all had your cheesecake,” she said with a smirk. “Why don’t you try something new?”
It was a challenge I was ready to accept, because I had a secret weapon. Well, if I’m being honest, my secret to success isn’t a very big secret; in fact, it’s kinda simple. Are you listening?
There’s more in the dairy aisle than just dairy!
That’s right. With the help of my local dairy aisle and Howard and Patty (my food-dilemma angels), I was able to use some creative new products to make this Orange Chocolate Cheesecake! It was the hit of the party, and I’m pretty sure it secured me the title of “Cheesecake Queen”. Let me show you how to make it.
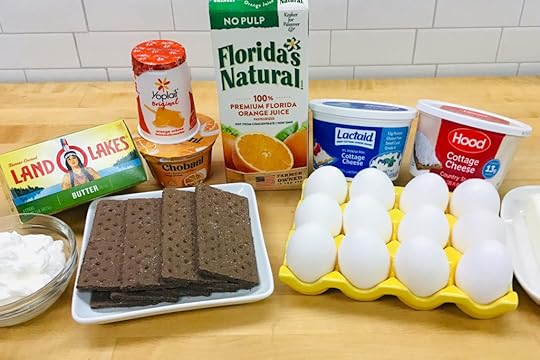 Head to your local dairy and freezer aisles to get all of the above! See our recipe for the full list of ingredients.
 Step One: Preheat the oven to 350 degrees F, and coat a 10-inch springform pan with cooking spray. Easy. Then, use a food processor to pulse graham crackers into crumbs. I always keep an extra graham cracker nearby for nibbling! Then, in a medium bowl, combine graham cracker crumbs, 2 tablespoons sugar, and 1/2 cup butter, and mix well. Press that mixture into bottom of springform pan with your fingers, and then set aside. Baking is always better when you get a little messy.
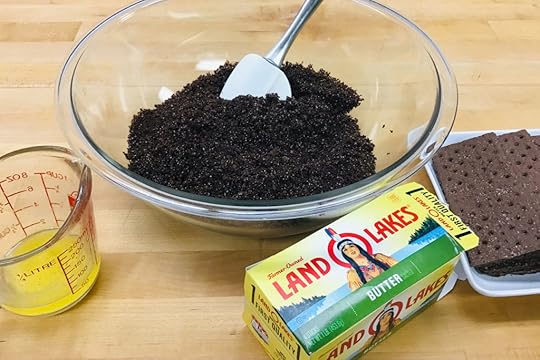 The chocolate graham crackers make a cheesecake crust that you’ll literally flip over! I wanted to anyway…
Step Two: Now we get to use those unique ingredients! In a large bowl, with an electric mixer, beat cream cheese and cottage cheese (Lactaid for those with sensitive tummies) until they’re well combined. Add your sour cream, yogurt, the 1-1/2 cups sugar, eggs, orange juice (yum), vanilla, flour, and the remaining 1/2 cup butter; beat until these ingredients are thoroughly combined. The yogurt provides a little lightness to this indulgent recipe, and the orange juice is what gives it that sweet hint of citrus. Pour your mixture into springform pan. The combination of all these ingredients may seem a little odd, but wow does it turn out great!
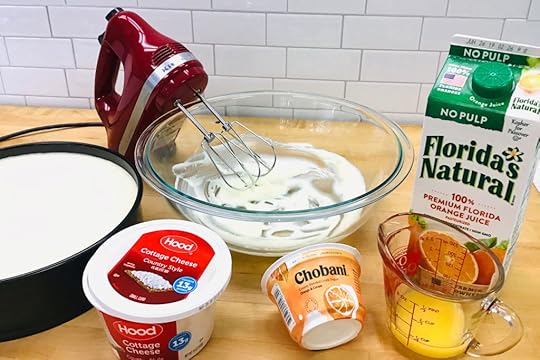 This cheesecake filling is BEYOND creamy. You’d never guess this wasn’t a traditional cheesecake recipe.
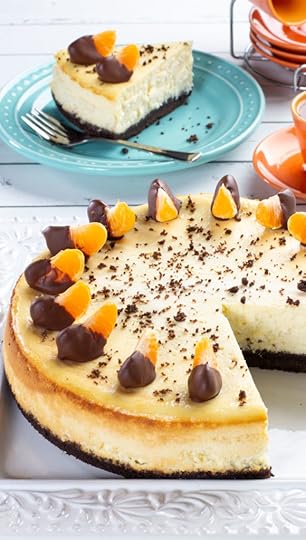
Step Three: Bake your cheesecake for 55 minutes and then turn off your oven. Seriously, turn it off. The center of your cheesecake will be slightly jiggly at this point so don’t freak out. We want to leave this cheesecake in the oven for another 60 minutes, so it can cool. Cooling your cheesecake at a slow rate will prevent the top from cracking. Once it’s done cooling in the oven, refrigerate it for 8 hours or overnight. Cheesecake only has one flaw: if you want it to be really good, it’s got to be made ahead of time! When you’re ready to serve, remove sides of springform pan and garnish with chocolate dipped orange wedges as seen below.
 Need a little help making the chocolate dipped orange slices? No worries! Check out Howard’s Mr.Food Test Kitchen Tip!
Mr.Food Test Kitchen Tip: Don’t worry, those chocolate orange slices look fancy, but they’re super simple. In a microwave-safe bowl, combine 1/2 cup semi-sweet chocolate chips with 1/2 teaspoon vegetable oil. Microwave for 45 seconds, stir and continue to microwave until chocolate is smooth. Dip orange section in chocolate halfway and place on a wax paper lined plate. Refrigerate until chocolate hardens, and then garnish your creamy cheesecake dessert. Thanks Howard!
That’s all there is to it! Thanks to all the amazing options in the dairy case and freezer aisle, this beautiful cheesecake was a hit at our party. Plus, Laura said it was one of the best desserts she’s ever had.
My favorite part of making this recipe is that it was one-stop shopping. After I grabbed my graham crackers, everything I needed was in the dairy aisle, including the orange juice! It just goes to show you, the dairy aisle, and National Dairy Month, has a little something for everyone. So, head over to your local dairy aisle now and take advantage of everything it has to offer, from cheese to cheesecake! Well, the ingredients for cheesecake, anyway, haha.
CLICK HERE FOR THE FULL
ORANGE CHOCOLATE CHEESECAKE RECIPE!
For more great family recipes visit
EasyHomeMeals.com
This conversation is sponsored by National Frozen & Refrigerated Foods Association. The opinions and text are all my own.
What’s your favorite flavor of cheesecake?
The post How to Make: Orange Chocolate Cheesecake appeared first on Mr. Food's Blog.
Mr. Food Test Kitchen's Blog

- Mr. Food Test Kitchen's profile
- 5 followers
