
Jeremy Roberts's Blog
April 7, 2015
The 4 Systems of Ultimate Productivity: 3. Action
We all want to be doing more. To track what we should be doing. To make lists. To mark things as complete. And yet, many of us still go without a structured system of action. A system of action is a way to organise and prioritise those things that need to be taken care of, by you or someone you are working with. This article will detail how to develop, maintain and work with your own System of Action.
Many actions are the result of some idea or “thing” being captured. As we discussed earlier, some of these things that are captured, which are not (directly) actionable, find their home in your system of reference. Often, items in your reference system are related to actions. In fact, one action may be related to any number of reference items.
Building your System of Action
David Allen’s GTD productivity system (recently updated for 2015) suggests that an action, or task, begins its life at the “in” state. This is very similar to the “inbox” described in the system of capture. As new actions are identified they end up in your head as something inside your actionable inbox. Just like when working through your system of capture, these actions need to undergo a process of sorting.
There are many questions that you should ask of a task in the “in” state. Consider asking the following to identify and refine each action.
Is this the real next action?
Given the current task in the “in” state, can it be done immediately, or do other actions need to be completed beforehand? Have any of these precursory actions already been completed? The real next action is something that you can complete without any additional information. If, for example the current action is “Write Report”, the real next action is “Collect Data”. The process of defining and understand the real next action is iterative. You may find that from a single new task a number of additional actions are spawned, and for each the question must be asked, “is this the right thing that needs to be done next?”
What is the context?
The term “context” as it relates to productivity is thrown around a lot, and has adopted many different meanings. I use context to better understand where a task or action belongs. Others, such as my good friend Mike Vardy, uses context to denote the energy/brain power needed to complete a task. In fact both the interpretations are valid and can be applied simultaneously.
On any given day you’ll likely need to action a number of tasks. However those tasks are not all of the same nature. Some will be related to a certain project; some to another, and others relate to your personal life. These so called Areas of Responsibility provide context around the work that needs to be done within that area. So let’s say, for example, that at work you are currently involved in exists in two projects, Project A and Project B. A new task appears with status of “in”. After understanding the real next action, the task must be allocated to the right project (context). Just as you sorted your inbox in your system of reference, so too must these new tasks be organised. Now consider that one of the tasks is to make a phone call to someone. You may wish to work by “mode” and make all your calls at once. In that case the task would exist within two contexts – a project and a call list. However, completing the task once should warrant it as complete the in both contexts. The best way I have found to work in this way is by managing your actions and projects with Asana, an online and mobile task and project management utility. A single task in Asana can exist within multiple projects. So the task may exist within Project A and a Calls project. Viewing the calls project will list all calls that need to be made while providing details of the additional context, being Project A. Alternatively, Asana supports the use of tags. This method will see the task appear in Project A and tagged with #call. Using a search it is then quite simple to see all calls that need to be made and what projects they exist in.

There is no limit to the number of contexts a single task can be part of. However, to keep things easy for your brain, this should be limited as much as possible. Creating too much granularity with contexts can make it difficult to actually determine which context applies right now.
How can I do this?
This is a similar question to “is this the real next action.” Here you will need to understand if you have everything at your disposal that is needed to see the task complete. If you don’t yet have everything that you need, it’s not yet possible to complete this task. In this event a new task should be created to ensure everything that is required is first obtained.
What happens next?
Once a new task has been properly processed it follows that you should be able to identify what task, or tasks, should happen next. Like a mini brainstorming session, think about what you would need to do once this task is complete. Add any new actions that crop up to your task list in the “in” state and process them accordingly. The ability to see what needs to happen next will help keep your projects moving along smoothly, avoiding delays and stalling while the project is continually reassessed for completeness to understand what still needs to be done.
Working in your System of Action
Your system of action has a very important requirement – that it be organised and prioritised. We have already looked at organising tasks through projects and contexts, what’s needed now is a means to organise these tasks by priority. This will then allow you to understand what actions you can do today, without floundering around with tasks that are not ready to be actioned.
There are a lot of ways that tasks can be prioritised, but ultimately it comes down to what works for you. Here is my strategy for prioritising tasks so I can get the right things done. My strategy is a mashup of few different ones and is largely influenced by a regular weekly review.
With all the tasks you have to do now properly organised review them all, holistically. Identify your top three to five priorities for the day. If any one of those tasks should take more than one day, it should be broken down into smaller parts (by asking what the real next action is). Move those top tasks to the top of your list, or even move them to be a separate group. You might do this by tagging them with #today, for example. These tasks are those that you should absolutely get done today at a minimum. That’s not to say that if you get through them you should pack up for the day. Instead, think of these tasks as those things that must get done in order for you to declare your day a productive one.
Next, go back to the main list and look for all the tasks that need to be done or worked on in the current week. Group these together, again either in a separate list or with a tag. The order of the tasks does not matter so much. Each day, when you start with no tasks marked for #today (because you completed them all yesterday), review this #upcoming list and pick the three to five tasks for today and group or separate them as above. If you get through your tasks for today, dive into what else you have upcoming and take a task from this list.
All remaining tasks should be set aside. Not trashed, just set aside. If you’re able to hide these tasks from your immediate view, even better. Or, tag them with #later. These are the tasks that do not need your attention in the current week.
Did you know you can easily prioritise your tasks into Today, Upcoming and Later groups with Asana? Find out more with Do Better With Asana.
At the end of the week, perform a weekly review of all your tasks. Update your #upcoming group from the #later group and ensure any newly created tasks are processed accordingly.
My system of action has been in place for a number of years now. I certain try tweaks and changes as I discover them if I believe they have value, but for the most part my personal system works. Your action is to take what you have learnt and develop your own system of action; something that works for you. Don’t feel constrained by what a particular piece of software or technology, or even a blog post or methodology wants you to do with your tasks. Figure out a system that works for you and stick to it. Personally, my system of action resides completely in Asana. I find that with Asana I can manage all my tasks, from multiple projects and areas of responsibility in a single place, and engage with collaborators seamlessly.
How do you manage your actions? What would you change after reading this article?
The 4 Systems of Ultimate Productivity: 3. Action is a post from: Cloud Productivity
Oh, one last thing... have an AWESOME day!


February 8, 2015
7 Steps for a Complete Weekly Review
Your world is made up of more than one workspace. There is more to who you are and what you do than your “job.” Because if this, reviewing your world on a regular basis is super important.
When I started introducing a weekly review into my workflow it seemed like a logical fit to do it on a Friday afternoon. The problem I encountered was context. Because I was usually at my desk at work on Friday afternoons it felt like the only thing I could review was that kind of work. The weekend would hit and I would be left feeling free! A little too free. Sure I had the regular parental commitments (sport/ballet etc) and the regular home washing stuff, but aside from that there was nothing… Or so it seemed.
One day (while letting the kids run around at the park) I opened Asana on my phone and switched worlds to my Personal Projects. Having some time to kill I lazily flicked to my list of all projects and casually went through each one. This was an eye-opening activity. As I reviewed each task I had created for myself I was continually struck with thoughts like “oops, forgot about that”, “wow that’s old and not needed anymore” or “I did that ages ago, didn’t I?”
It was then that I realised the obvious truth: there is more to life than work, and those extra things need just as much attention.
My Weekly “Real-Life” Review Process
When reviewing your projects do not forget about the things you have going on on the periphery of your current context. What I mean is, don’t let your current situation blind you from everything that you have going on in your world. Here’s my new process for executing a comprehensive review of everything I have going on:
Process my email inboxes – both work and personal. Emails I wish to keep are archived, others are deleted, but the important ones, the ones I really want to keep handy, are forwarded to Evernote. I actually work on doing this daily so that the task is not as overwhelming on Friday, it also helps to keep my updated on what’s going on.
Further reading: The 4-Systems of Ultimate Productivity: 1. Capture
Process my Evernote Inbox – this is a logical follow on step from processing my email inboxes since some of those emails will find there way into Evernote. At this point I review each note, adjust the titles and tags, and file in the appropriate notebook. If needed I’ll also link the note to other existing notes, building on a particular index of related information. Should any note conjure an action I, or someone, else needs to take I will quickly add a new task to Asana.
Review recent notes in Evernote – using a saved search I pull up all my notes that have been modified in the last 7 days. I then review each one to make sure it’s currently. Often this process produces additional tasks that need to be actioned or followed up. Again, these are immediately added to Asana for processing.
Further reading: The 4 Systems of Ultimate Productivity: 2. Reference
Review weekly summary and mini goals – opening my Evernote Planner to the current week I review all the appointments I had locked in and evaluate whether they actually occurred or were moved or canceled. I then go over the summary I had written for the week along with the mini goals I had defined (more on this later). For each I decide whether the goal was met and if so it gets a tick. If not, I consider whether the goal is still applicable for the coming week and if it’s nature has changed or not. For the mini goals that are still valid I add any missing next actions to my task list in Asana.
Review Tasks and Projects in Asana – starting with my work Workspace, I will start by reviewing the My Tasks list, including everything marked as Upcoming and Later. I review each task and decide if an update is required, if the due date or priority has changed, or if the task is no longer needed. I then ensure that the tasks I wish to complete in the following week are added to the Upcoming section. Next, I move on to reviewing each project I have marked as a favourite. Here I perform the same actions – updating, prioritising and adding tasks. Finally, I review a few saved searches to look for tasks across other projects where I am involved and am waiting on input. I also look at all the tasks I managed to complete over the last 7 days just to make sure I’m making good progress across my projects. Next, I will move on to each of the other workspaces I use, landing lastly on my Personal Projects. Here I also pay special attention to what bills are due in the following 7 days, what things need to be done around the house and more.
Update my calendars – based on all the activities I have reviewed and created, and meeting invites I have received, I review what my calendar has for the coming week. I often block out chunks of time at this point to work on tasks since a lot of my time is at the mercy of others booking it. This ensures I have enough time in the week to get my (real) work done, and not just be sitting in (often superfluous and unstructured) meetings.
Build a plan – with all my notes and tasks now reviewed, and my commitments locked in I take a step back and take in the bigger picture. Using my Evernote Planner I note down those appointments that are locked in and then add some other objectives I would like to get done. Finally, I spend some time just describing the upcoming week, the workload I’m expecting and the kinds of goals I’m setting for myself. I then identify three to five areas of focus for the week. These are the things that if completed will let me class the week as a success. I mark these with an empty box so that I can tick them off later. They are not so much tasks that I would put in Asana, but more like mini goals. I leave half a page so that at the next review I can look back at what my plan was for the week and reflect on how accurate or inaccurate it was, what went right and what went wrong (see step 4).
This entire process is highly rewarding. It allows me to start the working week with a clear vision of what needs to be done and when, and the goals that I’m working towards. Come Monday morning I review my Evernote Planner and the areas of focus I had defined. This fuels me to resolve outstanding issues and work hard on my goals for the week, keeping them top of mind.
What’s unique about my review process is just that – it’s unique. And I believe that’s how each weekly review should be. We all work very differently and live very different lives, and while we can take advice from blogs, or books, or anything else, ultimately, those recommendations need to be moulded to suit your own particular workflow. But one thing that should be maintained regardless of your process is that that process must include everything you have going on in your life!
Evernote Every Day
Find out more about processing your inbox with Evernote with Evernote Every Day: Getting more out of Evernote.
Learn more
Do Better With Asana
Discover how you can easily manage everything you need to do with Asana in Do Better With Asana.

Learn more
7 Steps for a Complete Weekly Review is a post from: Cloud Productivity
Oh, one last thing... have an AWESOME day!


December 21, 2014
5 Ways to Deal with Being Stuck
Do you ever get that feeling that some projects may never end. That some tasks, though properly captured, just never get your attention? Why is it that we start these endeavours, that we note these things we really want, or need to do, and yet they remain incomplete? I’ve done a lot of thinking about this over the last few years. I have many grand plans, many ideas that I start and that’s how they remain. I got to thinking, “what is really holding me back from getting these projects done?”
Turns out there are a number of things that either act independently, or form an alliance with other factors that can stall your projects. Luckily, each has a countermeasure that you can act on now!
It’s on you
At first I blamed others. It wasn’t my fault things couldn’t be progressed. I was waiting on input. Or, someone else was asking for too much of my time, taking it away from the projects I wanted to focus on. While I was thinking like this nothing could get done. If it is a personal project, the only person that can make progress is you. For collaborative projects, it’s time to take ownership; grab it by the horns and go.
There’s almost always some part of the project that can be worked on, even if another part is held up for some reason. This is the time to work on those areas.
Know your limits
We’re only human. We have limits. It’s not realistic or practical to commit to every project and attempt to run them at the same time. Taking too much on creates an unnecessary amount of stress, causes delays and can stall projects. There are only so many plates you can spin at once, only so many knives that can be juggled.
One way to work on multiple projects and ensure progress is being made on all of them is to do what’s called “time chunking” or “time blocking.” With this approach each active project is alloted a predefined amount of time each week. This sounds great when planning, however when you really get into a project during one of those chunks of time, when the time runs out it can be hard to stop and switch projects, only because you’ve picked up so much momentum. But, to keep all of your projects moving forward, this is a sacrifice that must be made.
If you’re like me, and just cannot control the random ideas that pop in to your head, ideas that ignite that spark and make you want to start working on them right away, the right approach here is to capture the project and store it in your reference system for later. These project ideas should be reviewed at least monthly. This “incubation” period will help to give you a new perspective – an idea that seems like the best thing since sliced bread one day, my seem like a waste of time the next.
Never forget your goals
As life goes on, a project that was very exciting in the beginning can become dull and monotonous. When this happens it’s very important to stop and review. Take note of how much work has been done so far. This will help you realise that you’ve already come a long way, or maybe you’ve not. Taking a step back and looking and your progress will create a sense of clarity and help you understand how important this project really is to you.
Another great idea here is to create a dual “so that” plan when you first start the project. A “so that” plan is an idea of taken from Pat Flynn and his approach to creating value, which is really what we’re trying to do with any project anyway. The concept is simple. Start with a one line summary that describes the project. For example, if you are writing a book, your “so that” plan might start with “write book about vampires”. Next is the most important part – add the words “so that”. Now finish that sentence with two objectives, one as it relates to who your project is for, and another as it relates to you. In the case of the vampire book, the complete dual “so that” might look like this…
Write a book about vampires so that the reader is terrified and I get a publishing offer.
Print this out in big print and stick on your wall next to any place you frequent – your desk at work, the kitchen at home, wherever you need that pick up. This one sentence will constantly remind you why you started this project in the first place and will inspire you to keep it moving forward.
Create a finish line
You know the feeling – when the deadline for that important project or report is looming, just days away; your heart races and the pressure sets in; you buckle down and get stuck into the task so the deadline is met. And it is.
Use a similar, albeit less stressful approach to avoid having those longer projects stall. Pick a realistic date when you believe the project you’re working on should be completed. This date may also be influenced by external factors such as the time of year. After honing in on any influences to meeting a certain date lock in that day. Grab a calendar and mark that particular day. A yearly calendar such as the NeuYear calendar is a great idea here since the marked date will always be visible.
With the final deadline now set, rather than leave everything you need to do in a jumbled mess, spend time planning out smaller milestones, and again mark those on the calendar, but in a different colour. At this point you coud break down things even further into even smaller milestones, or discrete tasks. However, you may not want to have your tasks show on your calendar – missing one will create a visual snowball and create added stress in your brain.
Now work towards each of those milestones. Each deadline will surely add an element of stress, and if that’s the kind of things that spurs you into action, harness it. As you reach each milestone, celebrate. Look back at how much you have achieved and use that as fuel to build the momentum.
Know when to stop
Some things are just not meant to be. The project you envision as being a tremendous success may turn out a dud. It can happen. I have personally been through this with a startup. After pouring a year worth of time, effort and money into the project it went nowhere.
I used to work with someone that had a saying. This saying is simple and effective: “fail early.” It sounds negative and depressing, but there is much more to it. The message here is to not let projects that are clearly showing signs of negativity, including negative influences on your life, your personality, and your relationships, continue, stop them in their tracks. When a project begins to show signs that it is going in a direction you did not expect you really must consider whether the project should continue to be pursued.
Create a barrier around the project. This could be a financial barrier, or a time barrier for example. If the project wants to creep outside of those boundaries consider pulling the plug. The barrier is he limit where the project “costs” more than the reward.
Feel victory
Visualisation is a powerful thing. It can create dreams, instill fear, and inspire action. When you feel stuck with a project, step back and take time to reflect on it. Meditation sounds complicated, but it doesn’t have to be. Find a quiet place and close your eyes. Focus on the project. Do not let the minutiae of the details cloud your mind. Instead picture yourself at the end of the project, the day you can declare it complete. Note what that feels like.
Take this a step further. Picture yourself a month, or a year after the project is complete. What impact has that project had on your life, your relationships, your career? What impact has that project had on those around you and more importantly, those who take advantage of the results of the project?
These thoughts will conjur powerful positive images and feelings. After you have let all that positivity sink in, open your eyes. Now, write down what you experienced, how you felt and how you feel after the visualisation.
Conclusion
These five simple tricks might just be enough to help you make progress on your projects. I use the term “project” fairly loosely here to describe any kind of endeavour that comprises a number of tasks or actions. It could be planning a wedding, taking college exams, or developing that next big thing in technology. No matter the scope, we all need a little reminder about why we do the things we do, and a gentle shove in the right direction. I hope these tips have inspired you, or at least engaged your mind to make you think about what motivates you.
5 Ways to Deal with Being Stuck is a post from: Cloud Productivity
Oh, one last thing... have an AWESOME day!


November 11, 2014
The One App to Help you Stay Focused & Do More
The Pomodoro technique is a widely adopted and highly effective method of getting through your tasks. When it comes to that point when you need to really buckle down and focus, using a Pomodoro helps to eliminate distractions surrounding you because your mind is now fixed on getting through as much as it can before the timer runs out. This is basically tricking your brain into thinking the deadline for your task is only moments away. But even with the clock ticking (and many Pomodoro apps actually making a ticking sound) it can be difficult to truly block out everything that is going on around you.
The Pomodoro technique is one way to help you gain focus. Another way is to free your mind from external distractions. There are a growing number of services that provide ambient sounds to help keep your mind on the task at hand. One such service is Noisli. Noisli is a free web service with and additional app for both iPhone and iPad that allows your brain to plug into any combination of up to 16 sounds ranging from a thunderstorm (my personal favourite), to a forest, to a busy cafe. Each sound can be combined with other sounds and the volume of each can be controlled. This provides 16! (16 factorial) possible sound combinations, or a whopping 2,092,278,988,8000. What’s more is that the mobile app allows you to save your favourite combinations and re-use them again later.
By combining the time altering effects of the Pomodoro and the singularity created by Noisli it’s possible to forgot all about the world around you, leaving your mind completely zoned in on getting the right tasks done.
But it doesn’t end there.
The Noisli app has another secret benefit – it has a Pomodoro timer built into it’s mobile app version. This makes Noisli a single app to create a level of focus and clarity that is generally very hard to come by. From Noisli for iPhone or iPad tap on the timer icon in the lower right corner of the app to bring up the timer. The timer is set to 25 minutes by default, which just so happens to be the same time as a standard Pomodoro. Once the timer starts, enjoy a period of focused productivity, without fumbling around between apps to start timers and toggle settings.
When the timer ends, the sound from Noisli will fade away leaving you free to continue working if you’ve found a good rhythm, or to take a break before starting your next Pomodoro. No alarm bells or sudden jolts back to reality.
The combination of Pomodoro timer and background noise generator in a single app has allowed me personally to do a lot more things in a lot less time. This post for example, was written in less than 2 pomodoros while riding a noisy train. With my timer running and my mind focused on the ambient storm sounds I was able to breeze through it, distraction free. What could you do?
The One App to Help you Stay Focused & Do More is a post from: Cloud Productivity
Oh, one last thing... have an AWESOME day!


November 5, 2014
The 4 Systems of Ultimate Productivity: 2. Reference
My memory is terrible. I am constantly being “gently” reminded of things by Mrs Cloud Productivity. Because of this, it is crucial that my memory has a fallback system; something it can lean on when things seem unclear. Through school I was always stronger in the science and mathematics than I was in English or art, tending towards objective thinking over subjective. I was taught that it’s not as important to remember the result as it is to remember how to get to that result. Simply put, remembering one process is much easier than remembering a thousand results, and remembering how to get information is easier than remembering the information itself.
Building upon the first system of ultimate productivity, capture, the system of reference is a critical factor in becoming efficient in both your work life and personal life, and everything in between.
Defining the System of Reference
The system of reference is a personal library of sorts. It is a place and a method of storing any kind of information and being able to quickly and easily retrieve it when needed. The system of reference should be able to cater for many types of things: ideas, projects, reference material, photos and video, and even physical things such as letters, for example. As items are captured and processed many of them will become un-actionable items that may need to be referred to at some point. These items cannot be left unchecked. Should the event arise when that information in needed, trying to find it could be a nightmare – where should you look? Under the bed? At the bottom of your desk draw behind last week’s vegemite sandwich? Next to the phone? Or on the fridge behind all the photos? The possibilities are endless.
Applying a systematic process to managing all these items consolidates the number of areas that such items could possibly exist. That’s not to say that absolutely everything needs to be in a single location, that just isn’t always possible. What is important is that those places are consistent and small in number. Having items one day stuck to the fridge and another day under your keyboard creates inconsistency that really troubles the brain to the point where the problem of locating that item lingers in the back of your mind, continuing to attempt to solve that problem. Like a monkey on your back these problems keep nagging and nagging, demanding attention, demanding the problem to be solved! Employing a trusted system of reference keeps these monkeys at bay because whenever one of them needs to find something they will know exactly where to look and exactly how to find it, freeing up your mind to do better, more creative and enjoyable things.

Principles in Developing Your Reference System
There are two approaches to building a system of reference and they are not mutually exclusive. That is, it is quite possible and acceptable to use either or both approaches at the same time. The two approaches can be boiled down to “structured” and “unstructured”. Let look at these two approaches in more detail.
The Structured Approach
The structured approach to building a system of reference is akin to a library. There is a system in place that allows anyone that knows the system to browse and find exactly what they’re looking for. The typical library uses the Dewey Decimal system. Creating your own system can use any type of logic, as long as that logic is consistent. Creating a personal system will involve categorising or “tagging” items in your reference system. Additionally, each item would have a name or subject. With such an approach it is easy to browse your reference system for any items relating to one or more tags or categories, and then browse to find the item with the most appropriate title. Your system could be primarily based inside a digital app, or even a good old filing cabinet.
Consider the filing cabinet for a moment. Each item can only exist inside one folder at any time. This is like its “category”. However, each item inside a folder could have any number of post-it notes sticking out from the edges, using either a colour scheme or writing things down, these post-it’s act as “tags”. With this approach a tag can span multiple folders making it easy to identify “bills” for example, when your folders may be split by “gas”, “mortgage”, and “credit card”.
Many digital systems follow the same principle. Evernote, for example, allows a note to be stored in a single notebook, but have any number of tags attached to it. Additionally, each tag can be used on any note, in any notebook. It is for this reason that so many people have flocked to Evernote, myself included, for their system of reference.
The Unstructured Approach
An alternative method of maintaining a system of reference is heavily dependent on a digital tool. The unstructured approach relies on search in order to locate stored material. As content is added to the reference system it is, for the most part, left unchecked. Sometimes just knowing that the things you need are in a handy location is enough. It is then that there is a big dependency on the reference system being able to locate what you are looking for. That is, you are relying completely on the system’s ability to surface what you need when you need it.
When attempting to reference purely text content, searching should be relatively straight forward. However, it is those occasions when you need to search for a PDF or document that these simple searches can fail, depending on the tool being used. Some apps allow searching through all content, including PDF files, office documents and images. It is these tools which truly excel with the unstructured approach.
And still, there is a kind of art to finding exactly what you need with the unstructured approach. Searching can be as simple as giving the app a single keyword. However, that can result in ambiguity and return many unwanted results. Masters of the unstructured approach combine multiple advanced searching techniques to pinpoint exactly what they need. Such techniques include:
Phrase searching
Metadata searching
Negative searching
Phrase Searching
Many tools will search for each keyword you enter in the search as a unique word. This can be problematic when you know the keywords you are looking for sitting next to each other in a sentence. Phrase searching forces the app to searching for the exact phrase entered. For example, searching for hello kitty will typically result in every piece of content that contains either “hello”, or “kitty”, or both. Wrapping both keywords in quotes (“hello kitty”) will only show results that contain the exact phrase “hello kitty” and can quickly narrow down search results.
Metadata Searching
With digital tools every time a new piece of content is created, or edited, there a number of properties that are updated in the background. These properties may include the date and time the item was created and changed, the location the item was created and much more. Often these properties can be used within a search to narrow down your results. Building on the example above perhaps you want to find only items that contain the phrase “hello kitty” and that were created in the last seven days. This could be searched for with something like: “hello kitty” created:-7
Of course, each app will handle this type of searching in their own way, so it’s best to refer to the documentation for the app you use.
Negative Searching
Just as it is possible to search for keywords and metadata that exist in the content you’re looking for, many apps allow searching with keywords and metadata that do not exist in your results. For example, searching for content that contains the word “hello”, but does not contain the word “kitty” might be done so by adding a minus symbol before the negative keyword. For example, hello -kitty.
Read more: Find out more about Evernote’s advanced search techniques and how to master them in Evernote Every Day.
My Reference System
Personally, I use a combination of the structured and unstructured approaches to managing my system of reference with Evernote. This includes bills, web articles, ideas, blog posts, project notes and much more. Through the capture process any reference content is ends up in my Evernote inbox – the Inbox is simply the default notebook that I have renamed to “.Inbox”. I then regularly review this inbox and for each item I tag it appropriately, adjust the title of the note and link it to any other related notes. The note is then moved to the right notebook and I move on to the next note.
With this structured approach I am able to browse within a notebook, and/or filter on tags to refine a search to find the right content. Additionally, I am able to use keyword based searching to find exactly what I need. The keyword search paradigm is my preferred method for recalling content. I often search with a combination of keywords and tags to really hone in on exactly what I need. Evernote can quickly become a massive repository of information – I currently have 5407 notes, and for some people that’s nothing – so being able to quickly and easily find exactly what I need is critical. After all, what’s the good of having a second brain if it doesn’t work either!
What about the important stuff?
Not all documents can be, or should be, digitized and stored in the cloud. Items such as financial records still have a physical place. I store them in a small expandable filing box/thing and then shove it under the bed and out of the way. I do this, of course, after capturing it to an offline Evernote notebook so that I can easily reference it whenever I need to.
Back to School
All this brings me back to my initial thought – high school mathematics. Nowhere in the process of setting up and managing a system of reference do I bother to attempt to remember “what” is in that system. All I need to keep in my mind is the method, the “how”. If the “how” turns up nothing, then it simply doesn’t exist – and yes, I have been caught out on the odd occasion when something has slipped through the system, but those events are few and far between. We’re only human, right?
Background of cover image by timetrax / CC BY SA
The 4 Systems of Ultimate Productivity: 2. Reference is a post from: Cloud Productivity
Oh, one last thing... have an AWESOME day!


October 13, 2014
The 4-Systems of Ultimate Productivity: 1. Capture
I strive to be as efficient as possible; as thorough as possible. I never want to let anything slip by me, and I don’t let the things I have to take action on stew around in my brain. I’m often asked how I do it and people comment that they wish they too could be as “in control.” It really isn’t that difficult. Anyone can do it. There are only a few key principles that just be adhered to.
Define the System
David Allen, author of Getting Things Done (GTD), uses the term “trusted system” to define a collection of process that act as a safety net to capture and organise anything and everything. My trusted system consists of four subsystems.
A system of capture
A system of reference
A system of action
A system of time
The most important aspect of these subsystems is that they each have a clearly defined purpose and responsibility. I make sure that each subsystem knows exactly what it needs to do, that it does it extremely well, and that it knows when it should step back and let another subsystem take over. There is a flow that connects each of these subsystems that allows for the natural evolution of a “note” to become a “task”, if needed. So what do each of these subsystems actually do?
Here I will cover the first subsystem: capture. Look out for future posts covering each other subsystem. Subscribe to receive updates in your inbox.
The “Capture” Subsystem
Capturing ideas and actions is critical to the success of any method of getting things done. If the right ideas are not captured somehow, they are missed, forever lost with only torn remnants left scattered in your brain. There are many tools that I use to capture, and each is used as frequently as the next.
The Basic Capture
I use a simple notebook when in meetings. I find that taking notes with pen and paper affords a level of engagement that digital note taking cannot – for example, in a meeting you can’t hide behind a screen and be distracted when everything you have is plainly exposed on the page before you. Pen and paper provides a level of freedom and flexibility that is not so easily available in the digital realm. For example, if I need to expand upon a note from earlier in the conversation I can do so without having to worry about fonts, or bullet indentation or that annoying misspelled world glaring at you with its little evil red underline. The context of the conversation has a spatial property that imprints itself in my mind better than text next to a bullet point and using pen and paper allows that awareness to be represented on the page.
The Digital Capture
Having said that, when I am making notes in my own time, I will often use a digital system. I have more time to get things right and the luxury of linking to other notes and documents. My system of choice for this is Evernote.
My paper-based notes do not stay analog for long. Nor do the whiteboards I create remain merely ink. Immediately after the conversions ends and before the notebook closes (or perhaps as soon as possible thereafter) I use my phone to snap a photo of each page of my notebook, or each whiteboard. Again, I use Evernote as the capture device here. Utilising the Document Camera option, snapping a page of my notebook or a whiteboard will automatically enhance the image, crop it based on contrasting edges, and adjust any perspective distortion. This results in a clear image of my notes and diagrams that are in the same place as my other notes. Additionally, those images are indexed meaning that when I need to find them again I can search for the words I have hand written and Evernote will find exactly what I am looking for (though it helps if my writing is somewhat legible).
Ready for Anything
To completely utilise all these methods of capturing ideas and actions all I need to have with me is a notebook, a pen, and my phone. With just these three things I can quickly and easily capture anything… except maybe a butterfly, that might be tough with a pen. That’s not to say that these are the only tools that work for capturing things. You may prefer to use Post-It’s, or Wunderlist, or Penultimate, or pretty much anything else (except Angry Birds, that won’t work). The one thing that must be adhered to when capturing ideas and actions is consistency. As long as you have a consistent and methodical approach to capturing content you can use any tool, even stone and chisel.
The Capture Inbox
Irrespective of how things are being captured, it is important that they flow through to a common repository; an “inbox” that spans everything on your radar. If you’re a “paper” person, your inbox could be a tray on your desk. A primarily digital person, such as myself, may use a tool such as Evernote as that inbox. Depending on the combination of tools being used, there may be multiple inboxes. For example, when using a notebook to capture meeting notes, and a whiteboard to collaborate on ideas, this may constitute multiple inboxes – one being the notebook and the other the photos on your phone or camera after snapping a photo of the whiteboard.
As long as the location of each inbox is known, and that there are a small and manageable number of them, your system is primed for action. I have two inboxes that I manage, the first is my email. This inbox acts a cursory inbox whereby I will review each email and make a decision as to what I need to do with it; if I’m certain I don’t need it further it will be deleted; if it’s not important, but might be worth holding on to it will be moved to an folder called “Archive”; or, if it’s important and I need to keep it handy it will be forward to Evermote.
Evernote acts as my ultimate inbox. Whether it’s an email, a photo of a whiteboard, notes from a meeting or even a screenshot with annotations, it all ends up in Evernote. I have a special notebook setup called “.Inbox”. The . at the start helps to keep that notebook as the first one in my list of notebooks, making it quick and easy to get to. This notebook (.Inbox) is set as the default notebook in Evernote’s preferences area.
Processing Rules and Frequency
Once everything being captured is flowing through to one or more inboxes that you have a handle on, they must be reviewed and process regularly. One simple but groundbreaking revelation for me was that an inbox should never collect dust. By that I mean that anything that enters an inbox should leave it within a relatively short timeframe. As soon as things begin to linger and stack up there the inbox becomes nothing more than clutter. An inbox may contain various things, such as that million dollar idea, a note to call the vet, the latest gas bill, or perhaps the structure of a blog post you wish to write. In any case, when these items get left unattended important things in your life begin to slip by, unnoticed, plotting to cause chaos. For some things it may not matter, yet for others (likely the vast majority) it can lead to a snowball of events that can be difficult to recover from – remember that time when you forgot to pay your credit card bill on time?
The key to keeping your inbox free from parasitic dust is to process it regularly. But what does it mean to “process an inbox”?
Processing an Inbox
Everything in an inbox should be transitioning from one state or location to another. An inbox will continue to collect anything and everything it receives and will quickly grow into an unwieldy beast if left unchecked. Processing an inbox is not a daunting task and doing so on a frequent and regular basis alleviates any undue stress over unknown or uncommitted actions.
Essentially, processing an inbox comes down to making a decision.
“Do I need this?”
That’s the first question that should be asked of any item encountered in an inbox. The answer to that can only be a simple “yes” or “no.” Obviously, if the answer is “no” whatever that item is can be discarded, deleted. This frees up space in your inbox for new items and also frees up brainspace. Like it or not, your brain knew about that item. Somewhere in the dark recesses of your mind was a little bug continually poking around trying to get you to do something about that thing. With that item now removed from your radar, that area of your brain becomes free and the bugs move on to other tasty things.
But what if the answer is “yes”?
“Yes” will often lead to additional questions, each of which can be asked in a certain sequence. This method creates a systematic and reliable approach to processing any inbox, resulting in a truly trusted system of capture.

The feeling of being in control that comes with a completely empty and processed inbox is truly extraordinary. The brain feels less scattered, shoulders more relaxed and a lighter and more energetic feeling will radiate from you. This is the feeling that comes with knowing that everything that has come your way has been captured and filed in such a way that when you need it you know exactly where it is and how to get to it.
The 4-Systems of Ultimate Productivity: 1. Capture is a post from: Cloud Productivity
Oh, one last thing... have an AWESOME day!


October 1, 2014
Automatically Backup iTunes with Dropbox
With Apple releasing new devices every few months it’s important to ensure everything you do with iTunes is kept safe. I have written before about moving an entire iPhoto library into Dropbox so that all your photos are backed up and safe, without having to even click anything. iTunes can be backed up in much the same way, with massive bonus benefit!
Apple’s mobile devices – iPhones and iPads – are well-known for using a lot of battery power. I’ll need to charge my phone while at work and overnight at home, too, just to make it through the day. Granted, I am a heavy user of the device, but really, it should be able to comfortably last one day, right? To charge, I connect my iPhone to my work computer. You know that annoying popup that appears in iTunes when an “unknown” phone is connected? What if my work laptop, and my personal laptop running iTunes, thought that they were the same iTunes library? That would mean that it would be possible to plug my phone in to either laptop and for everything to just sync; for everything to just work!
It works, and here’s how you can do it.
Get Enough Space
First and foremost it’s critical there is enough space available in your Dropbox account. If you haven’t already got one, head over to dropbox.com and signup. Dropbox have some massive options now, having recently upgrading their offering to provide a whopping 1TB of space for $99/year. That should be plenty. The biggest iDevices pack 128GB of storage space, that’s about 10% of what Dropbox will give you.
Find The iTunes Library
iTunes typically stores everything it needs in your Music folder. To be sure, in iTunes, go to Preferences, then Advanced. This will show the location of your “iTunes Media” folder. Note down this location. Open a Finder window and find the folder where iTunes is currently stored. Don’t go down to the “iTunes Media” level. Instead only go until the “iTunes” folder appears. Now make sure the iTunes app is completely closed down. If you’re running a Mac (like me), right-click, or two-finger-click, on the iTunes icon in the dock and select “Quit”.
Move The iTunes Library to Dropbox
While your Dropbox account comes with a few folders for you, I made sure I had one called Music. Open another Finder window (File > New Finder Window) and go to your Music folder in the Dropbox folder. Now the fun part. From the Finder window showing the iTunes folder drag the “iTunes” folder to the “Music” folder in the Dropbox folder. Dropbox will immediately begin to sync everything iTunes has. The synchronisation process will take quite a while to complete depending how much media you have. It coud be hours or even a few days. However, there’s no need to wait to keep using iTunes on the same computer.
Open iTunes… Carefully
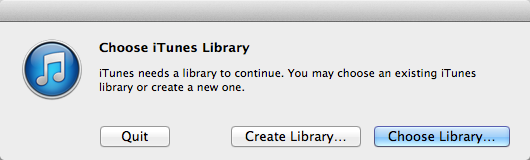
The next time you open iTunes you need to tell it to look for the iTunes library in a different place. To do this, on a Mac, hold down the OPTION key and click on the iTunes icon. This will force iTunes to ask you if you’d like to create a new iTunes library or find an existing one. Click “Choose Library…” then navigate to the newly located “iTunes” folder in the Dropbox folder. Once selected, iTunes will open just like it always has. This OPTION+click trick only has to be done once. Closing and reopening iTunes will continue to use the most recently selected library.
iTunes Multi-Homing
With iTunes now safe in the Dropbox cloud, and once the sync process has completed, opening the same iTunes library on other computer is simple. Use the OPTION+click trick when opening iTunes on other computers where you have Dropbox synchronised and again choose the library which is now available in the Dropbox folder. Again, the OPTION+click trick only needs to be done once.
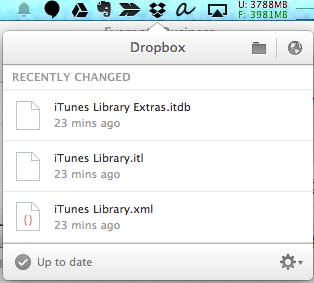
With the iTunes library completely synchronised, from the original computer, and now on any other computer, when anything changes in your iTunes library only those changes are synchronised, making the process to keep all your computers in sync much much quicker.
At this point, connecting an iPhone or iPad to either computer will initiate the sync process. As soon as it begins, Dropbox will kick in to action and begin to sync the changes to Dropbox. Your iDevice can now be connected to any computer that is running the same, synchronised iTunes library with no ill effects.
Final Word
There is one minor point that should be kept in mind when multi-homing your iTunes library. After using iTunes on any one computer, Dropbox must completely finish synchronizing those changes, and those change must be downloaded to any other computer before opening iTunes there. If you open iTunes before any modified iTunes library files finish synchronizing Dropbox will get confused and create “Conflicted Copy” files. Conflicted files can be remedied relatively easily by closing iTunes, deleting the conflicted files, then reopening iTunes (provided Dropbox has finished syncing the iTunes library).
Automatically Backup iTunes with Dropbox is a post from: Cloud Productivity
Oh, one last thing... have an AWESOME day!


September 23, 2014
A Review of the Evernote Commuter Bag
For years I carried around a thin, relatively small backpack. It was able to fit a surprising number of things in it, but it’s design left a lot to be desired. It was not a bag for someone looking to carry around a portable office – everything in there was muddled together in a heap. Eventually, the zips broke and it was time to move on. I then stumbled across a sample promotional backpack at work and was given the OK to claim it as my own. It looked promising. It was clearly design for a laptop due to the thick padding on its back and internal sleeve for a laptop. However, in an even shorter timeframe this bag also succumbed to wear and tear. The shoulder straps began to tear away from the bag itself. So what now? I had long had my eye on the Evernote Commuter bag. Was this the right time to invest in quality and design?
Yes. Yes it was!
The Choice
As a birthday gift I took the liberty of ordering the Evernote Commuter bag for myself. I had been regularly weighing up the pros and cons of thighs is bag since it first appeared on the Evernote Market. The web page demonstrated its compartmentalization options and how every aspect of it had been designed for a specific purpose. One of the key things that was holding me back from making the decision to buy it earlier was the fact that it was a shoulder bag. I have had shoulder bags in the past and when they have a bit of weight in them, such as a laptop, they can quickly become overbearing to cart around and actually cause a significant amount of strain on the left side of my body. The Evernote Commuter bag bosts a specially designed angled strap that would ease this burden and transfer much of its weight from the top of the should to the back. Additionally, this bag stood up, on its own! No longer would my bag fall on top of itself as soon as I put it down and force me to dive into it head first as I attempted to retrieve a cable from the back of its throat. The triangular shape of the Evernote Commuter bag means that the bag stays upright when not in use. OK, I was sold, but was it in the budget?
The Price
Whenever I would revisit the Evernote Market I would always check the price for the Evernote Commuter bag (hoping it had come down). AUD$219 (USD$199) sure is a lot of money, and for a bag, for a guy? Was it worth it? It’s a pretty big gamble to take. If it didn’t deliver on its promises, or didn’t comfortably fit the work-issued 15-inch MacBook Pro, it would be close to useless. My birthday was drawing near and with two bags already in the bin I decided it was time to invest in something of quality. I could have walked into the nearest department store and easily parted with just as much money for a nice looking leather messenger bag, but that would be something designed more for aesthetics than practicality, especially when my main need was to hold my portable office.
The Real Thing
The bag arrived a couple of weeks before my birthday. I had to hold off ripping apart the packaging for a while longer. When the day came, I cracked open the postage box and found the Evernote Commuter bag exactly as it was described, only more awesome.
The Outside
A charcoal/steel grey in colour, the exterior material feels sturdy and capable of withstanding just about anything short of a box-cutter from severing it. The bottom of the bag, on the outside (where it will end up getting the most traction) is covered by a durable black leather, preventing any damage or rips. There are no “feet” on the bottom, no little metal spikes that sound like a sports boot in a locker room when the bag is placed on a table. The front pocket serves as a place to stash random items acquired while on the move, as well as a place to keep things that need to be readily accessible at any time. I keep my phone and my work ID/swipe cards there – I don’t even need to take the ID/swipe cards out to use them.

The strap looks and feels right. The should strap is at an angle to the body of the bag so that when the bag is carried some of its weight feels more horizontal instead of attempting to pull your should off making it more comfortable to carry for longer periods than other messenger bags. The texture of the shoulder strap is like a car seatbelt, but much softer, and it is wide enough so that the weight of the bag is distributed over more area resulting in a comfortable feeling on the shoulder, not something that wants to create a groove for itself on your collarbone. The length of the shoulder strap is easily adjusted and an added band holds the overlapping parts of the strap together.
Zips are a small thing, but incredibly important. A bad quality zip can quickly turn a nice bag into a rubbish bag. This is not the case with the Evernote Commuter bag. I was thoroughly impressed by the quality feel of the zips. Not just the leather tabs for gripping onto, but the actual feel of the zips as they open and close – they feel think and solid. Appropriately, the zip for the small outside compartment is smaller than the zip for the main part of the bag. All zips are smooth, quiet and sturdy. I’ve only had one small problem with the front zip where something inside the bag got caught. However, as soon as I freed it everything went back to normal.
I am not one for wearing items that brandish brand advertising. This bag has nothing to indicate it is made by Evernote or Abrasus apart from a very small Evernote logo badge on the front and a small stitched label inside (which blends in nicely). The badge on the outside looks and feels like high quality metal. That’s right, it’s made of metal, not some cheap plastic that would age and crack. I actually love having the elephant head on the bag. It makes it look a little different, plain, but not boring and for those that recognise it, that’s right, I am wearing an Evernote bag!
The Inside
First, let’s look at getting into the inside. Opening the zip for the main compartment allows part of the bag to easily fold outward. The outward fold reveals two smaller pockets that have their own zips. One of these has a mesh-like material providing visibility into its contents, while the other keeps it’s contents hidden. I keep things like my keys in the hidden pocket so that they don’t get caught up in the mesh, or tangled up with cables in the main compartment.

The fact that the top part of the bag folds outward also reveals the entire contents of the main compartment, without anything falling out. This aspect, combined with the triangular shape of the bag means that it can be stood up on a desk, opened, and everything you need is easily at your fingertips. This is where the true portable office comes in to play. Without having to unpack everything, the layout of the bags contents and it’s accessibility means I can be up and running with exactly what I need very quickly and, should I need anything else, such as a power cable, it’s there in easy reach and I can see it. No fumbling around blindly for something that “feels” like the right cable.
 Towards the back of the bag is a material divider that allows a laptop to be easily dropped in. It looks like this section is ideally suited to a 13″ laptop, but it can still comfortably fit my work-issued 15″ MacBook Pro. Not only that, but I also add to this section an iPad in a leather cover. The only thing that I need to do in order to fit the larger MacBook into the sleeve is to unhook the outer corners of the bag so that the zip does up easily. Definitely not a big issue. The laptop sleeve is not padded, but I have not found this to be an issue. Because the bag stands up by itself the laptop is not going to fall onto hard surfaces.
On the other side of this sleeve are two more sleeves. Lower in height, and much skinnier. These sleeves are best suited for a smaller tablet (such as an iPad Air), or field notes notebook, or even folded papers. They are made of softer material which helps to protect the surfaces of delicate devices. These two sleeves are not equal in size – one is wider – allowing for various items to be stored in the most appropriate place. I tend not to use these two sleeves that much, apart from my field notes notebook or the occasional loose sheets of paper folded in half. I would use them more, I just don’t have the right thing to use them for.
The Evernote Commuter bag comes with three removable dividers for the thickest, and main part of the bag. Using velcro, these dividers can be placed within the bag to cater for your own items. My bag is setup such that one divider is placed wide enough to just fit a Moleskine, the next is wide enough to hold a MacBook power pack. The left over space is perfect for my glasses case and a packet of whiteboard markers. I don’t use the third divider so it is left out.
At either end of the main compartment is another smaller pocket. Perfect for pens and skinnier things. The materiel here is thin allowing pens to be easily stored and clipped on. For me, I have a portable battery that I use as a backup supply for my iPhone and iPad in one end and the other end has a spare pen and pencil and a PowerPoint remote clicker thing.
Everything fits and everything fits comfortably. Looking at the bag with everything closed up it looks very basic. But when it’s opens there are many sections, pockets and sleeves that cater for everything you need to carry with you, and more. Simplicity and practicality combined.
On The Move
I mentioned earlier that I keep my keys in one of the pockets available when the front of the bag is folded down. The magic of this bag is that it can fold down whenever you like. For example, I need to get to my keys in order to get into my house (obviously). While I am walking to the door I swing the bag around from my back to my side and fully unzip the main compartment. The top section folds down and I can get to my keys. Nothing falls out or even moves out of place, even while I keep walking, and this means I don’t have to fumble around blindly and hope that my keys don’t get caught up with other things.
The Portable Office
I have mentioned this concept of a “portable office” a few times now, but what exactly is it and why on earth would I need it? In my line of work I often have to visit clients, take many notes, be prepared to work on a whiteboard at no notice and deliver presentations. With the Evernote Commuter bag I don’t need to worry about making sure I have the right items for the job on hand. It fits everything I need for any kind of occasion.
 So, what is my portable office? It’s everything below, and it all fits into my Evernote Commuter bag.
MacBook Pro
MacBook Pro power pack
iPad
Work notebook
Evernote Moleskinne (journal)
Field Notes notebook (for sketches and project ideas)
Packet of Post-Its
iPhone and iPad cables
iPhone headphones
iPhone backup battery thing
Packet of tissues
Glasses case
Packet of 4 whiteboard markers
Eraser
Pencil
2 Pens
PowerPoint remote presenter thing (clicker)
Bunch of loyalty cards I rarely use
Wallet (usually)
Work swipe cards
I think that covers it. Oh, and my keys. That’s everything that lives in my portable office and there is still a lot of space left to fill!
Final Word
As of writing this I have been using the Evernote Commuter bag for two months. In that time I have not noticed any wear. None of the material is freying at all. The bag easily holds everything that I need to carry around and is comfortable to wear. While I primarily use it for carting around my portable office, I see no reason why it couldn’t be used for more casual purposes.
It is clear that everything about this bag has been carefully thought about – from the angle of the strap, to the material and location of pockets and sleeves. I couldn’t be happier with the Evernote Commuter bag. And the price? If you were to go and look at any store for a bag of equal quality, I’d say it would be easily double the price. This is the only bag I could find that was designed for everything I was looking for: quality, design, aesthetics, and practicality. If you are looking for something similar I highly recommend investing in the Evernote Commuter bag. You will not be disappointed.
Find out more out the Evernote Commuter bag or buy it.
 The Evernote family of products is an integral part of everything I do every day. The core Evernote application, Skitch, the Moleskine, the bag and more, I use all of them every day and in doing so I know I’m better off, so much so that I wrote a book on how you can use Evernote every single day too! If you’d like to expand the ways you use Evernote, please take a look at Evernote Every Day: Getting More Out of Evernote.
A Review of the Evernote Commuter Bag is a post from: Cloud Productivity
Oh, one last thing... have an AWESOME day!


August 21, 2014
How I Capture Content, Ideas and Actions
What do you do when you have a thought or idea pop into your mind that you want to remember? Before my adventure into the realm of productivity began I was the type of person that would make a “mental note of it”, letting it then float around in my head until it would dissolved into a thousand disparate pieces, or simply obliterated altogether. That thought, that ground-breaking idea was never to be heard from again.
In order to overcome this ongoing disaster I have employed a number of tactics. It all boils down to grabbing hold of three different types of “things”. They are:
Documentation
Ideas
Actions
In all cases, the most important thing to remember is the need for immediacy. As soon as the document presents itself, an idea is spawned, or an action determined, it must immediately be captured. Doing so will capture not only the item, but any additional context that has created the need to capture it – the “why.” The “why” of capture is just as important, if not more important, than the “what.” Understanding why an item needs to be captured will help to formulate the context that that item should be referred to later and help you decide if the item is worth holding on to for the long term.
Documentation
Capturing documentation amounts to any piece of content that enters my world and that I deem necessary or valuable to retain. This includes articles I discover online that I might want to refer back to or read later, as well as emails, bills, and receipts to name a few. There are many tools that help to capture such content for later referencing. My preferred tool is Evernote due to its incredible flexibility and ease of access. Web content can easily be captured with the Web Clipper, emails can be forwarded to it and other bits of paper can be captured with the built-in document camera, or captured with other apps such as Genius Scan or Scanner Pro and uploaded directly to Evernote automatically.
Ideas
Ideas are probably the most important of all things that I capture. As eluded to earlier, my mind doesn’t have a problem generating ideas, often when I least expect it. Because of this it is critical that I am able to capture those ideas instantly. I can then go back to them later and dive into them further.
When an idea is sparked I first organise my thoughts internally into something that flows coherently. The next thing I do is grab my phone and launch Evernote, tap the button for a new text note and as quickly as possible I transcribe my idea. Lately I have been trying the “speech to text” button on the iPhone (right next to the space bar), but the results are mixed, especially for anything more than one sentence at a time, but it’s handy to be able to get the main content down and then just fix up a few words here and there.
These ideas are typically then left in my Evernote inbox. During my weekly review I review, tag and process them. As long as they are captured safely I can forget about them and review all my ideas at any time.
Actions
All the information in the world can exist at your fingertips, but it’s what you do that truly matters. Actions, tasks and reminders are synonymous to me – they all represent something that needs to be done at some point. Just like ideas, I am often struck with thoughts about things I need to do. This can happen at unexpected times, or when reviewing the aforementioned content and ideas (or even other actions). To capture these actions and then review and refine them later I use Asana.
When something I need to do is realised I grab the device nearest to me (either my computer, or mobile device) and, using Asana I create a new task. Depending on the amount of time available there and then I will either put the task in the appropriate project(s) and complete other details, or leave the task in my personal queue with basic details, allowing me to review when I have more time and make any adjustments then.
If you’re looking for a way to manage all the things you need to do, register for Do Better with Asana – a project that’s coming very soon and will help you (and your team) do great things!
Summary
Through all these different types of things that I capture the constant is the immediacy of their capture to a safe environment, a place that I can trust and can come back to as and when I like. When you’re looking for the right way to capture your content, ideas and actions, irrespective of what tools you choose, make sure that immediate availability is paramount. It is the most important thing to have with you so that you can build your trusted system, because, really, can your memory be trusted? Mine certainly can’t – just ask Mrs Cloud Productivity 
How I Capture Content, Ideas and Actions is a post from: Cloud Productivity
Oh, one last thing... have an AWESOME day!


July 17, 2014
How you can stop asking “When’s it due?”
You know how it goes… You are given a task and the first thing you ask is “when is this due?” Often there is no due date, it just needs to get done at some point. Or, you are given a due date, but one that has no weight behind it and when you question as to why it is due by then the answer comes back as “just because.” That’s helpful (sarcasm).
Many task management tools give you the option to set a due date for each task. When I first introduce people to actually creating a task list, they quickly add due dates to everything based on when they want to have it done by. Absolutely every single task. This approach is incredibly granular and the result is messy. After setting due dates on everything, what happens is that you end up with too many tasks “due” on the same day. Very quickly the task list, which seemed like a really good idea at the time to help you get over the feeling of overwhelm, feels overwhelming. All these deadlines and tasks that are overdue constantly staring you in the face, demanding your attention. It’s enough to make you want to throw in the towel and resort to older methods of no task management system at all! Chaos!
For me, at least, it all comes down to prioritization and areas of focus. Instead of adding a due date to everything and then watching the storm of tasks bear down on me, I leave 80% of my tasks without a due date. Only those tasks that need to be done by a certain day, not on a certain day warrant a due date from me. Those tasks that are to occur on a certain day are not really tasks. They are events and belong in a calendar. However, those events may have tasks related to them that are indeed due by the date of the actual event. An example of this would be preparation for a presentation or meeting.
With 80% of the tasks in my list staring at me wondering when they will get some love, I organise those on a weekly basis as part of my Weekly Review. During this time I review every task on all my lists and for each of them I decide when I wish to work on them. Not a specific day, but a timeframe. Those tasks that I need to make progress on in the following week are added to my “Upcoming” list while everything else is added to my “Later” list. Each day in the following week I spend just 5 minutes reviewing my “Upcoming” list deciding what are three top tasks are for the day. These tasks are then moved up to my “Today” list, and that’s where my focus lies for the day. When all the tasks on the “Today” list are completed, if time permits I go back to the “Upcoming” list and pick another one that I can get done.
So, “when is it due?” is not always the right question to ask. A better question to ask might just be “when do I want to focus on this?” Now you have control over the task instead of the person that gave the task to you. And once you’re in control that ugly beast called “overwhelm” is easier kept under lock and key.
I use Asana to maintain my prioritization lists. Managing multiple lists and prioritising your focus with Asana is easy to do and incredibly effective. If you’d like to learn more about how you can do this and much more with one incredible tool, check out Do Better With Asana.
How you can stop asking “When’s it due?” is a post from: Cloud Productivity
Oh, one last thing... have an AWESOME day!


Jeremy Roberts's Blog

- Jeremy Roberts's profile
- 12 followers

