Joseph Classen's Blog
May 25, 2022
Food Shortage 2022 Solutions – Eat the Enemy – Asian Carp
Desperate, troubling days are upon us my friends. We have record-high gas prices, crushing inflation, division and chaos all throughout the land, and a broken supply chain. As a result, there are many empty shelves at grocery stores and sky-high prices on what remains. Indeed, many Americans across the country are greatly struggling to keep food on the table. While politicians and news commentators continue to fight and squabble relentlessly, not much is getting done in the meantime to alleviate any of these serious issues which are economically crippling so many people. When you head to the market, there’s a good chance you’ll find little to nothing in the way of fresh, healthy meat and fish, and what you do find will no doubt be crazy expensive at the moment. But let me ask you this, did you know that there’s currently an unlimited supply of one of the world’s healthiest and most delicious fish running rampant throughout America which is mostly going to waste? It’s the silver and bighead Asian carp. Let me tell you all about it.
Asian Carp Epidemic
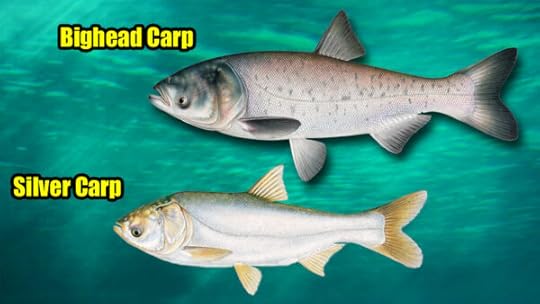
If you’re not familiar with the issue, the Asian carp epidemic is an ecological disaster that has infected the major river systems, lakes, and surrounding wetlands of America. From southern Florida to the Canadian border, Asian carp are ravaging ecosystems, destroying native fish populations and wildlife habitats, and now threaten to enter the Great Lakes. These invasive species have also negatively impacted regional economies that depend on renewable natural resources for their financial health.
After researching the issue for many years now, as well as writing a book on the topic, I learned that natural resource experts all across the county firmly believe that a major solution to decreasing the Asian carp population was for folks to start actively utilizing this resource. That is, to eat the enemy! But unfortunately, there’s a great deal of false, negative stereotypes and genuine misinformation that has kept people from doing so.
The Truth About Asian Carp
Unbeknownst to most Americans, the truth is that the silver and bighead species of Asian carp are among the most nutritious and delicious fish in the world! In thousands of blind taste tests, people preferred Asian carp almost unanimously to other popular eating fish. And, because they’re filter feeders who consume microscopic plankton, they don’t have nearly the high levels of mercury and other contaminants that most other fish do, making them a very healthy choice for regular consumption, even when caught out of not so clean and healthy waters.
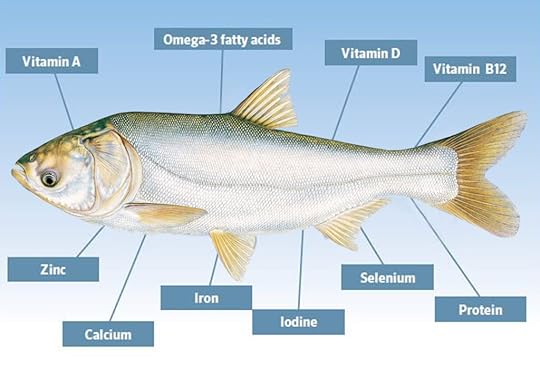
Asian carp are low in sodium, rank among the highest of all fish in dietary protein, and are exceptionally rich in antioxidants, minerals and vitamins, particularly vitamin B12, and zinc. These incredible fish also are among the highest in heart-healthy Omega 6 and Omega 3 fatty acids…even more so than salmon, according to some studies. The taste and texture of silver and bighead carp is a beautiful, white, flakey, mild flesh, similar to cod and even crab, which easily absorbs the flavors of whatever herbs, spices, and sauces that are used in preparing it.
Now it is true that catching these fish can be a little challenging, as again they are filter feeders, so they typically don’t go after the types of baits or lures that are commonly used for fishing. However, there are many alternative fishing methods that you can use that are very effective, and a heck of a lot of fun! It’s also true that Asian carp have a unique Y bone structure that can make them difficult to process, but there are ways to quickly and effectively remove the bones, that is, if you insist on eating boneless fish. But when cooked as is, the bones come out very easily.
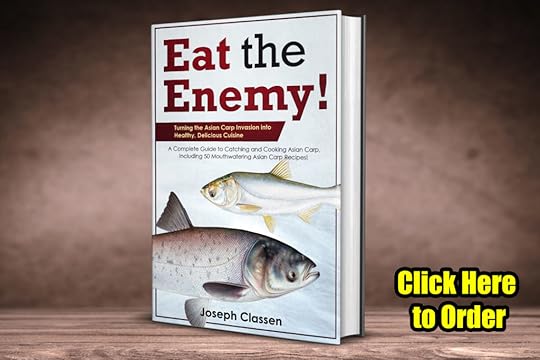
I’ve made many videos about a wide variety of Asian carp topics that you can check out at the Wild Revelation Outdoors YouTube channel, or read about here on the Wild Revelation Outdoors blog, but the best place to learn everything you need to know is in my book Eat the Enemy, which is a complete guide to catching and cooking the Asian carp and includes 50 delicious Asian carp recipes.
Check out the video below to see more…
The post Food Shortage 2022 Solutions – Eat the Enemy – Asian Carp appeared first on Wild Revelation Outdoors.


May 18, 2022
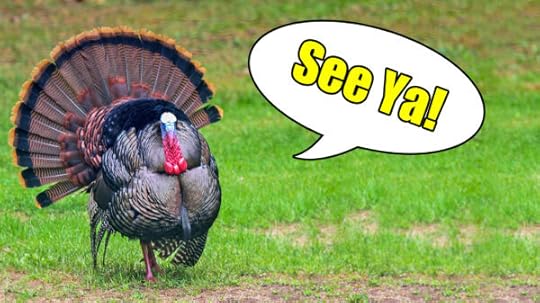
Wild Turkey Recipe – Bacon Wrapped Honey Jalapeno Wild Turkey Strips
In this blog and video, I’ve got another delicious and super easy wild game turkey recipe for you, Bacon Wrapped Honey Jalapeno Wild Turkey Strips! Now of course, you don’t specifically have to use wild turkey, as domestic, store-bought turkey will work just fine too, but if you’re a turkey hunter looking for a fast and easy way to cook up some of your bird, then you’ll definitely have to give this recipe a try.
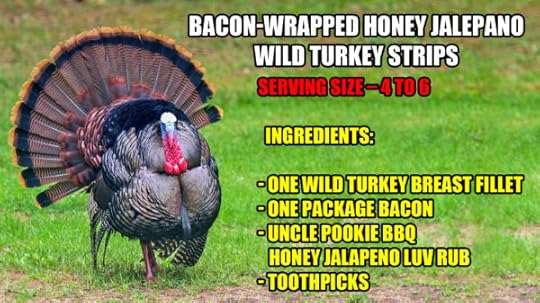
Bacon-Wrapped Honey Jalapeno Wild Turkey Strips
Serving size – 4 to 6
Ingredients:
One Wild Turkey Breast FilletOne Package BaconUncle Pookie BBQ Honey Jalapeno Luv RubToothpicksStep #1
Go turkey hunting! Or, get one from the store.
Step #2
Cut turkey breast fillet into 1-inch x 3 to 4-inch strips. You can make them longer if you’d like, but try to keep the thickness around one inch so they cook evenly and thoroughly.
Step #3
Coat turkey stips heavily with Uncle Pookie BBQ Honey Jalapeno Luv Rub. Click here to order some. A friend of mine introduced me to this product recently and it’s fantastic! It’s not super hot or spicey either as the jalapeno flavor is fairly mild.
Step #4
After your turkey strips are rubbed down heavily with the seasoning, cut your package of bacon in half, use one-half strip of bacon to wrap around each strip, and keep it in place with a piece of a toothpick on each end. Just be sure to let your guests know about the toothpicks so they don’t bite into one. Wild meat of any kind is very low in fat and tends to dry out when cooking, so I like to think of the bacon as a heat shield for the turkey strips to help keep the moisture in, but of course, the bacon also adds a wonderful flavor! Yes indeed, everything tastes great when wrapped in bacon!
Step #5
After your turkey strips are all assembled and ready to cook, you can bake them in the oven at 355 degrees or grill them over medium to low heat. As far as cooking time, when the bacon is brown and fairly crispy, your turkey strips will be done. Typically 15 – 20 minutes should be fine. But keep an eye on them so you don’t over or undercook them.
Enjoy!
And that’s it! Serve them nice and hot either as is or with your favorite dipping sauce and you’ve got a fantastic meal that the whole family will enjoy.
Check out the video below to see more…
The post Wild Turkey Recipe – Bacon Wrapped Honey Jalapeno Wild Turkey Strips appeared first on Wild Revelation Outdoors.
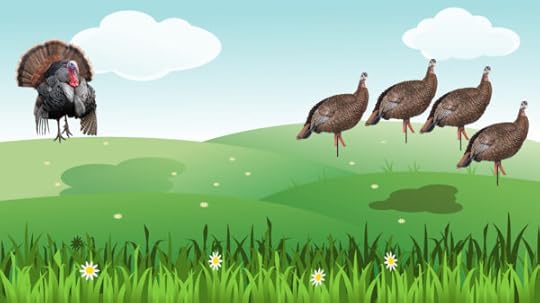
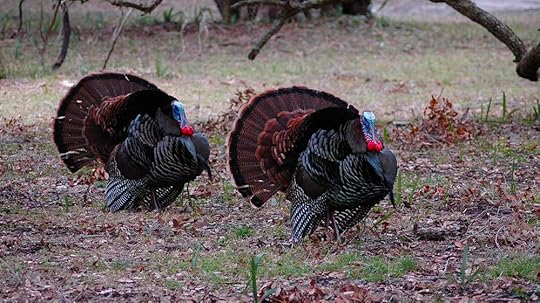
Turkey Hunting Tips – Should You Use Turkey Decoys – Yes or No?
Yes indeed, it’s an age-old question that virtually every turkey hunter faces, especially beginners, “Should I use turkey decoys on my hunt or not?” After turkey hunting for close to three decades now, I still sometimes struggle with that choice. However, experience has taught me that there are many situations in which it’s best to leave the decoys behind. In this blog and video, we’ll have a look at the positives and negatives of using turkey decoys, what turkey hunting scenarios are best to use decoys, and which ones are not. I’ll cover a variety of turkey decoy tactics, turkey decoy setups, and turkey decoy strategies that have been used by many successful turkey hunters for generations.
My turkey hunting career got off to a rocky start. I started pursuing those crafty birds in my home state of Missouri in my early 20s, however, I didn’t experience much in the way of consistent success until I was in my early 30s. It’s a long story, but whenever I went turkey hunting, something would always go wrong. From extreme weather to wild dogs, virtually every time I headed to the woods my hunt would get sabotaged. You can read all about it in my Hunting for God books. It was an unbelievable run of really bad luck, but, none of that deterred me. I just loved getting out there and going after those big dirty birds. And, during all the time in the woods throughout those unresourceful years, I got a very thorough education in the ways of turkey communication and turkey behavior, all of which paid off big time in the years that followed once my turkey hunting curse was finally broke.

During my early days of turkey hunting, I watched tons of TV shows and videos where the hunter would locate a big gobbler the evening before the hunt, head out to the woods first thing in the morning, set out a few decoys in the vicinity of the roosted bird, and as soon as the sun came up the big tom flew off the roost, came right into the hunters calling, walked right up to the decoys, and game over! In my almost 30 years of turkey hunting, I’ve only had a few hunts that worked out so perfectly. Throughout those years I’ve had little trouble locating birds and calling them in, but most of the time that I’ve used decoys I’d go home empty-handed. In fact, many of the times that I’ve used turkey decoys I’d attract everything except turkey! I’ve had countless coyotes come in and pounce on my decoys, I’ve had eagles and owls come in and take a look at them, and I even got the attention of a herd of elk once…which is something I made a past video about.
When and Why Decoys Don’t Work
Now before I get into talking about when and why decoys may or may not work, please keep in mind that these are generalizations. There are times when those crazy birds will break all the rules and do things you never would have expected. Regarding when and why turkey decoys generally don’t work so well, especially on spring hunts, the bottom line is that when going after a wise old gobbler the natural order of things is for the hen to go to the tom, not the other way around. When a mature male turkey makes visual contact with a receptive hen, he usually stops where he is and waits for that hen to come a-runnin’. And if she doesn’t, most of the time he’ll get impatient and leave.
As an example, last year during a spring hunt I located a big tom the evening before the hunt, went out the next morning and set up a hen and a jake decoy in a wide-open area within shotgun range, and called that tom in as soon as he came off roost. He worked his way out of the thick woods and came out into the open area where my decoys were, but as soon as he saw them, he would not budge an inch further! He gobbled and gobbled and strutted around for quite some time but stayed hung up well out of range. I was hoping the jake decoy would make him jealous and bring him in further to the decoys, as that does sometimes work, but he didn’t care. If the hen he thought he was seeing and hearing didn’t come to him, then he simply wanted nothing to do with her. Again, this is a very common behavior, as the natural order of things is for the hen to go to the tom.
I went back out a few days later to hunt the same bird in the same location, but this time I left my decoys at home. I snuck into the area first thing in the morning and sure enough, called him in within the first hour of sunlight. As he was getting closer and closer, I stopped calling and let him hunt for me. Sure enough, as he gobbled his way through the woods looking for the hen he was hearing, he came right into shotgun range, as there was no decoy to make him hang up. I had to do a little belly crawling to get into a better shooting position, but I was indeed able to close the deal on that beautiful double-bearded gobbler. While mature toms can definitely hang up with or without decoys, I’ve found that you have a much better chance of filling your tag by leaving the decoys behind and using your turkey calling techniques in a manner that makes the gobbler come looking for you. But be ready! You never know when or where that gobbler will show up. As he hunts for you, sometimes he’ll go quiet, he may sneak up right behind you, or pop out from a place you least expect.
When Decoys Do Work
As I’ve already mentioned twice in this article, the natural order of things is for a receptive hen to go to the mature gobbler, not the other way around. And again, this is why many mature toms will hang up on spring hunts and keep their distance from decoys. With all that being said, however, there are some scenarios in that strategically using decoys can definitely increase your chances for success. Ultimately, the choice is yours. This blog is certainly not meant to be anti-decoy. It’s simply intended to give you a little more knowledge as you consider your options. As a few preliminary tips for turkey decoy tactics, be sure to use the most realistic decoys you can find and afford, set them up well within your shotgun range…typically 20 yards or so…and also be very careful with turkey decoys if you’re hunting on public land, especially if you’ll be using a tom decoy. So with those considerations in mind, here are some tried and true turkey decoy tactics.
Lone Hen
Using one single hen decoy in hopes of bringing a mature gobbler into range is a commonly used tactic, but as we’ve just seen, it’s often not all that effective, as a big tom will commonly hang up as soon as he sees it. Juvenile gobblers, known as jakes and other hens may come right into a single hen decoy to investigate, which is a good thing if you are after such birds and they’re legal to harvest in your area, but again, the lone hen set-up is not always the best for a big mature bird. Now one major exception to the rule is if you can set up a hen decoy in a manner in which you can cut a gobbler off at the pass.

For example, if you’re hunting an open field and you know for certain that a gobbler is going to come in from a roosting area on the left, you could set up a hen decoy at the far right and position yourself in the middle. If all goes well, the gobbler may hear your calling, see the decoy at the other end of the field, and come in a little closer to try to get what he thinks is the hen’s attention. Thus, there may be a chance to get a shot as he’s moving in. But, you’ll have to be careful with your calling and cease as soon as he sees that far-off decoy. Otherwise, he very well may pinpoint your location and think you’re a hen that’s closer than the one he sees and then hang up.
Flock of Hens
If you’re hunting turkey in the fall, or in the early spring months when birds still gather and travel in large flocks, using several different hen decoys to imitate a large group of birds can be a very effective way to bring in both toms and hens, especially if you use feeding calls in conjunction with your decoy set up. Hungry or curious turkeys will come in without much hesitation if they see and hear other birds having a feast. I made another video on this calling technique if you’d like to learn more, click here to check it out.
Another way to utilize a small flock of hen decoys is to position them in a manner in which it looks like they’re about to exit an open area and head back into the woods. If a desperate gobbler sees his ladies about to leave him behind and he thinks they don’t see him, there’s a chance that he may come rushing in fast to catch up with them to get their attention. But for this to work, the tom has to be approaching from behind the flock. If he comes in from the front in a manner in which he’s facing them, he very well may hang up and eventually leave.
Jake Decoys
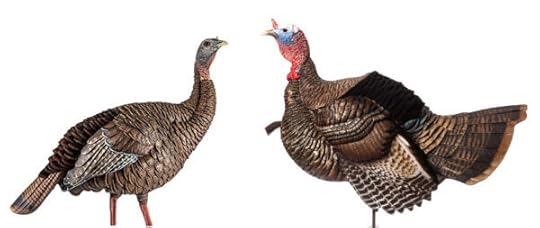
A “jake” is a juvenile male bird, and normally if a dominate gobbler who is desperately looking for a lady sees a young punk jake moving in on the hens, he’ll typically get jealous and aggressively come in to run off that subdominant young bird who’s trying to steal his date. A jake decoy can be added to a lone hen or a group of hen decoys to greatly increase your odds of success. A jake decoy can also be used in conjunction with a mature tom decoy to imitate a pair of male birds fighting for dominance. This can work to bring in the big king gobbler, but it may also scare away less aggressive gobblers who aren’t looking for a fight.
Tom Decoys
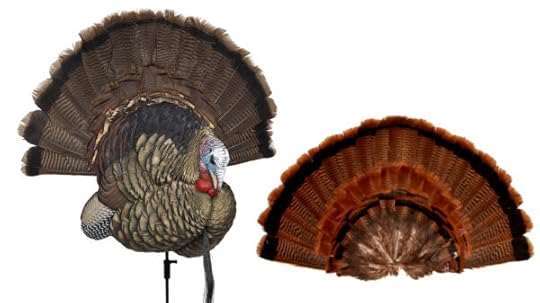
Again, a mature tom decoy or even the use of a tail fan from a mature tom can be used in conjunction with a jake decoy to imitate a fight to bring in an aggressive, dominant gobbler. You can also use a tom and a submissive hen decoy combo to imitate a breeding or attempted breeding scenario, which again can be effective at bringing in the big king turkey.
Wrap Up
There are many other ways that you can utilize turkey decoys and you should certainly feel free to use your imagination, but the tactics and scenarios I just covered here are among the most common and have proven themselves time and time again for many hunters. Trying out new tactics and tricks is half the fun of turkey hunting really, so get out there and do some experimenting for yourself, take note of what works and what doesn’t, and as always, be careful and enjoy your time in the turkey woods. If you’d like to shop online for some great turkey decoys, click here.
Check out the video below to see more…
The post Turkey Hunting Tips – Should You Use Turkey Decoys – Yes or No? appeared first on Wild Revelation Outdoors.
April 30, 2022
Rainwater Harvesting – Rainwater Collection System for Under $100
Over the last couple of years, my family and I have planted several new trees, including some fruit trees, a pretty good-sized garden, and a whole bunch of blueberry bushes around our house. As you can imagine, it takes quite a bit of water to keep all those trees and plants properly hydrated to ensure that they grow up big and strong and produce abundant fruit. To help reduce our water bill for the hot summer months ahead as well as make use of the bountiful resources that God provides through nature, I decided to rig up a rainwater collection system in my backyard. It was super easy to do, I had it up and operating in about an hour, and when it was all said and done, it cost me less than one hundred bucks to get it all going. In this blog and video, I’ll share with you an overview of the project to hopefully inspire you to do something similar yourself.
Why Harvest Rainwater?
Many homeowners don’t realize that every time a good rain shower comes their way hundreds of gallons of water come off of their roof and flow out onto the ground or simply go down the drain. Meanwhile, depending on where you live, you can get hit with a very expensive bill each month for using that same amount of water, or far less, for doing things like watering your lawn or your garden. Thus, many homeowners across the land have begun harvesting rainwater to use for utility purposes, or to store as emergency drinking water, which does require the extra step of using a filter system such as a Berkey water filter. In fact, many folks who live off-grid in places like the Alaskan bush use rain, nearby creeks, rivers, or lakes as their primary water sources and then run it through a Berkey water filter or similar systems.
But no matter where you live, don’t forget that in the event of a disaster or survival situation where resources are limited, clean water is the most important thing you’ll need, besides air and adequate shelter. While so many people tend to focus on storing up tons of food or even guns and ammo for a survival scenario, you’ll be dead in about 3 days if you don’t have clean water to drink, whereas you can go for 3 weeks or more without food. So no matter if you want to harvest rainwater for the garden or for your family to drink, a rainwater collection system is very easy to set up and use. Here’s an overview of the one I made to give you some ideas.
Rainwater Collection System Overview

I set up my rainwater collection system in the backyard under a relatively small tin roof that covers a patio area. It has a gutter downspout on each side where I set up my collection barrels. I bought two 55-gallon drums that had spigots attached for $50 from someone in the area who had several on hand that they were selling. You can buy these new for around $80 – $90 apiece, (or significantly more!) but I’d be willing to bet that you can find plenty of used ones in your area on Craigslist, eBay, Facebook, or other online marketplaces that will work just fine and for a very reasonable price. But very important though, be sure that the ones you buy didn’t have any fuel or toxic chemicals in them.
After getting my barrels and washing them out good, I set up an elevated stand for each one so I can get buckets under them to easily fill up as well as to better utilize gravity when attaching a hose. I was originally going to build my stand from some treated lumber, which is very expensive at the moment, so I decided on some cinder blocks instead, which cost me less than two bucks apiece. The ground was a little uneven where I set up my stands, so I used some gravel to level things up and simply put a couple of scrap boards across the blocks.
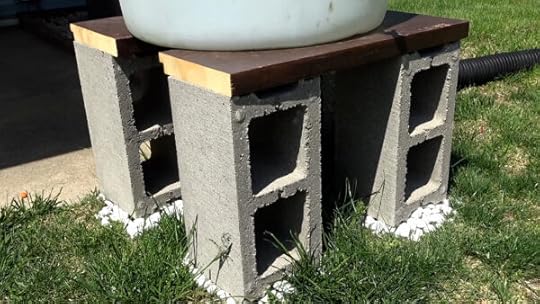
The next step was to rig up the flow of water to each barrel, so I cut the downspouts off a few feet above each drum and attached some flexible downspout sections with some zip ties and sheet metal screws, all of which cost me about $25.00 total. Another important step was to make sure that big leaves and debris didn’t get into my drums and clog up the spigot, so I devised a simple filter system by cutting sections of gutter screen to fit inside the holes on the top of the drums where the water goes. And that’s basically it for the whole system. It cost me a grand total of around $95.00 and took me no more than an hour or so to set up.
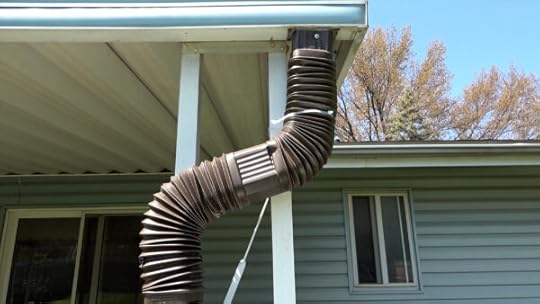

Now if you live in an area where you’re prone to flooding and torrential downpours on a regular basis, you may want to have an overflow drum or two standing by, or simply have some gutter and drain attachments handy with which you can divert water away from your house after your drums are filled. After it’s all rigged up, simply wait for the rain. One good rainstorm filled up both my barrels in an hour or two, which came to 110 gallons of free water to use for my garden immediately.
Check out the video below to see more!
The post Rainwater Harvesting – Rainwater Collection System for Under $100 appeared first on Wild Revelation Outdoors.
April 25, 2022
Turkey Calling Tips – Use Multiple Turkey Calls
The wild turkey has a unique langue all its own and they can be quite vocal, especially during the spring mating season which also coincides with the primary turkey hunting season in many states throughout the county. The many sounds that turkeys make isn’t the primary focus of this blog, but I did make a very extensive video on that topic some time ago if you’d like to learn more. Click here to check it out.
Why Use Multiple Calling Devices?
When you’re going after a crafty gobbler there are many different calling strategies that you can use, but no matter what kind of calls you utilize it can be very effective to make those calls on a variety of different calling devices, individually, and even at the same time.
As an example, I use three main calling devices when I head to the turkey woods: a slate call, a box call, and a diaphragm call. Each of these calls has a different tone, a different level of volume, a different overall character, and most importantly, a different frequency. Sometimes a turkey that I’m trying to call in will completely ignore me when I use a diaphragm call and then sound off immediately when I switch to a box call or a slate call. And, sometimes it happens the other way around. The bottom line is that you just never know what sound and especially what frequency will make a gobbler respond, as every bird can be different. Thus, it’s always important to have several different calling devices with you and know how to use them well.
Also, another tactic that you can use when you have several different calls is to sound like several different birds. As another example, if I have a gobbler who doesn’t want to come in, I’ll often sweeten the deal by trying to sound like not just one lone hen, but a whole flock of hens. I’ll run my slate call while using a diaphragm call for a few calling sequences and then switch over to my box call and diaphragm call combination to sound like a whole bunch of different birds. And, depending on the situation, I’ll sometimes finish that sequence with a gobble call to try to make the Tom jealous. Using multiple calls in this manner is also a very effective calling strategy for fall hunting scenarios when I’m trying to sound like a whole flock of turkeys that are feeding or milling around in the area.
Check out the video below to see (and hear!) more…
The post Turkey Calling Tips – Use Multiple Turkey Calls appeared first on Wild Revelation Outdoors.
April 20, 2022
Asian Carp Fish Jerky Recipe – Cajun Carp Jerky
In this blog and video, I’ve got another delicious fish recipe coming your way: Asian carp Cajun jerky! You heard right…I’m talking about jerky made from silver and bighead Asian carp, which unbeknownst to many people are two of the most delicious and nutritious fish in the world, despite being a highly destructive rampaging invasive species here in America. This is an easy recipe that anyone can make and all you deer hunters out there who make your own jerky from ground venison will be quite familiar with the process.
Eat the Enemy – A Complete Guide to Catching and Cooking Asian Carp -by Joseph ClassenThere are two basic ways that you can make jerky, and that is the whole muscle method where you cut fish or meat into thin strips (which I did a past video about), or the ground method, where you make your jerky from ground meat or fish. Asian carp is a rather boney fish. And while there are effective ways to remove the bones, another option for recipes like fish burgers and in this case fish jerky, is to simply grind the fillets up with a meat grinder and a fine grinding plate, which is what I’ll be doing for this recipe.
Asian Carp Fish Jerky Recipe – Cajun Carp Jerky
Step #1
As a first step, remove the skin from your fillets, remove the dark meat from the back, which are the low twitch muscle fibers than can give fish a strong flavor, and then run the fillets through a meat grinder twice using a fine grinding plate. Running the fish through twice will help ensure that all the bones are ground up and mixed in well with the fish, which also provides an added boost of calcium to your finished product.
Step #2
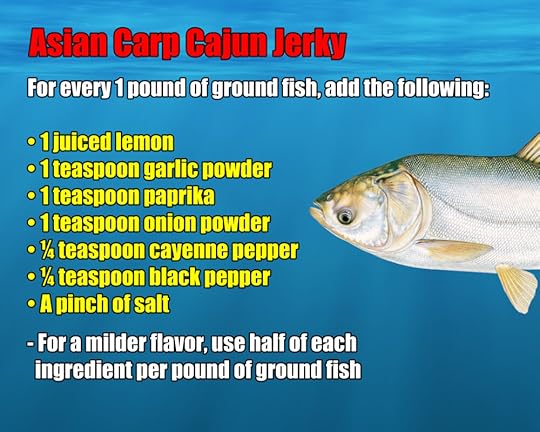
For the Cajun-style seasoning for this jerky recipe, add the following ingredients to each pound of ground Asian carp:
For every 1 pound of ground fish, add the following:
1 juiced lemon1 teaspoon garlic powder1 teaspoon paprika1 teaspoon onion powder¼ teaspoon cayenne pepper¼ teaspoon black pepperA pinch of saltNow this is a rather spicy recipe and it does have a fair amount of kick to it, so if you want a milder flavor, I recommend cutting the ingredient amounts in half per each pound of ground fish.
Mix in all the ingredients together thoroughly in a large bowl, place in a strainer of one kind or another, cover with plastic wrap, and refrigerate overnight in order to both marinate the fish and drain out any excess liquid, which is very important.
Step #3
For this step, you’ll need a jerky gun of one kind or another and a quality dehydrator. I’m using the LEM Jerky Cannon and a Cosori dehydrator which both work great for making jerky of any kind. Load up the ground, marinated, strained Asian carp in your Jerky Cannon, and carefully shoot out some strips that are long enough for your dehydrator trays. Make sure you leave a little room between each strip for optimal airflow and then put your trays in the dehydrator. Dying time and temperature will depend on what kind of dehydrator you’re using as well as the thickness of your fish strips, but I’m drying out mine at 145 degrees (which is a recommended temperature for fish in general) and it took a little under 4 hours to do this batch.
After it’s all done, let the jerky thoroughly cool down, carefully remove it from the racks, put it all in a bag to share with others, and then gobble it up! Well there you have it my friends, that’s yet another Asian Carp recipe for you to try out. If you’d like to learn lots more about how to catch, clean, and cook these fish, check out my many others videos on those topics and be sure to get a copy of my book, Eat the Enemy, the complete guide to catching and cooking Asian carp.
Check out the video below to see more…
The post Asian Carp Fish Jerky Recipe – Cajun Carp Jerky appeared first on Wild Revelation Outdoors.
April 13, 2022
Fly Fishing for Beginners – Part 8 – Fly Casting Basics
Welcome to episode #6 in the Fly Fishing for Beginners blog and video series. To quickly recap what we’ve covered so far, in episode #1, I answered the question, “What is fly fishing,” as there are many misconceptions. In episode #2 we explored the fascinating history of fly fishing. In episode #3 we looked at the wide variety of fish that you can catch with fly fishing. In episode #4 we covered how to find places to go fly fishing in your local area. Episode #5 was about essential fly fishing gear. Episode #6 was how to set up some of that gear…more specifically, your backing, fly line, leader, and tippet. Episode #7 was about the types of flies used for fly fishing and fly categories, including dry flies, wet flies, streamer flies, poppers, and saltwater flies. And in this 8th and final installment, I’ll share with you the basics of how to fly cast. Before we get going here, please note that the accompanying video way at the bottom of this article will visually demonstrate many of the topics I cover in this blog, so if you’re more of a visual person, you can cut to the chase and simply watch the video here.
Casting a fly rod is quite a bit different from casting other types of fishing rods and it is perhaps the greatest barrier that keeps people from getting into fly fishing. Many folks see experienced fly fishermen gracefully casting their rods with tremendous beauty and perfection and they say, “Forget it! I can’t do that!” Well my friends, I’m here to tell you that you can do that! You simply need to learn the fundamentals, and then patiently practice them. During my time working as a fishing guide in Alaska I’ve had many clients who thought there was no way they could ever learn to fly fish, yet within just a few short hours, they were casting like a pro and catching lots of fish.
If you’ve ever seen the famous movie A River Runs Through It, which I highly recommend and which has inspired many people to take up fly fishing, you may recall the scenes in the movie in which the Rev. Maclean is teaching his sons to properly cast a fly rod. The methods featured in the movie were indeed based on decades of traditional fly-casting instruction, such as imitating a metronome and casting from 10 o clock to 2 o clock. Other time-honored fly-casting models include the hammer analogy as well as the apple on the stick method. Both these classic teaching models ultimately focus on the proper grip, acceleration, momentum, and the abrupt stop in motion that are all utilized in casting a fly rod.
Keep in mind, when you cast a spinning or a baitcasting rod, you essentially fling the rod with as much force as possible to get the lure or bait moving, and then the weight of the lure or bait keeps the line coming off the reel and moving to its target until at last the momentum is gone. With fly fishing, you’re often using tiny little flies that weigh next to nothing, so what you’re actually doing with a fly rod is not casting the fly, but rather you’re casting the fly line, of which your fly is at the end of. Thus, the different mechanics of fly fishing tackle requires a different method of casting. And this is often the first place that many folks run into trouble: they try to cast a fly rod in the same manner that they would a spinning or baitcasting rod, which only leads to great frustration.
Fly Casting Basics – What NOT to do!
Casting a fly rod is all about the right combination of timing and momentum and learning to execute that timing and momentum properly in a variety of fishing scenarios. Let me start things off here by addressing what not to do when casting a fly rod, as these are the most common mistakes that people make which lead to frustration and ultimately failure.
The Buggy Whip – First of all, don’t try to cast your fly rod as if it were a buggy whip. A common mistake people fall into when starting out is to make a nice slow backcast…which is essentially correct…but then they whip the rod forward with an exaggerated snapping motion, which results in the fly line piling up right in front of you and not going anywhere. The only time you might use this buggy whip motion is to get some line off your reel or your leader through the guides when preparing to make your first true cast.
The Windshield Washer – Another common mistake people make is to cast in a motion similar to a windshield washer – making long, sweeping casts all the way back…almost to the point of their rod touching the ground behind them…and then casting all the way forward, until their rod tip touches the ground or the water. This too will result in your fly line, and ultimately your fly, going nowhere fast, except maybe in your hat or stuck in your ear!
Slow Down! When folks get stuck in these two primary bad habits, the tendency is to cast faster and harder, as one would do with a spinning or baitcasting rod, but which also only makes things worse and more frustrating with a fly rod. With fly casting, you have to learn to do the opposite of what you think you should do in order to overcome a lot of those bad habits and develop the proper technique. You have to learn to cast slower and softer to make those long, beautiful casts with a fly rod.
Loading and Unloading the Rod
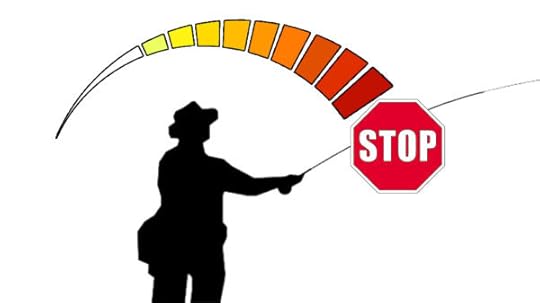
Casting a fly rod properly is all about what’s referred to as loading and unloading your rod. When you make a backcast and the rod bends backward, you are loading energy into the rod, which is then released when you make a forward cast and the rod bends forward, resulting in launching the fly line, leader, and fly forward to your target.

Again, the key to basic casting is learning how to load and unload your rod by properly timing the acceleration, momentum, and the abrupt stop of your cast. And while you don’t want to fall into the bad habit of doing the aggerated windshield washer cast, you do want your backcasting motion (when properly executed) to mirror your forward casting motion. A good way to do this is to simply watch what you’re doing when casting. Keep your eye on your rod tip and your fly line during the entire duration of your cast so you can clearly see how long it takes for your fly line to completely level out during your backcast, so you’ll then know exactly how much acceleration, momentum, and time you’ll need for executing your forward cast.
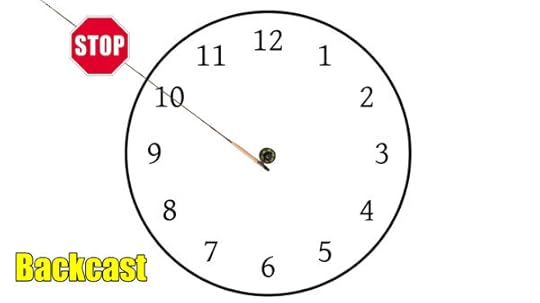
Along with learning how much acceleration, momentum, and time you’ll need to both load and unload your rod, you’ll also need to know when to make the abrupt stop that’s needed in both your backcast as well as your forward cast, as this quick stopping motion is what unleashes the energy you’ve loaded in your rod. While the classic metronome or clock face model is not used all that extensively by many fly casting instructors these days, I find that it does give people at least an idea of where they should make that abrupt stop during both the back cast and forward casting motion, although it will vary slightly from person to person based on their body structure as well as the particular fly rod and fly line that they’re using.
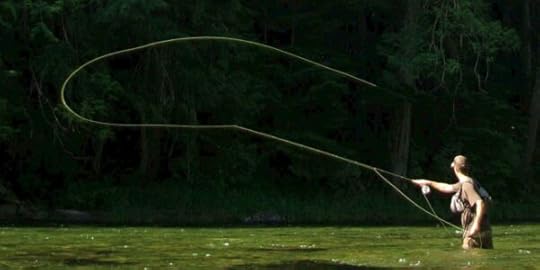
The Basic Forward Cast
With everything I just shared as an introduction, let’s now put it all together and learn how to do the basic forward cast, which is what you’ll probably be using the majority of the time you’ll be fly fishing. To begin, find a place where you have lots of room to practice such as your backyard, an open field at a park, or even a small pond where the water is calm and there’s nothing behind you that you’ll easily snag with your fly line when practicing. Tie a small piece of yarn or cloth to the end of your fly line or your leader as a practice fly and grip your fly rod handle as if you were firmly shaking someone’s hand, with your thumb toward the top of the handle…not completely wrapped around it like a baseball bat.
For practice purposes, you’ll only want ten to fifteen feet of fly line out to start casting with. This is where a little of that buggy whip motion may be needed to get some line off your reel. So after you have ten feet or so of fly line out in front of you in a relatively straight line, hold on to the fly line near the reel with your opposite hand in a comfortable position and then begin your back cast. With your wrist locked as if holding a hammer and using primarily your elbow and forearm, start your backcasting motion soft and slow but with increasing speed and force until it climaxes in that abrupt stop when your rod is somewhere in that 10 0 clock range. Again, especially when you’re just starting out, keep an eye on your fly line and your rod tip and watch everything you do throughout the entire duration of your cast.
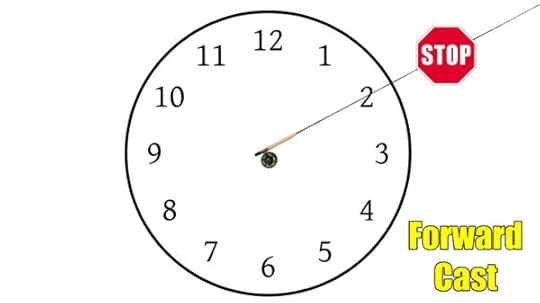
After you make that abrupt stop and your fly line completely levels out behind you overhead, it’s then time to start your forward cast by essentially doing everything you just did in reverse. Again, keep an eye on what you’re doing and start your forward cast soft and slow while increasing your speed and force until stopping your cast in that 2 O clock area. After that abrupt stop, let your line trail out in front of you and gently fall to the ground or on the water. For practice purposes, you can either continue holding on to your fly line with your opposite hand, or you can let it go while your forward cast comes to completion. If your fly line levels out nicely and does indeed land in a relatively straight line in front of you, congratulations! You just made your first successful cast! If things didn’t quite work out so well, it’s simply a matter of patiently practicing until you get the right combination of timing, acceleration, momentum, and that abrupt stop of your cast.
No matter what happens when you’re first learning this basic cast, don’t get frustrated or make that critical mistake of trying to cast faster or harder. Remember, if things are not going so well, you probably need to do the opposite of what your inclination is and cast slower and softer until you get it right. And don’t forget to keep watching what you’re doing at every moment of both your back cast and your forward cast. Much like learning to throw a baseball, with continued practice your hand, eye, and body coordination will eventually all match up and adjust so that you’ll start to consistently hit your target. But go slow, stay patient, and don’t overdo things! Start out with only 10 to 15 feet of line and don’t use anymore until you mastered that short distance cast.
Making Longer Casts
Once you’ve mastered making those short forward casts, it’s time to start making longer casts. The only major difference between a short cast and a long cast is the appropriate increase in all the elements of your cast. You’ll need a more forceful acceleration, a stronger momentum, a longer duration of time, and an even more abrupt stop in your casting motion on both the back cast and forward cast. You’ll also need to get more fly line out, which will be the job of your opposite hand. To do so, first make sure that the drag is set properly on your fly reel so you don’t get a backlash when pulling out more line. Then, in conjunction with your backcasting motion, pull an arm’s length of line off your reel and let it go during your forward cast in sort of a “shooting” motion as it’s called.
False Casting
If you need to get more than just an arm’s length or two of line off your reel in order to get your fly to the intended target, then you’ll need to implement what’s known as “false casting.” With false casting, you’re increasing the amount of fly line you’re casting with by feeding line off the reel with your opposite hand until you have the amount needed to get your fly to the target. When you see a fly fisherman making several casting motions before releasing the line, this is what he or she is doing.
To practice your false casting, start with a repetitive back and forward cast motion…without letting the line touch down…then pull one arm’s length of line off your reel, work it into your cast motion, and then let the line touch down on your target area. Once you’ve got the basic technique down, you can then start practicing with more and more line until you can shoot out many more feet of line and cast longer and longer distances…which all comes back to making the necessary adjustments to the acceleration, momentum, the duration of time, and the abrupt stop of your cast. And again, don’t forget to carefully watch everything you’re doing throughout the entire duration of your cast when starting out.
An important point to remember when false casting is not to let your line hit the water until you’re ready to deliver your fly exactly where you want it. This will take time to develop, but don’t get in the habit of hitting the water with your false casts as a way to measure how much more line you need to get out to reach your intended target…unless you’re simply practicing to get a better idea of your range. If you beat the water to death with your false casting, the fish you’re after very well may get spooked and leave before you have a chance to make a cast that counts.
Roll Casting
Along with the basic forward cast, the roll cast is another one that you’ll most likely use often. The roll cast is very effective in situations where you have don’t have much room behind you for making a regular forward cast…which requires adequate room for your backcast, it’s ideal for situations where you need a fairly short cast, and it’s is also great for rapid-fire casting when you want to repeatedly present your fly to a fish over and over again. To make a roll cast, slowly bring your rod straight up, and after a short pause, initiate a forward cast but with much greater acceleration and a much more forceful stop in order to send your fly line rolling over itself, like an outgoing wave. Now you don’t want to do a buggy whip here, but rather, the idea is to still perform your forward cast with that increasing acceleration and momentum, but in a much shorter duration of time and with a more prominent stopping motion. If you perform the roll cast correctly, your line should roll out completely, ending in a straight line, with your fly right on your target area. Once you master the basic technique you’ll be able to make longer and longer roll casts and a weight forward or triangle taper fly line will also be a big help in making great roll casts.
Line Control
So, you’ve made a beautiful cast right in the strike zone of the fish you’re after. Now what? Well, this will all depend on what kind of fly you’re fishing and the body of water you’re fishing on. You may want to let that fly slowly dead drift through the area with little to no movement at all, you might want to do a slow enticing retrieve to get the fish’s attention, or you may want to strip that fly in quickly to provoke a savage predatory attack! Whatever the case, the key is to properly control your line. No matter what kind of presentation or retrieve you utilize for any given fishing situation, you want that fly to look and behave as natural as possible. For example, if you’re allowing your fly to dead drift downstream through an area where fish are holding, then you’ll want that drift to be as drag-free as possible. If there’s a big wake behind your fly, or your strike indicator, or even the end of your fly line, that’s a sure sign that your presentation is off and you’ll need to make some adjustments.
With fly fishing, you generally make those adjustments to your fly presentation by manipulating or “controlling” the fly line with your hands and/or by moving the rod. You may need to do what’s called “mending” your fly line during a drift, which means to continually flip and roll the line back over in order to maintain a drag-free drift, you may need to slowly let out a little more line while your fly is getting in position, or retrieve a little line to make micro-adjustments to your presentation. All this is a matter of practice that you’ll get a feel for with more experience.
When it comes to adding motion to your fly by doing what’s known as “stripping,” this is a method of retrieving your fly at varying speeds to make it look like it’s casually swimming, injured, or trying to frantically get away. Stripping is common for streamer fly patterns and again is quite effective for more aggressive, predatory fish. To strip your fly, simply pinch the fly line between your thumb and finger of choice to add tension and then pull the line in with your opposite hand with the desired speed and duration. You’ll have a pile of excess line at your feet when stripping, so it’s important to keep an eye on things so it doesn’t get tangled or in the way when you get a strike, set the hook, and start fighting the fish, which is what we’ll take about next.
Setting the Hook and Fighting the Fish
No matter your style or method of fly presentation in any given fly fishing scenario, you’ll need to be able to set the hook fast and effectively when you get a strike, which means to keep a close eye on how much slack line you have out. To set the hook, as soon as you detect a strike either by sight or by feel, give a fast upward or sidewise (depending on the situation) motion with your rod while at the same time pulling the fly line tight with your opposite hand, as seen here. Those two motions working in unison can pick up a lot of slack line and get the hook set fast. And if they can’t, then that’s a sure sign that you have too much line out. Finding the proper balance between having enough line off the reel to manipulate your fly presentation and quickly setting the hook is something that you’ll have to experiment with. But like everything else we covered, you’ll quickly get the hang of it with the more experience you get.
Once the hook is set, it’s time to fight the fish! How you fight and land the fish will depend on the size of the fish as well as the situation. If it’s a small fish, you might be able to simply pull in the fly line and land the fish without even using the reel. If it’s a big, strong fish, it’ll no doubt make some runs and pull out some extra line. Like all fish fights, its a careful tug of war in which you don’t want to put too much pressure on the fish which may result in breaking your tippet or leader and losing the fish, and you don’t want to put too little pressure on the fish and needlessly prolong the fight. Doing so may result in totally exhausting and ultimately killing the fish, which is not good if you’re catch and release fishing. As I mentioned in a previous episode, be sure that you’re using the appropriate rod weight for the fish you’re pursuing, as your rod is what essentially does the fighting by absorbing the shock of the fish on the end. The drag system on your reel also plays a major roll in applying the right amount of pressure to tire the fish. So keep your rod tip up, make sure the drag on your reel is set appropriately while battling your fish, and hold on. Once more, this is all something you’ll get the hang of with more experience.
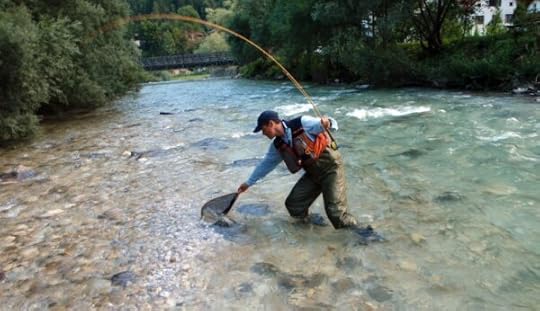
When your fish is ready to land you can scoop it up in a landing net, or just gently bring it to the bank. If you’re catch and release fishing, it’s good to use a net with soft rubber mesh to not damage the fish’s skin as well as barbless hooks, which make getting the hook out much easier and won’t damage the fish’s mouth. If the flies you buy or use don’t come tied on barbless hooks, you can easily flatten the barbs with a hemostat or small pliers. If you’re going to keep your fish to eat, you don’t need to be so gentle. But you do need to ethically kill and then bleed out your catch as soon as possible. I did a recent video on this topic if you’d like to learn more.
Wrapping Up
There is obviously a lot more to fly fishing than what I’ve covered in this blog and video series and in this particular installment, but I hope I’ve given you enough information to get started. As I mentioned serval times throughout this series, fly fishing is a lifelong journey and it is truly an “art.” Like all great artists, as you learn more, get more experience on the water, and refine your technique, you’ll develop your own unique fly fishing style as well as your own philosophy and approach to fly fishing. In time, your fly rod will become an expression of who you are and a catalyst for gaining knowledge, learning new skills, exploring new places, having a heck of a lot of fun, and making memories that will last a lifetime!
Check out the video below to see and learn more…
The post Fly Fishing for Beginners – Part 8 – Fly Casting Basics appeared first on Wild Revelation Outdoors.
April 5, 2022
Fly Fishing for Beginners – Part 7 – Fly Fishing Fly Types – Dry Flies, Wet Flies, and Streamers
Welcome to episode #6 in the Fly Fishing for Beginners blog and video series. To quickly recap what we’ve covered so far, in episode #1, I answered the question, “What is fly fishing,” as there are many misconceptions. In episode #2 we explored the fascinating history of fly fishing. In episode #3 we looked at the wide variety of fish that you can catch with fly fishing. In episode #4 we covered how to find places to go fly fishing in your local area. Episode #5 was about essential fly fishing gear. Episode #6 was how to set up some of that gear…more specifically, your backing, fly line, leader, and tippet. And in this 7th installment, you’ll learn about fly fishing fly types and fly categories, including dry flies, wet flies, streamer flies, poppers, and saltwater flies.
Types of Flies
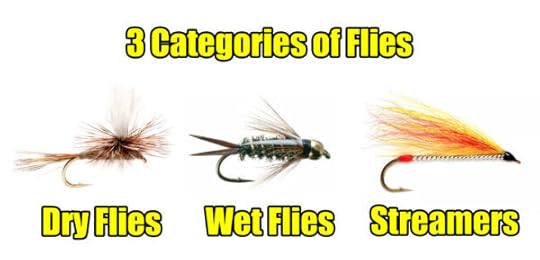
There is some debate among fly fishermen about how many categories of flies there are. Many say three: dry flies, wet flies, and streamers, and others say five, which includes poppers and saltwater flies. However, poppers and saltwater flies can also fit into the primary three categories of dry flies, wet flies, and streams, which is what we’ll focus on here. Keep in mind though, that within these three primary categories, there are many different types of patterns and thousands of fly pattern variations. Don’t let that overwhelm you though, while there are indeed thousands of fly patterns to choose from, you can generally catch most any fish with just a few different ones. As I mentioned in a previous episode, you can make fly fishing as complicated or as simple as you’d like. The choice is yours.
Flies are created or “tied” from a variety of natural materials such as feathers and fur, as well as many kinds of synthetic materials. The types of flies you choose will depend on the species of fish you’re after, as well as the water conditions and the time of year, as most flies are designed to imitate the insects, baitfish, and other food items that those fish feed on where they live, which does vary during the different seasons of the year. On the other hand, there are also many fly patterns, known as attractor patterns that might not imitate a preferred food item at all, but rather, are designed to appeal to a fish’s sense of curiosity or aggression.
This is another element of fly fishing that makes it so exciting and challenging. Studying the food that fish eat and trying to match that food with flies, or coming up with wild and crazy attractor patterns that fish readily go after, is a never-ending source of fun and a means of growing in knowledge about the great outdoors. Learning what flies to effectively use for certain species of fish is way too big of a subject to cover in this video, so this is definitely a topic that you’ll have to study and experiment with on your own. But have no fear, there are countless books and tons of information on the internet that will help you. Chatting with fellow fishermen in your area will also point you in the right direction. As most fly fishermen find out, learning about what fish prefer to eat in different places and situations becomes a fascinating source of lifelong study.
Dry Flies
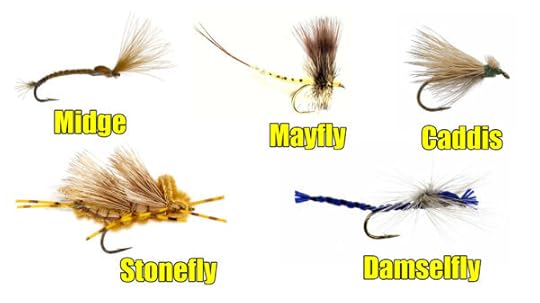
Dry flies are designed to float on the surface of the water and generally are tied to imitate either emerging or adult insects such as midges, mayflies, caddisflies, stoneflies, damselflies, and even large insects such as grasshoppers. Poppers, which can imitate big bugs, frogs, and other larger critters can fit in this category as well, as they are indeed designed to float and be fished on the surface.
Many fly fishermen consider dry fly fishing the ultimate, as it does take a great deal of attention to detail as far as selecting the proper fly to “match the hatch” as well as accurate casting and a very skilled presentation. Prime dry fly fishing can also depend on the favorable weather conditions as well as being in the right place at the right time, such as when a good insect hatch materializes.
Wet Flies
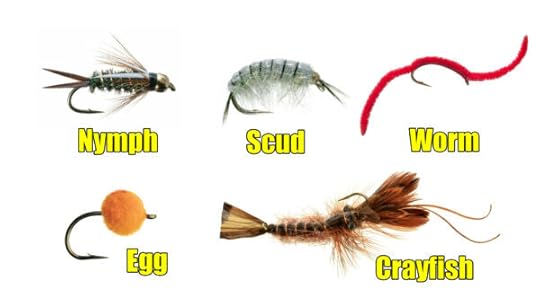
Wet flies are those that are fished under the surface of the water at varying depths, and even on the very bottom. They can be tied to imitate things like nymph and pupal stage aquatic insects, freshwater shrimp or “scuds,” worms, fish eggs, and crayfish. These types of flies can be dead drifted and allowed to sink naturally, they can be fished with a sinking tip line or with some split shot to get the fly down to the bottom fast, and they can also be fished under a strike indicator to control the exact depth of the presentation, which is a particularly effective tactic. Casting heavily weighted nymphs, micro jigs, and other wet flies, especially with a strike indicator, is usually not nearly as graceful as casting dry flies, but they can produce great results any time of year in any conditions.
Streamers
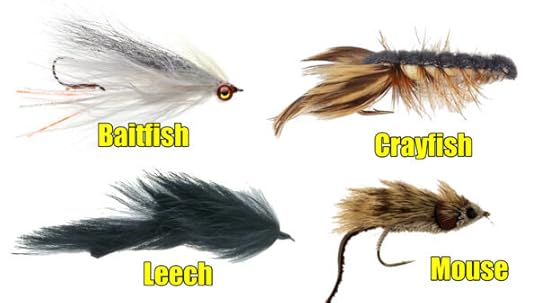
Streamers are typically much larger than dry flies or wet flies and they are designed to imitate a wide variety of baitfish, crayfish, leeches, mice, and other such food items. Like wet flies, streamers can be fished at different depths from subsurface all the way to the bottom and they can be also be fished with varying speeds, from a dead drift, a slow retrieve, or a super-fast stripping retrieve. These are an especially good choice for large predatory fish and many saltwater flies are essentially big streamer patterns.
Again, while the dry fly, wet fly, and streamer are the three most basic categories, there are hundreds and even thousands of variations of them all, which will give you plenty of options to explore. Many fly fishermen enjoy making their own flies. Fly tying as it’s referred to, is a very enjoyable hobby, it can save you a ton of money, and it’s incredibly satisfying to catch fish on the tackle you crafted yourself. I was originally going to include a few episodes in this blog and video series on fly tying, but I decided to do a separate series on that topic in the near future, so stay tuned. In the next and final episode of this series we’ll cover basic fly casting, so stay tuned!
Check out the video below to see more…
The post Fly Fishing for Beginners – Part 7 – Fly Fishing Fly Types – Dry Flies, Wet Flies, and Streamers appeared first on Wild Revelation Outdoors.
Fly Fishing for Beginners – Part 6 – Fly Rod and Reel Setup – How to Connect your Fly Line Components
Welcome to episode #6 in the Fly Fishing for Beginners blog and video series. To quickly recap what we’ve covered so far, in episode #1, I answered the question, “What is fly fishing,” as there are many misconceptions. In episode #2 we explored the fascinating history of fly fishing. In episode #3 we looked at the wide variety of fish that you can catch with fly fishing. In episode #4 we covered how to find places to go fly fishing in your local area. Episode #5 was about essential fly fishing gear, and in this 6th installment, you’ll learn how to set up some of that gear…more specifically, your backing, fly line, leader, and tippet. It’ll be pretty obvious how to attach your fly reel to your fly rod, and most fly reels also allow you to set them up for either right or left-handed retrieval. Simply consult your owner’s manual to make any necessary changes or adjustments. When it comes to connecting the various components of your fly line and leader materials, however it can be a little confusing and tricky at first.
To begin, make sure you purchased fly line that is matched to the correct weight of your fly rod. For example, if you’ve chosen a 6-weight fly rod, then you’ll need a 6 weight fly line for optimal performance. As I mentioned in the last installment, there are many options when it comes to fly line, but for starters, a weight forward, or double taper floating line is a good choice that will cover most situations.
How to Attach Fly Line Backing to your Fly Reel
Before you get started with setting up all your line components, I suggest having your reel mounted to the base section of your fly rod during this whole process to make things easier. The first step is to attach the fly line backing to your fly reel. You can use an arbor knot to connect your backing to your reel, which is quite popular, or any other knot that you’re confident with. Even a couple of simple overhanded knots will work fine for connecting backing to your reel, which is what I often do. For the arbor knot, simply tie an overhanded knot at the end of your line and pull it tight, then tie another overhanded not and pull that one tight so that the knotted end buts up against that second knot you tied.
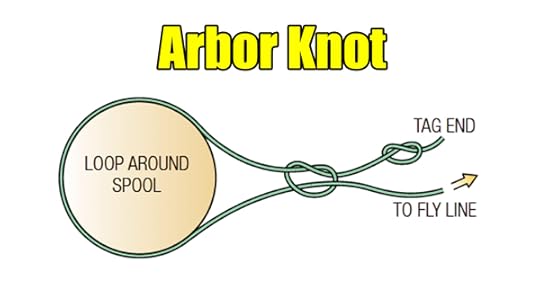
You’ll most likely never get all the way to the end of your backing when fighting a fish, but nonetheless, you do want to make sure it’s tied on securely. No matter what knot you use though, it’s best to then wind the backing on your reel in a perpendicular fashion by using a vice to hold the spool of backing as I demonstrate in the video below, or anything that will keep the spool upright when winding up the line. If you wind up the line with the backing spool lying flat, your line will get twisted up, which may cause troubles and tangles down the road. Be sure to keep the line evenly dispersed on the reel as you wind it up by simply using your fingers to guide the line. Also, keep your fingers fairly tight in order to keep tension on the line as you reel. If your line is too loose when wound up on the reel, you may have issues with backlashing while you cast.
How to Attach Fly Line to your Backing
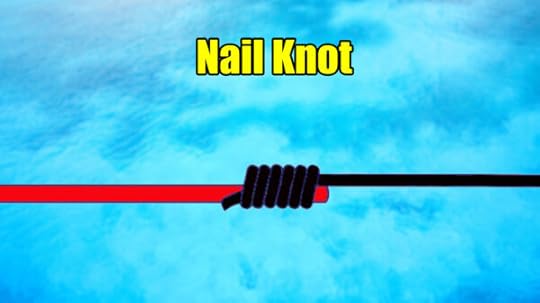
Next, after all your backing is on the reel, it’s time to attach your fly line. Your line should have a little tag on it designating which end should be tied to the backing, unless it’s a double taper line, in which either end can be tied to the backing. To connect the fly line to the backing, I recommend a nail knot which can be easily and confidently tied with a handy dandy nail knot tool. Here is a how to tie the nail knot. After the fly line and backing are connected, you should then wind up the fly line in the same manner as you did the backing. If your fly line didn’t come on a spool and was instead just packaged as a bundle of line, I recommend unraveling it and laying it all out straight in a place where you have plenty of space like your backyard, and then winding it up on your reel.
How to Connect a Leader to your Fly Line
After you have your fly line on your reel, it’s time to connect your leader. As I mentioned in the last episode of this blog and video series, there’s a lot of variety when it comes to leaders, but the bottom line is that you’ll want a leader that will be appropriate for the species of fish you’re going after. Leaders and leader material usually have this information right on the packaging. As far as attaching the leader to your fly line, some fishermen use the trusty nail knot and others prefer the loop-to-loop connection system which enables you to quickly and easily change leaders when going after different species of fish or fishing dramatically different sized flies. You can buy a loop extension to attach to your fly line and buy leaders with loop ends, or simply tie a loop knot in the end of any leader you’d like.
How to Connect your Tippet to a Leader
While you may not have to change your leader all that often, you will have to change or replace your tippet material quite a bit. Naturally, you’ll want to use lighter tippet for fishing with small flies and larger tippet for bigger flies and bigger fish. Just as with leaders, tippet material comes in species-appropriate sizes and strengths. It’s also important to note that some leader and tippet materials float, such as nylon monofilament, which is a good choice for dry flies that float on the surface of the water, and some materials sink, such as fluorocarbon, which is good choice for nymphs, micro jigs, and other sinking flies. Leader and tippet materials are generally standardized with a numeric “X” system to designate the size and strength. Here’s an example…
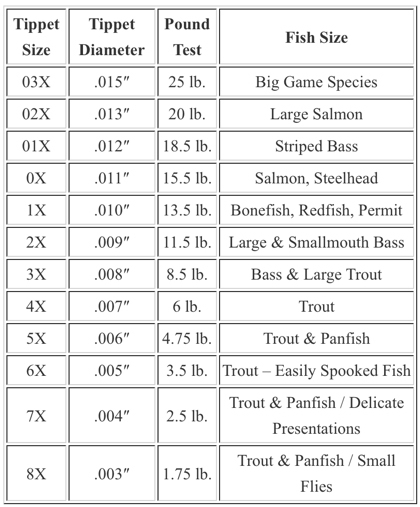
Charts like this one will help you with selecting the proper tippet and leader material, but as I mentioned in the last video, if you want to save quite a bit of money, you can simply buy and use monofilament and fluorocarbon that’s designed for more generic styles of fishing. For example, a big spool of premium monofilament or fluorocarbon that’s designed bass for crappie fishing will cost much less than a tiny spool of fly-fishing leader or tippet material, and it’ll last much, much longer. In fact, I have spools of fluorocarbon that I bought years ago to use for fly fishing tippet that are still going strong. I simply wind up a supply of line on a smaller-sized spool when needed, put it in my pack, and I’m good to go! The only time that I buy the fancy, expensive fly fishing tippet is when I need a new spool.
Anyhow, no matter what you choose to use for tippet material, you only need a few feet of it to attach to your leader. I recommend connecting your tippet and leader together with a surgeon’s knot. This knot is an especially important one to master, as you may be changing or adding new sections of tippet to your leader fairly often. Here is how to tie it.
How Long Should the Leader and Tippet Be?
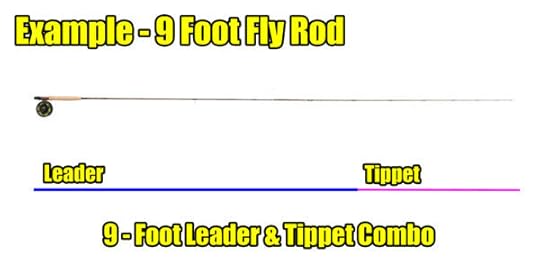
When it’s all said and done, the leader and tippet section of your fly fishing rig should be about the length of your fly rod, or perhaps a little longer. Some like a little longer leader and tippet, and some like a shorter one. This is something that you’ll develop a feel for as you get more experience with your fly fishing efforts. Too long of a leader can throw off your casting and fly presentation, and too short can end up spooking the fish. So again, I recommend a leader and tippet combo of the length of your rod for starters and then adjust as necessary.
There you have it my friends, that’s an overview of how to set up you fly rod, fly reel, and all your line components. Check out the video below to see more…
The post Fly Fishing for Beginners – Part 6 – Fly Rod and Reel Setup – How to Connect your Fly Line Components appeared first on Wild Revelation Outdoors.
March 21, 2022
Fly Fishing for Beginners – Part 5 – Essential Fly Fishing Gear
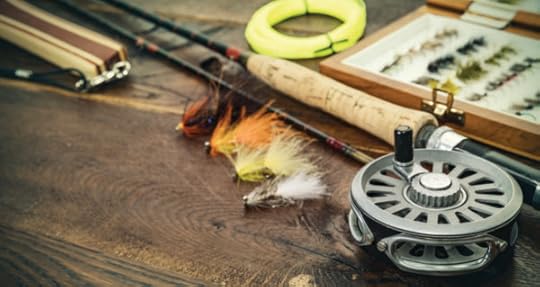
Welcome to episode #5 in the Fly Fishing for Beginners blog and video series. To quickly recap what we’ve covered so far, in episode #1, I answered the question, “What is fly fishing,” as there are many misconceptions. In episode #2 we explored the fascinating history of fly fishing. In episode #3 we looked at the wide variety of fish that you can catch with fly fishing. In episode #4 we covered how to find places to go fly fishing in your local area, and in this 5th installment, we’ll address the topic of essential fly fishing gear.
Let me start things off by sharing a quick story with you. Many years ago, while on a fly fishing trip in Arkansas, my buddies and I took a break from fishing one afternoon and went to a nearby sporting clay shotgun club to watch a friendly skeet shooting competition. All of the guys in the competition had beautiful, though very expensive, custom-made shotguns…except for one. There was one good ol’ boy who entered the contest with a beat-up, rusty Remington 870 pump that looked like he bought it for five bucks at a garage sale. No elegant engraving, no custom fitted stock, no fancy case like the other guys had…just an old worn-out hunk of wood and iron. As the match got underway, however, that guy with the beat-up old Remington DESTROYED the competition! It wasn’t even close! As he put his gun away in a cheap vinyl case afterward, he looked around at his astonished competitors and humbly said, “You know boys, the only thing that matters is that you can hit what you’re shootin’ at!”
That same dynamic holds true with fly fishing gear and pretty much any other outdoor gear for that matter. No don’t get me wrong, beautiful custom-made fly rods, shotguns and all the rest are true works of art that take incredible skill to produce and that are worthy of great admiration. And, it can certainly be a joy to fish with such a finely crafted rod. But, the point is that you certainly don’t need fancy, super expensive fly fishing gear to catch fish and thoroughly enjoy your time on the water. As I mentioned back in episode #1, many folks unfortunately buy into the stereotype that fly fishing is only for the wealthy and elite, which is certainly not true. You can get started with fly fishing on any budget and you don’t need near as much gear as you may think. Let’s have a look at the essentials.
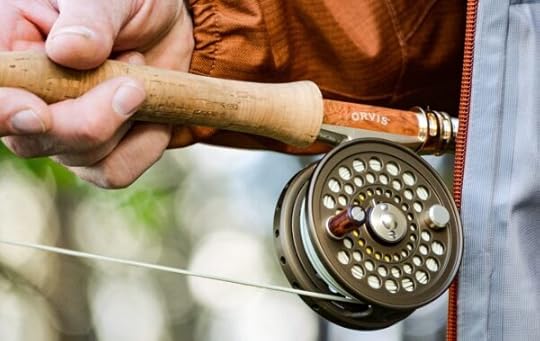
Fly Rod
First of all, you’re going to need a fly rod. Fly rods are long, lightweight, highly flexible, and specifically designed for casting with fly line. Most fly rods are around 8 to 10 feet in length, but some are longer and some shorter. Along with being available in different lengths, fly rods are also available in different weights and actions. The action of a fly rod is generally a matter of preference. If a fly rod loads and unloads the fly line quickly, it’s considered a fast action rod, and if the rod casts slower as a result of the rod taking longer to load and unload the line, then it’s identified as a slow action fly rod. Some like a fast-action rod, and some like a slower rod. Again, it’s a matter of preference that you’ll develop as you get more experience.
The weight of a fly rod doesn’t refer to how much the rod actually weighs in ounces or pounds, but rather, this is a reference to the overall size and strength of the rod. Lower rod weights are used for casting smaller flies and fishing for smaller fish, and larger weight rods are designed for bigger flies and bigger fish. Some fishermen enjoy the challenge of using a smaller weight rod for big fish, but you do need to be careful with this. If you wear out and exhaust a fish too much because you used too light of gear, there is a good chance that the fish will die not long after you release it. So if you plan on catch and release fishing, make sure you use the right-sized gear for your target species of fish and don’t fight the fish longer than you need to.
To give you an idea about what weight rods are ideal for certain species of fish, 3 to 4 weight rods are common for panfish, small trout, and similar-sized fish. 5 to 6 weight rods are a popular choice for larger trout and char species, smallmouth bass and medium to small-sized largemouth bass, small salmon such as pinks, etc. 7 to 8 weight rods are a good choice for larger sized species of bass, salmon, carp, steelhead, bonefish, pike, muskie, and similar sized fish. And finally, 9 to 10 weight rods are popular for king salmon, big pike, carp, and any other jumbo-sized, strong fresh or saltwater fish.
When deciding on what rod to purchase, consider the species of fish you’ll primarily be pursuing as far as the ideal weight you’ll need. And, if the store will let you, try casting the rod a little to see how it performs as far as the action. Basically, you want to get rod that has a good feel to it and that will be fun to fish with. Again, much of it is a matter of personal preference that will develop over time.
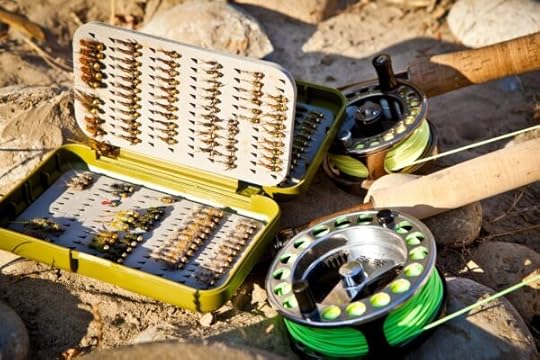
Fly Reel
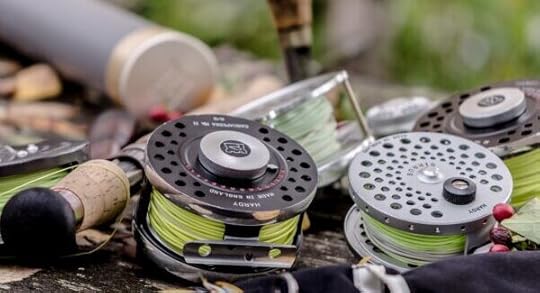
While fly reels can look fancy and quite different from other types of fishing reels, in reality, they’re quite simple in design and function. A fly reel is basically a big spool that holds and dispenses your fly line as needed. A great deal of fly fishing is done by maneuvering the fly line with your hands, so you really only use the reel for winding up excess line that you may have taken out while casting, or when you’re fighting a big fish. Most fly reels have an adjustable drag system that helps with these tasks.
Fly Line

Fly line is different from any other kind of fishing line. There’s quite a bit of variety in fly lines, but the most commonly used lines are a thick, heavy, often brightly colored floating line. The heavy line is designed to be used in conjunction with a fly rod to cast out the small, lightweight flies that fly fishermen use. Fly lines have different tapers to help increase the momentum of one’s cast, and again, they come in a wide variety, including sinking lines to go after fish who hang out in deeper water. For most beginners though, you’ll want to get either a weight-forward or double taper floating fly line that’s matched to the weight of your fly rod. This will cover most fishing scenarios, and you can always add a weighted extension to your fly line to get down deeper and faster if need be.
Backing
If you hook into a really big fish (or you foul hook one) that fish may make such a long powerful run that it takes all the fly line off your reel, which is a great feeling, but you certainly don’t want to lose all that expensive line! This is where backing comes into play. Think of backing as your safety backup line. Backing is simply strong, usually braided string that attaches from the back end of your fly line to your reel. You can typically get quite a bit of backing on your reel and it’s very rare to get all the way to the end of your backing during a fight with a fish.
Leader
Most fish are not going to take a whack at a fly if it’s presented to them on a big, thick, florescent line! Thus, the need for a clear, thin, stealthy leader and tippet to present your offering. The leader is simply a piece of clear monofilament or fluorocarbon line that attaches to the casting end of your fly line. Some leaders are tapered, and some are straight, and like any regular ol’ fishing line, they come in a wide variety of species-appropriate sizes and strengths. Prepacked leaders are available, or you can simply use a section, or several sections, of monofilament of your choice.
Tippet
The tippet section is a shorter piece of line that’s tied to the end of your leader and is then connected to your fly. Tippet material is thinner, lighter, and sometimes clearer than the leader and is designed to give your fly presentation that added degree of stealth. As with leader material, you can buy the fancy, rather expensive, prepackaged tippet material, or you can just use a smaller section of standard monofilament or fluorocarbon line.
Flies
Obviously, you’re going to need some flies to go fly fishing. There are many different styles and categories of flies that fly fisherman use, which is too big of a subject to adequately cover in this installment. I’ll be addressing this topic in an upcoming episode, so stay tuned!
Fly Box
No matter what kinds of flies you use for your target species of fish, you’ll need a box to keep them in. Fly boxes come in a wide variety of shapes, sizes, and models to choose from, which is all a matter of personal preference. Some also come with really cool designs!
Waders
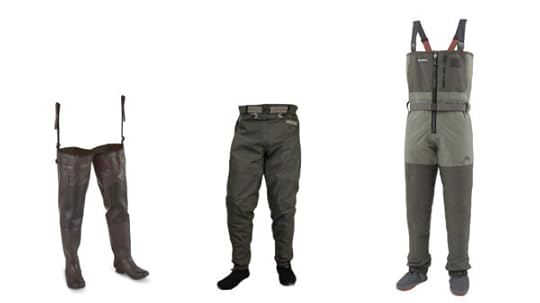
If you’re going to be wading in cool or cold water while in pursuit of your fish, you’ll most likely want a pair of waders. Waders come in a variety of styles from hip waders to full chest waders, and they’re also made from a variety of materials, such as rubber, vinyl, neoprene, and breathable Gore-Tex style fabrics. Some are insulated, and some are not. Some have boots attached to them, and some are stockingfoot which will require you to wear wading boots on top of them. As with many things in fly fishing, wader styles are also a matter of personal preference. I recommend chest waders though, as they’ll cover every situation from shallow to deep water fishing. Also, many prefer stocking foot waders over boot foot waders, as a separate set of wading boots do provide much better ankle support and mobility.
Wading Boots
If you decide on a set of stocking foot waders, you’ll need a set of wading boots. These too come in a wide variety of styles and are made from materials that are designed to increase traction and help you be more stable while wading. In the not-so-distant past, felt-soled wading boots were a popular choice as they helped to prevent sliding around on slippery rocks, but these are now prohibited in many states as they have been found to carry and transport a variety of unwanted organisms to other bodies of water.
Fishing Pack or Vest
Some fishermen are gear junkies and like to have all sorts of gizmos and gadgets with them when they go fishing, and others are minimalists and only take along the bare necessities. Whatever the case though, you’ll want to have a pack or a vest to keep it all organized and readily accessible. Packs and vests come in a wide variety of designs as well, and like most of other the items we’ve covered thus far, much of it is a matter of preference.
Landing Net
While many fish can be landed right on the shore, if you’re in deeper water, away from shore, you very well may need a landing net. Nets also come in different sizes and you can attach them to the back of your pack or vest with a bunji cord or a retractor device. If you’ll be doing mostly catch and release fishing, it’s advisable to get a net made from soft, non-abrasive material, which will be gentler on the fish’s skin.
Miscellaneous Accessories
Let’s quickly cover some of the odds and ends you might want to have along in your fly fishing pack.
Floatant – If you’ll be fishing a lot of dry flies, which are designed to float on the surface of the water, then it’s a good idea to have some fly floatant along. Dry fly floatant comes in a variety of materials including gels, powders, and pastes.
Strike Indicators – Strike indicators can be used to help detect the subtle strike of a fish, or they can be used to control the depth of your presentation when fishing sinking flies such as nymphs or small jigs. They come in different sizes, shapes, and designs, including brightly colored yarn, small stick-on pieces of foam, and small bobber-style indicators.
Nippers – You’ll definitely want a set of nippers on your pack or vest which are used to clip excess line when tying on your flies or rigging up your line. Many have built-in eye buster tips to clear out any leftover head cement on your fly, and some also have a variety of knot tying attachments. No matter what kind you use though, it’s a good idea to have it attached to a small retractor for ease of use.
Hemostats – Hemostats are a small, skinny, scissors-shaped tool that acts like a micro-set of pliers. These come in very handy for removing hooks from your fish and can be clipped right to your pack or vest. Dehooking devices such as this one also come in handy, especially for catch and release fishermen.
Split shot – You may need some extra weight to get your fly down to where the fish are. Thus, small split shot, or the newer twisty tie leads will do the trick.
Nail knot tool – The many nail knot tools that are available these days come in quite handy for quickly tying nail knots, and other trusty fishing knots which are important for fly fishing applications.
Hook sharpener – This is a tool that is often overlooked by many fishermen. It’s amazing how many fish you’ll lose because of a dull hook and how many more you’ll catch because of a sharp hook! Taking a few seconds to sharpen the hook on your fly every once in a while will pay off big time!
Tape measure – There may be size limits on the fish you can keep from certain bodies of water, so be sure to always check the regulations for the area you’re fishing, and bring along a small tape measure.
Polarized sunglasses – A quality pair of polarized sunglasses are indeed essential gear, as they tremendously reduce the glare on the water, allowing you spot and see the fishing you’re going after much easier. In fact, in many cases, you won’t see the fish at all without polarized glasses, so don’t forget them! And if you wear prescription glasses, have no fear, as you can get polarized sunglasses that will go over, or clip on to your prescription lenses.
Those are pretty well all the essentials. You may want to have some additional items along such as a good pocketknife and/or a multitool, a water bottle, pen, micro-survival kit, snacks, camera/phone, and whatever else you’d like to bring. To quickly wrap things up, if you’re still on the fence about getting started in fly fishing in general, you can start out with moderately or even low-priced fly-fishing gear. But keep in mind, you generally get what you pay for, and if you buy super cheap, low-quality gear that will no doubt not perform well, you very well may get frustrated to the point that you’ll quickly give up your fly fishing efforts. If you’re serious about getting into fly fishing, I recommend buying the best you can afford, or even buying quality used gear, which there is a lot of on places like eBay and other online marketplaces. Respectable fly fishing brands such as Temple Fork Outfitters, Sage, Orvis, and others have quality rods, reels, and other products available in a wide variety of price ranges and many of their products have lifetime warranties.
You can also save a lot of money when it comes to all those accessories such as packs, vests, leader materials, etc., by simply buying the more generic, moderately priced products that are meant for other styles of fishing. Improvising, adapting, and getting creative will go a long way and save you a ton of money when it comes to fly fishing. Like many things in life, you can make fly fishing as difficult or as easy as you’d like. The choice is yours. And, like I learned from that good ol’ boy at the shotgun range in Arkansas, learning to do more with less goes a long way and can be a major key to success.
Check out the video below to see more…
The post Fly Fishing for Beginners – Part 5 – Essential Fly Fishing Gear appeared first on Wild Revelation Outdoors.