Marcus Richardson's Blog
April 4, 2018
Freeholder Reviews: Jison Case for the iPhone 6
Howdy Freeholders!
I’m back after a double-barrel fight with the flu and other seasonal illnesses that invaded the Freehold for the past two months (I just love schools…lovely little germ factories that they are).
I wanted to kick things off with a review. The good folks at Jison Case were looking for unbiased reviews for their iPhone cases and contacted me about doing a little write up for them. Disclaimer: I was given the case in exchange for an unbiased and truthful review of the product.
Okay, with that out of the way, let’s get to it, shall we?
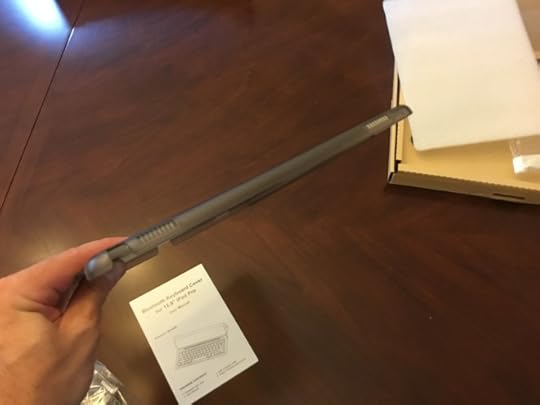
Jison Case for iPhone 6/6s
The Details:
molded genuine leather construction, rigid body
2 3/4” wide, a hair over 5 1/2” long, 3/8” deep
cut outs for the rear camera, mute rocker switch and the bottom is open for the speaker/charging port
raised bumps that cover the volume buttons and power button
arrives in a handsome box and packaged well, no hint of the case-in-a-bag here!
Fit and Finish

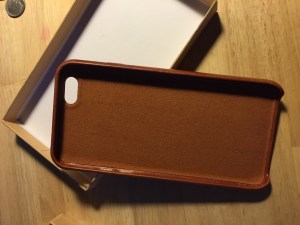
Here’s what the case looks like when you first open up the shipping package. A nice sturdy, simple box that feels really well constructed—that gave me a great first impression.

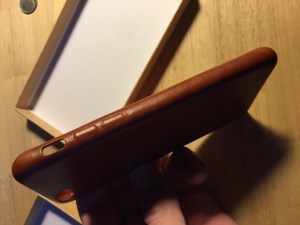
This case is a real surprise for me, coming from a long line of TPU “jelly” cases. I love the protection offered by those big thick plastic armor cases, but I can’t stand the bulk. So for me, slimmer is better. And this Jison case is slim! It’s about 3mm thick by my measurements, and that’s pretty darn slim. The leather looks really nice and the added layer of super thin suede-like material on the inside to protect the back of your phone is a nice touch.
The manufacturer did a fantastic job of making sure the cut outs for the camera and mute switch rocker are spot on and crisp. There’s no jagged edges and everything lines up perfectly. The fact that there’s no stitching in the entire case is also a plus in my book. This thing isn’t a baseball mit, after all.
There’s a pleasing grain to the case that feels great in the hand (more on that later) and a stamped logo that is discrete but still reminds you who made the case, located on the back down near where the speakers slot is.
How does it feel?
Just holding the case in your hand, it feels light—very light. So light, in fact, it might be about the same (if not less) than one of my ultra thin TPU cases. Folks, this thing is like a feather.
The phone snaps in pleasantly snug though, and there’s absolutely no chance of this case just falling off (despite the whole bottom essentially being open in one long cut out). The curved sides of the case grip the phone and are perfectly contoured to provide wrap around coverage. I have a tempered glass screen protector on my 6, so that sticks up over the edge of the case (like it does with all cases except those with thick, armored sides), but without that 2mm glass, the screen itself should not touch any flat surface if the phone was turned over—the lips around the edge of the case are just high enough to keep the glass from touching anything.
Despite being so light, once the phone is snapped in place, the case takes on a heft that is very pleasing. It doesn’t have the thin, light feeling that plastic cases provide, this—and maybe it’s just because it looks like and feels like leather—seems solid. Yet because the case itself is so light, the phone/case combo still feels pretty darn light. It’s a strange combination but…there it is.

The leather itself is rather slick feeling—I think that will change with use as it gets broken in and likely scuffed a bit, knowing my kids—so if you’re thinking it’ll be grippy like some of the cases out there, think again. That might be a problem, but I found I enjoy holding it so much I don’t worry about letting it slip out of my hand—the texture is just plain nice to feel.
Speaking of texture, it’s definitely a slight leather pattern that’s been imprinted on the case, and like I said, it’s not all that grippy, but it feels great in your hand.
How does it look?

With the phone installed, this thing looks sharp. Like, Apple quality sharp. At least to me—I’m sure there’s purists out there who will jump all over me for that statement, but it just looks good. And like all leather products, as it absorbs the oils from your skin, I’m sure it will darken as it ages (and who doesn’t love that aged leather look?).
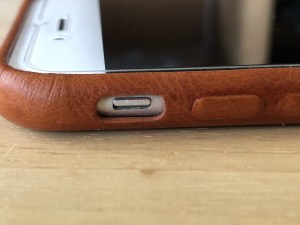 The cut outs are precise and crisp. There is little to no wasted space—and unlike with most cases, the spot for the mute switch is neither too big nor too small. In short, the case looks like it was designed with the phone and not merely an add-on accessory. Which is awesome, because just about every case I’ve ever used had that stupid slot too small. As a guy with big hands, trying to cram the corner of a fingernail in there to hit the mute button was a pain. Due to the thin nature of the Jison case, though, it’s very easy, even for a galoot like me, to hit that switch whenever I want.

The cutout for the camera is likewise spot on. There’s no vignetting of images and does a good job of keeping the camera lens off any flat surface if the phone is put down on its back. Very nice looking.

The speaker cutout runs across the entire width of the case down by the charging port. I must admit when I first saw it, I was skeptical how well the phone would be able to stay installed—I mean it looks like the phone can just slide right out. But Jison has engineered this case to be so snug (yet not difficult to install or remove) that despite me vigorously shaking the phone up and down (over a nice soft bed) it never even budged, let alone slipped out. The cutout itself is plenty wide for the speakers and charging port and I assume in an emergency you could even slip a business card in there to keep for later…
How does it perform?
Now the real test. So we know it looks good and it feels good and it holds the phone really well and doesn’t take up too much space or weigh too much. How does the thing actually work? If the button cutouts and bumps are hard to use, the case is worthless in my opinion. Thankfully, that is not the “case” here.

First, the power button. I’ve had several cases on this phone where it’s downright difficult to wake the stupid thing because the power button bump (I have no idea what the technical name is for the little part of most cases that covers the button, so I call it a bump) is either too thick or too stiff to press easily. Not so with this Jison case. Once the phone is installed, I found with the normal pressure I always use to push the button, I can wake the phone or put it to sleep or take screenshots. Easy peasy.
 What about the volume buttons? Same deal—the little contoured bumps that cover the buttons and are within a millimeter of the actual size of the button from what I can tell, work flawlessly and with just barely any more pressure than is required for the phone to work outside the case. That and the brilliant mute switch slot are well worth the price of admission in my opinion!
How does it hold up?
While I’m not set up to do hard core testing and durability experiments, I can give you some observations. First off, this case is not built like a tank, like some other cases out there. But the trade off is it doesn’t look like a tank either—or weigh as much as one in your pocket. That said, this is leather, not plastic, so there’s going to be a little more give than on a hardened case, and likely a little less give then on a soft jelly TPU case. It’s a nice middle ground compromise between protection, weight, and feel.
 It doesn’t have the new-fangled air-cushioned bumpers that I see on a lot of cases coming out now—but on the plus side, it doesn’t have those hideous corners that stick out from the case either. Sure, it might not protect your phone as well as those ugly cases if you drop it on the corner from any height over a foot off the floor, but lets be honest, if you’re prone to dropping your phone, go buy one fo the tank cases. In the past two years, I have dropped this phone precisely three times—two of which weren’t my fault because one of my darling Mini-Freeholders knocked it out of my hand. I feel confident if I dropped this phone anywhere other than a marble floor or concrete, it’ll come out just fine (assuming the screen doen’t land on something like a rock!).
Price and where to find it:
So that’s all well and good, but where can you get your hands on one, and how much does it cost? Well, have no fear, muchachos, I’ve got all the details for ya. This fantastic case is $16.99 on Amazon. Yeah, less than $20 for a genuine leather case that in my opinion easily rivals the $45+ case from Apple itself. But for that $16.99 you can find a case that will fit the 6/6s, the 6/6s Plus, the 7/7s and the iPhone 8!
You can find the Jison leather iPhone 6/6s case on Amazon (of course), from Jison’s own website, and from AliExpress (this place is pretty cool, like the Amazon of the Orient…they’re not so influential in the US, but I can see that changing in the future).
Another disclaiminer—unlike a lot of other people out there who offer reviews, I’m not an affiliate for Amazon so I don’t make any money off this if you click through my site to Amazon. I just like the product and thought you might enjoy my thoughts on it.
But after poking around Amazona bit, I discovered the iPhone 6 isn’t the only size they have available in this line of cases! You can also get it for the iPhone 6/6s Plus on Amazon. They also have versions available that fit the 7 or 8 on Amazon.
And not to leave out the new kids, you can even get the cases for the 7/7s Plus and 8 Plus on Amazon and on Jison’s website. This version is a little more expensive at $18.99 but hey, it’s also bigger.
Last but not least, to check out the version for the iPhone X, look here.
Parting Thoughts
I think this case is really something special—for the price, I don’t see you getting anything better anywhere with the same quality. I dug around Amazon and discovered there are black versions for some of the cases as well (note that all the links above are for the brown versions). For the price, you really can’t go wrong. So, there you have it! I have another review coming out soon regarding Jison’s version of an Apple Pencil holder that I’m pretty excited about too, so keep an eye out, folks!
Till then, as always, keep your heads down and your powder dry!


October 27, 2017
Freehold Friday: Practical Prepper Bike Project #2
Howdy Freeholders,
So it has certainly been a while since I’ve written a post, I’m just going to jump right back into things.
The Writing Update
For the obligatory writing updates, I have completed Season Two of Solar Storm with the publication of Episode Six: Homestead, a few weeks back. The story is not complete, as I have some ideas in my head for season three, plus some more fleshed out ideas for spinoff books. I’ll post more about those wind I have more to share.
In Wildfire news, I’m finally getting close to publishing the next book in the series, Oathkeeper. This book will chronicle Cooper’s first mission after leaving the SEALs. I’m going to be sending it out to my ARC Team (advanced reader copy) very shortly so I’m excited to see what they think.
The Practical Prepper: Bike Project (continued)
As for what’s happening in real life, my bike, the subject of a post back in July finally failed after almost two decades of faithful service. I went on a fitness ride and return to find the rear wheel’s spokes had crumpled, rendering the rear wheel useless. It wouldn’t even turn. On its own, that’s not such a hindrance—they can be fixed. After doing some research however, I found I could buy a few tools probably fix those spokes myself. However, the bike was using 28 spokes per wheel, which isn’t really a standard anymore, from what I can tell—almost everyone uses 32–36 spokes—especially for a bigger rider like me. 28 spokes just wasn’t cutting it, as evident by the failure of the rear wheel. When you combine that with the fact that the bike was probably in need of a professional tune up—after not receiving any love and care in about 20 years…so I investigated the possibility of doing so at several local bike shops. I was unanimously told that the price of a tune up and repair would be more expensive than just buying a new, modern bike.
So I did some more research, and after several weeks of checking out local like stores and what they had for offer, I discovered that I wouldn’t be able to get a decent bike without spending less than about $800-$1000. Unfortunately that’s something I was just not prepared (Bikes Direct. If you look up this place in search for opinions on bicycling forums, you’re going to find a mixed bag. A lot of people swear by them, and a lot of people—just as many in fact—curse them and warn people away.
This confused and intrigued me at the same time.
How can one company, innocently providing bikes to consumers, garner such loyalty and animosity at same time? None of the reviews I saw indicated the company itself was at fault, their customer service was usually quick and reliable. The prices were fantastic—hundreds and hundreds of dollars less than what you would pay in a bike store.
However, the detractors were correct: there were certain consequences for dealing with Bikes Direct. For starters, you, and only you are responsible for the set up and first tune up of your bike. It comes a big box—in pieces—and you have to assemble it. Once it’s assembled, you’re responsible for tuning it up, making sure the brakes are properly tensioned, making sure the gears shift properly, making sure the tires are true, and all the bolts are tightened, and the handlebars are set in the proper position, etc., etc., ad infinitum.
To most people these days, doing something like that yourself is a daunting, nigh on impossible challenge. They would gladly spend several hundred dollars for someone in a bike shop to take care of that for them. And that is exactly why the prices in the bike shop were more expensive, coupled with the fact that many of them offer long-term service warranties and guaranteed tuneups, etc. for any bike purchased in their store. Slap on a couple hundred dollars for a name-brand sticker and there’s the difference.
As a woodworker, I’ve never been one to shy away from using tools. I’m not exactly the most mechanically inclined—I don’t work on my own cars besides simple things like washer fluid, putting air in tires, changing wiper blades, that sort of thing. I do change the oil and service my tractor, but that’s about the extent of my mechanical experience. However, I figured if I can run a table saw, miter saw, and bandsaw without losing any digits, I should be able to turn a couple wrenches (Allen or otherwise) and use a pair of pliers to get a bicycle in shape. I mean honestly, other than the moving parts (the crankshaft) and the chain, there’s not much to a bike, right?
My first stop was to acquire a copy of a book called Zinn and The Art of Road Bike Maintenance. You see, a while ago, I decided I wanted a bike that was faster, sleeker, and more capable on roads than my tank of a mountain bike. That bike must weigh close to 25 or 30 pounds. It was a big, bulky, and heavy. Kind of like me. However, my goal is to get in shape with the new bike, so I wanted something to inspire me to a more slim, streamlined appearance. So I settled on finally getting a road bike. Besides, they just look cool as hell with those drop handlebars. I have no aspirations of becoming a Tour de France winner, but there’s something to be said for the ability to drop down low and pick up to speed (on hills). I can tell you without a doubt, after doing so with my new bike, it’s a real adrenaline rush!
My Precious
So after thoroughly digesting the maintenance book, I realized I could take care of my own bike. The book was laid out in such a way that I knew exactly what tool to use in certain situations for fixing the chain or the brakes or just about anything—at least that I can think of—that could go wrong with the bike. Armed with this knowledge, and knowing just enough about tools to be dangerous, I selected my bike from Bikes Direct (thank you YouTube reviews!) and pulled the trigger.
My choice? A 2018 Gravity brand Liberty CXD cyclocross bike. Now back in my day—damn, that makes me sound old—there were really only two types of bikes: mountain bikes and road bikes. I don’t think I remember seeing a single road bike on campus at the University of Delaware…everyone, I mean everyone, from students to professors, rode mountain bikes.
So the bike I selected has 11 gears with 21 speeds, drop handlebars, a fancy carbon-fiber fork, and a frame that’s considered compact—which after much reading, I discovered was better for smaller rider and also for large riders who wish to have more a upright writing experience. I don’t have best the back in the world, so I figured leaning over the handlebars all day probably wasn’t the best thing for me—I noticed a bit of discomfort with my mountain bike when it worked, where my weight was shifted over the handles too much because the frame was too long. So I found the correct size—for me it was the biggest one they offer, surprise, surprise.
This bike also came with disc brakes, something that I’ve never heard of on a bicycle before, but after looking into it, found that they were considered the next big thing. Many bikes still have the old rim breaks that my mountain bike had, but I discovered that disc brakes have better stopping power and aren’t affected by rain and mud as much as rim brakes. So I figured why not?
The other benefit of a cyclocross bike is that it is essentially a road bike designed to use wider tires and ride in the mud and off-road sections of a cyclocross race. That seemed like a good combination for me—I don’t especially relish the idea of riding roads with cars, but there are many, many miles of gravel and paved bike trails in my AO. I live in a neighborhood that has wide roads and about 3 miles of quiet routes through the development. I figured this was a way to have my cake and eat it too!
According to Bikes Direct, this Liberty CXD would retail around $1200 – $1300 in a comparable brand like Trek or Specialized. However, because I was responsible for doing the maintenance and assembly myself, and I wasn’t buying it with a Trek sticker on the side, but one that read Gravity—which from my research, seems to come from the same Chinese factory that makes other name-brand bikes—I was able to snag this bike for well less than half what was charged in a local bike store.
Once I’d taken the plunge and clicked purchase the only thing left to do was wait and track the package. Bikes Direct told me I would get the bike in 7 to 10 business days. In fact, the FedEx truck pulled up my driveway only three days later. It was like ordering something from Amazon!

The box was bigger than I expected, and quite unassuming—also weighing close to 30 pounds.
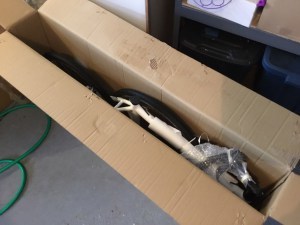
The bike was listed at 17 pounds, so I was relieved to see that the bulk of the weight inside the box consisted of cardboard and packing material. The bike came unassembled of course, and looked like some sort of perverted jigsaw puzzle, held together with zip ties as I pulled it out of the box.
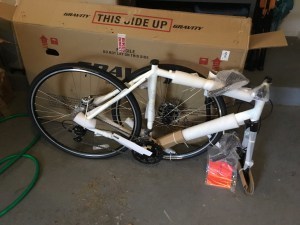
I’ve got to sort through all the pictures I took during the assembly process, so next time I’ll give a proper write up of how I put it altogether. Then I can actually get going with what I originally intended to do this summer: document rides and fitness routines. I can say, though, that since I received this bike a few weeks ago, I’ve ridden close to 30 miles and since July, when I started this bicycle journey, I have lost almost 10 pounds.
Of course, as Jon Snow has said before, Winter is Coming, so I’ll have to adjust my writing schedule. I found this bike to be so much fun and the exercise so addictive, though, I don’t perceive slowing down too much unless the roads and paths are covered in snow or ice!
Till next time, keep your head down and powder dry, my friends.
[image error]
August 25, 2017
Freehold Friday: Here comes Harvey
Howdy Freeholders,
I want to extend my hopes and prayers for all the people down in Houston and in Texas who are staring down the barrel of Harvey. Y’all are looking at Biblical flooding and hurricane conditions along the coast for days, not hours. This thing is going to be a nightmare.
But it can also be a teachable moment for everyone else: Mother Nature doesn’t play by a predictable timeline. She throws us a curve every now and then so you can’t go around unprepared. Ever.
Those of you along the Texas Gulf Coast saw what happened first hand in the last 24 hours when the storm went from a tropical depression to a Cat 2 knocking on the door to a Cat 3 monster. Then, just when it looked bad, it got worse when forecasters realized the damn thing was going to slow down and stall out between two big pressure systems working their way across the country (one to the west and on the east coast).
If you weren’t ready two days ago, it’s too late.
With autumn just around the corner for those of us who actually get seasons (sorry Florida), the time to get ready for winter is now. Don’t be caught flat footed like some people in Texas and Louisiana right now—prepare and get ready.
Granted, there’s not much you can do to prepare for almost three feet of rain in a matter of a couple days, but jumping ahead of the curve and getting water and food supplies to top of your reserves before the American Idol masses panic can mean the difference between comfortably waiting out a disaster and being so hungry/thirsty you’re willing to do something stupid (like wading through waist deep water to find food) to survive.
Remember it only takes a few inches of moving water to knock you down or injury your feet/ankles. And if you can’t move on your own in a disaster environment, you’re in for a world of trouble.
So what will happen in Texas? God only knows, but all signs point to it being nothing good. We can only pray and watch at this point, hoping for the best for those who were caught off guard (like just about everyone else) when this storm literally blew up in the Gulf.
Whatever happens, we observers on the outside should make the most of it and learn as much as possible to apply to our own situations. In that way, the damage, harm, and lives lost will not have been in vain, for that knowledge may help someone else to survive next time.
In light of the unfolding drama in Texas, making a lot of announcements about my books and writing updates (there’s a lot) seems crass, so we’ll forgo that this week—except to let you know that the latest installment of the Solar Storm saga is now live. If you didn’t pick up the preorder copy, you can get your copy today at Amazon. Solar Storm: Season 2: Episode 3: ESCAPE.
Until next time, stay safe, stay dry, and keep your heads down, muchachos.
[image error]
August 10, 2017
Freehold Friday: it’s review time! iPad Pro keyboard case from Moko
Howdy Freeholders!
There[image error]s lots of exciting stuff to go over today, from book releases to pre-orders to product reviews, so let[image error]s just jump right in, shall we? This one's a big'un, so go crack open a beverage of your choice and set yourself down for a while. Here we go…
WRITING UPDATE
As some of you may know, Episode 2: TRAPPED (Season 2 of Solar Storm) is live today for purchase or reading through Kindle Unlimited on Amazon. Those of you who preordered this book after reading Episode 1: CONTACT should already have it on your device! I[image error]d love to know what you thought, so please consider leaving a review if you liked it!
Following the pattern from Season 1, I will be releasing Episode 3: ESCAPE very soon, so you can get things lined up for the next one in two weeks!
I want to thank all my readers for the wonderful support you[image error]ve shown me through purchasing and reading my books! I couldn[image error]t do this without you and I get just as excited over launching a new book as I did when I launched my first one! THANK YOU.
Disclaimer: I am not associated with Moko in any way, but I am an Affiliate with Amazon, so if you purchase one of these cases by clicking on the links I provide, I[image error]ll get a small percentage. It[image error]s not much, but every little bit will help me with the upkeep costs of this website so I can continue to bring you content.
RICHARDSON REVIEWS
This segment will be something I[image error]d like to do every now and then to bring you my thoughts on different items that could be useful for non-prepping situations. For things like freeze-dried lasagna reviews, we[image error]ll rely on my Practical Prepping segment.
But you may have noticed that beside someone who[image error]s enthusiastic about preparedness and post-apocalyptic fiction, I[image error]m also a writer. Now, writers don[image error]t need a lot of gear other than a computer, some software, and a desk/chair/monitor (if you[image error]re so inclined) in general, but the more you think about it, the more things a writer uses on a daily basis. For example: reference books on grammar, etc.; reference books on writing; computer accessories like wireless mice, keyboards, etc.; printers!; notebooks, pens, even paper (types, sizes, styles[image error]they all play a role in how easy it is for you to get words on[image error]well, paper). The list can go on and on[image error]which surprised me when I first sat down to think about this topic. In the beginning, [image error]lo these many years ago (like, 2011) I had a computer, a monitor, a desk, and a chair. Now? I[image error]ve tried lots of things to improve or simplify my writing process[image error]some have worked, some have worked beyond my wildest dreams (ahem[image error]iPad Pro), and some have been abysmal failures (I[image error]m looking at you, broken-ass desk chair).
As a writer, I enjoy reading about other writer[image error]s workflows, processes, even their damn desk setups (I know, it sounds weird to non-writers, but it is a fascination many of us scribes seem to have[image error]maybe it[image error]s a result of our forced isolation, maybe it[image error]s just curiosity, and maybe it[image error]s just a case of keeping up with the Jones[image error], but it[image error]s real[image error]). And I also appreciate it when fellow writers offer reviews on certain products[image error]not because I think they[image error]re better at writing reviews (though many times the grammar is lightyears beyond your average Amazon review), but rather because as a writer, they get it.
It[image error]s kind like the thrill someone gets from playing a sport they truly love. Try to describe that rush to someone who[image error]s either never played the game or doesn[image error]t understand it. You[image error]ll get a deer-in-headlights look every time. It[image error]s one of those you have to experience this to understand what the hell I[image error]m talking about moments.
This whole preamble was just to set you up for something I[image error]ll be doing every now and there here on the blog, namely writing reviews about products and services I, as a writer, use and want to tell other writers (or non-writers who might get some value out of a little more knowledge about a product/service). When I started out on this path and looked at my empty office (ha! It was the dining room[image error]) I had no idea how to start, nor what tools would help me on the way (other than a computer). There were product reviews, sure, but not many by people using the products the way I intended to use them[image error]that makes a yuge difference.
So without further ado, here we go!
My writing process has gone through several iterations, but most recently, I[image error]ve taken to writing on my iPad (when I[image error]m not dictating, of course). Partly this is because it[image error]s summer and the kids are home. In order to get some semblance of peace and quiet every so often, I need to go hide in a closet[image error]the iPad excels at portability. Another reason is my desktop computer is acting strange lately and it[image error]s making me nervous. That[image error]s a whole other story for another time.
Back to the iPad. It[image error]s light, it[image error]s portable, it[image error]s powerful (I[image error]m talking about a 2015 iPad Pro 12.9” for those of you keeping score at home). One thing it lacks is a proper keyboard[image error]I[image error]m not even going to discuss the digital keyboard thing iOS devices have. If you can use it, then good on ya, but it ain[image error]t for me.
So that means I need a keyboard to go with the iPad to make it the “laptop replacement” Apple[image error]s been touting for a few years (it[image error]s not, but I[image error]ll get into that when I discuss the iPad in it[image error]s own post). What, I wonder, am I to do?
Moko Slim Cover 12.9
Enter the Moko iPad Pro 12.9 Keyboard Case.
This case has a foldable stand to attach your iPad to the keyboard, it[image error]s light, it[image error]s good looking, and it protects your $1,000 investment without adding too much weight or bulk. For those of you looking for the TLDR: it[image error]s a great, lightweight keyboard case, and I highly recommend it.
For this review, I[image error]ll be looking at Function, Price, Design, and Durability.
Price
The keyboard case is listed on Amazon for $43.99, a respectable price for the value you[image error]re getting in my opinion. There are several cases with keyboards out there which are less expensive, but at what point do you ask yourself, do I really want to trust my expensive machine to the lowest bidder?
Of course there are dozens of cases out there made by Apple, Logitech, and Zagg[image error]to name a few[image error]which are at least $100 more expensive and they may come with more features (some of the entries from Logitech and Zagg cases offer backlit keys and the Apple Smart Keyboard uses the iPad[image error]s battery to power the keyboard, removing the need for charging cables and batteries), but I think you[image error]ll find it hard to find a case with more utility in this price bracket.
Overall, I[image error]d give the price a solid 4 out of 5 stars. The value you[image error]re getting more than deserves the $43.99 price tag.
Design
This Moko case takes a cue from Apple[image error]s Smart Keyboard (ASK) and has the same look in its folding cover design. In fact, you[image error]ll see me reference the ASK repeatedly here because the similarities are striking. But where Apple[image error]s version has cloth-covered keys (which supposedly keeps the keyboard cleaner and more liquid resistant) and lacks the row of function keys found on standard keyboards, the Moko version uses actual individual keys.
But lets step back and take a look at the over all look and feel of the case[image error]we[image error]ll get to the keyboard in a minute.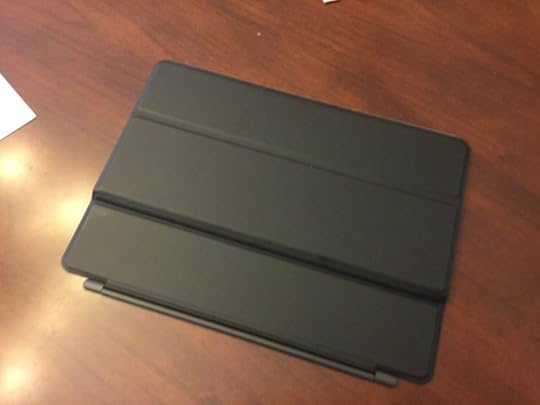
The texture on the outside of the case is what I would call synthetic leather. It[image error]s smooth, despite a fine grain pattern to the material, but it has sufficient grip that I[image error]m not afriad of carrying it one-handed. The intierior face feels like suede, but I[image error]m sure it[image error]s some kind of synthetic micro-fiber. Either way, it[image error]s soft that I[image error]m not worried about any scratches to the iPad screen (looking at you, Logitech Create). The seams are flawless and quite flexible, so it really feels as nice as it looks. 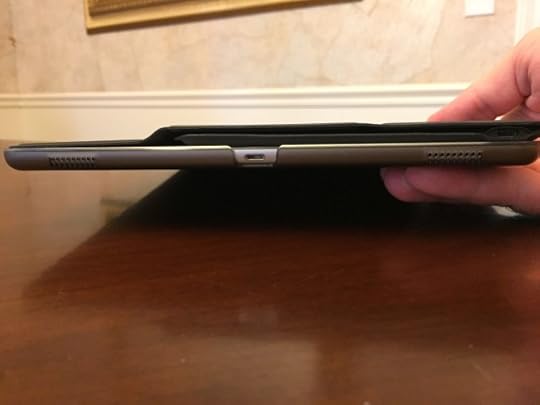 When the cover is secured, it[image error]s thicker on one side than the other (because there[image error]s a keyboard in there). It took all of 5 minutes to get used to the asymetry. I[image error]m a little OCD when it comes to stuff like that and even I got right past it when I started playing with it.
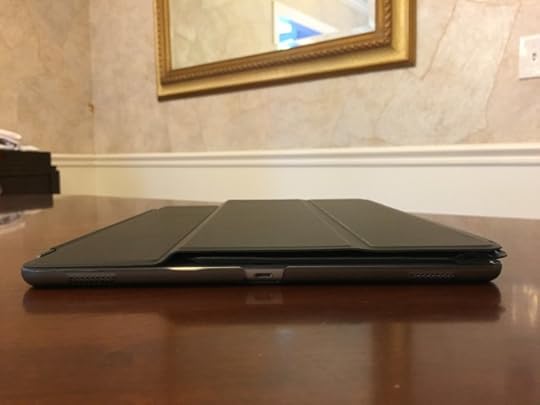
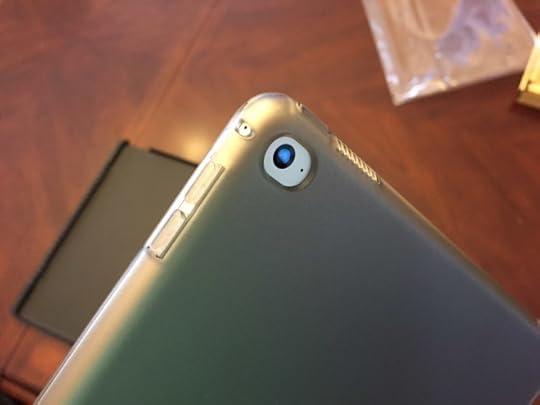
The case also comes with a hard ABS plastic backer shell that is smoke colored and semi-transparent. It turned the back of my silver iPad Pro into a space gray iPad Pro.

The backing is smoother than the cover itself, so if there[image error]s any slickness issues, it[image error]s from the back, not the front. Like I said however, the case itself has plenty of grip without being almost sticky like some cases I[image error]ve seen. That should help a lot in preventing dust and grime from sticking to the case (some rubberized cases are dirt magnets). In short, the case feels great in the hands.
 The backing has acurate cut outs for the four corner speakers on the iPad, as well as the camera, microphone, charging port, and headphone jack.
 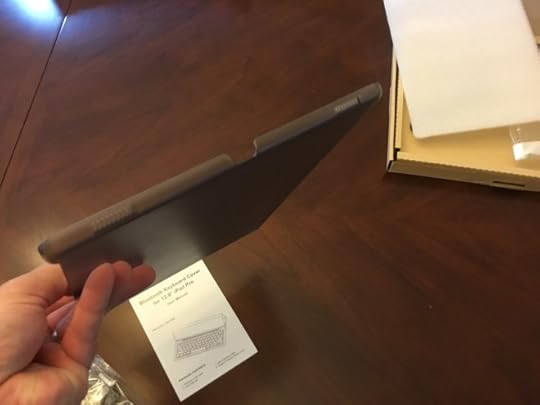 The backing is about 1mm thick, though it may be something rediculous like 1.1 or 1.2mm. It[image error]s just thick enough to feel substantial without adding too much weight. There[image error]s no fancy “air gaps” or rubber stoppers on the corner, or any gimmicky proectection enhancements that are present on other cases, but that doesn[image error]t deter me[image error]the ABS plastic is solid and let[image error]s be honest: the 12.9” iPad Pro is a beast. I don[image error]t care what you put on this thing (short of a Kevlar vest) dropping it from any height onto anything harder than a feather bed runs a significant risk of causing damage. Be careful with your stuff, people.
As for the power button and the volume keys, Moko chose a different route from the standard options of a simple cutout letting you touch the keys directly, or completely covering them in plastic and making things that much more difficult to activate (looking at you again, Logitch Create). Moko chose a third option, which was to have cutouts that span the keys, but also design a flexible tab that rests on said keys, so as you push the tab, it pushes the key. If you look, you can see the iPad underneath the tab. It[image error]s not as easy as just pushing the button, but it sure feels a lot smoother than having the entire button encased. It[image error]s an elegant, yet simple solution.
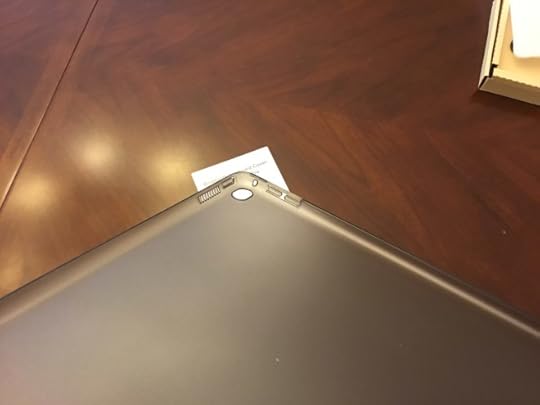

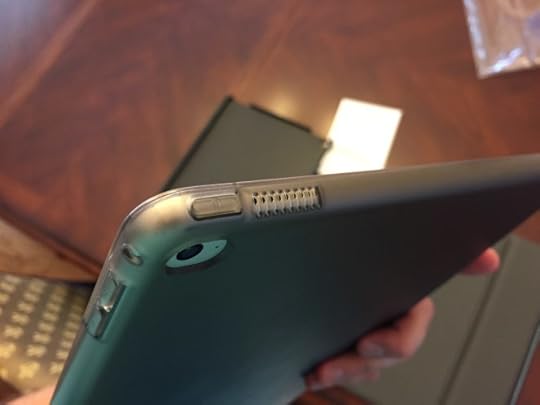 Along the left side of the iPad (when you looking at the screen and the Home Button is down) the backing is cut back to allow access for the spine magnet which holds the cover in place.
You[image error]d think, upon first opening the box, that this gap is way too big[image error]it looks like the iPad will fall right out[image error]but trust me, it[image error]s fine. The iPad is easy to install and easy to remove, thanks to four edges (one at each corner) that securely click the iPad into place. [image error][image error]Installation takes about 3 seconds if you[image error]re clumsy. Just firmly push the iPad into place in each corner (I started with the side where the power and volume keys are[image error]because). You should hear a distinct click at each one.
To remove the iPad (seriously though, why would you want to?) just reverse the procedure starting on the side with the spine magnet cutout and the corners pop out with very little effort. Compared to the other cases I[image error]ve had on my iPad, which seemed intent on cracking the screen given the amount of torque you had to apply to each corner to extract the iPad, this Moko case is a godsend.
But how much does it weigh? Not as much as you may think. This case is very lightweight for a keyboard cover (with backing!) yet it feels sturdy at the same time. I don[image error]t know how Moko managed this, but kudos are deserved. According to Amazon[image error]s product specifications the case weighs in at 638 grams (about 22.5 ounces). That puts it at about a pound and a half in weight. Considering the iPad Pro (2015) itself weighs in at 713g, the entire combo (including the built in keyboard) weighs somewhere shy of 3 pounds (2.97 pounds if you want to be precise). This puts it in the same league as a 2017 MacBook Pro (3.02 pounds). Yeah, see what[image error]s going on here? It[image error]s creeping toward that “laptop replacement.”
The Moko case also features a magnetic closure that not only helps keep the cover closed on your ipad but also activites the wake/sleep function. I[image error]ve found this to work flawlessly and the magnets are plenty strong to keep the case closed under normal usage.  Now, if you turn it upside down (screen down) and shake it, the keyboard is heavy enough to open the cover, so be warned. Granted, heavy is a relative term here when we[image error]re talking about grams.
On the left side of the case, there[image error]s a long, strong magnet that clips to the exposed portion of the iPad where the Smart Connector resides. The case[image error]s magnet is about 9” long, so it[image error]s a good size compared to the iPad itself, which is almost 12” long. At either end of the spine magnet (I[image error]m not sure what term to use here, but I open it like a book cover, so it[image error]s a spine magnet[image error]deal with it) there are two small swivel pieces which connect the two hinges (one for the cover, one to connect to the iPad) and allow the cover to open all the way. 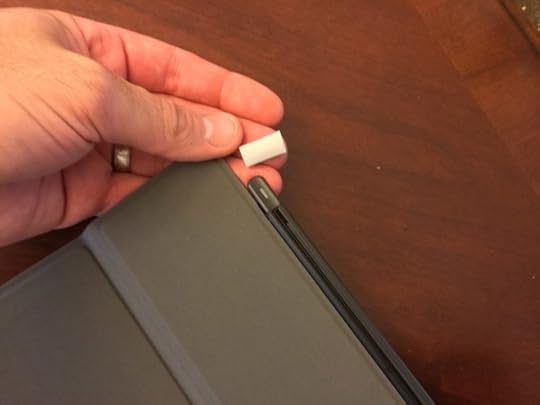 It[image error]s a smooth operating piece of kit and machined well. (The little white thing in my hand was a piece of plastic that protected the hinge end during shipping. The spine magnet really snaps to the iPad with a solid sound and stays put[image error]you[image error]ll have to put some power into pulling the cover off, but not so much that it[image error]s difficult at all. It[image error]s a great connection and helps reassure me the cover isn[image error]t going anywhere unless I make it.
Overall, I[image error]d give the design a 5 out of 5 stars. This thing is light, sturdy, has strong magnets, and looks and feels great. Moko knocked it out of the park!
Function
Now we[image error]re getting to the good stuff. How does it work?
To set up the keyboard, you simply open the cover by lifting the right edge like a book (in portrait orientation, or lift the lid like a laptop in landscape orientation).  The first couple times I did this, I found it easier to practice on a flat surface and open the cover all the way (like laying an open book on a table). Then you lift the inner flap (which is really the back of the keyboard) and lay that out (making one really long cover).
Just like most of these tri-fold cases, you simply bend each segment of the case as if you were pulling the iPad toward the far edge.  The case takes care of the rest and forms into a triangle.
  Pull the spine side of the iPad toward the keyboard and line it up with the magnetic strip just above the function keys.
 You[image error]ll hear a pleasantly loud snap and the iPad will lock in place.
The magnet is strong enough by far to hold the iPad attached to the keyboard on any stable, horizontal surface (even my lap) but I wouldn[image error]t try lifting the whole setup by the top of the iPad as the keyboard will disengage. Also, if you pick up the keyboard, the iPad will fall off.
How does that affect usability? Not at all.
When I type, I type[image error]I don[image error]t get up and walk around with an open laptop or a keyboard case attached to an iPad. If I need ot move to another room (I[image error]m a stay at home dad, it happens a lot), I[image error]ll close the case, be it laptop or iPad and reopen when I arrive at my new workstation. If you like being able to keep the iPad attached to the keyboard while you walk around, you may not like this.
Personally, I think it[image error]s a great “feature” because on those occasions where I[image error]m distracted and move without thinking, seeing and feeling that keyboard disengage is a great reminder to make sure I know what I[image error]m doing with my $1,000 tablet. I see the keyboard pop off and I close the case and now the iPad is secure, then I move. It takes 5 seconds.
I[image error]ve notcied in my testing that the magnet holding the iPad to the keyboard allows some slight movement on either side back and forth (maybe a couple milimeters) but the middle is rock steady.  This doesn[image error]t have any affect at all on how it works, though, so it[image error]s just an observation. I believe it[image error]s just the nature of the beast, becasue the cover has to be flexible, there[image error]s going to be[image error]well[image error]flex[image error]in things.
The angle the case makes to hold the iPad for typing/viewing is fixed, but I[image error]ve found it[image error]s a great angle for not only tabletop but laptop use. [image error]Using one of my kids[image error] protractors, I measured the angle between 120-130° and it[image error]s really quite nice. When in your lap, it doesn[image error]t make you crane your neck down, and on the table, it[image error]s kind of perfect. I[image error]m guessing this is a standard angle, because based on looking at pictures of other covers and the ASK, they all seem to be around the same. I have to admit though, at first, I thought I[image error]d want to adjust the angle more than I really do. I think it[image error]s just because I used a laptop for so many years, I[image error]m just accustomed to the idea of adjusting the screen angle where I am to make it perfect. Now that I[image error]m using the Moko and the position is fixed, I[image error]m finding I don[image error]t even miss the ability to move the screen.
Now, on to the keyboard. As a writer, this is the most important feature of the case, and I have to say, I[image error]m pretty happy with it. The Moko case doesn[image error]t have the same keyboard as a MacBook Pro or anything, but for $43.99 I wouldn[image error]t expect that either. For a case so thin and light, what I expected was honestly a lot less than what arrived.
 This keyboard is actually quite nice.
The connection type is your standard Bluetooth, meaning you still need to pair it to the iPad for it to function properly. That[image error]s really no surprise, because of all the keyboards in existence, only a select few made by Apple itself and Logitech take advantage of the iPad[image error]s Smart Connectors. When you connect the iPad to the magnet on the keybaoard, a green LED lights up just above the lock and Del keys. At first, I thought this was the power indication and had to look twice because it seemed like the Moko case was using the Smart Connector, but alas. The green LED is merely letting you know the keyboard is awake.
For it to function, you still need to pair it with your iPad. Press the Fn key (it[image error]s got blue text) and the volume up key (which has a blue Bluetooth symbol) and after about three seconds, the iPad will display a message asking you to enter a number code and press enter (standard procedure, really).
So what[image error]s it like to type on? Well, for starters, there is zero lag[image error]I press a key and boom, it[image error]s on the screen. That[image error]s always a plus for anyone who types fast. I played with each key and found no issues[image error]enter, delete, space bar, the arrows, the numbers, all the symbols and letters[image error]everything works as it should.
The keys themselves feature a nice bit of travel for such a thin keyboard. They[image error]re in the famous (or infamous depending on your point of view) Chiclet style and Moko takes advantage of the iPad Pro[image error]s size to offer us a full sized[image error]or close enough that I don[image error]t notice, and I[image error]ve got big hands[image error]keyboard layout.
The only downside to the keyboard is the sound. And that may be that I[image error]ve just grown used to typing on my Logitech K870 which has very quiet keys[image error]but it was twice the price of this case. I guess it[image error]s not the sound the keys make so much as the combination of the feeling of the keyboard with the plasticky sound of the keys that makes it noticeable. That[image error]s right, I said noticeable not irritating.
And by noticeable, I mean I only notice it when it[image error]s on my lap. On a table or desk, it[image error]s not very prnounced. But because of the thinness of the case (and the flexibility required) the keyboard has a slight amount of flex to it. Nothing too distracting, and honestly, after the first few minutes of playing with it, I didn[image error]t even notice the movement anymore. I would challenge you, in fact, to find any keyboard case that[image error]s this flexible, thin, and light that has less flex. The only way would be to construct the case out of aluminum, or make it thicker and heavier, all of which would drive up the price and weight, thus reducing the value this case brings to the table.
At any rate, the function keys work great and control the standard functions like taking you to the home screen, locking the iPad, starting media, skipping tracks, adjusting volume, bringing up emojis and even adjusting screen brightness. There[image error]s also buttons for iOS Search and to bring up the iOS keyboard (shudder).
There are two LED lights on the right side above the function key row. One is green/blue  and one is green/red. The left one is for your Bluetooth pairing (flahsing blue) and caps lock (solid green).
 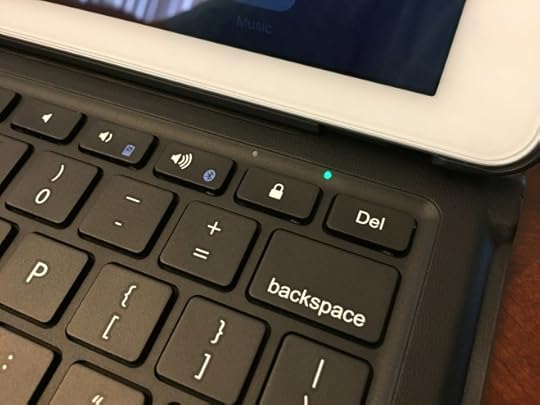 The right one indicates when the keyboard wakes (when you attach the iPad it turns solid green for 10 seconds) and if you hit the Fn and volume down keys, the LED blinks green, one blink for every 25% or remaining battery life, so: 1 blink=25%, 2 blinks=50%, 3 blinks=75%, 4 blinks=100%. If it blinks red, the battery is in need of charging. Mine arrived 50% charged and it took several days for it to wear down enough that I needed to charge. The included micro-USB cable allowed me to charge the keyboard in less than two hours, which matches the item description on Amazon. The red light will remain on while it[image error]s charging.
Overall, I[image error]d give this case a 4.5 out of 5, deducting half a point for the noisy keyboard. In the grand scheme of things, though, the noise from the keys is merely background and after a few minutes of typing, I tend to get into the zone and block out all noise, not just what[image error]s coming from my keyboard.
Durability
This category is the toughest to test right now because I[image error]ve only had the keyboard for about a week. However, I[image error]ve really put it through its paces (I typed this review on it and several thousand words in my upcoming books) and taken it to parks to type while the kids played, sat in my favorite recliner and typed, and sat up in bed to type, as well as sitting in the car (here[image error]s an added bonus for me[image error]if I pull the driver[image error]s seat all the way back and prop this case and iPad in my lap, I can park it between me and the steering wheel[image error]something I have never been able to do with a “clamshell” type case that looks like a laptop).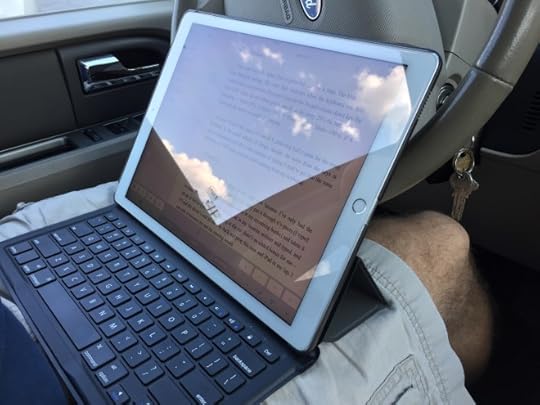
That said, I will be continuing to use this case and have already added notes in my calendar to update my review as time passes to keep you informed on how well it[image error]s holding up with use over time. I have to say though, if it[image error]s durability is even half as good as it[image error]s looks, fit and finish, and capabilities, this case will last a long time.
I can[image error]t rate it yet, but I will soon. After a week, it[image error]s holding up great, with no blemishes, hiccups, or malfunctions to date.
Final Verdict
I[image error]ll say it like this[image error]I love this keyboard case. It[image error]s got just about everything I[image error]ve been looking for in a case for my iPad with a built-in keyboard. Portability, check. Style, check. Easy to switch from typing to tablet mode, check. A nice keyboard, check.
Is it the best keyboard out there? No. I[image error]ve used a Zagg Slimbook (which as of last week is mysteriously no longer available on Amazon and sold out on Zagg's own website…are we looking at a relaunch or did they pull it from the market completely because of the bad reviews?) and man, that thing was sweet, but it didn[image error]t last more than a couple weeks without the hinge breaking. So it turned out to be useless.
Is it a good enough keyboard? Way better than good enough, this keyboard is awesome for what you pay, and what it is, a lightweight, long-lived battery option to always have on you when you[image error]re ready to type on the go.
Would I recommend this case to someone? Absolutely. I think it[image error]s great and unless something comes up with its durability (which I haven[image error]t seen anything to indicate I should be wary), I think this case is a real winner, folks.
So check it out if you[image error]re interested, you won[image error]t be sorry!
Disclaimer: I am not associated with Moko in any way, but I am an Affiliate with Amazon, so if you purchase one of these cases by clicking on the links I provide, I[image error]ll get a small percentage. It[image error]s not much, but every little bit will help me with the upkeep costs of this website so I can continue to bring you content.
July 28, 2017
Freehold Friday: Practical Prepping: Bug-out-bike #1
I had a lot of fun tinkering with my bug out bike project this week and I’ll give you all the deets in a minute. But first, let’s jump right into the other good stuff.
WRITING UPDATE
 I’m happy to report that Solar Storm Season 2, Episode 1: CONTACT is now live on Amazon!

In case you missed it, you can click the cover to head over and grab your copy. Episode 2 is up for preorder (it won’t be live until August 11th) and the other episodes will be every two weeks after that.
In other Solar Storm news, my fantastic narrator, James Romick, is in the early stages of putting together the Solar Storm audiobooks! How cool is that? I’ll give y’all more updates as we go.
What else? As far as Oathbreaker is concerned, I’m still plugging along with the revision notes from my awesome editor—trust me, that’s a good thing, because he’s caught every mistake I think I could ever make! It’s a lot slower to go through someone else’s notes (while trying to crank out a different series at the same time) but in the end the book is going to be a lot more polished than any other book I’ve put out before! I’m really excited!
Ah, we’re past the midway point in Summer. I can almost taste the beginning of school…one month to go, people! ONE MONTH. Then it’s back to high-productivity days…my stories are backing up like planes at O’Hare and my head is threatening to explode (good thing I’ve got all this duct tape).
I had planned to release Solar Storm Season 1 and had prepared myself for it to be a tremendous flop, so I’d gone ahead and booked my summer full of Wildfire adventures and a paranormal thriller serial I’d started (and dropped) about two years ago that just won’t leave me alone. Low and behold, the kids took up WAAAAAY more time than I’d expected (even with camps and visits from grandparents) and—and—Solar Storm took off and I needed to strike while the iron was hot, so to speak. So, the paranormal seems to have been bumped aside (again) and Solar Storm Season 2 took over.
But I’m going to give it my all and go balls to the wall to close out the summer, because I’d like to release the paranormal one in October, before Halloween—and it just so happens that October 13th is a Friday…see? 13…my new favorite character…a Friday (the day I usually release my books)…October…it’s all coming together to tell me that Fate has decreed that this year is the year my paranormal thriller is going to be released.
Pic of surprised kid with book
Aaaaaaanyway…let’s get to the meat of the post, shall we?
PRACTICAL PREPPING
So last week I left you with the idea of using a bike as a bug out vehicle. Obviously, it’s not the idea choice (that would be an armored truck with all-wheel drive, armored tires, flamethrowers, you know, the usual stuff), but in many situations, the humble bicycle could be a force multiplier that might just get your ass to home/safety/reinforcements/family, etc.
We went over a couple scenarios and discussed the pros of using a bike in a SHTF situation. But what about the disadvantages?
Well, for starters, a bike is a bike—it’s not a car, so (1) it’s powered by you, meaning that if you’re not in shape (more on this in a minute) you’re going to get tired or injured and (2) you are completely exposed to everything around you. At least in a car, if the fuel runs out you can shelter in place (think trapped in a snowstorm, rainstorm, etc.). Both a bike and a care can (and will in a SHTF scenario, just count on it) have flat tires and be rendered useless. The difference (okay, I know we’re talking negatives here, but this actually a positive for the bike as well) is with a bike you can carry lots of spare inner tubes and a patch kit and fix your ride multiple times, where with a car, you’re pretty much limited to only a couple (at the expense of valuable storage space for food, gear, weapons, etc.).
What else? Well, that being exposed thing counts for a lot more than just the weather. If you’re in a crowded environment, think NYC during a power outage, sure a bike can weave in and around parked/stranded/stalled/blocked cars, but think of the people. All it takes is one good punch, a close-line, or someone tackling you and you are now off your bike (maybe injured) and on the ground. If you’re paying real close attention (there’s that situational awareness thing again!) you can probably avoid a lot of attacks, but where people are all around you trying to escape something, being on a bike can be like having a flashing beacon on your head saying rob me.
While we’re on the “compared to a car” kick, a bike can allow you to carry far more than you could on your back if you were walking, but it’s not a zero sum tradeoff. The more weight you carry on your bike (or behind it with a trailer) the harder you’re going to have to work to pedal said bike. Granted, it’s not like trying to carry a huge backpack or drag a travois behind you—a bike does have wheels—but you’re going to notice the difference and need to work harder to keep moving. Not to mention all that gear is going to throw off your balance a bit.
 If you’re on a bike, you won’t be able to just cut and run down a path or disappear into the woods—crashing through underbrush on a mountain bike will make quite a bit of noise, just in case you were wondering.
Don’t ask.
If you’re on foot and people are following you, yeah, you can just juke and weave and hide a lot faster than on a bike. Okay, so if you’re on a bike you can go a lot faster than people on foot so I guess that’s a wash.
If you think about it, there’s quite a few disadvantages to using a bike in a SHTF scenario, but upon further reflection, I think you’ll also realize that those negatives are only so when you compare a bike against another form of transportation, like a car.
If, in the event of a nuclear EMP attack, our worst fears are realized and most cars are rendered useless, a bike would then be compared to what…walking or riding a horse? In that case the negatives associated with a bike (except for the totally exposed thing) pretty much vanish. In a world where everyone is walking, those with bikes will have a tremendous advantage.
In a world where cars remain useful, those with bikes will have a tremendous advantage only over those who walk. But…those with bikes will have another valuable tool in their survival arsenal that might just save their ass.

I mean, come on. You can pack a lot of shit on a bike.
Imagine if all those plants and things were food packs, first aid kits, and tents…
Anyway, I guess my point in this rambling dialog is that everything has pros and cons when it comes to survival and preparedness. Except two things (that I can think of): fitness and practice.
What is the negative of fitness? Nothing—you’ll be stronger, have more endurance, be healthier and likely live longer, the fitter you are. What’s the downside to practicing your bug out/SHTF/preparedness skills? Nothing! You’ll have a deeper understanding of what to expect when the excrement flies, and you’ll be better prepared to handle said excrement and help yourself and those you love. And those around you. If you want.
Well, that was an awesome segue.
Ahem.
So…in the spirit of practicing and fitness, here’s the second part of my bug-out-bike series. Last week, I introduced the idea of rehabbing a 18-year old bike and using it for training and fitness, and as a SHTF experiment, all to be shared with my followers.
Well, I’ve finished the rehab and taking my first tentative steps into the fitness segment, so here’s what happened this week:
Here’s what I did. Upon looking over the sad state of my beloved bike, I wiped off most of the dust and flipped her over, exposing the drivetrain. It was filthy. I mean fugly. Almost 20 years of caked on grease, dirt, grime, and dust, really clogged the chain, cassette, and chainrings (for you non-biking types, the cassette is the group of little cogs attached to the rear wheel and the chainrings are the big cogs attached to the crank arms—which are attached to the pedals).
First order of business was to get that shit off my chain. So I pulled out a can of aerosol WD–40 (which is great for
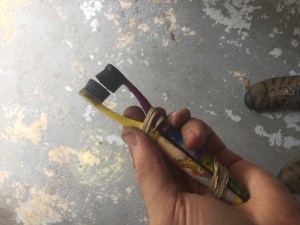
cleaning and degreasing stuff) and sprayed the hell out of the chain. Using a tip I picked up from a biking forum, I used rubber bands to connect to toothbrushes (these were donated from the pile of kids’ toothbrushes we have collected from the dentist) and run the chain through this modified brush. In seconds, it had scraped the chain clean and white bristles became black as coal.
Ew.
Next, I detached the rear wheel (unhook the quick-release bolt, gently extend the rear derailleur down so the chain pulls away from the cassette and the wheel can slide right out).
Tip: if you go slow and take a look at what you’re doing, you can (1) avoid getting your finger pinched—that hurt like hell—and (2) keep the chain from going crazy, so when you’re done, reinstalling the wheel is a breeze.
With the wheel off, I sprayed even more WD–40 all over the cassette and let it soak for a minute while I moved back to the bike and sprayed the chainrings. These were just as filthy as chain itself and took some more scrubbing to clean. While I was removing the decades of grime, I noticed the middle chain ring (the most used on my bike) looked jagged, like it had been damaged.

I thought, holy shit, that can’t be right, the teeth on this thing look like they’re ready to come off! If I try and ride it, I’m going to break it and possibly myself.
Well, fear not…I plowed ahead with my cleaning and when I was done, spent about an hour in research mode…I found out that Shimano (the maker of my drivetrain) made chainrings like that on purpose back in the day (1999), which supposedly made it easier to shift gears or something…basically, bike mechanics in the 1990s laughed a lot when customers brought their new bikes in complaining of defects. My bike is normal.
Whew.
 On with the cleaning! In no time flat, I had the chainrings looking great. I sprayed a little WD–40 in an old rag and wiped down everything by hand, then used a dry part of the rag to…well, dry it all off. That drivetrain hasn’t looked this good since 1999…
Okay, so back to the cleaning…once I got the chainrings all spiffy, I moved back to the cassette. Here it is before I started. It’s kind of hard to see, but that thing is filthy. So I scrubbed it as best I could with the tooth brushes. I don’t have the tool (some special wrench, I guess) to remove the cassette cogs and really clean them, so I just did my best and called it a day when it looked about 70% better than before.
With the drivetrain now as clean as I could get it, I moved on to the wheels. The mountain bike tires I was driving on this thing were original, ca. 1999. I’d never had a flat (miracle of miracles!) so I wanted to keep the tires, but I needed to change them out. I wanted a smoother ride and more of a hybrid/street tire looked nice. I bought a pair of kevlar lined tires from Amazon for $16 each.
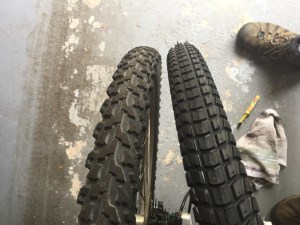 Here’s the difference. That’s the old mountain bike tire on left in the picture.
Taking the tire off the wheel (something I’d never done before) couldn’t have been easier. I watched several Youtube videos and then had a go and it worked! First, I made sure the tire to be replaced was at least partially deflated. That was easy, since the inner tubes were so leaky (and I can’t blame them, they are 18 years old), they were practically flat. Anyway, you use these nifty little tire tools…and wedge the flat, scalloped part under the rim of the wheel, then bend it down and use the hook on the other end to secure it to a spoke. With a gap now held in place, you use the second one (again the flat, scalloped part) to wedge under the tire next to the first and pushed along the rim, following the contour of the wheel. It takes surprisingly little effort, in within about 30 seconds, the tire came off, exposing the deflated inner tube. I just pulled the inner tube out and and that was it! Seriously, if you want to know how, look it up on Youtube.

Next, I unpacked the two new inner tubes I bought (they have that anti-puncture, self-healing, green slime shit inside) and inflated it a little, just enough to give it shape and help in the installation process. I popped the valve through the hole in the aluminum wheel, then started to attach the new tire. First things first, you get one sidewall of the new tire complete seated under the rim of the wheel first. Once one whole side is in place, carefully turn the wheel over, making sure the inner tube stays put. Without much air, the damn thing likes to move around a lot—next time, I’m going to inflate it more.
After you’ve got the tube in place and one side seated, you can use those tire tools again to press the other side in place, working around the wheel. I found the tools to be a big pain in the ass, really, and I spent more time keeping them in line than actually using them, so I tossed them aside and used my fingers. It took about two or three minutes as I fumbled along, forcing the recalcitrant tire into place, but I finally got it all set. Satisfied it was good to go, I inflated it to max pressure (that my little air compressor could handle) and capped it.
I repeated the process—albeit it slower, because for some reason the second tire was just being a stubborn bastard about going out he wheel, but I eventually prevailed.
I took the opportunity with the wheels off to give the frame a good dusting and polishing, then checked all the cables to make sure everything was still in good condition. It was, so I put the tires back on, reconnected the brakes and flipped her over.
Back out not he driveway, my bike never looked so good since the day I got her.

And that, my friends, is how I brought a, 18-year old bike from the edge of the junkyard back to life. After a few test runs to get the saddle adjusted and tweak the handlebars for comfort, I pronounced the bike ready to ride.
And ride I did. The next day, Mrs. Richardson and I went on a little 4 mile ride on the local bike path and I’m happy to say the old Trek handled itself really well. Just yesterday morning, after a three day break for rain, I hauled myself out of bed at 6am and did about 6 miles through the neighborhood (we’ve got nice wide paved streets and the whole loop around the neighborhood is about a mile and a half). Despite the fact that I wanted to throw up and I was literally dripping sweat (note to self: get biking gloves…my hands were so slick I had a hard time holding on for the last lap), I had a blast, got some great exercise and enjoyed the quiet morning before my house woke up(and seemingly the neighborhood, as I only saw two cars).
So not only will I keep track of the mods I do to this bike (which right now include the addition of a bottle holder on the frame and a little tool/cell phone pouch on behind the handlebars) but I’ll keep track of my fitness goals and mileage, to prove this is a worthy cause for anyone who’s preparing. After all, I’m 6’2″ and 247 lbs, but if the SHTF tomorrow, I’d be woefully unprepared as far as my physical fitness is concerned. I aim to change that right now. I keep hearing how much weight people lose biking (ever seen a fat pro cyclist?) and thought this would be a nice, low-impact way to put up or shut up.
So hang on and keep your heads down, because this Freeholder is rollin’.

July 21, 2017
Freehold Friday: Cover Reveal and bug out bikes
Howdy Freeholders!
There’s lost of excitement around the Freehold this week, so lets get to it. First, the Writing Update.
Writing Update
The countdown has begun! One week from today, Solar Storm: Season 2 launches with Episode 1: CONTACT. There’s still time to preorder and get the convenience of having it auto-delivered right to your device as soon as Amazon releases it. While you’re at it, strap in, because things are about to get wild for Jay and the gang. With that in mind, here’s the cover reveal!

The other almost done project is Oathbreaker, the next Wildfire Saga book starring Cooper Braaten. It’s in the final editing stages as we speak and I’m super excited to get this one out there. Look for it soon! (If you want exact dates one when my books are released, sign up for my mailing list and you’ll know before everyone else!)
I’m making good progress on the other episodes in Season 2 of Solar Storm and somehow I’m managing to still crank out about a chapter a day during summer vacation—don’t ask me how because I don’t freaking know. The kids haven’t burned down the Freehold yet, but don’t think for a second that they wouldn’t try if given half the chance, but they’re too busy fighting each other and trying to eat hand soap (yeah, don’t think they’ll do that again!).
Annnnway, I’m pretty darn excited about this weeks blog. It’s got everything: preparedness, fitness, gear, and time outdoors. What the hell am I talking about? Well, read on, friend, read on!
Practical Prepping: The Bug Out Bike
I can see your face now. The what? Doesn’t this fool know there’s things called cars out there?
Yes, yes I do. But here’s the thing, if you’re honest with yourself, being prepared means expecting the unexpected and getting ready to deal with shit that others don’t have the time/patience/inclination/wisdom to think about.
Why would a bicycle be a good mode of transportation during a crisis? Oh, many there are too many reasons to list—I put serious thought into this for about 30 seconds and came up with a bunch, but I’ll get to that in a minute (along with the downsides). For starters, you need to set the stage: what kind of crisis are we talking about?
At the top of the list is the true post-apocalyptic nightmare that seems to be looming ever closer on the horizon thanks to North Korea: a nuclear EMP attack. If you’re reading this blog, you know what that means. If you just stumbled on this looking for dancing hamsters (first, no), here’s a brief explanation: someone sets off a nuke at the proper altitude, generating an intense electromagnetic pulse (EMP) that fries the power grid by overloading the circuits of anything connected to it (much like a solar storm, hint hint). Where a natural event ( the Solar Storm) will cook just about anything connected to the grid if the pulse is strong enough, an EMP operates on another level as well, potentially (I say this because there’s no hard proof…yet) killing delicate electronic circuits in things not connected to the grid at impact. If that holds true, then things like cars with computer controlled steering/traction/emissions (whatever) will be fried along with cell phones, pacemakers…just about anything electronic.
What would the roads look like if 90% of the cars just died when an EMP went off up on the edge of space? Well, for starters we’d have the mother of all traffic jams at every intersection in every city in every state (except maybe Alaska). Cars would die and if their drivers are smart, they’d let them coast to a stop in a controlled manner. But most drivers aren’t, so we’re going to be seeing accidents everywhere. And if cars are affected, so will the ambulances and tow trucks and fire trucks and police cars…starting to get the picture? One fender bender, easily moved off the side of the highway today, will block several lanes (maybe the whole road) in an EMP and then everyone who’s car died behind that initial block piles into each other…total chaos.
The survivors will be walking. Remember that scene from season 1 of The Walking Dead? Where there’s a huge traffic jam and the survivors are hoofing it, checking cars for supplies and then a zombie herd shows up, like a migration or something?
Think how much easier that would have been to escape if only they’d had a few bikes.
Zombies aside, bicycles—as anyone in a major city can likely attest—bikes can zip in and around cars and into tight spaces were no driver could hope to go. Think about how that could apply to any of several situations we might prepare for: if hurricanes shut down a coastline and debris and traffic snarl the roads, a bike can move relatively easy (as long as you don’t hit a nail, but we’ll get to disadvantages in a bit) and unimpeded.
If you come to a roadblock (manmade or otherwise) in a car, your options are limited to turn around and find another way, or smash through it (really bad idea unless you’re driving a Mack truck or a tank). With a bike, instead of smashing through something, depending on your load, you can just pick it up and traverse over the blockage, put the bike down and be on your way (assuming there aren’t two-legged predators waiting in ambush).
Keeping with the traffic concept, let’s say your in a major city somewhere and a disaster is declared, whether it be natural (or impending natural) or manmade, something has happened that has caused a mass panic leading to a general evacuation of the city. Streets are clogged and there are cars everywhere. A bike can go right along the road in the grass, it can head down to railways and ride along the right-of-ways, and it can follow rivers or park trails, walking trails, sidewalks, you name it—on a bike, you can find almost limitless paths out of the city where a bigger vehicle wouldn’t be able to go (legal or otherwise).
So a bug out bike has great mobility, we all get that. But what about utility? With add-on panniers, you can haul stuff on over the rear wheel and with the addition of a rack, you can attach a box or just about anything you can imagine, up to and including Rubbermaid totes of gear or food. You can strap on bags behind the saddle (that’s seat for you muggles out there who drive or walk), in between your legs from the top bar, even hang bags (or baskets) from the handlebar.
And that’s not even touching one the idea of towing a bike trailer. You could easily take a child carrier and stuff it with food or supplies or what have you (if you don’t have kids of course) and be able to bring a sizable stash of supplies with you as you escape whatever disaster caused you to bug out.
If you do a Google search for “DIY Bike Hacks,” you’ll find days’ worth of instructions, images, and videos on how to modify your recreational cruiser into an end-of-the-world battle box on two wheels. Even better, with a little creativity, you don’t need to drop $30,000—I’ve seen mods in PVC, wood, even aluminum yardsticks! People have hacked apart shopping carts and added 5 gallon jugs as panniers—it’s really crazy what some folks can think up, and these people are just trying for utility right now, they’re not thinking what if…
Let’s look at another big benefit of the bicycle: fitness. I’ll be the first to admit I’m not in SHTF shape, but I’m trying. Beyond being able to carry your stuff, you get a great workout that’s low impact (until you fall or someone tries to knock you off your bike). That could be the biggest selling point for those in training for disaster readiness. Practice bugging out with your gear by hauling it around, get used to the load, build endurance and strength, and get in shape.
All courtesy the humble bicycle.
To that end, I’m going to start a series of posts about practicing what I preach.

See, I have a bike from 1999, a Trek 800 Sport that I rode in college, then mothballed until my parents retired to Florida in the mid-2000s. Dad took it and used it down south until he bought a scooter (that he’s gotten up to about 80mph!). For several years it sat unused until it was returned to me when we lived in Texas. The tires died down south and she sat neglected and dusty for another 6 years, hanging from the rafters in our garage in Wisconsin. The above picture was after I inflated the tires this week to see if they’d hold air…they did. For about 24 hours. But hey, that was long enough to snap a picture, then hide her in the garage again in shame. I don’t think any of the neighbors saw…
And now that I’ve recognized the utility and fitness factor (and my kids are learning to ride), it’s time I dusted the old girl off and thought about getting her back into fighting shape. I thought about going with something modern and new for this project, but realized that this bike and me have been through a lot.

This scratch here was where I skidded across a rain-slick road after history class one day at the University of Delaware and almost ate the grill on an oncoming car. Notice the fine patina of orange/brown dust just above that nasty black scratch. The chain, the wheels…ick. Almost 20 years of use and abuse and neglect coating the drivetrain. I have my work cut out for me. She’s still got the little spoke reflector and original dork disk, for crying out loud.
It’s hard to see, but the right handlebar is just slightly off kilter next to some rust, from where (at UD again) some motorist wasn’t paying attention and flung open his door as I passed. I almost ripped that door off (I’m a pretty big guy and when you get me moving at a decent clip, it takes a lot to slow me down). He was furious at first, until he realized a kid hit his door on a bike, and I lay sprawled in the road. My front tired needed to be tried after that and the front spoke reflector died.
Anyway, my point is me and this bike have had some fun. Though she’s got a bit of rust and the tires look and feel dry-rotted, I think she’s structurally sound. So I’m going to do some book-learnin’, tune her up (something I’ve always wanted to do but never had the ability) get some new tires, make sure everything’s lubed up and tight, then see if I can’t bring her back to life.
Once that project is done, I’ll see about doing some SHTF mods and I’ll be sure to post about them here.
On top of all that, as a way to keep me motivated, I’ll keep a fitness progress so that anyone out there thinking of losing weight or getting in shape as part of their readiness routine can see what an average Joe can do with a bike and some determination.
And, just for shits and giggles, I’ll test out dictating on the bike to see if I can not only combine fitness with preparedness, but add in writing as well.
So tune in next time, where we start the resurrection and I’ll go over some disadvantages of a bike (not trying to talk myself out of this, just being honest) as a bug out vehicle. Maybe we’ll even touch on why you want to bug out at all…or maybe that’ll be a separate post. Who knows! There’s so much to do and so little time…
Till next time, muchachos, keep your heads down and your powder dry.
Marcus
July 14, 2017
Freehold Friday: Cover reveal!
Howdy Freeholders!
It’s been a while, hasn’t it? Well, don’t dismay, I haven’t been goofing off (too much). I’ve had my nose to the old grindstone, working like a fiend during the hellish summer months where the three little ones run wild.
That said, I’ve been hard at work writing and going over editorial comments (oh, that happened!) and I’m pleased to say I’ve got some exciting stuff happening soon. First up, Solar Storm Season 2 is about to launch in 2 weeks! Episode 1 goes live on the 28th (you can preorder here if you want), and will be followed every two weeks with a new episode (6 in total).
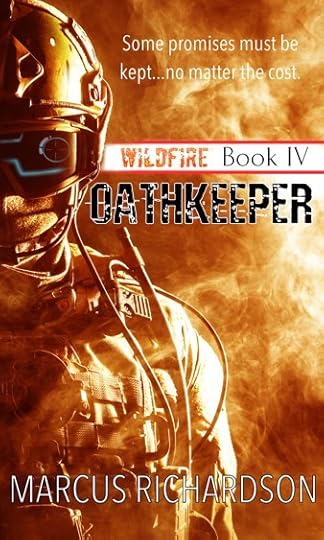
Beyond that, the latest Wildfire book, (#4 for those keeping track at home) Oathkeeper, is nearing the final stages of production and I couldn’t be more excited.
To share the love with y’all, here’s the cover concept art. There’s liable to be some changes to the font or wording, etc., but you get the idea of what it’s going to look like. I’ll post back when it’s 100%.
Cooper Braaten returns to the Occupied Zone to retrieve his former XO’s family (Aliana and Charlie, Jr.) and stumbles onto something that could affect the outcome of the invasion. He’s geared up and officially working for Oakrock now, but even all the high-tech gadgets he’s got might not be enough to survive the OZ.
He swore an oath and he means to keep it.
Okay, enough with the pretty pictures, I’ve got some more edits to make for Solar Storm Season 2 (and the covers as well!)…so much to do and even with the extra daylight of summer there’s still not enough time in the day.
Till next time, keep your heads down and your powder dry, my friends.

June 3, 2017
Freehold Friday: Mountain House freeze dried Lasagna review (Saturday Supplement)
Howdy Freeholders,
This week I decided to do another product review, but this time it’s on a food product, not gear.
It’s been a busy week here at the Freehold, as school is winding down for the year once more and the little Freeholders are anxious to start summer vacation. Speaking of vacation, travel season will soon be upon us, so I’ll be posting some travel tips for preppers in upcoming posts and focusing my themes on mobility and the survival situation.
In writing news, the Solar Storm series continues to sell well and receive positive reader feedback. I couldn’t be happier and I’m currently knee deep in Season 2 (launching at the end of next month!). As a nod to my most requested item on the old To Do list, I’ll be compiling all five episodes of Solar Storm into a box set and should be able to release that next week. So if you’re not a fan of the small individual episodes, don’t worry, Uncle Marcus hears you and will provide.
And now, let’s see what I think about some Mountain House freeze dried lasagna! As a back story, I’ll tell you I’ve never had freeze dried food before (camping or otherwise). I know all about them from what I’ve read online (which, as with most things online, you need to take with a grain of salt, even this blog!) but I’ve never purchased any for my food storage.
All that changed in March of this year when I was perusing the local Wallyworld and discovered they had put almost everything in their camping section on clearance. Well, Marcus Richardson is not one to pass up a deal so I went looking and lo and behold, I found this sweet chicken:
I can’t even remember what the regular price was, but I’m thinking it was in the $5-$7 range. I picked it up for $4. It’s a single serving pouch and I cooked it up the other day and wrote down all my notes (with pictures!) Let’s get to it.
Here’s I reviewed, see below for the deets:
–Ease of Cooking, 10 points (I rate it 8/10)
–Portability, 10 points (I rate it 10/10)
–Shelf Life, 15 points (as preppers this thing has to last) (I rate it 14/15)
–Taste, 10 points (I rate it 9/10)
–Nutritional Content, 15 points (I rate it 10/15)
–Price, 10 points (I rate it 8/10) This is an average…see below.
–Portion Size, 10 points (I rate it 8/10)
–Filling, 10 points (I rate it 7/10)
–Requirements 10 points (I rate it 8/10)
Grand total: 100 points
Details:
Ease of cooking: According to the instructions, all we do is boil water, stir, and wait. What could be easier? I’ll tell you what could be easier, simply opening the food and eating it. But that’s not a big deal. As far as I’m concerned, this freeze dried stuff is pretty damn convenient. Since you only need 3/4 of a cup of boiling water, I rank this as 8/10 points for ease of cooking.
Portability: Another easy one—this package is very light, only 1.91 ounces, and is smaller than an average dinner plate. It’s only about an inch and a half thick making it very light and easy to pack or carry anywhere. My only concern is the packaging itself is foil—a very heavy duty foil, but foil nonetheless. It’s not encased in cardboard or a box or anything and looks like it could be punctured with a sharp object and more than a little amount of force. Because I kept it stored in my kitchen pantry these last few months, but if I had it in my food storage area or a go bag or the car, etc., something could have cut through the bag. Because it’s not your typical thin mylar covering, I still gave it full points. I think for everyday use, even on the trail when camping, it’ll be fine. For a SHTF situation where you’re running for your life? Well…maybe that canned tuna might be better for longevity, but you can’t beat how light this stuff is. 10/10 points.
Shelf Life: this here is like p0rn for preppers. We always want to know how long something will last—we’re always looking for the buy/prep it and forget it Holy Grail. I’m not going to tell you this is it, but look at the expiration date on this package.
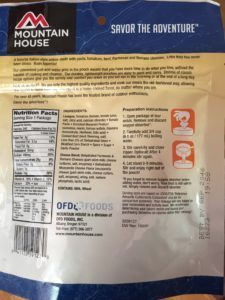
Best by Sep 2046. Yeah, 29 years. This thing should supposedly last a generation in storage and still be edible and nutritionally valuable. That blows my mind. I kept it for about 3 months (LOL). I’d call this shelf stable. My concerns about the packaging carry more weight here, because if you’re going to plan on keeping this stuff for more than just a few months, or take it anywhere long term, you’re going to need to plan to protect the packaging somehow—that could be kind of inconvenient if you have a lot of freeze dried stuff to deal with, so I’ll deduct a point, but buying something now that I could share with my grandkids in 30 years is kinda cool. 14/15 points.
 Nutritional Content: I’m no doctor and I didn’t stay at a Holiday Inn Express last night, so take this for what you will. This lasagna has 12% of your recommended daily fat and 10% of your recommended daily cholesterol.
The human body needs some of that stuff on a daily basis to function properly (the brain especially needs fats and sugars in a high stress environment like a SHTF scenario) so in a collapse or grid-down world, this food would come in handy in the absence quality meals found elsewhere. It’s low in calories though, only 240 per serving (this meal pouch is designed for one serving for one person), so thats’ something to keep in mind. I’m pretty sure you’ll need to consume something else with this meal to get your calorie count up (I keep seeing 3,000/day thrown about the internets in regards to what you need in a post-SHTF environment to keep up with increased activity running from danger, running to danger, hunting, repairing, working, etc.). This is about half a typical meal for me, so I’d need some fruits, veggies, bread, rice…something to go with this pouch to keep pace with my normal needs, let alone elevated needs in a crisis. Like I said though, take my 10/15 points rating with a grain of salt in that I’m no nutritionalist and I may be dead wrong on this stuff…I’m going with my gut here and that tells me this ain’t gonna cut it, but it’s not bad for what it is. An entree, not an entire meal like an MRE.
Portion Size: this ties in with the previous criteria. I’m 6’2″ and about 240 pounds. I’m not a small dude, nor am I grossly overweight. Looking at this package, I’m thinking I’m gonna be hungry when I’m done. It looks like about half what I’d normally consume when eating a lasagna dinner. That said, I get it—we’re talking camping or survival food here not, what you’d get at home or a restaurant. I’m happy to report, however, that after cooking it and eating it, the portion size was just about perfect. It appeared to double in size after soaking up the boiling water. I felt almost full, but not satisfied completely. 8/10 points because I was left ready to eat just a little more to round out the meal when I was finished.
Taste: Ah, the kicker. What’s this shit taste like? My frozen lasagna from the store? My homemade lasagna? Something the dog hacked up? I’m happy to report overall it tasted better than your average freezer food (sorry Stouffer’s) but not nearly as good as homemade. You can tell it’s not fresh, but in this case, that ain’t bad. The meat was firm but not rubbery, had a slightly grainy texture but wasn’t that bad or noticeable. If I was hungry and just looking to eat something, I wouldn’t have cared or even noticed—but because I was trying to record everything about this for you all, I noticed. The sauce was thick and rich and flavorful with bits of rehydrated minced onion that were tender and tasted fresh. The pasta was thick and a bit more dense than what I’d call al dente, but it wasn’t the mushy stuff you get from frozen meals. A big surprise there. It’s pretty good overall and way better than I expected. Mountain House sets the bar pretty high in my book. Now I need to compare it to others. I give it 9/10 points (because of the graininess of the meat and the density of the noodles, which don’t make it taste bad but do keep it from being perfect).
Filling: this ties into portion size but I decided to split it up because…well, I needed to get to 100 points somehow. Anyway, as I mentioned, it wasn’t quite filling on it’s own, but it was surprisingly so as it was. I could have eaten a second pack and been totally stuffed, or some bread or cheese or a cookie or something and a bottle of water and been totally fine. As it was, I was left with my hunger temporarily quenched and ready to get to work. But within an hour I was ready for more to top off the tank. Had I eaten some crackers or something alone with the meal, I would have been full and ready to go until dinner time. Because I needed extra food to stay full and this is considered 1 serving, it ranks 7/10 points.
Price: the final consideration in this oh-so-scientific examination is price. What’s it gonna cost me? Since I bought it off-season for $4 on clearance, I’m content. 7/10 stars. That said, is it worth $4.89 at regular price? I think so, but it depends on your usage. If you want to take a hot meal out into the bush on a camping trip, or even an extended trail run, it’s great. Planning for a SHTF event and stockpiling lots of these things may be convenient but they will be costly. So, two ratings here—short term gets 10/10 points. Long term (more than a year, or bulk storage) gets about 7/10. I’ll give it an 8/10 average. You don’t get a lot for the price compared to buying separate ingredients in bulk, but what you get is quality and convenience. What’s more important to you?
Requirements: at last we get to the nitty-gritty. What’s this take to make? Well, for starters you need 3/4 of water to boil. In a normal use scenario, that’s not hard to come by—you do have extra water and/or filtration systems ready, right?
In a grid-down or major SHTF event, even 3/4 cup of water might be hard to come by, so that’s something to consider when purchasing freeze dried food for your storage. Your individual requirements will dictate what you do, I’m just laying out what I see.
What else? Oh yeah, you’ll need something boil that water in, and a heat source. Don’t forget the fuel to maintain the fire long enough to heat 3/4 water to boiling! And time…the package says pour the boiling water in the bag, seal it, and wait 4 minutes, then stir it (optional step). Then close it and wait another 8–9 minutes. I opened it at the 4 minute mark and stirred it, then closed it up and waited another 8 minutes. It was still hot but ready to eat right away without having to blow on it to cool it off. I give it 8/10 points on the requirements.
Process

So what did I do, what do I think? Well, after glancing at the packaging and reading the instructions, I set about boiling 3/4 cup of water on my stove (this NOT being a SHTF event) and opened the package. Inside I found the standard little oxygen absorber packet, which went into the trash.
Here’s what the lasagna looks like before you cook it.
Not really appetizing, is it? Patience, padawan, patience. After the water boiled (maybe a couple minutes of waiting and checking my phone), I poured it in and got a soupy mess. I stirred it up with a metal fork (to test the packaging), not being particularly careful about the sides to see how well it would hold up to puncturing. The foil—or whatever it’s made out of—held up just fine! I sealed the bag and started the timer, set for 4 minutes.
When the timer when off, I went back to the kitchen and opened the back to a face full of steam, then stirred it again, noting how much of the water had been absorbed. It smelled pretty good—surprisingly good for a meal of this kind…I’d say better than a Stouffer’s frozen lasagna, but not as nice as a home-cooked/restaurant meal might smell.
I resealed the bag and set the timer again. After 8 minutes, I opened it up again and this is what it looked like:

The water had for the most part been absorbed/turned into a nice sauce, not too thick, not watery, either. The first bite was shocking. The meat—in decent chunks—was just barely grainy in texture, but in no way bad. I was expecting…well, anything but this. Honestly, I’ve had stuff come out of my fridge as leftovers that tasted a LOT worse. The sauce itself is almost sticky—I was expecting it to drip off the fork and leave a puddle in the bottom of the bag when I was done, but it clung to the food and despite using a fork, left hardly anything behind:
 This makes for a mess-free meal that is super light and clean to pack out (if you’re inclined to take your trash with you for environmental/legal/security reasons). A quick rinse in a creek/pond, etc., and your bag could be used for water storage or just about anything. It has a nice base and will stand on it’s own if placed on a relatively flat surface.
All in all, I was pleasantly surprised by my first freeze dried meal and look forward to testing others in the Mountain House and other lines. I give this lasagna a 83 out of 100 points. It’s pretty damn good and I recommend it, especially for short term storage needs. I’ll have to buy another one now and make sure I don’t eat it so I can test its longevity.
So that wraps up my first food testing…what brands do y’all recommend I try next? I want to build a little database here at the Freehold (not only for my own personal edification, but for anyone who wants to see what’s out there). What’s your favorite brand? What’s your least favorite (I’m willing to try it all)?
Until next time friends, keep your heads down and your powder dry (and your lasagna warm!).

May 20, 2017
Freehold Friday: Addendum–the groaning trees video
Okay Freeholders, it took me longer than I thought to get my Mac updated and download the proper version of iMovie to get this thing edited and saved…but I finally did it. In the meantime another round of thunderstorms rolled through last night so I had to pause everything until this morning. Sigh.
Anyway, here’s the video I meant to show you with yesterday’s post (it’s on there now for anyone who missed it). If you weren’t one of the originals who got the email when that post went out, then you probably already saw this. Just skip ahead to next week you readers from the future.
For those too lazy to click the above, here’s the video itself! This would be great at night…around Halloween…
https://freeholderpress.com/wp-content/uploads/groaning-tree.mp4
May 19, 2017
Freehold Friday: Mother Nature’s slap to the face.
Howdy Freeholders,
I wanted to write about, well…writing…today but mother nature had other plans. See, today is changing into a prepper post because we had some vicious thunderstorms two days back that left some damage around the Freehold—we’re all fine and the house is fine, but the trees around our property have seen better days.


They’re probably a little jealous of the money tree I picked up last week, all safe and warm (and well-cared for) inside.
Anyway, here’s what happened. Along about 11:30pm local time on Wednesday night one hellacious thunderstorm popped up and rolled over the Freehold. Things were compounded by the fact that we’d had 30–40mph sustained winds for the previous 36 hours. The trees had been whipping back and forth for hours on end, and when the storm hit and dropped even more windspeed, it proved to be too much for this one:

And right next door, it was even worse—about 100 feet from my kitchen window, this massive tree was ripped in half.
The picture doesn’t do it justice at all folks—that trunk is at least 3 feet in diameter!
Because of the near constant lightning (I’ve never seen anything like that, even during tornadoes in Texas) and roar of the wind and rain and thunder, we didn’t hear anything at all. But the next morning when I rubbed the sleep from my eyes and shuffled into the office I spotted the damage immediately.
Around 12:30am Thursday morning, the power went out—I know this because (1) my phone chirped, (2) the ceiling fan clicked like it always does when the power goes out) and (3) the air conditioner shut off. If I wasn’t already awake because of the storm I was wide awake at that moment.
Luckily the power came back after only about 15 minutes. Otherwise there would have been an entirely different post here, about how I went into action and put my preps to the (real-life) test. Either way, I didn’t panic because I knew we had food, water, batteries, flashlights, and emergency supplies squirreled away for just such an occasion.
In the end, the even turned out to be rather anti-climatic (which is what you want!). The storm passed, the power stayed on after about 12:45am, and the damage to our trees was relatively minor compared to others. The tree that fell in our yard is beyond the kids’ normal play area and into the timber, so it’s really no loss/harm to us. If I get motivated, I may hack it up for firewood, but honestly the chances of that happening are pretty slim.
However, there were many lessons to be learned from this experience—the man observations I made in the immediate aftermath are, I think, worthy of mentioning here.
First, the damage, while somewhat surprising in my immediate vicinity, was more extensive just hundreds of feet from my house (around the corner a tree was blow over onto a house, where two streets beyond that, another tree crushed a car in someone’s driveway). My neighbor not only had the tree fall in his front yard, partially blocking his drive, but another tree (only discovered on taking the dog out for her morning constitutional) fell dangerously close to his house—only a few feet away, laying right down the side of the closest wall to our place. Farther along the route to get the kids to school, branches and huge limbs from trees lay on the roads and sidewalks for miles. Several trees had their tops sheared off, which suggests to me we were dealing with a nascent tornado.
Another observation: it’s now 36 hours after the event and most of the damage is still laying where it fell Thursday morning. I’ve seen several tree-service trucks roaming about but with so much damage, I have a feeling it will be some time next week before everything is put back together.
Why do I mention this? To warn you: in the best of times, when power was stable and damage was minor, it’s taking days and days to clear up relatively minor damage. Imagine if this had been an actual twister that leveled several houses, or a hurricane along the coast devastating several towns. Imagine how long it’s going to take for help to arrive in that situation, to clear roads and driveways, to restore power, to bring food and water…
If I wasn’t already well on my way to being prepared, I’d say this storm was one hell of a wake up call. And alarm. I didn’t get hardly any sleep that night thanks to the high wind and creaking trees.
Somewhere out behind our house, a tree was damaged in the storm but didn’t fall—instead, it groans and moans in the wind now, sounding like a coyote that ate too much bad Chinese food. Creepy. We’ve got another round of severe storms coming through (supposedly) tomorrow, so we’ll see if any more firewood falls on my property…I got it on video but I’m having issues uploading it to the internets so when I get that fixed, I’ll tag it on and let you know. It’s pretty creepy and I sure as hell wouldn’t want to hear it at night…sounds like a squatch mating call or something…
Till next time, keep your heads down and your powder dry, my friends.