
Geoff Blake's Blog
March 28, 2012
Building A Custom Web Grid System in Photoshop!
Many web designers use grid system templates as a way to speed up the wireframing and design process. In this lesson, pulled from Ten Ton's latest release, Scratch-Building WordPress Themes with Photoshop, you'll learn how you can create your own custom grid system in Photoshop for fast, easy layout! Let's do it!
So, you can custom-build a grid system using whatever specs you want. Then, simply use your grid as a template for your layouts. It's an awesome way to work! If you want to see how to use a grid system to wireframe out a layout, apply design to the wireframe, and then move the design from Photoshop into a blank WordPress theme, then that's what Ten Ton's latest release, Scratch-Building WordPress Themes with Photoshop, is all about! Be sure to check it out!
Related posts:Extracting Content From Photoshop and Inserting it Into A WordPress Theme!
Saving Out Custom Photoshop Colour Palettes!
Customize WordPress Category and Search Pages!


Saving Out Custom Photoshop Colour Palettes!
Once you've established a palette of colours to use in your design, consider exporting that colour palette and saving it with your design files for easy retrieval later on. In fact, load it into Photoshop's Swatches panel and keep your colours at the ready. In this video lesson, from Scratch-Building WordPress Themes with Photoshop, you'll learn exactly how to do this!
There ya go! It's a nice way to keep your Color panel consolidated and well organized — keeping you focused on your design. Be sure to check out the full training course, Scratch-Building WordPress Themes with Photoshop, now available!
Related posts:Building A Custom Web Grid System in Photoshop!
Extracting Content From Photoshop and Inserting it Into A WordPress Theme!
Customize WordPress Category and Search Pages!
Extracting Content From Photoshop and Inserting it Into A WordPress Theme!
Ten Ton's latest release, Scratch-Building WordPress Themes with Photoshop, is all about building a web layout from wireframe architecture all the way up to a finished design, and then how to pull that design out of Photoshop and into WordPress theme files. In this video lesson, you'll see how to pull the site's logo out of Photoshop and how to insert it into the theme via CSS! Let's see how it's done!
Pretty cool, huh? There's actually a few different ways to go about pulling content out of Photoshop and getting it into your WordPress theme, and if you enjoyed this video lesson, be sure to check out the full-length Scratch-Building WordPress Themes with Photoshop, available now!
Related posts:Customize WordPress Category and Search Pages!
Building A Custom Web Grid System in Photoshop!
Saving Out Custom Photoshop Colour Palettes!
Customize WordPress Category and Search Pages!
One of the big things about Ten Ton's Scratch-Building WordPress Themes with Photoshop training series is that it isn't just about moving a Photoshop layout into the world of WordPress and code, but also how to take our site design as far as we can go…And this includes things like designing post pages, formatting the comments areas, and in the case of this video lesson, how to get your site's category and search results pages under control!
So there ya are, that's how you can pull it off. And hopefully this video lesson has the wheels turning and is giving you some creative ideas for your own work! If you liked this video, be sure to check out the full length Scratch-Building WordPress Themes with Photoshop training course, available now!
Related posts:Extracting Content From Photoshop and Inserting it Into A WordPress Theme!
Saving Out Custom Photoshop Colour Palettes!
Building A Custom Web Grid System in Photoshop!
January 10, 2012
Adjusting Sideboxes In Zen Cart’s Storefront
Ever wanted to get your storefront’s sideboxes under control? You can easily move ‘em to the left or right sides of the layout, or even remove them completely by disabling their visibility. It’s all straightforward in Zen Cart’s Layout Boxes Controller screen. Let’s see how!
If you’re relatively new to Zen Cart, or even if you’ve been using it for a while, one of the wonderful discoveries is learning that the entire storefront layout is customizable, from the header, and the footer, to the sideboxes, and even all the text that’s displayed. It’s all customizable…you just have to know where to go and what to do.
In this video, which is pulled from chapter 3 of the full-length Ten Ton Zen Cart Customization Fundamentals, we’ll take a look at a fairly straightforward aspect of customizing the storefront, and that is how to move the sideboxes within the left and right columns. Fire open your store, press play, and get ready to follow along!
So as you can see, controlling the positioning of your store’s sideboxes, and even turning off the display of specific sideboxes, is relatively easy — although the first few times though might seem a bit tricky, you’ll quickly catch on to how Zen Cart “thinks.”
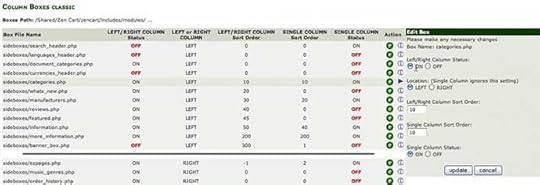
And here’s a few pointers related to working with the admin console’s Layout Boxes Controller screen, as seen below: First, remember that any sideboxes that appear above that thick, black horizontal line dividing the screen appear in the left-hand column, and sideboxes below the black horizontal line appear on the right. Also, to help you along, be sure to make use of the columns that appear onscreen, too. They give you a bird’s eye view of your store’s layout and sidebox behaviour. For example, at a glance here, we can see that search, languages, and currencies have all been disabled in the header, and we can see the sidebox sort order, too. And for more advanced users, all the sideboxes are just PHP files which you can, of course, go and edit to customize things even further.
Pretty cool stuff, huh? If you have any tips related to working with sideboxes, be sure to share ‘em in the comments. And if you’re up for learning more about how to make your Zen Cart store your own, be sure to check out Ten Ton Zen Cart Customization Fundamentals!
Related posts:Ten Ton Zen Cart E-Commerce Quick Start Now Available!
Zen Cart & Ecommerce Fundamentals!
Setting Up A Test Product In Zen Cart
Adjusting Sideboxes In Zen Cart's Storefront
Ever wanted to get your storefront's sideboxes under control? You can easily move 'em to the left or right sides of the layout, or even remove them completely by disabling their visibility. It's all straightforward in Zen Cart's Layout Boxes Controller screen. Let's see how!
If you're relatively new to Zen Cart, or even if you've been using it for a while, one of the wonderful discoveries is learning that the entire storefront layout is customizable, from the header, and the footer, to the sideboxes, and even all the text that's displayed. It's all customizable…you just have to know where to go and what to do.
In this video, which is pulled from chapter 3 of the full-length Ten Ton Zen Cart Customization Fundamentals, we'll take a look at a fairly straightforward aspect of customizing the storefront, and that is how to move the sideboxes within the left and right columns. Fire open your store, press play, and get ready to follow along!
So as you can see, controlling the positioning of your store's sideboxes, and even turning off the display of specific sideboxes, is relatively easy — although the first few times though might seem a bit tricky, you'll quickly catch on to how Zen Cart "thinks."
And here's a few pointers related to working with the admin console's Layout Boxes Controller screen, as seen below: First, remember that any sideboxes that appear above that thick, black horizontal line dividing the screen appear in the left-hand column, and sideboxes below the black horizontal line appear on the right. Also, to help you along, be sure to make use of the columns that appear onscreen, too. They give you a bird's eye view of your store's layout and sidebox behaviour. For example, at a glance here, we can see that search, languages, and currencies have all been disabled in the header, and we can see the sidebox sort order, too. And for more advanced users, all the sideboxes are just PHP files which you can, of course, go and edit to customize things even further.
Pretty cool stuff, huh? If you have any tips related to working with sideboxes, be sure to share 'em in the comments. And if you're up for learning more about how to make your Zen Cart store your own, be sure to check out Ten Ton Zen Cart Customization Fundamentals!
Related posts:Ten Ton Zen Cart E-Commerce Quick Start Now Available!
Zen Cart & Ecommerce Fundamentals!
Setting Up A Test Product In Zen Cart
October 22, 2011
Ten Ton Zen Cart Essentials
Dig deep into one of the most popular e-commerce applications available, Zen Cart! With the huge array of options and powerful settings, you can configure your online store exactly the way you want. But navigating through the myriad of options can be daunting, especially for those new to e-commerce and web design. Join award-winning author and presenter Geoff Blake in Ten Ton Zen Cart Essentials, as he walks you through getting your online business up and running quickly. This feature-packed DVD, which spans over 9 hours across two discs, shows you everything you need to get up to speed and selling your products online fast! You'll learn about Zen Cart's features, how to install and configure your store in a variety of situations, and how to begin testing out your settings. From there, you'll learn how …more >


"Ten Ton makes killer products. The price was a little high, but totally worth every penny. With the amount of knowledge and effort packed into it, it's actually underpriced." —Patrick
View all Web Design & Development training
View all training products

Related posts:Ten Ton Zen Cart E-Commerce Quick Start
Ten Ton Zen Cart E-Commerce Quick Start Now Available!
Zen Cart & Ecommerce Fundamentals!
Ten Ton Zen Cart E-Commerce Quick Start

Take a fast-paced journey into the world of Zen Cart ecommerce with Ten Ton Zen Cart: E-Commerce Quick Start! Delving into e-commerce can be a murky, complicated (and even scary!) undertaking, but with Ten Ton Zen Cart: E-Commerce Quick Start as your guide, you'll have your Zen Cart store up and running in no time. Join award-winning trainer and presenter Geoff Blake as you gain a big picture understanding of how e-commerce works. In his casual and fun style, Geoff will show you how to get the Zen Cart installation running smoothly, tour you though the various Zen Cart admin screens and consoles, and how to efficiently work with Zen Carts features. Then, learn how to set up products and test customers to ensure your store's running smoothly. Next, learn how to configure and test the variety of the Zen Cart shipping and payment …more >

"Ten Ton makes killer products. The price was a little high, but totally worth every penny. With the amount of knowledge and effort packed into it, it's actually underpriced." —Patrick
View all Web Design & Development training
View all training products

Related posts:Ten Ton Zen Cart E-Commerce Quick Start Now Available!
How To Change Or Delete The Sales Message Text In Zen Cart
Zen Cart & Ecommerce Fundamentals!
Ten Ton Photoshop CS5 Beginner's Workshop
Join expert software trainer Justin Seeley as he takes you through the newest version of Adobe's flagship image editor. Ten Ton Photoshop CS5 Beginner's Workshop is a fantastic place to start for those just getting into image editing and graphics, and although it's dubbed a "beginner's workshop," even more experienced users are sure to pick up new skills and techniques. And this isn't just another tips 'n tricks course. Justin will take you step-by-step through real-world scenarios and show you how to utilize some of the hottest industry techniques in your everyday workflow. This course is simply the fastest way to get up to speed with Photoshop CS5, so be sure to check it out! …more >

[image error]
Related posts:New Release: Ten Ton Photoshop CS5 Beginner's Workshop!
Photoshop Creative Magazine Reviews Ten Ton Photoshop!
Ten Ton Photoshop Essentials
Ten Ton Dreamweaver CS5 New Features
Ten Ton Dreamweaver CS5 New Features is a free video series from tentonbooks.com, which takes a down 'n dirty look at the best new features in Dreamweaver CS5. You'll discover the new site set up process and how to set up a staging server, which allows you to work with Content Management Systems like WordPress, Joomla!, and Drupal. Then, find out about Dreamweaver's new Live View Navigation and CSS features, like CSS Enable / Disable and CSS Inspect. Finally, check out Browser Lab and the new Widget Browser. It's 100% free and 100% fun, so let's get started! …more >

Related posts:Now Available: Ten Ton Dreamweaver CS5 New Features…And It's Free!
New Title From Ten Ton Available…For Free!
Ten Ton TV Episode #4: Working with WordPress and CMS in Dreamweaver CS5!
Geoff Blake's Blog

- Geoff Blake's profile
- 3 followers


![[image error]](http://www.tentonbooks.com/images/Ten-Ton-PhotoshopCS5-BeginnersWorkshop-Sample1.jpg)