Pretty Little Things
**Enter Giveaway Below**
Hi, my name is Jillian Peery and I am a beauty product junkie. Oh this love for makeup and hair product goes way back, but I can say with certainty that it reached an all time peak after I graduated with my cosmetology license from Toni & Guy. That’s when it got real crazy! You see, I wanted to learn more! So I took fashion makeup classes and went to as many makeup labs as I could! I was fortunate enough to learn under some great teachers and was able to get my hands on to-die-for mu brands…I was in love. So I took all that knowledge of hair/makeup and started applying it! Again, I was so lucky! I dove head first into doing hair and makeup for fashion shows and photoshoots, weddings and Quinceañeras. I had the privilege of working on the road, in salons, freelance…I’ve been a stylist, color tech, makeup artist, makeup rep, and even an eyebrow specialist–I love it all! Thankfully, my husband is very understanding about my obsession with hair/mu and all the products that go along with it. That’s how you know you’ve got a keeper ladies!  Anyway, the point of me blabbering on about this obsession was to explain my reason for this particular post. While sorting through my email I realized that I had quite a few questions regarding hair/makeup/beauty, most asking about the mu look Clara has at the end of PineLight (the dark, smokey look described as she’s struggling with Victor’s evil grasp). Well, I thought it would be fun to share this look and possibly a few other tips and tricks! So let’s buckle down and get our hands in some makeup!
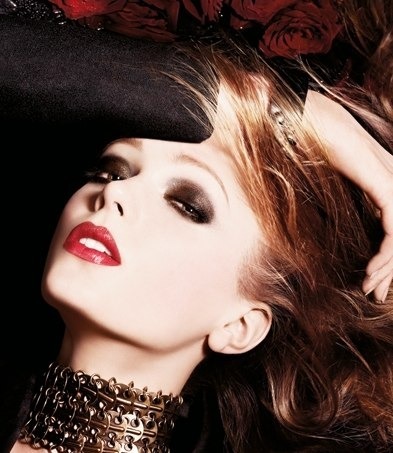
“As soon as the jewelry was snapped into place, my skin became paler than I had ever seen, my lips turned blood red, and a shadow fell over my eyes…” -PineLight
The best visual of this makeup look would be something similar to the mu on the model below. Keep in mind that this model only reflects the makeup look, she’s much too “much” to look anything like my vision of Clara.
To recreate the smokey smolder look (as I like to call it) follow these steps:
Step One
Prep your eyes!
Before you paint the picture you have to prep the canvas! This is going to keep those eyeshadow pigments in place. Now, if you have oily skin I would recommend primers such as Benefit’s-Stay Don’t Stray, Urban Decay’s-Primer Potion or Two Faced-Shadow Insurance. If you’re skin is normal to dry, you can actually get away with using a nice concealer or your normal foundation, just make sure you put one or the other on your entire lid and underneath your eye.
Step Two
Line your eyes.
Invest in a really good liner that stays on, but will smudge when you want it to…with this look we want it to smudge, then stay there! A few eyeliners I would recommend (prestige brands): Himalaya Herbal Kajal, Urban Decay Zero, Mac Powerpoint Eye Pencil, and Stila Kajal Eyeliner. Since we are looking for a smudged look, you can practically use any drugstore brand of eyeliner, just stay away from the liquid and gel liners (the liquid and gel tend to crack and flake when you try to blend shadow into them). Drugstore eyeliner recommendation: L’oreal Voluminous Smoldering Eyeliner.
Tip: If you have large eyes, line from corner to corner (top and bottom lashes). If you have smaller eyes it is best to only line from the middle to the outside (top and bottom lashes). This will prevent the liner from making your eyes appear smaller.
Step Three
Blend liner.
For this look we don’t want to have a harsh line of eyeliner, so after you line, take a nice strong angular brush (eyebrow brush works great…if you don’t have a brow brush use a Q-tip or your finger) and gently stroke your lash line until the liner has a nice soft appearance. Recommended brushes: Mac’s 266 angle brush, Sonia Kashuk Angled Shadow Brush
Step Four
Set Liner.
With your angular brush, apply a dark shadow over the smudged liner. This is the building block for your smokey eye. The shadow will not only ensure that your liner stays in place, but will soften the smudged liner. Recommended shadows: Mac’s Carbon, Sugarpill’s Bulletproof, Urban Decay’s Blackout, Bobbi Brown’s Charcoal
Step Five
Build smoke.
Where there’s smoke there’s fire! And since we want a hot look, we’re going to give a lot of smoke! With a medium sized shadow brush, apply shadow (same shadow as in lash line) slightly above the crease and bring down to form a “C” or half-moon shape around the eye. You will need to build this, so lightly sweep your brush in this half moon shape, until you reach a soft color that graduates outward. (See Figure below) This shape is going to give you a nice sexy contour! Recommended Medium Shadow Brush: Mac’s #239 Shader Brush, Sonia Kashuk’s Small Eye Shadow Brush or if you want to go with a cheap drugstore brand–ELF’s eyeshadow brush
Tip:
If you have trouble blending with your medium shadow brush switch to a brush that has softer fibers. I recommend: Mac’s 224 Tapered Blending Brush, Mac’s 217 Blending Brush, Lancome’s Blending Tip Brush #16 or a good drugstore blending brush like the NYX Shadow brush in large.

Step Six
The Final Blend.
With your blending brush, dust a lighter shadow (for this look we want a deep brown color with a hint of red or mauve) over your entire lid. On this step you can encircle your entire eye, blending into the previous half moon shape. (See Figure below) Recommended shadow: Burberry Midnight Brown #21 (I love, love, love this shadow) Others to recommend: Chanel’s Cinnamon or Mac’s Mulch

Step Seven
Mascara those lashes!
I recommended: Diorshow Mascara, Lancome’s Definicils High Definition Mascara, Maybelline’s Great Lash Big Washable Mascara, Loreal’s Volumous Original Mascara
Optional Step
Just for fun!
For Clara’s look, I saw her shadow as being a bit more glossy. So if you were wanting to recreate her “exact” look, then you could add a bit of vaseline over your lid. Keep in mind this is not a wearable look. The vaseline WILL crease your shadow VERY quickly, but if you were creating this look for fun or for a photo shoot you could add it to make the look even more striking!
Tip: After your eyes are complete, don’t forget to wipe away any shadow that has mistakenly fallen under your eyes or cheeks. And clean up any unwanted smudge by dabbing a thin concealer under your eyes!
Step Eight
Add lipstick!
Clara’s were blood red! Now red lipstick can be a tricky buy, simply because one red may look completely different on two models. This is due to the different pigmentation you have in your skin. Do you pull more cool or warm tones? We want a warm red for this. Here’s a few of my favorite red’s…try Mac’s Ruby Woo, Mac’s Russian Red, Armani’s Hollywood Red, or E.l.f Royal Red to finish off the look!
If you tried this tutorial, let me know how it turned out and post your pictures!
Enter this week’s giveaway to win a ebook copy of PineLight or TigerLily!
.goodreadsGiveawayWidget { color: #555; font-family: georgia, serif; font-weight: normal; text-align: left; font-size: 14px;
font-style: normal; background: white; }
.goodreadsGiveawayWidget img { padding: 0 !important; margin: 0 !important; }
.goodreadsGiveawayWidget a { padding: 0 !important; margin: 0; color: #660; text-decoration: none; }
.goodreadsGiveawayWidget a:visted { color: #660; text-decoration: none; }
.goodreadsGiveawayWidget a:hover { color: #660; text-decoration: underline !important; }
.goodreadsGiveawayWidget p { margin: 0 0 .5em !important; padding: 0; }
.goodreadsGiveawayWidgetEnterLink { display: block; width: 150px; margin: 10px auto 0 !important; padding: 0px 5px !important;
text-align: center; line-height: 1.8em; color: #222; font-size: 14px; font-weight: bold;
border: 1px solid #6A6454; -moz-border-radius: 5px; -webkit-border-radius: 5px; font-family:arial,verdana,helvetica,sans-serif;
background-image:url(http://www.goodreads.com/images/layou... background-repeat: repeat-x; background-color:#BBB596;
outline: 0; white-space: nowrap;
}
.goodreadsGiveawayWidgetEnterLink:hover { background-image:url(http://www.goodreads.com/images/layou...
color: black; text-decoration: none; cursor: pointer;
}
Goodreads Book Giveaway

TigerLily
by Jillian Peery
Giveaway ends August 24, 2012.
See the giveaway details
at Goodreads.


 Janet wrote: "AMAZONG!!! Your instructions are so good ... can't wait to try it ou!"
Thanks, Janet! Let me know how it works for you! And post pictures!