Where there is a will, there's a way... to self-publish for free
A few months back I wrote a blog (
Edit, edit, and edit again!
) about all the different
FREE
resources : use to edit my books and some of the most common mistakes I made with my first book release. I have received a lot of feed back from that blog, as well as many requests for more helpful tips to become a better writer. If there is anything you should know about me, it is that I am extremely cheap! I have taken the long road in self publishing due to the fact that I simply can't afford to pay anyone to edit and format, or to make cover art for me. The long road wasn't easy and it meant spending countless hours learning how to work a new
FREE
writing program. In addition to learning that program, I also became somewhat proficent in the basics of photo manipulation through another
FREE
program. So, here I am sharing with my fellow newbie authors or anyone else who wants to improve their budget.
Today I will not only share the programs I used, I will also show you some of the things I have accomlished with these programs. The first one is my writing program. Microsoft Word is the standard program used by the average PC user; however, I looked into the cost of it and found it to be a bit too expensive for my pocketbook. Not to mention the fact that I tried it free for a month and it lost my 'saved' document three times in two days which is totally NOT acceptable for someone who spends hours writing every day.
Fear not my cost-concious friends, there is a free alternative that many people use and it isn't hard to shift your knowledge of Word to this program. OpenOffice (OO) Writer is the program I have used for almost two years now and it is 100% free. No tricks or gimmicks, just a free program which is very similar to what most writers are used to. There are tutorials all over the place to help you learn about the small differences you may encounter with OO, but I will show you a screenshot of my most recent book which was formatted for Createspace with OO.
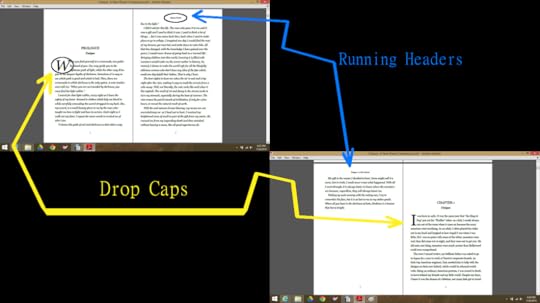 As you can see, with the help of many other wonderful people who took the time to make a tutorials, I successfully implemented running headers and drop caps into my new book to make it look as professional as possible. Although I did not point it out, I also added page numbers and used various other formatting techniques to make sure my book fit the parameters of the book size I chose to publish (6'x9'). Perhaps in the future I will do my own tutorials to walk through each step I used to format my book, but for this post I am simply showing you what OO can do if you take the time to learn it. I am currently using Apache OpenOffice. There are a few other versions out there that may work; however, I can't vouch for them. I always use
CNET
for my downloads because it is safe, but you can find
Apache OpenOffice
to download free in other places.
As you can see, with the help of many other wonderful people who took the time to make a tutorials, I successfully implemented running headers and drop caps into my new book to make it look as professional as possible. Although I did not point it out, I also added page numbers and used various other formatting techniques to make sure my book fit the parameters of the book size I chose to publish (6'x9'). Perhaps in the future I will do my own tutorials to walk through each step I used to format my book, but for this post I am simply showing you what OO can do if you take the time to learn it. I am currently using Apache OpenOffice. There are a few other versions out there that may work; however, I can't vouch for them. I always use
CNET
for my downloads because it is safe, but you can find
Apache OpenOffice
to download free in other places.
Now, on to the program I used to make free book covers and promotional images. I found Gimp almost two years ago and it has changed my life, literally. After spending countless hours building cover after cover and simply playing around with this program, I have become quite efficient at photo maniplation. I also learned that I LOVE to create things and enhance photos. I have even done it several times now, by request, for family and friends.
Gimp is similar to photoshop. It has almost all of the same functions, although I have heard that there is a learning curve for those of you who are photoshop veterans. I have never had a photo manipulation program before I found Gimp, so for me, it only took learning the basics and moving into more advanced manipulation from there. I often watch tutorials for fun now, just to see what new filters and ideas people have that I may not have explored. You can find additonal tools such as filters, brushes, fonts, and plugins to download for free that make this program even more impressive. You can even find prebuilt Gimp programs that have already installed some of the more popular filters and plugins for you. My first time around with Gimp, I did most of the installation of extras myself but after purchasing a new computer this spring, I downloaded a prebuilt version from http://www.partha.com/
If you would rather do all the customization yourself, you can find the basic version of Gimp on CNET .
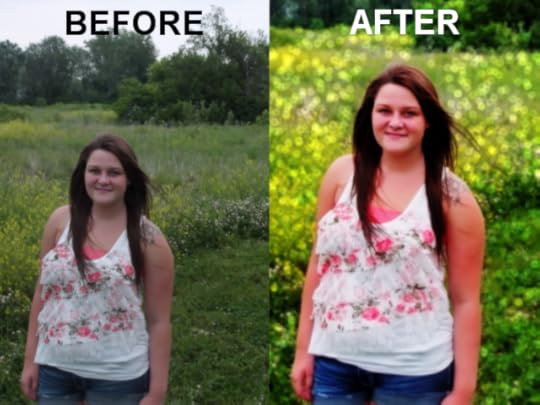
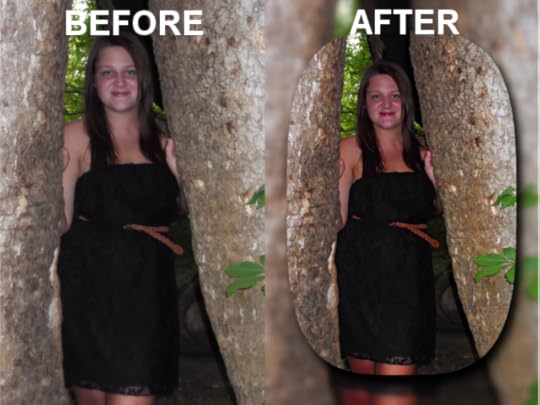
Here are a few of the things I have accomplished with Gimp. The first set of photos are simple photo manipulations I did for my niece's graduation. I enhanced the photos and used filters to add the desired effects.
 The second manipulation is my latest book cover for my new series which will be released in August. The models are my own photographs of family and friends and the background is a public domain image. All of these were obviously free to use and will not cause me any grief due to copyright issues. The only thing I spent any money on was the sword, which I purchased from Amazon for $50 and it will end up being a great investment since I will be able to use it for more than one book cover in my series.
As you can see, I changed and added quite a bit to get the final cover art the way I wanted it. I decided how I wanted the cover to look and then found tutorials to teach me how to do each change; making day into night in the forest, fading the background behind lettering for the back cover, making metallic text, etc. All these changes were done by watching a tutorial someone else did and a little bit of trial and error.
Well, I hope you find the two free programs I use helpful. I do know that it is no walk in the park to learn how to use either one of these programs. As I said before, there are all kinds of tutorials and walkthroughs all over the internet that will help guide you. I am by no means an expert, I still have a lot to learn. Maybe one day I will have a blog to share with you about how I became an expert one step at a time. For now, I will share what I know and we can learn together.
Today I will not only share the programs I used, I will also show you some of the things I have accomlished with these programs. The first one is my writing program. Microsoft Word is the standard program used by the average PC user; however, I looked into the cost of it and found it to be a bit too expensive for my pocketbook. Not to mention the fact that I tried it free for a month and it lost my 'saved' document three times in two days which is totally NOT acceptable for someone who spends hours writing every day.
Fear not my cost-concious friends, there is a free alternative that many people use and it isn't hard to shift your knowledge of Word to this program. OpenOffice (OO) Writer is the program I have used for almost two years now and it is 100% free. No tricks or gimmicks, just a free program which is very similar to what most writers are used to. There are tutorials all over the place to help you learn about the small differences you may encounter with OO, but I will show you a screenshot of my most recent book which was formatted for Createspace with OO.
 As you can see, with the help of many other wonderful people who took the time to make a tutorials, I successfully implemented running headers and drop caps into my new book to make it look as professional as possible. Although I did not point it out, I also added page numbers and used various other formatting techniques to make sure my book fit the parameters of the book size I chose to publish (6'x9'). Perhaps in the future I will do my own tutorials to walk through each step I used to format my book, but for this post I am simply showing you what OO can do if you take the time to learn it. I am currently using Apache OpenOffice. There are a few other versions out there that may work; however, I can't vouch for them. I always use
CNET
for my downloads because it is safe, but you can find
Apache OpenOffice
to download free in other places.
As you can see, with the help of many other wonderful people who took the time to make a tutorials, I successfully implemented running headers and drop caps into my new book to make it look as professional as possible. Although I did not point it out, I also added page numbers and used various other formatting techniques to make sure my book fit the parameters of the book size I chose to publish (6'x9'). Perhaps in the future I will do my own tutorials to walk through each step I used to format my book, but for this post I am simply showing you what OO can do if you take the time to learn it. I am currently using Apache OpenOffice. There are a few other versions out there that may work; however, I can't vouch for them. I always use
CNET
for my downloads because it is safe, but you can find
Apache OpenOffice
to download free in other places.Now, on to the program I used to make free book covers and promotional images. I found Gimp almost two years ago and it has changed my life, literally. After spending countless hours building cover after cover and simply playing around with this program, I have become quite efficient at photo maniplation. I also learned that I LOVE to create things and enhance photos. I have even done it several times now, by request, for family and friends.
Gimp is similar to photoshop. It has almost all of the same functions, although I have heard that there is a learning curve for those of you who are photoshop veterans. I have never had a photo manipulation program before I found Gimp, so for me, it only took learning the basics and moving into more advanced manipulation from there. I often watch tutorials for fun now, just to see what new filters and ideas people have that I may not have explored. You can find additonal tools such as filters, brushes, fonts, and plugins to download for free that make this program even more impressive. You can even find prebuilt Gimp programs that have already installed some of the more popular filters and plugins for you. My first time around with Gimp, I did most of the installation of extras myself but after purchasing a new computer this spring, I downloaded a prebuilt version from http://www.partha.com/
If you would rather do all the customization yourself, you can find the basic version of Gimp on CNET .
Here are a few of the things I have accomplished with Gimp. The first set of photos are simple photo manipulations I did for my niece's graduation. I enhanced the photos and used filters to add the desired effects.
The second manipulation is my latest book cover for my new series which will be released in August. The models are my own photographs of family and friends and the background is a public domain image. All of these were obviously free to use and will not cause me any grief due to copyright issues. The only thing I spent any money on was the sword, which I purchased from Amazon for $50 and it will end up being a great investment since I will be able to use it for more than one book cover in my series.As you can see, I changed and added quite a bit to get the final cover art the way I wanted it. I decided how I wanted the cover to look and then found tutorials to teach me how to do each change; making day into night in the forest, fading the background behind lettering for the back cover, making metallic text, etc. All these changes were done by watching a tutorial someone else did and a little bit of trial and error.
Well, I hope you find the two free programs I use helpful. I do know that it is no walk in the park to learn how to use either one of these programs. As I said before, there are all kinds of tutorials and walkthroughs all over the internet that will help guide you. I am by no means an expert, I still have a lot to learn. Maybe one day I will have a blog to share with you about how I became an expert one step at a time. For now, I will share what I know and we can learn together.


No comments have been added yet.