Stephanie Thurow's Blog
November 5, 2025
Cranberry Shrub Recipe
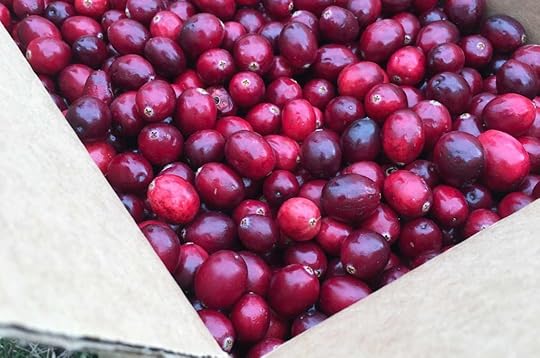
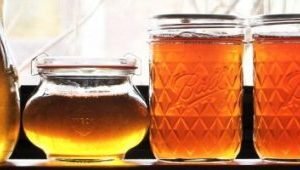
I’m still chipping away at the 15-pound box of fresh cranberries that I bought from the farmers market. I’ve already made cranberry apple jam, cranberry apple butter, and cranberry sauce for Thanksgiving – all recipes can be found in my cookbooks. Other recipes that I have yet to make but can also be found in my books include cranberries infused in honey, fermented cranberry relish, and infused cranberry vodka. I love preserving with cranberries, if you can’t tell.
Cranberry season is fleeting so we must make the most of it while we have the opportunity. Unlike the shrub recipes in my cookbooks, I cook this one to help extract the juice from the berries.
Festive Cranberry Shrub
Yield: 2.5 cups finished shrub
Ingredients
2 cups fresh cranberries
1.5 cups white granulated sugar
1 cup orange juice
To finish off after making syrup: about 1.5 cups raw organic apple cider vinegar (or other drinking vinegar of choice).

Directions
Rinse cranberries, remove any white or damaged berries and stems. In a medium sized saucepan, bring the cranberries, orange juice, and sugar to a simmer. Simmer until the berries begin to pop and cook and become soft and deflated. Stir often.
The syrup will become bright red once it’s ready to strain. Keep an eye on the pot as it simmers – it is a syrup and will get hot and bubble over if not carefully watched and stirred down.
Once the sugar has dissolved and a syrup is made, use a fine mesh strainer to strain out the solids, reserving the syrup in a heat tolerant measuring cup. Use a spoon to stir out the juice from the solids. Double strain for a cleaner/clearer syrup (optional).
Once strained, measure the amount of cranberry syrup that was collected and add that same amount of vinegar to the syrup (it will be about 1-1.5 cups of vinegar), stir well to mix.
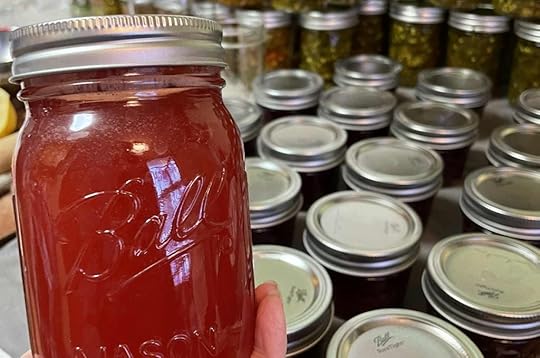
Store in a clean jar with lid tightened on and refrigerate. Enjoy within a few months for best flavor.
To serve
Mix about a shot (1-2 ounces) of the shrub mixture with water, or carbonated water. Serve over ice. Shrubs also make tasty and unique cocktail mixers. This bright red shrub is perfect to serve over the holidays (my photo doesn’t do the color justice).
Side notes
You can also use brown sugar, coconut sugar, maple syrup, or other sugar alternative in place of white granulated sugar.
This method of shrub making can be applied to any fruits and herb combinations. Consider adding orange zest, ground cinnamon or rosemary while simmering the syrup.
Don’t toss the strained-out fruit solids! The solids are delicious mixed into plain yogurt, oatmeal, or blended into a smoothie. You can also process them in a food processor and make a tasty fruit leather!
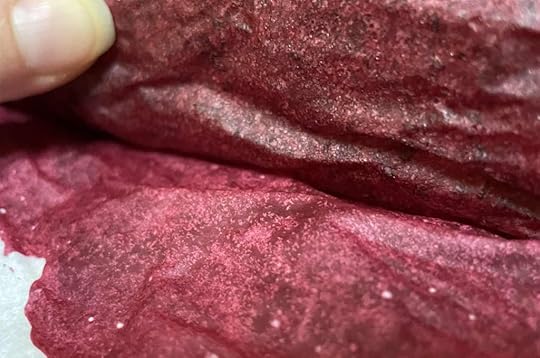
Cranberry fruit leather made from leftover shrub solids.
This recipe was adapted from WECK Small-Batch Preserving (2018) with permission from Skyhorse Publishing, Inc.
The post Cranberry Shrub Recipe appeared first on Minnesota from Scratch.


October 7, 2025
Fermentation Summit 2025 – Free to Attend!

Fermentation Summit 2025 will run from October 21–23, 2025
Each day is packed with amazing speakers—18 experts covering everything from sauerkraut and salsa to sourdough, kombucha, miso, and beyond.
I’m going to be talking all about… (drum roll, please)… how to ferment your very own hot sauce!
We’ll have a pop-up Facebook group where you can connect with other fermenters, ask speakers your burning questions, win prizes, and share your jars!
The summit is absolutely free to attend, but you can also grab the Fermentation BONUS Bundle—a collection of recipes, guides, and replays of all the presentations—for an upgraded experience.
The Fermentation BONUS Bundle is currently available at a special price, and it will disappear for good once the summit is over. You’ll get all the details and a special offer as soon as you grab your free ticket.
Sign up to join our free event here!
Hope to see you there,
Stephanie
The post Fermentation Summit 2025 – Free to Attend! appeared first on Minnesota from Scratch.
September 11, 2025
Preserve Your Green Tomatoes: Spicy Pickled Green Tomatoes + Fermented Green Tomato Salsa Recipes
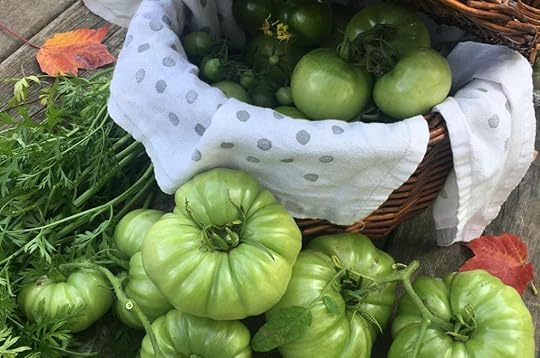
Whether we want to accept it or not, another growing season will soon end here in the north. I’ve begun collecting nasturtium, calendula and marigold seeds. I’ve been preserving ripe tomatoes and freezing many for later-date processing. Next week I’ll pull all my hot peppers and pickle them for winter enjoyment and right before we experience our first freezing temps, I’ll harvest all of our green tomatoes.
There are so many delicious ways to enjoy green tomatoes besides letting them ripen on the countertop. We love making fried green tomatoes, I base my recipe off of this one and enjoy them with a garlic aioli. Green tomatoes can also be made into a sweet treat, like this green tomato pie recipe.
Over the years, I have found many ways to preserve our abundance of green tomatoes and transform them into other condiments and pickles. My cookbooks have recipes for green tomato relish, green tomato salsa (canned and fermented recipes), green tomato chutney and more.
Today I’m sharing two delicious and easy recipes to use up your end of season green tomato harvest: Spicy Pickled Green Tomatoes and Fermented Green Tomato Salsa.
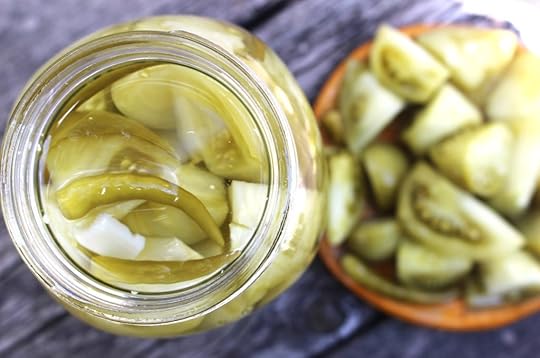
One of our very favorite recipes, that my grandpa made for years before I was born, is spicy green tomatoes. This is a refrigerator pickle, so it doesn’t require any boiling water bath canning or fermenting.
These pickles make a great snack straight from the jar but are also a surprisingly flavorful addition to a snack platter. Use them as you would a regular dill pickle – chop them up into tuna or egg salad for a spicy kick. They also make a great Bloody Mary garnish.
Spicy Green Tomato Pickles (Refrigerator Recipe)
Unripe green cherry or other large tomato varieties are both great pickled, feel free to mix and match. The spicier the better in my opinion. For a bearable heat, just add one jalapeno pepper. For more of a kick, add a halved habanero pepper or a few Thai peppers.
Yield: 1 quart jar
Ingredients:
3.5 cups green tomatoes, cut into bite-sized chunks
4 cloves garlic, halved
2 jalapeño peppers, halved (or spicier peppers if you prefer)
Brine:
1.5 cups water
1.5 cups 5% white distilled vinegar
2 tsp. canning salt
Directions:
Wash tomatoes, remove any flawed or bruised areas and stems.
Prepare tomatoes, garlic and hot peppers and transfer them to a clean quart jar, leaving one-inch of headspace (room from the tomatoes to the rim of the jar).
Heat the brine ingredients to a simmer and stir until the salt is dissolved. Remove from heat.
Carefully ladle the warm brine over the tomatoes until they are submerged completely.
Wipe the rim of the jar clean with a dampened cloth to remove any spillage. Place the canning jar lid on the jar and tightly screw on the ring. Allow the jar to cool to room temperature and transfer to the refrigerator.
Allow the tomatoes to pickle for at least one week before tasting. The longer the tomatoes pickle, the more flavor they will have.
Notes:
My grandpa traditionally made these tomatoes really spicy and that’s how I tend to enjoy them to this day. Add any type and as many spicy peppers as you’d like.
If using cherry tomatoes, I recommend slicing them in half before pickling.
Add in whole peppercorns, dill, mustard seeds, or other spices to alter the pickle flavor.
This recipe has been shared from Stephanie Thurow’s, WECK Small-Batch Preserving cookbook, with permission from Skyhorse Publishing, Inc.
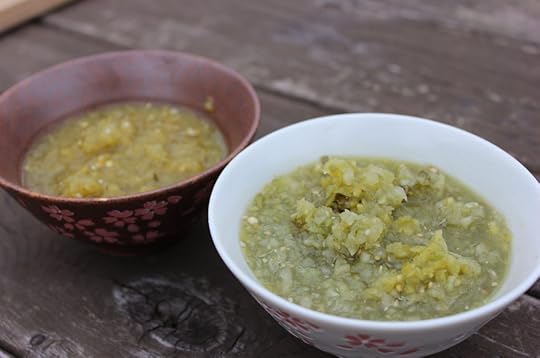
The left is canned green tomato salsa and the right is fermented green tomato salsa. Recipes found in Can It & Ferment It.
Fermented Green Tomato Salsa
Use this salsa as you would any traditional red tomato salsa. It’s great right after it’s made but allow it to ferment for two or three days and you’ll enjoy it even more once the flavors meld together!
Yield: 1 quart jar
Ingredients:
6 cups fresh green tomatoes
1/2 onion, yellow
2 jalapeno peppers
1/2 cup fresh cilantro
1.5 tsp. salt
1 lime juiced, for serving
Directions:
Using a food processor, add all the ingredients except the salt and lime juice. Pulse in a food processor a couple of times until the tomatoes are broken down to a salsa consistency. If you do not have access to a food processor, dice the green tomatoes and finely chop the other ingredients. Transfer the prepared ingredients into a nonreactive bowl and add in the salt, stir well.
Transfer the salsa to a clean quart canning jar and leave at least 1-inch of headspace. Add the jar lid and tightly screw on the ring. Burp this ferment one to two times a day; stir up the ferment and press it back down so that no salsa remains on the side of the jar.
Ferment at room temperature (ideally around 70-degrees F) and keep out of direct sunlight. Taste test after 48-hours to determine if this is done. Typically I ferment three days. Once the flavors have melded together and you are pleased, stir in the lime juice and transfer the salsa to the refrigerator.
This recipe has been shared from Thurow’s Can It & Ferment It, with permission from Skyhorse Publishing, Inc.
*Be sure to thoroughly clean your workspace and supplies before preserving food. Wash jars and lids with hot soapy water.*
The post Preserve Your Green Tomatoes: Spicy Pickled Green Tomatoes + Fermented Green Tomato Salsa Recipes appeared first on Minnesota from Scratch.
August 7, 2023
Small-Scale Homesteading Book Release Events with Stephanie Thurow and Michelle Bruhn
Michelle and I kicked off the new year at full speed. We basically haven’t stopped yet… The excitement for our book, Small-Scale Homesteading, has been electric and we are deeply grateful for all of the opportunities we’ve had.

First, in February we were invited to the Minneapolis Home and Remodeling Show at US Bank Stadium to speak on the main stage Friday and Saturday about Food Preservation. We taught the audience about the most common methods that people can easily and safely do from the comfort of their homes. I also demoed sauerkraut making to show everyone how just how simple it is.

In March we were invited to the Minneapolis Home and Garden Show at the Convention Center to speak on MN Hort’s Green Thumb Stage. Michelle and I taught the audience about Companion Planting and followed up the presentation with a book signing at the MN Hort booth.
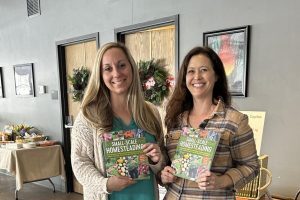
In March, we had a incredible book launch party at Bad Weather Brewing a couple days prior to the release – we were overwhelmed by the turn out and support.
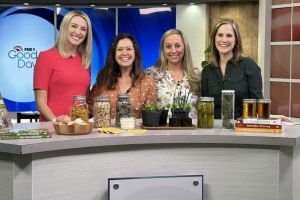


Also in March, we were invited on Fox9 Good Day not once, but twice! We talked about homesteading tips the first time we visited and discussed our “healthy home” chapter the second visit.
While I was in Hawaii in March, Michelle braved it and went on Minnesota Live to talk about our book with Elizabeth Ries! Well done, Michelle!
We feel honored to have been included in many publications including Mother Earth News, Hobby Farms Magazine, White Bear Lake Magazine, The Sun Current, and Minnesota Women’s Press.
Over the past 4-5 months, we’ve been guests on numerous podcasts including:
The Wisconsin Vegetable Gardener – Gardening with Joey and Holly Radio Show
Sustainability Champions Podcast
Coffee with the Chicken Ladies Podcast
Beginner’s Garden with Jill McSheehy Podcast
The Good Dirt Lady Farmer Podcast (not yet published)
Plus, we had a book signing event at Lake Country Bookstore in White Bear Lake, a Winter Sowing class and signing at Patagonia St. Paul, and a class and signing at Heidi’s GrowHaus. Phew! I feel like I’m still missing a thing or two.
What a wild ride it’s been. Stay tuned for more events coming soon!
Thank you,
Stephanie
The post Small-Scale Homesteading Book Release Events with Stephanie Thurow and Michelle Bruhn appeared first on Minnesota from Scratch.
July 18, 2023
Small-Scale Homesteading – Stephanie Thurow and Michelle Bruhn
Years ago I pitched a book all about urban homesteading to my publisher. I wanted it to include all the things that I do around my suburban homestead such as garden, keep chickens, preserve food, make homemade syrup, make candles, lotion and all the other things. My editor loved the idea and wanted me to write up a formal proposal. I did write up the proposal, but I never sent it off. I let the book idea sit and simmer in my mind for months and months. It seemed like too much of an undertaking to put all of that information in one place by myself. Fast forward to the spring of 2021… I was on the phone with my friend Michelle (@forksinthedirt) to speak to her about a feature she was including me in on her website. We got to chit-chatting and on a whim I asked her if she’d like to join me in writing the book. By May of 2021, we had a deal under contract for what became Small-Scale Homesteading.
Michelle and I live thirty minutes across town from each other. We’d only met once or twice when I asked her to write with me. We had been friends on Instagram for years and we’d spoken over the phone about various projects from time to time but really, were we crazy to collaborate on this project? I knew she lived in the suburbs and did pretty much all the same things I did at my suburban home. The only difference is that she has about three-quarters of an acre and I have an .18 acre lot (which includes my house, garage and driveway – not much space).
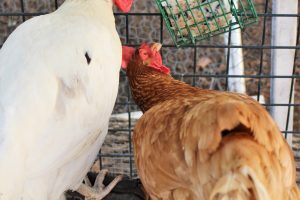
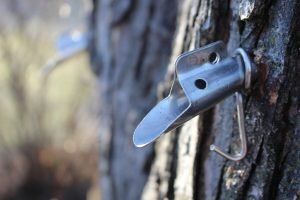
We learned through writing the book that though we did many of the same things, we had very different methods of getting to our endpoints. For example, we both tap our silver maple trees and make homemade maple syrup, but she uses a different method for collecting the sap. We even have different methods for boiling the sap down into syrup and our methods vary for preserving the syrup as well. Another example, we both have backyard hens for eggs. Our coop set ups and runs are completely different, she supplements light in the winter and I don’t and we have different winter care routines – yet we both raise happy, healthy hens that provide enough eggs for the bulk of the year for our families.
Where Michelle and I differ is how we garden. She’s more of a methodical gardener that extends the season as early as she can in the spring to as late as she can in the fall. She cleans her trays before she starts seeds and mixes up her own fertilizer and seed starting soil. She has an understanding of why things are done the way they are. I, on the other hand, start seeds indoors in my living room and plant the starts where I see room in my garden beds (no real rhyme or reason). I do things more on a whim, see how they work out and learn by trial and error. That all being said, at the end of the season, we both grow hundreds of pounds of produce and have preserved of it much to enjoy throughout the winter. Same endpoint, different methods.
In our book, Small-Scale Homesteading, we include chapters on gardening, backyard chicken keeping, food preservation, maple sugaring and healthy home projects. Michelle and I have combined our knowledge and methods of how we run our suburban homesteads and put it into one place in hopes that others can learn from us. There are some great garden projects as well as some of our favorite recipes included and the “healthy home” chapter is packed with how we make homemade candles, lotion, salves, infused vinegar, safe homemade cleaning solutions, soap making, and more.
This project proves that working together is sometimes easier than doing things independently when trying to attain a goal. We promote that same idea throughout the book. You don’t have to do everything by yourself to become sufficient; do what you actually enjoy and work together with others to get to where you want to be.
Books are available everywhere books are sold or you can order a signed copy by e-mailing me.
Praise for Small-Scale Homesteading
“From integrated pest management and companion planting, to setting up a chicken coop that will keep a flock safe and happy, to homemade natural lotions and salves, Small-Scale Homesteading provides anyone eager to be a bit more self-sufficient and take control of what’s going into (and onto!) their bodies a road map for success. Broken down into easily digestible sections conveyed in a friendly, conversational manner, this book is a must for aspiring homesteaders.”
—Lisa Steele, author of Fresh Eggs Daily and 101 Chicken Keeping Hacks
“Cultivating a relationship with your food is more important than ever, and doing so in a small space or urban setting never felt so approachable!”
—Crystal Schmidt, creator of Whole-Fed Homestead and author of Freeze Fresh
“This knowledgeable guide is chock-full of practical advice for homesteaders, small farmers, or anyone interested in doing more for themselves.”
―Rodney Wilson, senior editor at Hobby Farms
“This book is the inspiration you need for embracing the homestead lifestyle without acreage. The authors’ love of gardening shines through as they share techniques for making the most of limited space, proving that small-scale food production is possible, even when you have space restraints. They also delve into other methods of finding good quality, locally grown food, helping you bring your meals closer to home.
―Kris Bordessa, author of Attainable Sustainable: The Lost Art of Self-Reliant Living
“Experienced homesteaders Stephanie Thurow and Michelle Bruhn have created a guide packed with authoritative advice and practical projects that anyone can tackle at home, whether their property is rural or urban.”
—Rebecca Martin, technical editor at Mother Earth News
“Small-Scale Homesteading is an absolutely indispensable guide for anyone wanting to maximize their success in the garden and beyond. In a clear, concise style, it offers comprehensive solutions, smart strategies, beautiful photos, and the warm voices of the authors sharing their ambitious homesteading adventures in compact urban settings. Sustainable home growing has never been explained better.”
—Cynthya Porter, editor at Northern Gardener magazine

The post Small-Scale Homesteading – Stephanie Thurow and Michelle Bruhn appeared first on Minnesota from Scratch.
November 7, 2022
Long Time, No Post – I’m Back!

It’s been two and a half years since my last post. If you follow me on Instagram, you know that I post pretty often, but if you don’t then I apologize for the silence. Here’s a quick update to catch you up to speed.
What a whirlwind the past few years have been. Once I got my first book deal in 2016 for Can It & Ferment It, I pretty much stopped blogging here. At the time, having a job in real estate, owning a hand stamped metal jewelry business, raising a little girl, and working on my book was just too much and the website just fell to the wayside. Fast forward five years… just two months ago, I sent my fourth book to print and am currently in negotiations for my fifth book. In addition to writing books, I have also been freelance writing for print and online publications, as well as teaching food preservation classes. A lot has happened in a seemingly short time.
For ten years I worked for one of the top real estate agent’s in Minnesota. In 2020, I decided to let that job go and focus on my writing and teaching. I had numerous classes lined up for 2020, all over the country. But, once everything was cancelled because of the pandemic, I was at a loss. I think most of us can relate to the feeling I’m referencing. For the first time ever, I had nothing to do. I wasn’t actively writing a book or writing for any publications, I couldn’t teach and I was at a complete standstill. I didn’t know what to do with myself.
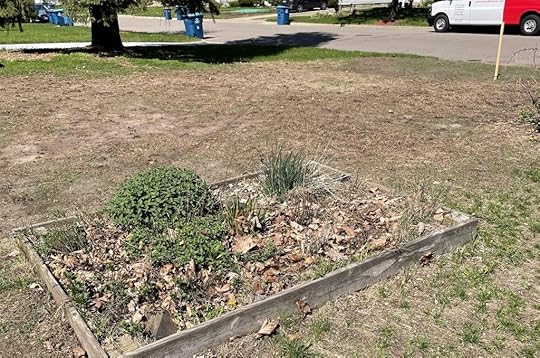
In May of 2020, we had an Ash tree that was dying from the Emerald Ash Borer removed from our backyard. Little did I know that the removal of the tree would change the course of my life. Once the tree was removed, we suddenly had a large, sunny space behind our garage that used to be the “dead zone” of our yard. Conveniently, I had hundreds of seedlings started already since I had participated in a seed swap earlier in the year, but I had anticipated that I’d give most away since up to this point, we only had a few garden beds in the backyard. Well, now with the tree gone, I had plenty of space to grow! Suddenly, I had a purpose again. My husband, daughter and I worked to add garden beds to the “new” area. I had gotten some old beds from neighbors that didn’t use them (free!). My husband reinforced and reconfigured the old beds and after weeks of working on installation and filling them, we finally had a new, big garden space. I did give some of my seed starts away, but I was able to keep most for myself.
That year I grew pink celery, at least 20 tomato plants, two types of zucchini, cabbage, kale, cucumbers, beans, potatoes, various flowers, lots of herbs, swiss chard, pumpkins, spaghetti squash, more tomatoes, garlic, horseradish, (did I mention tomatoes?) and so much more. It was fantastic. The garden became my therapy. It helped me through the pandemic, when times were so uncertain and sad. I really found solace in the gardens. I loved nothing more than to go out to the backyard gardens each morning with my mug of coffee and hens – it was a great way to start the day.
I grew so many tomatoes that year that I was giving them away daily. I saved as many gallons as I could fit in our stand alone freezer (9 gallons) and made every tomato recipe you could think of – good thing we like tomatoes. In the fall, once the gardens faded, I set to preserve the frozen tomatoes and made spaghetti sauce, pizza sauce, bloody mary mix, ketchup and more (all the recipes are in my books). It was wonderful. I was hooked on gardening more than ever.
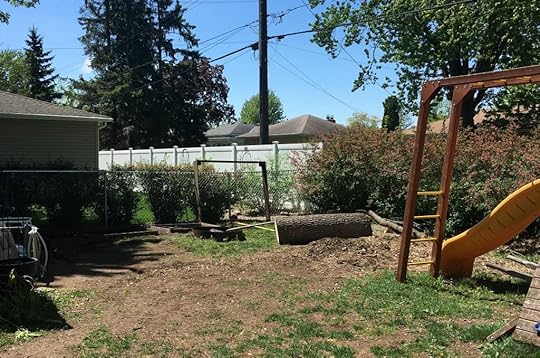
Empty garden space after the tree was removed – May 2020.

Flourishing garden space mid-summer 2020.
In 2021, we added even more gardens to the backyard, including two cut flower beds which became my favorite part of 2021. In 2022, we converted the front yard into gardens. What fun I’ve had through the transformations. The front yard garden was a bit more nerve wracking since I wasn’t sure all neighbors would approve. I spoke to the two on the north and south sides of me before expanding and they didn’t mind. But, some peoples have strong feelings about growing vegetables in the front yard and I wanted to make sure it looked aesthetically pleasing. Design is not my strong suit, it gives me a lot of anxiety. Anyway, we dove in and added six Vego Garden beds. I grew eggplant, kale, tons of herbs, collard greens, tomatoes, potatoes, lots of flowers, bell peppers, corn, spinach, pumpkins and more, all in the front yard. It was so fun having strangers stop by and praise the changes. I loved hearing little kids pass by and exclaim, “Pumpkins!”.
Front yard 2022 after the Japanese beetle grubs killed off the grass.
Flourishing front yard gardens mid-summer 2022.
I’m hoping that in 2023 I’ll have more than enough garden produce to share with the neighborhood – I have visions of setting up a little table with veggies, bouquets of cut flowers, and bundles of herbs that passersby can take freely at their leisure.
Anyway, this update was turned into a love letter to my gardens, but it really is so much of what has consumed my life for the last few years (aside from writing).
What’s next? Well, my co-author, Michelle Bruhn, and I have some great classes that we are developing and plan to teach in 2023. We have some big events we’ll also be apart of and I will announce them here (Twin Cities HOME Show and a Book Release Par-tay). We just launched our pre-order push for our new book, Small-Scale Homesteading, that is set to release in February of 2023. We have some great rewards that we’ll send monthly until our book is released, so once you pre-order from your favorite book seller, be sure to pop over and sign up for the rewards.

Stephanie Thurow and Michelle Bruhn at the Lowertown St. Paul Farmers Market
That’s all for now. Hope you are well!
Take care,
Stephanie
The post Long Time, No Post – I’m Back! appeared first on Minnesota from Scratch.
May 1, 2020
How to Raise Monarch Butterflies – Supply and Resource List
[image error]
Many of you have followed my journey of raising monarch butterflies over the last several years on my Instagram. And many of you have expressed interest in raising them yourself, and that’s why I’m writing today. I learned everything about how to care for monarch butterflies from egg-to-butterfly from helpful blogs/videos. I’m putting together a list of resources that I feel will help you learn as well. But before that, I must mention that raising butterflies in habitats does end up feeling like a part-time job. It is a lot of work and requires daily care. If you are not up for the task, then perhaps plant pollinator-friendly flowers and milkweed in your garden instead. Though, be sure to find out if the flowers are indeed safe for pollinators. You’d be surprised at how many nurseries receive pre-treated plants, that ultimately do more harm than good.
Also, when I talk about raising butterflies indoors, it is raising the eggs that are laid on milkweed, found outside my front door. I do not get shipped eggs/caterpillars to release into the wild. I am purely caring for the caterpillars to increase their odds of survival. In nature, less than 1 in 10 eggs laid will successfully transform into a butterfly. The caterpillars surprisingly have a lot of predators, such as bees, spiders and flies. And humans tend to poison or mow down their habitats. I’ve been raising butterflies for 5 years now and last year we successfully raised and released over 100 butterflies, which would have only been maybe 10 if left outside.
[image error]
I’ve compiled a list of supplies needed:
Milkweed. We grow common in our yard but there are many varieties. Try to pick a variety that is native to your area. You can order seeds here.
Butterfly habitat. I have owned 5 habitats in my 5 years of raising monarchs and this one is my favorite. I like it because one side unzips, which makes it easy to clean and another side is clear, which is fun for better viewing. The only con of this is that it is lightweight and therefore a little unstable. I fix the issue by putting a few clean rocks on the bottom of the enclosure so that it does not easily tip over. I do not support using jars or glass tanks for butterfly raising – I see people doing it all the time. The reason I don’t like it is because once the butterfly encloses, it needs to hang to dry their wings. They cannot climb on glass. If they fall before their wings are dry, it could cause them to never be able to fly properly. So, I stick to the netted enclosures and have had amazing success with them.
More milkweed. You will not believe how much milkweed the caterpillars go through as they grow. Each day, I clean up the butterfly habitats and clip off fresh milkweed leaves from the garden to feed the caterpillars. Be sure not to rub the milkweed milk in your eyes – it’s poison. If I leave town for a couple days, I create a vase-like set up where I can poke milkweed stems through a mason jar lid and screw the lid onto a water-filled mason jar. This allows the milkweed to stay fresh while I’m away, without the risk of the caterpillars falling into the water and drowning. The con to doing this on a daily basis is that if you are cutting away an entire stem (or many stems), you are removing that plant from the garden. I like to leave the stems outside so that more butterflies can lay eggs. If you don’t want to make a vase as I described, you can buy these.
[image error]
Here is a list of helpful resources to get you started:
Watch this video to learn how to find monarch eggs.
How to Raise Monarch Butterflies: A Step-by-step Guide for Kids book. I haven’t personally read this book, but I came across it while shopping and after reading the reviews, it seems like it’s been a reliable resource for many.
The Joyful Butterfly blog has a wealth of information about the topic.
Deanna at Homestead and Chill has a very in depth post here with additional resources linked.
MrLundScience on YouTube has detailed videos, just search the topic “raising monarchs” on his channel.
[image error]
The entire process is pure magic. If you aren’t interested in raising butterflies at a large scale like we do, then caring for a couple is simple. Children will be in awe of the transformation process. If you have specific questions, feel free to comment on this post or DM me on Instagram.
If you have other helpful resources, please leave a link in the comments.
Good luck!
[image error]
This post includes affiliate links.
October 9, 2019
Sweet Maple – Book Review
A photo of our homemade maple syrup from spring 2019. The color intensifies throughout the tapping season.
We have tapped the silver maple tree in our backyard for the last three or four years now. Each year we learn a bit more about the process of making syrup. The 2019 tapping season exceeded all of our expectations, leaving us with more syrup then we’d use in an entire year. That’s why when I connected with Michelle Visser on Instagram, and learned about her recently released book Sweet Maple, I was eager to get my hands on it to see which delicious recipes she included. To my surprise, this book is so much more than just recipes, this book is your complete resource for everything maple-tapping. It’s filled with detailed directions and helpful tips. And lots of personal details about her family, farmhouse and acreage, which are endearing and enjoyable to read about.
[image error]
Now, I’m off to order a hydrometer (I never knew there was such a thing for syrup-making before reading this book). And I’m hoping that when my daughter gets home from school, she’ll bake up Gina’s Maple Snickerdoodles, included on page 105!
Other delicious recipes I can’t wait to try:
Maple-Infused Butter
Maple Cream (I have tried before, and failed miserably – so I hope this recipe teaches me the proper way because it sounds heavenly!)
Jill’s Maple BBQ Sauce
Maple Popcorn
Maple Cinnamon Rolls
Thanks for reading,
Stephanie
September 27, 2019
Homemade Peach Shrub Recipe
[image error]
Homemade shrub is one thing you’ll always find in my refrigerator, all year round. There are many methods and recipes for how to make shrubs (all great, I’m sure), but I share my preferred method in my cookbook, WECK Small-Batch Preserving.
Though shrub can be made in a matter of a few minutes by cooking fruit with sugar (or other sweetener of choice) and making a syrup, I prefer to make fresh fruit shrub, without applying heat. The cooked method is great for when you are in a pinch. But, cooking the fruit makes it taste completely different, giving it a cooked flavor. By macerating the fruit for 3-4 days, as I direct in my cookbook, the fruit syrup retains a fresh fruit flavor and ultimately tastes better.
My method of shrub making can be applied to any fruits or fruit and herb combinations. Some fruits make better and more flavorful shrubs than others, but I’ve never made one I wasn’t pleased with.
Peach Shrub
Yield: 2-3 cups finished shrub
1.5 cups peaches, pitted and chopped (fresh or frozen)
1.5 cups organic or non-GMO granulated sugar (or other sweetener, such as brown sugar, coconut sugar, or maple syrup)
1.5 cups organic apple cider vinegar (or other vinegar of choice)
Combine peaches and sugar in a quart canning jar, shake or stir to mix. Place canning lid on jar and screw ring on the jar tightly. Place the jar on a counter at room temperature (out of direct sunlight) and allow the mixture to macerate over 3-4 days, so that a thick and delicious syrup is made. Shake the jar vigorously at least once a day, or use a spoon to stir up the mixture.
After 3-4 days, when a syrup is made and the sugar is dissolved, use a fine mesh strainer to strain out the solids, reserving the syrup in a measuring cup. Once strained, measure the amount of syrup made and add in the same amount of vinegar (about 1-1.5 cups) and stir to mix well. Store in a clean airtight jar and refrigerate.
To serve, I mix about 2 ounces of shrub with 6 ounces of water (or carbonated water), and drink over ice. Shrubs can also be used as a zingy and unique cocktail mixer. And don’t toss those solids! They are great to mix with plain yogurt for a quick smoothie or poured into popsicle molds for an easy, homemade popsicle.
Click to view slideshow.
[image error]
For more stone fruit inspiration, follow:
Facebook: @WAStoneFruit
Twitter: @WAStoneFruit
Instagram: @wastatestonefruitgrowers
Website: https://wastatefruit.com/
September 19, 2019
Canning Recipe: Drunken Peach Jam (No Added Liquid or Powdered Pectin)
[image error]
I have been so fortunate to receive fresh peaches from the Washington State Fruit Commission this month. When they were delivered, it was an unseasonably cold September day in Minnesota, that felt like the onset of winter was near. So, it really brightened up the kitchen when we tore open the box of fresh yellow peaches.
I went straight to work by washing, chopping and simmering the peaches, making small batches of different flavored jams. I did have a few “OK” outcomes and a few winners that dazzled our tongues. I spent eight hours straight in the kitchen, preserving all but 10 peaches that I kept aside for fermented recipes. I’ll be keeping a couple recipes a secret for now. But I had to share a couple of the winning recipes with you, and I’m starting with this drunken peach jam recipe.
Peaches are one of my favorite fruits to preserve with because they don’t require much prep work and they boil down to a jam consistency in a timely manner, which means it’s a quick and easy fruit to preserve – and that makes them favorable to me. I’ve seen tons of peach jam recipes that require added pectin to set, but that is totally not the case with this recipe… no need to take the extra step by adding pectin, this will set perfectly without.
I leave the skins on the peaches in this recipe because leaving them on makes the prep work even that much easier. I do not mind the skins in my jams, in fact I hardly notice them. And if anything, I think they offer a prettier colored jam in the end.
[image error]
Drunken Peach Jam
Yield: 3 – 8 ounce jelly jars
4 cups diced yellow peaches, pitted, skins on (or off if you prefer it that way)
1 1/4 cups granulated organic or non-GMO sugar
2 tsp vanilla extract
2/3 cup whiskey (you will taste the flavor, so pick one you like)
1 tbsp lemon juice
1/2 cup finely chopped apple, peeled (optional – I like the additional crunch, but they are not required)
Wash peaches, remove any bruised or flawed areas from fruit. Remove pits and rough chop into chunks (bite-sized). Add peaches to a large heavy-bottomed nonreactive pot and use a potato masher to carefully breakdown the peaches somewhat. Add sugar, vanilla, whisky, apple chunks (optional) and lemon juice and bring the fruit to a medium-high simmer. Simmer until the peaches breakdown and the mixture begins to thicken (about 20-30 mins). Stir often to avoid burning, especially as the mixture thickens and is close to being done. If you aren’t sure how to determine when your jam is set, click here.
TO WATER BATH CAN: Ladle the hot peach jam into warm prepared jars. Use a funnel to safely transfer the mixture, leaving ½” of head space. Wipe the rims of the jars with a dampened, clean, lint-free cloth or paper towel and again with a dry towel. Place the canning lid over the rim of the jar, and screw the ring on until just-snug on the jar. Process in the water bath canner for 10 minutes. Carefully remove the jars from the water bath with canning tons and place them on a towel-covered surface for 12 hours without touching. Once completely cooled, remove the ring and test that the lid has securely sealed onto each jar. Refrigerate after breaking the seal.
SKIP WATER BATH CANNING: Allow the jam to cool, add the lid and ring and store in the refrigerator. The jam will keep for several months refrigerated.
For more stone fruit inspiration, follow:
Facebook: @WAStoneFruit
Twitter: @WAStoneFruit
Instagram: @wastatestonefruitgrowers
Website: https://wastatefruit.com/
[image error]