
Steven R. Boyett's Blog
October 12, 2025
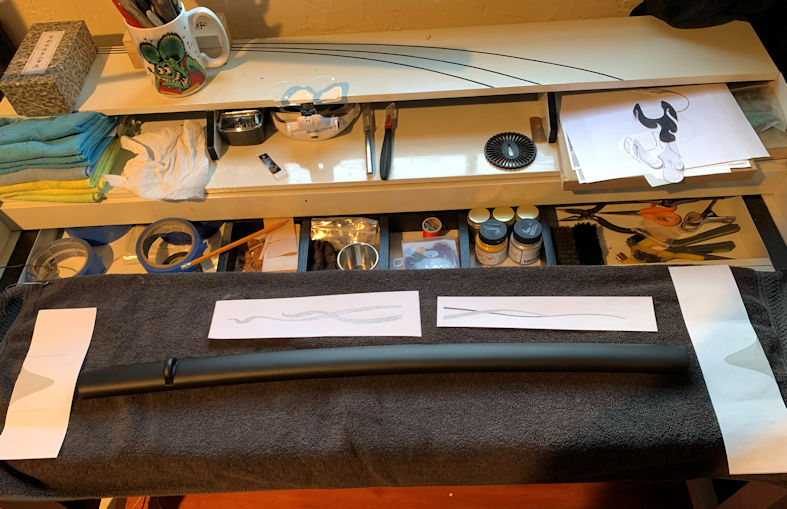
Repair/Re-Theme My Instructor’s Katana
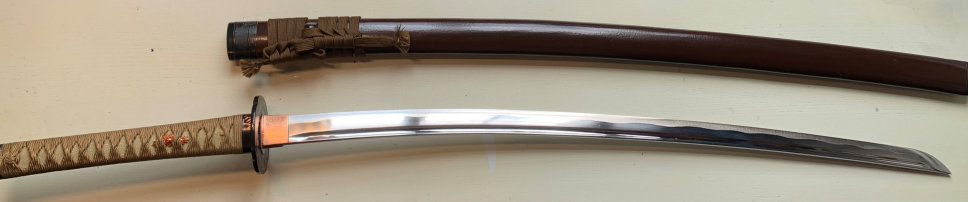
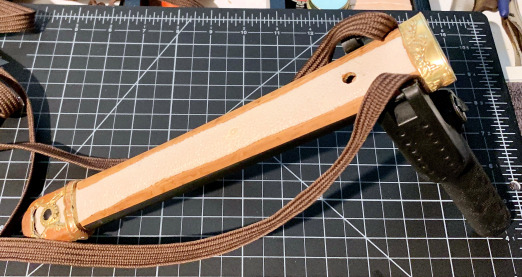
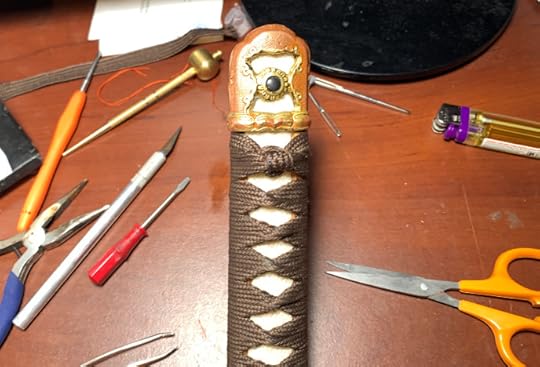
My batto-jutsu instructor asked if I would repair & rework the first iaito he ever owned. He was nervous giving it over to me, and I was nervous working on it. I checked in with him at every major step so it wouldn’t go off the rails.
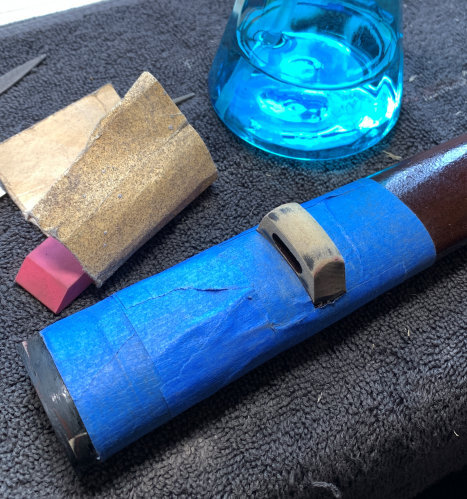
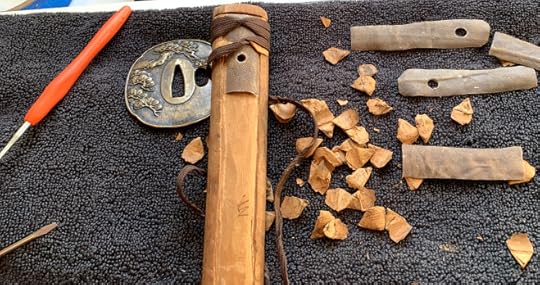
The tsuka & fittings were pretty worn. The blade was in good shape but had minor pitting. The saya was ok except for a crack at the koiguchi:

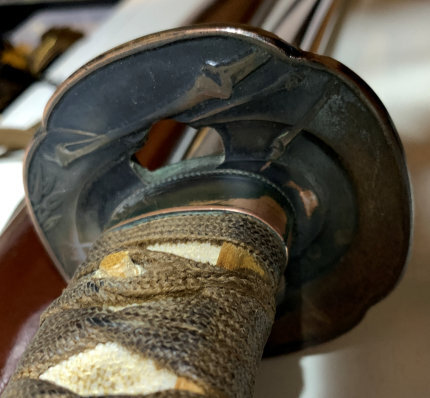
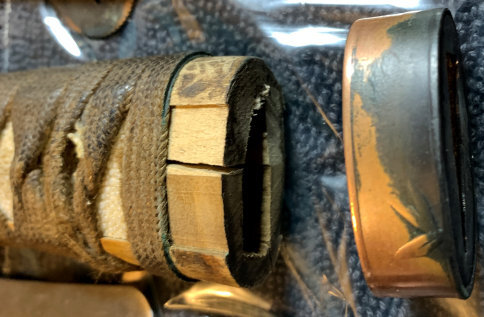
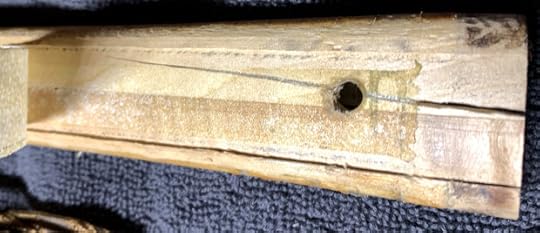
Disassembly showed a big crack in the tsuka (pretty common, I’ve found):
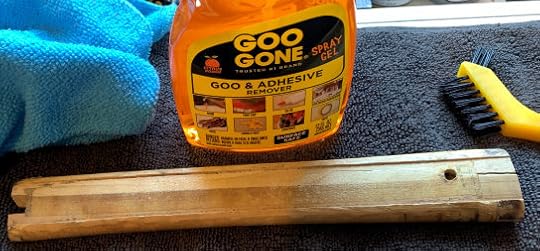
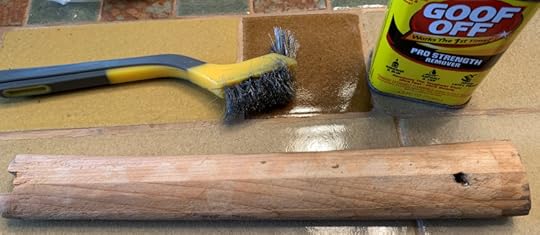
I pulled off the samegawa and scrubbed off the adhesive with a stiff brush and Goo Gone:
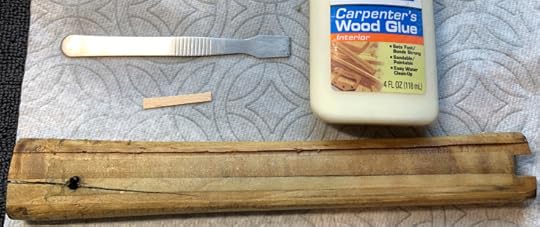
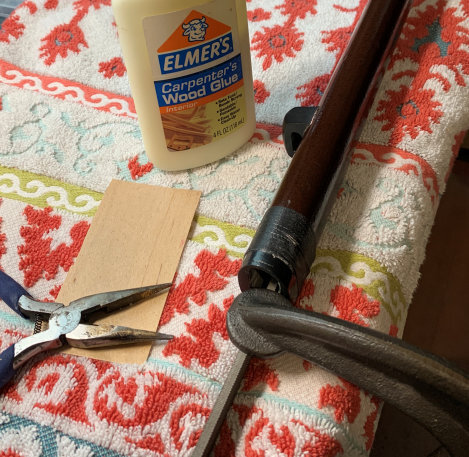
I used a knotting tool as a pry bar and a wood-veneer shim as a spatula to apply wood glue in the crack:
I bound it tight with the trashed ito I’d pulled off and clamped it to dry:
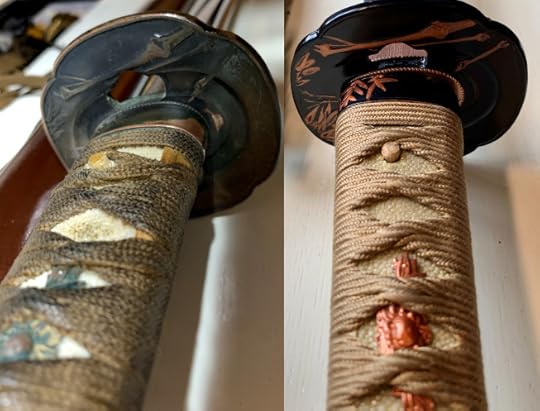
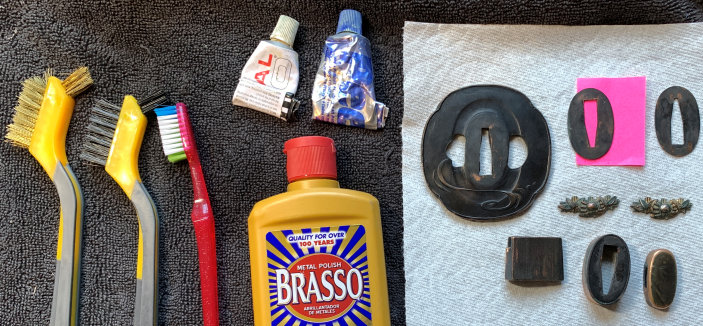
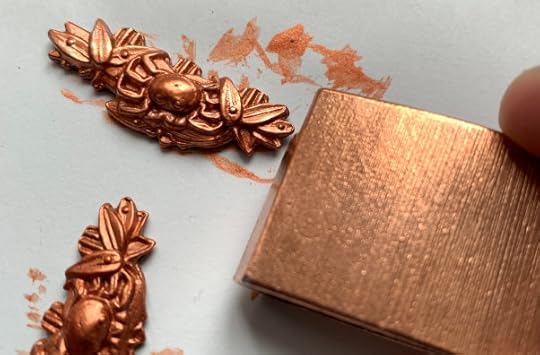
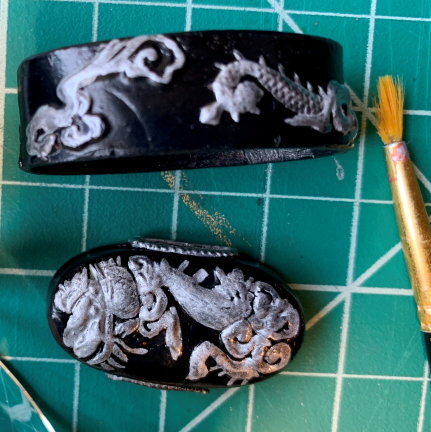
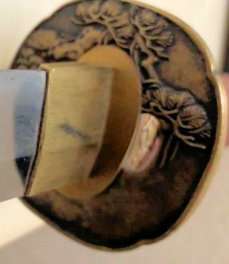
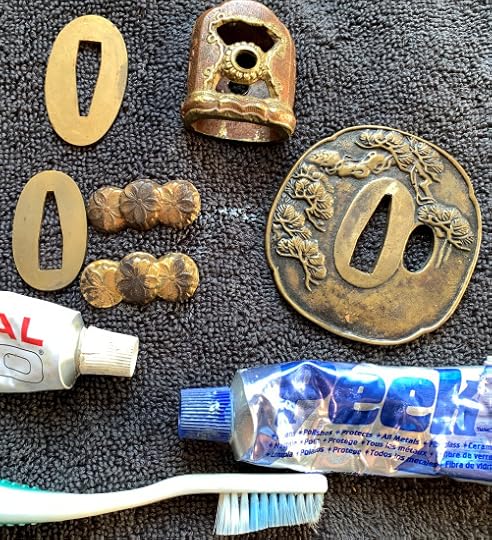
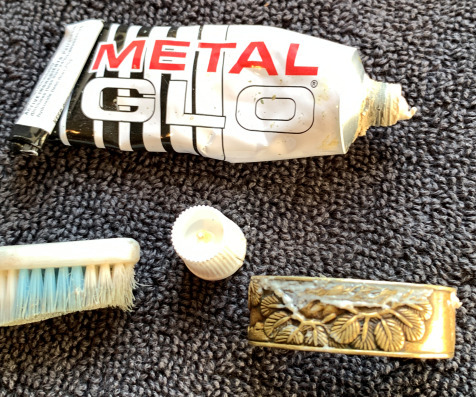
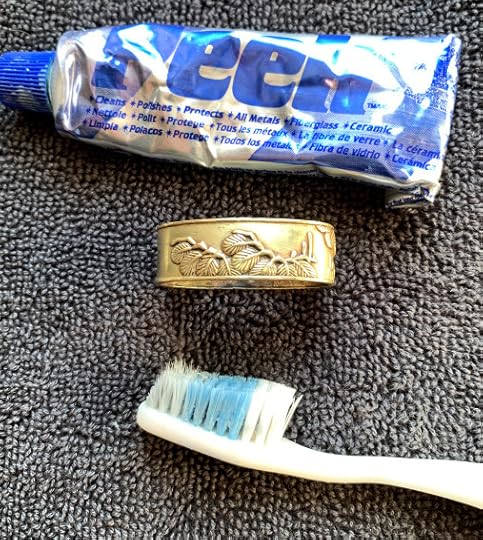
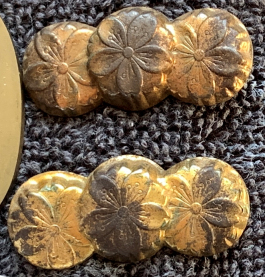
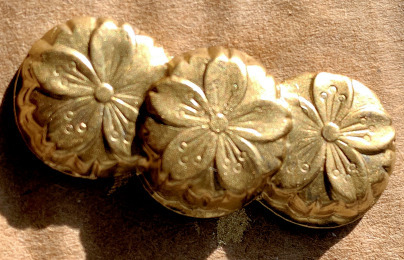
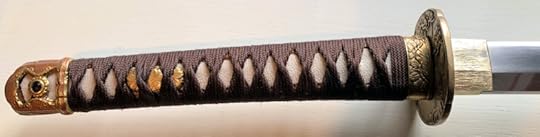
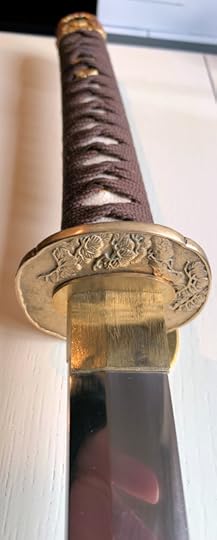
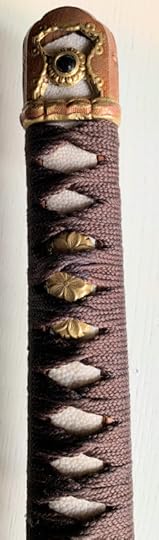
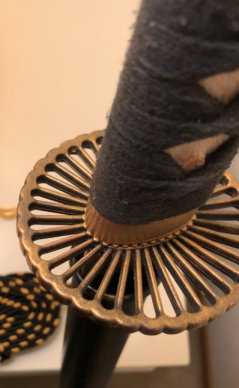
Cleaning time! I removed the patina from the tsuba & fittings with Brasso and several brushes, then polished with Metal Glo and Peek:
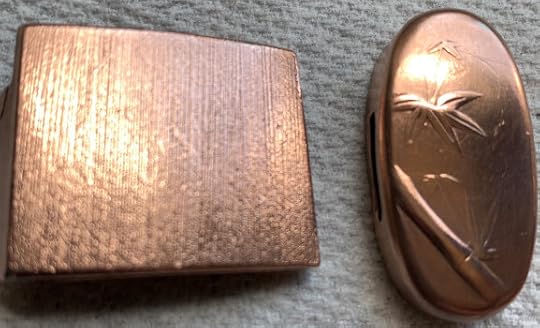
Cleaned & polished! I was a bit surprised to see that all the metal was copper. I thought it looked really good:
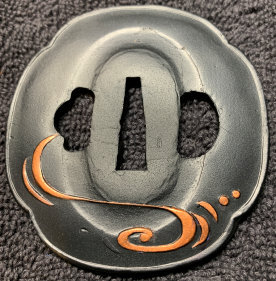
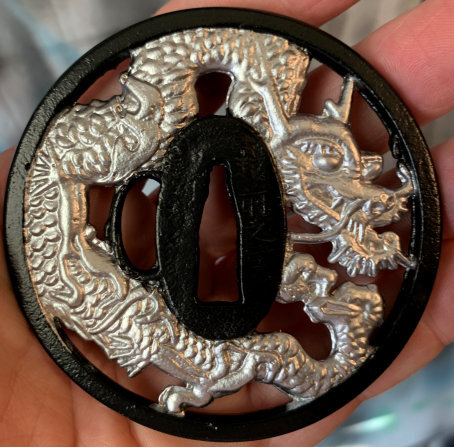
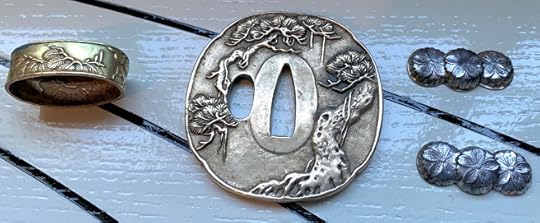
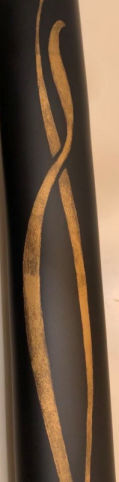
My instructor liked it enough to ask if we could go with it for the color scheme. I recommended painting everything black and leaving the decorations copper, and he agreed.
Rather than make life hard for myself by either doing painstakingly detailed masking on the decorations before painting black, or painting everything black and then doing painstaking filing back to copper on the decorations, I decided to cheat and paint everything black, then paint the decorations with Createx metallic copper paint. (Shhh.)
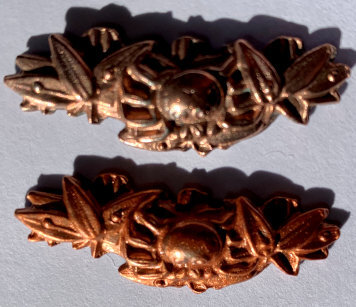
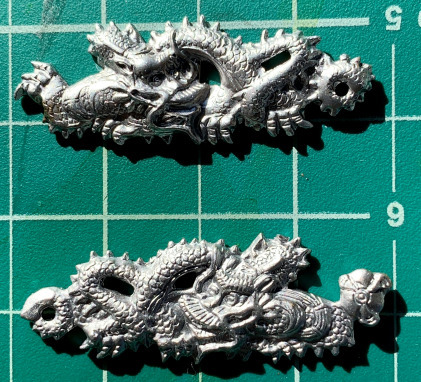
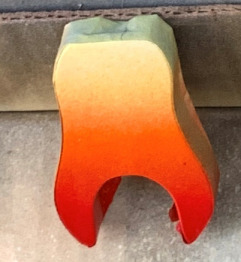
I painted the menuki first so I could color match against the polished, unpainted copper. Here’s the before & after on the menuki:
And here they are against the polished copper habaki. Go, Createx!
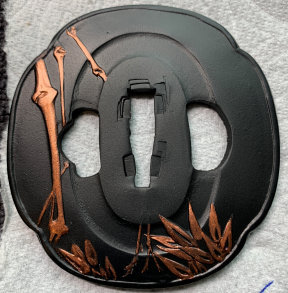
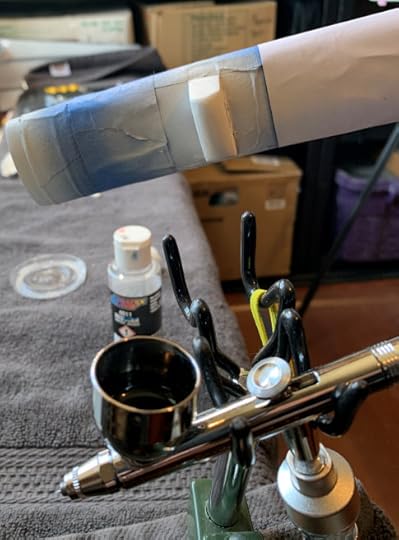
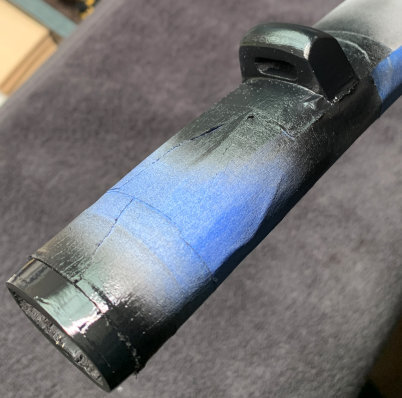
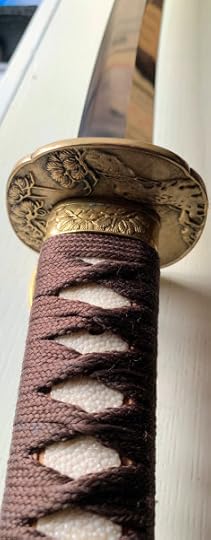
I airbrushed the tsuba, fuchi, and kashira jet black, then brush-painted the decorations with the metallic copper:
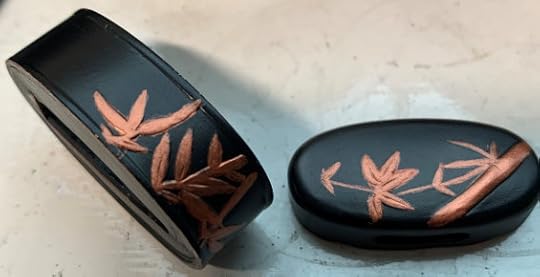
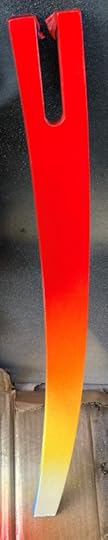
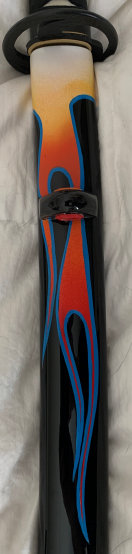
I was sure I could re-create the saya’s speckled paint pattern, but I wasn’t confident I could duplicate the pretty reddish-brown color. My instructor requested that I just clean it up and not repaint it. I repaired the crack and repainted the kurigata and the horn at the koiguchi:
Then I shimmed the saya at the koiguchi. I have a stack of business-card-sized maple veneer that’s easy to work with and great for shimming. I measured, cut, wood-glued, and clamped. When it’s dry I file a slight ramp on the shim so that the habaki won’t catch on it when the sword is sheathed.
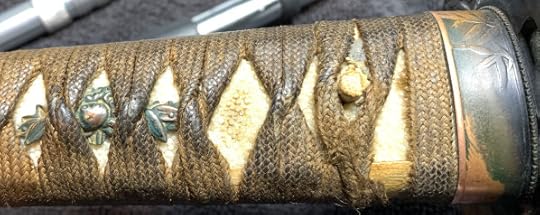
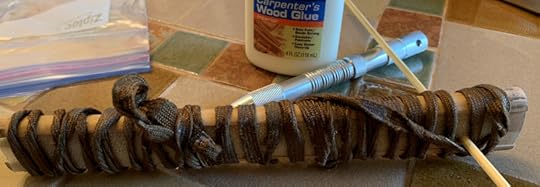
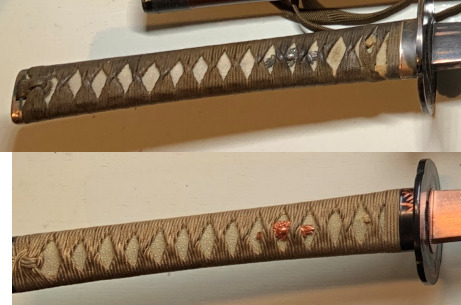
Now for the tsuka! A pattern had yellowed onto the samegawa over time, and nothing I tried would get it out. (If anyone knows how to re-bleach these things, please let me know!)

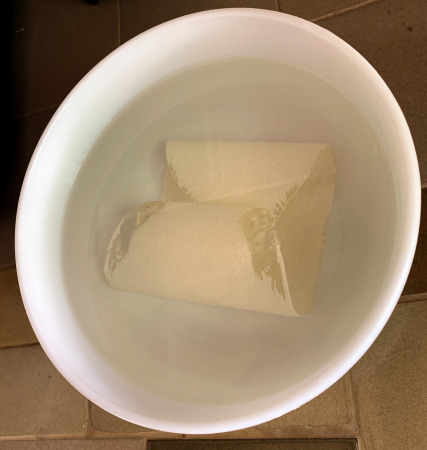
I sanded & shaped the tsuka a bit, then soaked the samegawa in water a few minutes to make it flexible. I glued it back in place and wrapped it tight. I ran a dowel through the mekugi-ana because the samegawa shrinks a little when it dries, and I didn’t want the hole to move.
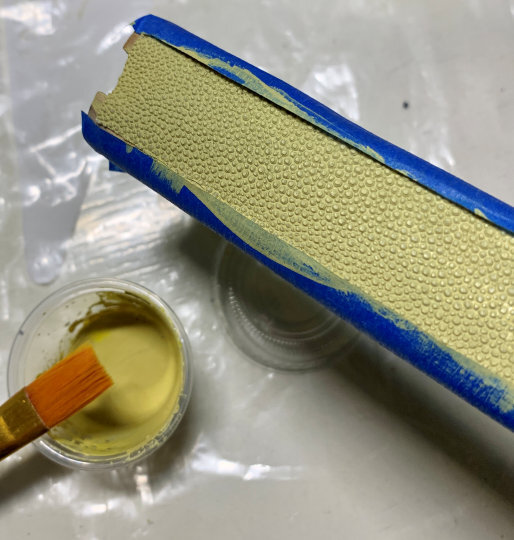
To get rid of the discoloration, I painted it with a faintly mustard-colored paint that looked antique-ish:
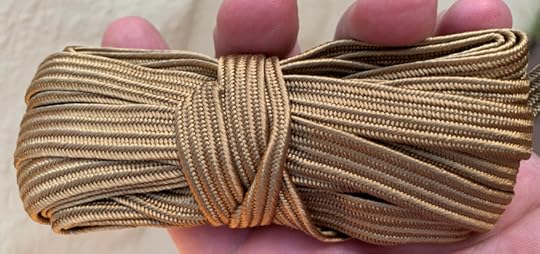
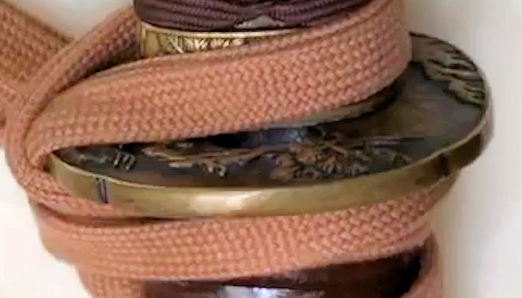
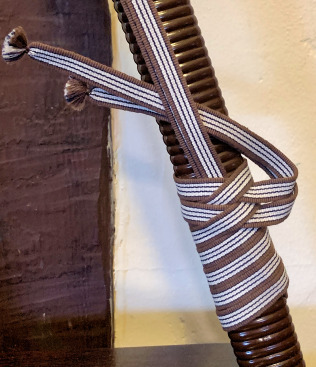
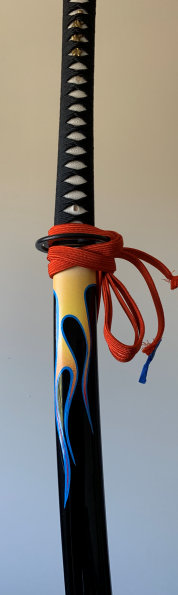
My instructor wanted a silk ito wrap, but we’d held off ordering until we’d settled on a color scheme. With the copper-on-black and the antiqued samegawa, I suggested a champagne colored silk ito from Ryujin (UK). (He’s since closed down his shop.)
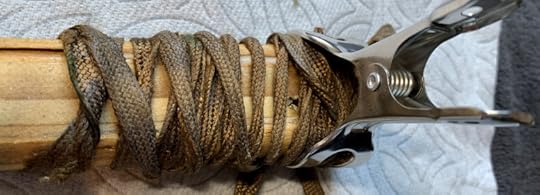
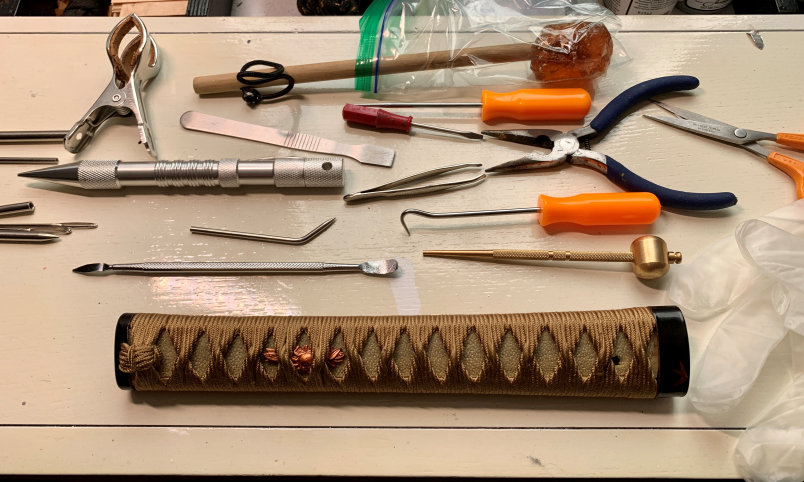
Let’s get wrapping! I was a bit nervous about this part, because one mistake and I’ve ruined a $150 piece of silk.

A lot of tools, hours, and sore fingers later:
I brushed two coats of Minwax gloss polyurethane on the ito (I’d already brushed semigloss onto the samegawa):

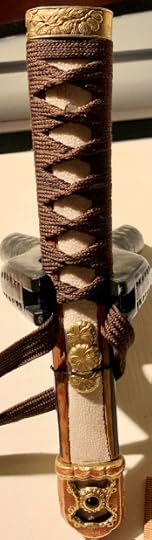
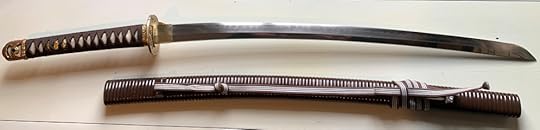
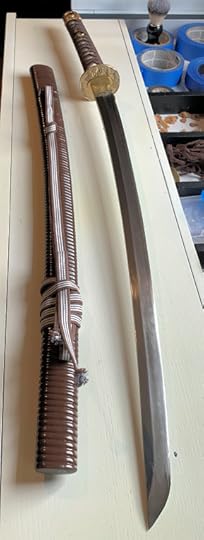
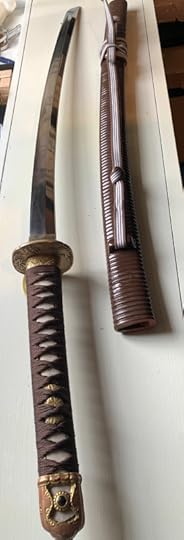
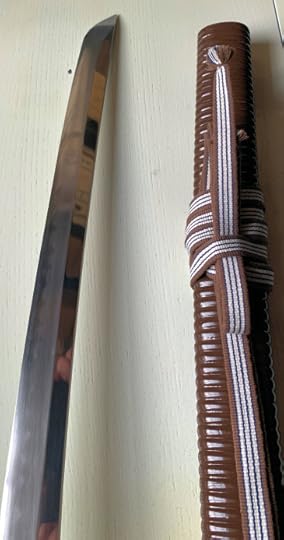
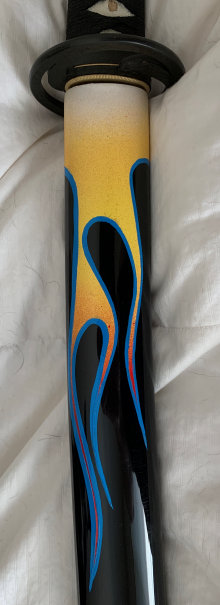
I cleaned & polished the blade (I think I used Mother’s Aluminum Polish for this one) and put it all back together. I tied the sageo cord into a presentation knot:


I was really happy with how this turned out! The color scheme was unusual, and there was an overall elegance that I really didn’t expect. I wish I’d been able to repaint the saya, but that’s my only regret in this project. My instructor loved it which, you know — whew!
Here’s some before & after:


October 9, 2025
Dragonscale Iaito

An 80-year-old martial artist who was learning batto-jutsu to help him recover from a stroke gifted me a daisho (a long- and short-sword set, katana and wakizashi) after he had to quit, because I had renovated the wakizashi for him. I felt really bad that he couldn’t keep practicing, and was very touched by his gesture.
I had just begun to learn to use an airbrush, and I thought about what to do with the katana. I wanted to learn how to paint metal-flake candy colors, and I also wanted to try a fish-scale stencil technique I’d seen. I figured, why not combine them? I was worried it would end up looking like an airbrushed 70s Chevy van, so I decided to rein it in a bit and did some sketches. Wish I had pix of those, because it’d be fun to show how badly I draw. I definitely see these things in my head and not on paper.
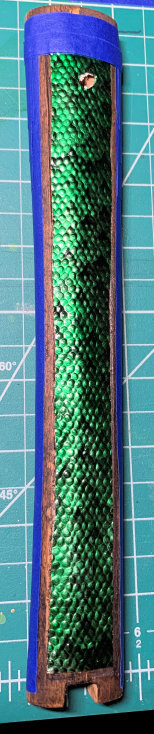
To be honest, the katana (an iaito, a non-sharp practice sword) was in pretty bad shape. The saya (scabbard) had three cracks running from the koiguchi (opening) to the kurigata (the knob that holds the cord):

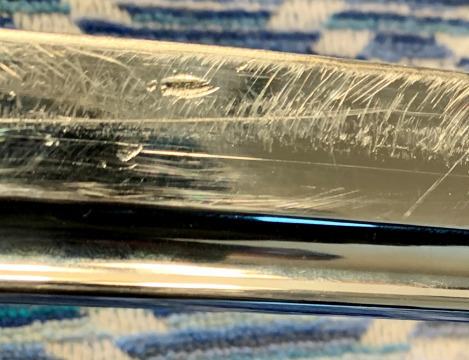
The blade looked like it had tried to kill a woodchipper:
Well. Been there before! I disassembled it and got to work.
I smoothed the blade edge with a rattail file, sanded the sides with a palm sander and grits from 400 to 2500 lubed with vegetable oil. (You should use better stuff for better swords, but this here was total mall ninja territory.) Final polish with Peek and Mother’s Mag & Aluminum Polish, which I now swear by. You can see one of the copper veins in the cheap alloy blade at the top of the pic:
I cleaned the tsuba (hand guard), fittings, and habaki with Brasso and a wire brush. I airbrushed the tsuba and fittings jet black, and polished the habaki with Peek.
I brush-painted the fuchi & koshira (handle caps) decorations silver. The molding is so bad I’m not positive what they depict. Something dragonish.
I masked off the tsuba, then airbrushed it and the menuki a brushed-aluminum color that I like a lot. I figured this thing was gonna be calling enough attention to itself that a silvery silver would be, um, gilding the lily.

I pulled the ito (handle wrap) and cheap plastic samegawa (ray skin) from the tsuka (handle):

Most of the wood was tacky from adhesives. I think they’d not only glued down the samegawa, but sprayed something like Super 77 to make the cheap shoelace ito stick. I used lots of Goof Off and a wire brush to get back to bare wood:
I’d decided to paint the plastic samegawa, and I wanted it to be flush with the tsuka so that it wouldn’t have that line humping down the length of the wrap. Plus I didn’t want the plastic edges to show. So I marked out a recess with a box cutter and chiseled it out, then smoothed it with my then-new Wen rotary tool.

I put paper over the recess and traced out its shape by pressing a fingernail along the edge. I cut that out, then used it as a template to reshape the samegawa to fit.


Now the fun part! I sanded the saya down to bare wood, starting with 100 grit and ending with 400 (I think).

I cleaned off the dust with a wet rag and then coated the saya with PVA mixed 1:1 with water.
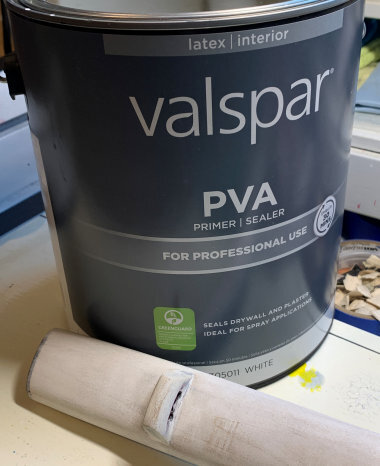
The wood in these cheaper swords tends to be porous composite, and the PVA helps seal it so that it doesn’t drink up the paint. It also acts as a filler for minor scratches and gives a smoother pre-primer surface. I let it sit overnight and then sanded smooth.
I primered it black and then airbrushed with three coats of metallic silver. Candy colors get both their sparkle and their sense of depth from an undercoat of metal-flake.
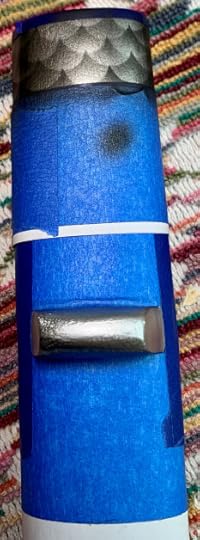
I used fineline tape to mark out bands near the koiguchi, and to mark out a panel border in the saya’s bottom third. When all the painting was done I would pull these and have — fingers crossed — nice clean silver borders. I also masked off around the kurigata because I was going to paint it straight-up candy.

I made a fish-scale stencil by making a row of dots in PaintShop Pro and printing them onto 3M transparency film. I X-acto’d off the top half of the dot row (didn’t have a Cricut plotter yet) and poof! — stencil!
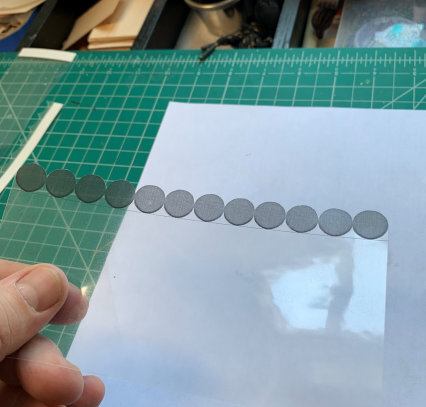
I practiced the scale effect on paper before committing to the saya. It’s fairly easy: Lay down the stencil and lightly airbrush across the top, spraying at about a 45-degree angle. Then offset the stencil so that the taper points touch the centers of the dots at their tops. Lightly spray again. Lather, rinse, repeat.
[image error]
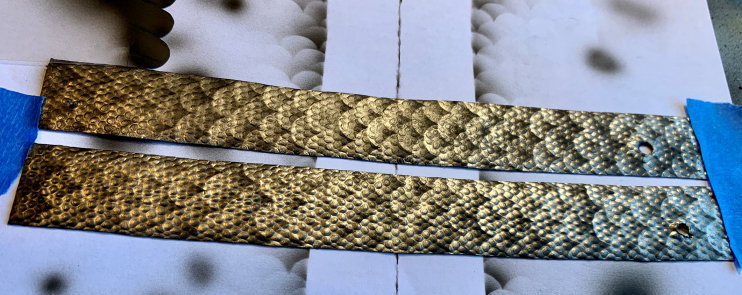
I scaled the marked panel and a band near the koiguchi. I also scaled the samegawa, but I screwed up and had the scales going the wrong direction (I’d already cut the pieces to fit the tsuka). D’oh.

I liked just the black over the silver so much that I thought about sticking with that. But nope: It’s candy or bust. So here comes the emerald green candy:
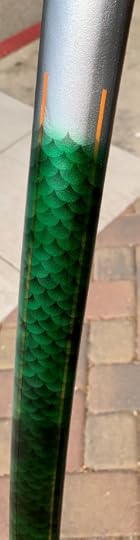
[image error]
It’s notoriously hard to get an even tone with candies, but I was painting small areas that already had a lot of shading variation, so I wasn’t too worried. And I was jazzed how it was looking.
I sprayed Createx Bleed Checker over the candy to keep the layers from leeching (yeah, apparently they do that sometimes), then sprayed Createx UVLS Gloss as an intercoat. Then I masked off the green-scaled areas with masking tape. The bleed checker and intercoat would also minimize the chance of the masking tape pulling off the thin and more delicate candy paint.
Then I sprayed the whole saya jet black:

I pulled the mask and fineline tape from the scaled panels and did a jet-black fade. I wanted the scales and border to kind of emerge from the black:
I carefully removed the rest of the masking and fineline tape from around the koiguchi and kurigata — and oh man was I a happy camper (click the below pic for the full-sized image):

I was still using a very cheap airbrush and it didn’t handle Createx glosscoat very well, so I bristle-brushed Minwax gloss polyurethane and hung it in an old gym locker I bought for this purpose.
While it cured I finished up the tsuka. I glued the samegawa in place, wrapped them tight with the crappy ito I’d removed, and let them sit overnight. Then I stained the wood because I thought the lighter-wood contrast wouldn’t look good where it might show against the dark green samegawa and black ito:

I used masking tape to build out the sides and the fuchi end so that the ito would be flush with the fuchi when I wrapped it:
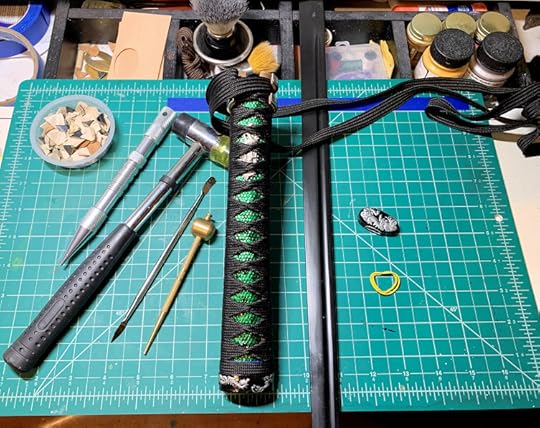
There’s an entire art to handle-wrapping, called tsuka-maki. I knew I’d never come close to what the experts could do, but I had to learn it at least serviceably if I was going to be taking swords apart, repairing, and customizing them.
I did the tsuka-maki at my very customized craft desk. Since this was one of my first attempts, I wasn’t about to use $150 worth of silk wrapping. Instead I used a $10 synthetic ito from eBay. Despite my customizing, this is still a cheap, thrashed sword. I was kinda lipsticking a pig here, and I was new at it, so $150 lipstick seemed a bit much.

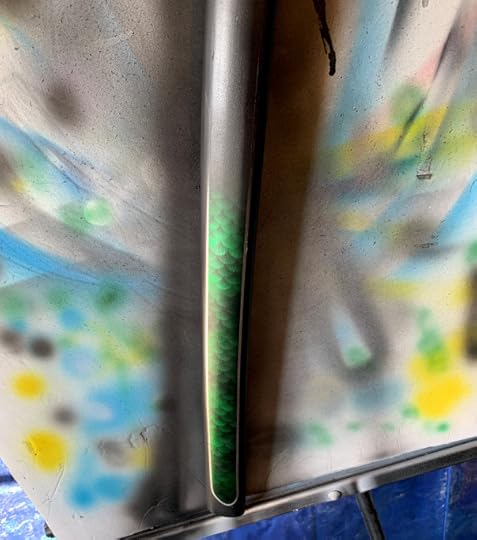
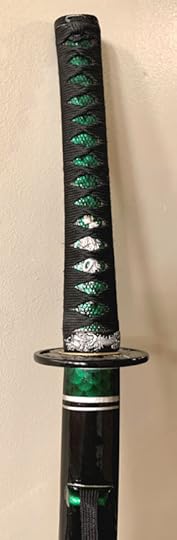
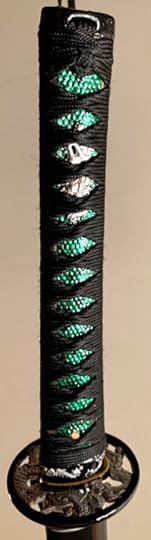
The ito mostly hid the fact that the scales are going the wrong way (oopsy!), and I was really happy with how the brushed-aluminum menuki looked against the black and green.

I lacquered the ito (brushed urethane onto it to stiffen it & reduce wear). Next day I put it all together. That’s a real moment of truth, because I really don’t know how it’ll look or fit until the very last step. I find it nerve-wracking and exciting.


I haven’t gotten a good picture of how much the clearcoat makes the candy color and metal-flake pop, and how much more depth it gives. I polished with Johnson wax and a final layer of Nu Finish.
My worries that this iaito would look too gift-shop-kitsch/anime/Chevy van were a thing of the past: I’m really happy with how it turned out!
September 8, 2025
WWII Gunto Katana Restoration

In 2019, not long before I started learning batto-jutsu, I bought a gunto (WWII military samurai sword) at a flea market. The blade wasn’t stamped-out and there was no serial number, so while it probably wasn’t very valuable, at least it wasn’t a mass-produced factory blade from the period.
There was no signature or info on the nakago (tang). The blade was in good shape. I didn’t think it was very new, because the hamon (tempering pattern) was tired and nearly worn or polished out. But I also didn’t have any reason to think it was especially old or valuable, either.

The saya (scabbard) was completely rattan-wrapped and painted a brown that had seen better days. The fittings were brass and had heavy patina. The ito (handle wrap) was worn and loose, though it still seemed too new to date from WWII.


It seemed at least worth the modest investment as a restoration project. It was one of the first katana I worked on, and I made a lot of mistakes, but I learned from them.
I took everything apart, and, surprise! (Repairman Voice: Ah, yeah, well there’s your problem!) Handle cracked in two:

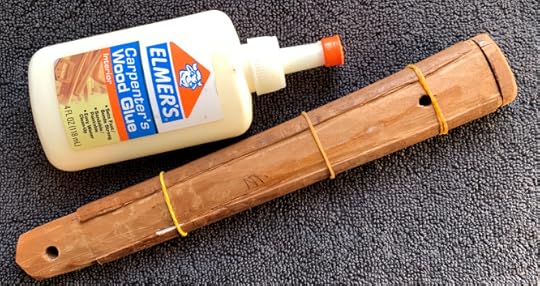
The break was pretty clean, though, and easily wood-glued:
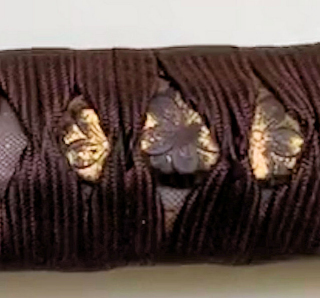
The hishigame (folded paper triangles that help give shape and stability to the diamond shapes of the handle wrap) were old Japanese newspaper. Definitely keeping those! (Maybe there’s news about stalling MacArthur in the Philippines.) The samegawa (ray skin that helps bind the wrap) were several smaller, badly shaped pieces in poor condition.
I bought a modest rayskin from an ebay dealer in China. (I still have mixed feelings about this, as I don’t know how humane or indiscriminate the skin harvesting is, and I don’t want to help enable something awful.)

I made rubbings of the tsukka recesses and cut out their shapes:


(Steve! Are you drawing dicks at your desk again! What did I tell you?)
Anyway…. I soaked the rayskin in water for a few minutes to soften it:
Then used the rubbing cutouts as stencils to mark the shapes in the rayskin:

I did a whole bunch of things wrong here.
First, I didn’t realize that the skin shrinks a decent amout when it dries. So the shapes I traced onto the wet skin would dry smaller.
Second, I didn’t realize that there was a “grain” to the skin — that is, there’s a direction in which the tiny hooks at the top of the nodes will more strongly bind against something. You want them positioned so that the hooks are pointing toward the tsuba. It gives the strongest bind against the ito, preventing it from slipping when the sword is swung.
Third, I didn’t turn the stencils face-down against the smoother back of the rayskin and trace that way. Not putting them face-down meant that the cut shapes were actually upside-down: To properly fit according to how I’d cut them, the hooks would be against the wood and the smooth side would be up.
Naturally I realized this after I cut them.
Finally (yep, four big mistakes here): I used decent kitchen shears to cut the rayskin. Yeah, no. Don’t do that. This stuff is amazingly tough and abrasive, and I ruined the shears. Tin snips next time! Also: Probably best not to ever fight a stingray.
I didn’t have enough good rayskin remaining to redo the shapes, so the best I could do was to swap their intended sides. They fit better than I had a right to expect, to be honest. (Anyone who does this professionally is probably crying by this point. I apologize.)
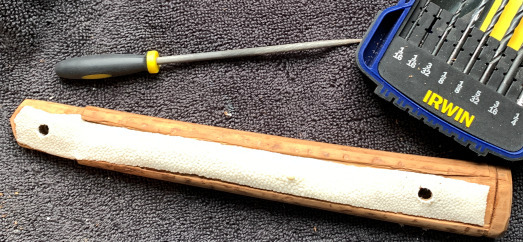
I glued on the samegawa, wrapped them tight, and let them dry. Then I drilled holes at the mekugi-ana (the hole for the pin that goes through the handle and tang to secure the handle to the sword) and used a small round file to smooth the holes and edges.

Brief philosophy aside:
I was in a quandary about the fittings. How far do you go with cleaning & polishing? This was an antique; making it bright, shiny, & new didn’t seem right.
I spoke with a vintage-jewelry-expert friend about the philosophy of restoration. There’s a lot of argument about how far to take it, the degree to which you can go before you’re actually devaluing the item and disrespecting its provenance.
There’s also the Ship of Theseus problem: Worn parts get replaced over time, until nothing left belonged to the original. It’s a big issue in restoring paintings.
The discussion was very helpful, and I ended up resolved that I would clean & polish for appearance but leave enough patina to make the age apparent. Keep what matters, replace what doesn’t. Samegawa, ito, & sageo (the securing cord on the scabbard) were designed to be replaced. Koshirae (decorative fittings) could be, but should be restored best as possible out of respect for their origin. Ultimately, though, all of it is a support system for what really matters, and what absolutely should not be screwed with: The blade.
So:
I cleaned the fittings with Brasso, a hard-bristled plastic brush, and a toothbrush (metal bristles would have been damaging).

I polished with Metal Glo and then with Peek. The patina in the deeper sections actually helps highlight the decorative shapes:
The finish had worn off of the menuki and there was a lot of tarnish. Cleaning & polishing actually made them look worse:
I didn’t want to replace them because the goal was to restore where possible, not replace. I compromised by painting the originals with Liquid Leaf Brass, a product I swear by. (They no longer make their copper paint, which is a shame because it was amazing.) Apart from the saya, this was the only painting I did on this project:

I rewrapped the tsuka with a new brown cotton ito:
There’s an entire art, tsuka-maki, devoted to handle wrapping. I would never come near the expertise of these artists, but if I was gonna disassemble, repair, and customize samurai swords, I had to at least get serviceable at it.
The gunto was my second ito wrap, and my first effort with the little paper hishigame wedges. I simply couldn’t figure out how to make them work. Some of it was me not having good tools; most of it was me not having good skills. All my attempts using hishigame ended up looking worse than without them.
I decided that, as a total neophyte in restoring & repairing katana (much less katana with at least some historical value), being obsessively completist was useless if my inexperience made it look worse than it would if I wasn’t obsessively completist.
So I wrapped it without the hishigame:


I didn’t document the saya restoration, but it was mostly just a repaint. It was rattan-wrapped, thick with old scarred brown paint. I stripped off the paint and scrubbed it clean with stiff brushes. I’d never worked with rattan and didn’t want to sand it.
I don’t recall having to repair the rattan itself — I think I’d remember if I had, because contouring it around the kurigata and tapering the ends to fit flush looked tricky.
Really I just stripped it, cleaned it, scrubbed it with TSP to remove residue, and rattle-canned it primer gray. Then I rattle-canned a terracotta color that I thought would look great but ended up too orange.
I tried again with a more chocolate brown, and was happy to see that the orange underneath tinted it just a tad, giving it a unique color that still recalled the original. I let it cure and then clear-coated it with Rustoleum spray gloss.
I bought a brown-and-white Sanada-Himo cotton sageo that looked great with it:
The koiguchi (scabbard opening) was very loose, and I shimmed it in three places with maple veneer.
The blade had light pitting. I was hesitant to be aggressive cleaning it because I might be ruining a good blade, and because it really was a tired blade. I settled for a straight-up clean with denatured alcohol and a mild polish with Peek.
The edge was fairly dull, but I was nobody’s proficient sharpener (still ain’t, though I’m better), and, again, I didn’t want to ruin what might prove to be a valuable blade. I settled for stropping it.
Then I put it all back together. I was happy about the improvements and the overall look, especially given how new I was at this:


To be honest, the sword feels odd in the hand. The blade’s a bit short, just under 25″ from tip to tsuba, a bit thick, and very front-heavy.
Because of the nature of this katana, I feel bad about mistakes I made and subpar work I did, most visibly on the tsuka. I wince a bit at the samegawa shrinkage and poor fit that exposes the tsuka wood. It ruins the lines of the ito diamonds. Nowadays I’d know to at least wrap the ito tighter and make the diamonds smaller to minimize that exposure.
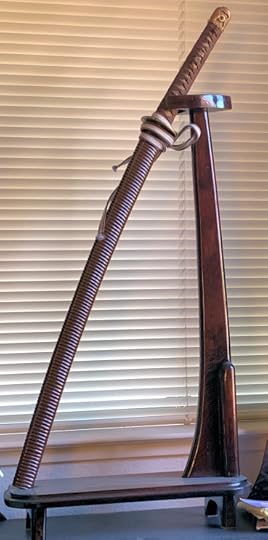
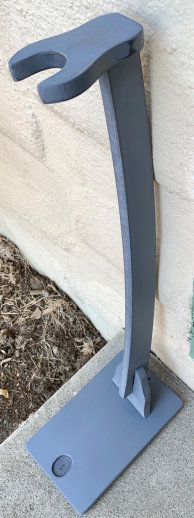
I found a beautiful brown tachi-kake stand on Etsy, almost Deco, made by an artist in Ukraine, and I decided wotthell, let’s give this old soldier a good home:
I’ve learned and improved a lot since I worked on this gunto, and I get the feeling I’ll revisit it one day to upgrade some of the repairs I made. I worry that, if I don’t, it’ll rattle chains and haunt the house.
August 25, 2025
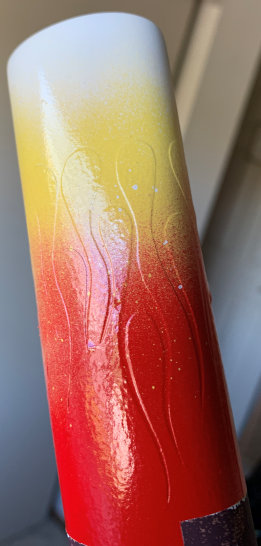
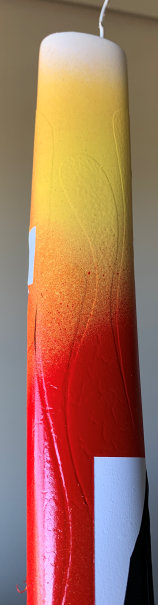
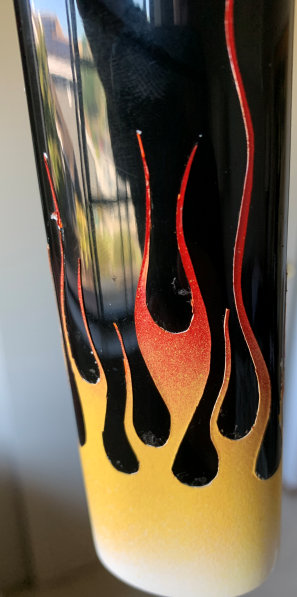
Hot Rod Tachikaze (vertical stand)
I wanted a stand to go with my hot rod katana, so I ordered a cheap vertical stand from an ebay seller for about $20, sanded it down, and primered it gray:
Another flame job would have competed with the sword, when the goal was to highlight it. So tried it out a lot of designs on paper before deciding what I wanted to do.

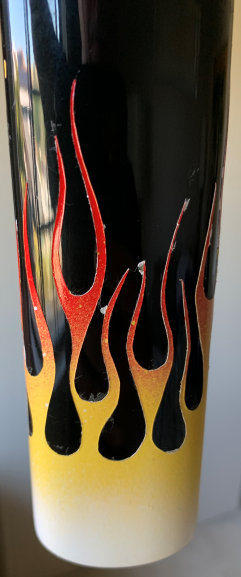
I used Rustoleum 2x rattlecans in white, yellow, orange, and red to do the fades:
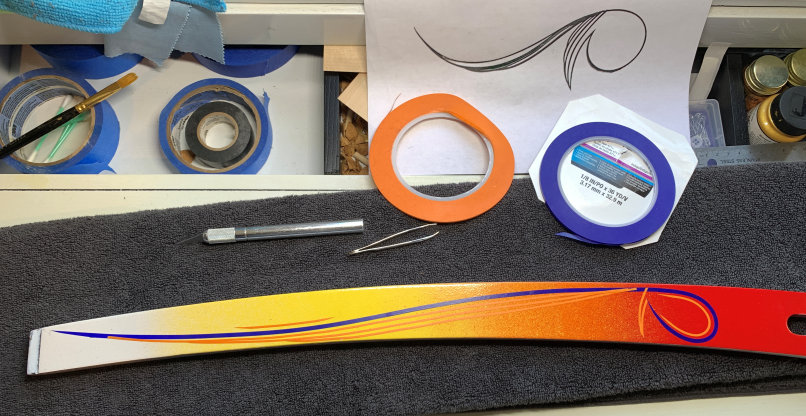
I used 1/8″ and 1/16″ vinyl fineline tape to freehand a pinstripe design on each side of the can-faded neck. I tapered the ends with an X-acto:
I tried out different flame designs for the top piece to be sure. I think I have commitment issues.
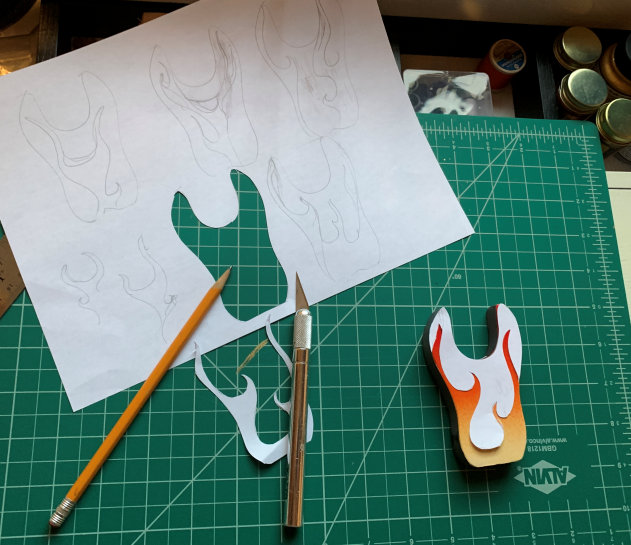
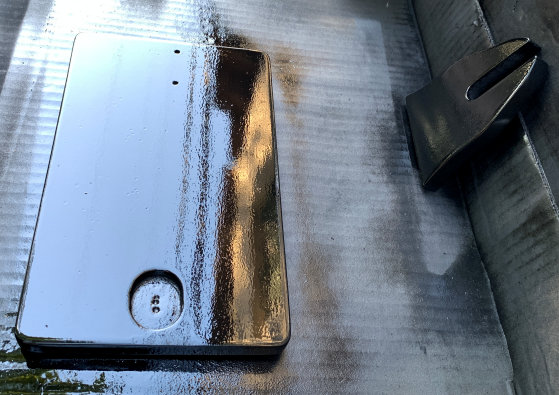
I traced the design onto adhesive vinyl, cut it out, and applied it to the top piece. Then I sprayed all the stand pieces with Rustoleum 2x gloss black. As you can see, the cheap stand surface is a bit orange-rindy. (That can also happen to the paint, if you spray too hard and/or too close, but I don’t think that was the case here.) Nowadays I’d coat it with watered-down PVA before primering and sand it smooth. Live & learn, yah?
I pulled the tape from the top and the neck. (Things I Learned the Hard Way: pull by sort of folding the tape back on itself and keeping close to the surface, rather than pulling up):

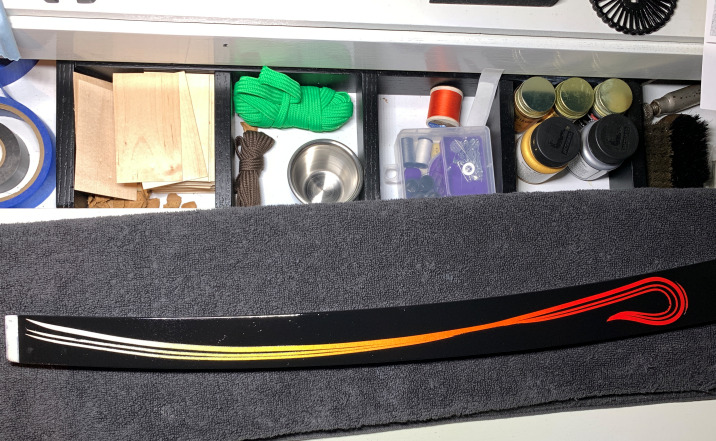
Another reason to try for a super-smooth paint foundation: The orange-rind surface made it hard to get crisp, clean edges with the striping tape. Live & Learn again! I cleaned up the edges with an X-acto:

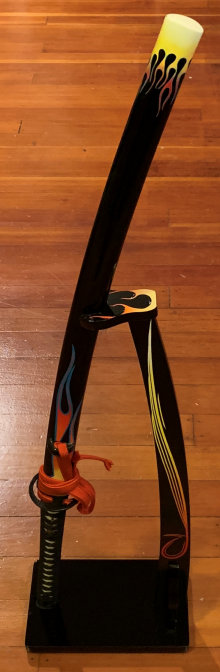
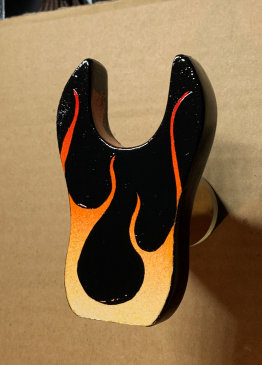
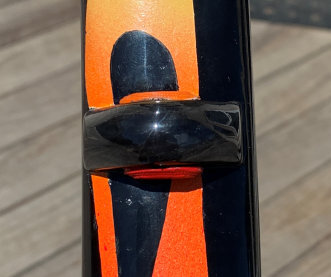
I clearcoated with three layers of Rustoleum 2x gloss and it smoothed out the orange rind pretty ok (that was lucky, really). I let it cure for a week, then waxed with Turtle Wax, buffed it, and put it together. I didn’t like the idea of the top piece & bottom divot’s bare wood rubbing against the saya, so I glued soft rubber lining meant for instrument cases to the cutaways. Moment of truth with the hot rod katana on it!
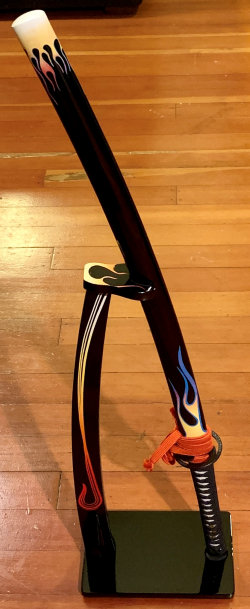
It’s now beside a wardrobe at the entrance to my home office, and I usually grin when I walk by it. It makes me happy.
August 12, 2025
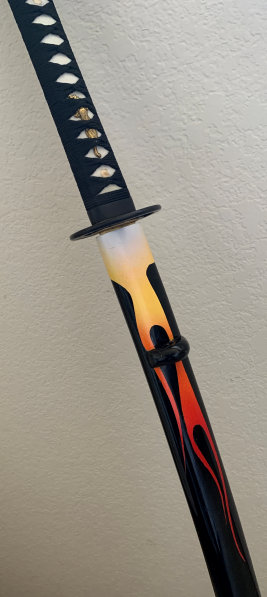
Hot Rod Katana
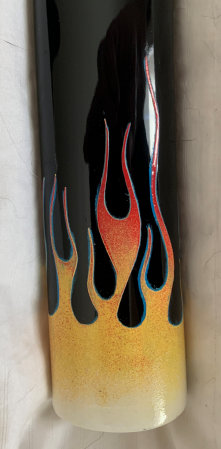
Years ago I learned how to do rattlecan fades from hotrod-flaming a PC case, monitor, & mouse, and I really liked the idea of doing a classic hotrod-flamed katana.
This was a Ronin Katana Dojo Pro scratch & dent shinken (live blade) I bought for about $190. At this time I was still nervous about disassembly, so apart from lacquering the ito (handle wrap), I didn’t modify the katana & fittings at all. This was all about the saya (scabbard).
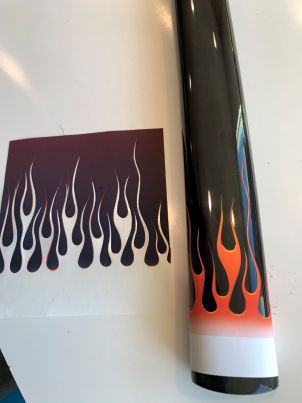
Rather than sand it down to bare wood, I masked the areas that wouldn’t be flamed. Then I laserjet-printed hotrod flames onto adhesive vinyl and cut out the flamed area with an X-acto (still didn’t have a Cricut printer/plotter yet). I applied these to the ends of the saya. The pic below shows one of the stencils, with the cut-out flames wrapped around the saya to give me an idea what the painted version would look like.
I used Rustoleum 2x rattlecans to fade the custom flame stencils with white, yellow, orange, and red. (I’ve found that a wire coat hanger bent into an S at one end and shoved into the saya is great for hanging them to paint & dry.)

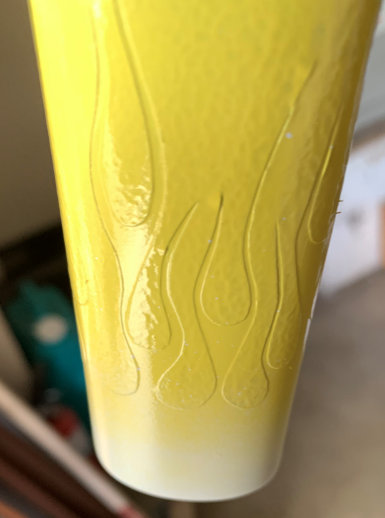
Surprise! The orange paint crackled and I had to redo everything. Man, I was so happy with that fade, too.
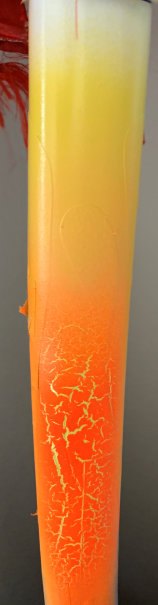
But I still ended up pretty happy with how it all looked after I peeled off the vinyl:
The edges needed cleaning up, and I carefully scraped them with an X-acto. The flames were going to be pinstriped, so I didn’t need to be too obsessive about it. This is after edge-scraping:

I ordered an orange silk sageo (ribbon cord) from the sadly defunct Ryujin Swords (UK), and I painted the shitodome (metal washer) to match.
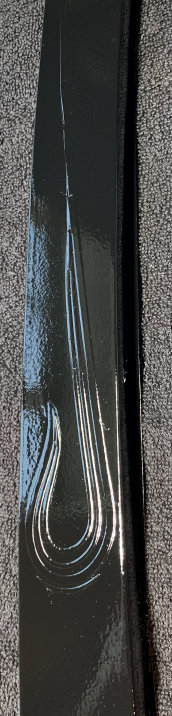
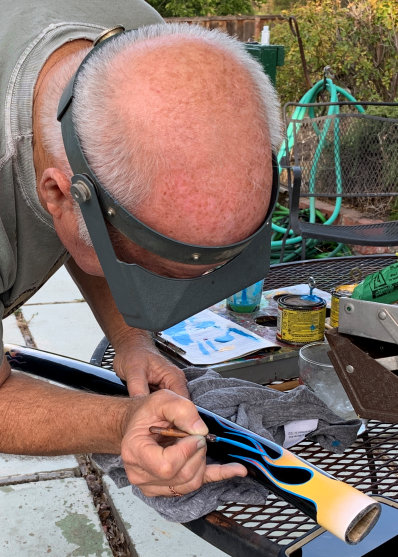
I am nobody’s pinstriper, and my best friend Ken Mitchroney — director/animator/race-car driver/locomotive restorer/Ninja Turtles comic artist, and my Fata Morgana coauthor — was an expert. (He worked with Ed “Big Daddy” Roth, who created Rat Fink.) Ken did the pinstriping, bless him.
When I told him about the paint problems I’d been having, he said he hated working with rattlecans because too much was unpredicatable and inconsistent. He admired my can fades but said I’d be so much happier with fades and consistency if I learned to use an airbrush. Which definitely put a bug in my ear.
For the final polish, I didn’t use rubbing compound because there was a chance it’d damage the pinstriping, and I didn’t clearcoat the flames because it would have been clearcoating the already-coated black sections of the saya. D’oh. So I just waxed it with 3-4 layers of Turtle Wax and called it a day. (Well, a whole lot of days.)


If I had it to do over again, I’d sand the saya down to bare wood, primer it white, and fade the ends (I have an airbrush now). Then I’d mark out the flames with fineline tape, mask them, and paint the saya black. Remove the tape, pinstripe the flames, and clearcoat the whole thing. Soooo much less work.
Even so — especially considering where I was in my learning process with all this — I was so happy with my hotrod katana that I decided to customize a vertical stand to match it. I’ll post that next.
August 7, 2025
Art Nouveau Iaito

Modifying low-end katana has been a great, low-risk way to learn. I’ve made a lot of mistakes (still do!), but they weren’t $10,000 mistakes that ruined a work of art or piece of history, and they let me learn the hard way without causing much damage.
This was one of the first customizations I did, in 2021. I’ve always thought the elegant shape of a katana suggested Art Nouveau’s trademark curvilinears (unsurprising, since Art Nouveau was heavily influenced by traditional Japanese design), and thought it would be fun to make an Art Nouveau-themed iaito.
It’s a $70 ebay sword. I sanded the saya (scabbard) down to bare wood and primered it gray with two coats of Rustoleum 2x. The black was Design Master ubermatte Ink Tinta. I hadn’t got an airbrush yet; it was rattle-cans all the way.
I can’t draw worth a damn, so I found a Nouveau border I liked, elongated it quite a lot in PaintShop Pro, and printed it onto adhesive vinyl. I cut out the design with an X-acto knife (I hadn’t gotten a Cricut printer yet), and applied it to the black-painted saya. This may have been my introduction to the unique pain in the ass that is the saya shape, when it comes to attempting symmetrical design, straight lines, and applying adhesive stencils.

I wanted a curvilenear shape on the ends of the saya. I realized that the shape I wanted was basically a bell curve, if you unrolled and flattened it. I’m a bit embarrassed to admit that the graphic I found that best fit this was the CDC bell-curve graphic that was everywhere at the beginning of the pandemic when we were supposed to be flattening the curve. I printed it onto adhesive vinyl, cut out the shape, and applied it to the saya.

I wanted a slightly worn, antiqued look, so I brushed Rub ‘n Buff Antique Gold into the end-cap stencils, the fittings, and the tsuba.

I polished the 1040 steel blade with Peek metal polish. Back then I was afraid to disassemble anything, so I did all the painting & polishing by masking off areas. Nowadays I know better.
I lacquered the ito (handle wrap) with two coats of Minwax gloss polyurethane, clearcoated the saya with matte spray polyurethane, and was pretty much done.
Over time I discovered that the Rub ‘n Buff wears away pretty quickly with handling, and I subsequently sanded everything down again and repainted, this time using Liquid Leaf Classic Gold. Once I became more comfortable with an airbrush, I did it all one more time. I’ll post that version later. I love it.
As I said, this was an early effort, and I learned a lot. It’s been my go-to training iaito for a few years, and I’m very fond of the little guy.
August 3, 2025
Yeah, so this is a little late

Yes, I’m still writing. It’s not easy for me, though why that may be so is a topic for another day.
For now I’m going to kind of ease back in by posting walk-throughs of airbrush projects I’ve done in the last few years. I realize that seems like quite the non sequitur; I’m asking your indulgence as I take baby steps here.
I started taking Batto-Jutsu, a samurai sword art, just before the pandemic, and earned my shodan this year. This would put nearly 50 years between my black belt in Tae Kwon Do and the new one, which I find sorta funny and sorta cool.
Katana have been a big deal in my novels Ariel and Elegy Beach, and I’ve owned a few cheap iaito (dull practice swords), and trained with them (unsupervised and wholly ignorantly). Once I started Batto, I found I really wanted to learn more about the swords themselves: Take them apart, clean them, repair them, maintain them–and customize them.
That entailed tons of tutorials helping me learn cleaning, assembly, rattle-can painting, handle-wrapping (tsukamaki), airbrushing, and a host of related skills. Thank god for Youtube.
So I think I’m just gonna post walk-throughs of some of these projects for a while. Partly because this is a new endeavor for me even while it’s part of a lifelong undertaking in martial arts that I haven’t talked about much. And partly, as I said above, it’s to help get me get used to doing all this again.
So I beg you be gentle as I get my sea legs back.
January 10, 2021
Broken-windows theory

“The broken windows theory is a criminological theory that states that visible signs of crime, anti-social behavior, and civil disorder create an urban environment that encourages further crime and disorder, including serious crimes.”
September 9, 2020
Living in a favorite novel
 SF Bay Area this morning
I woke up this morning to the realization that I am now living in one of my favorite novels.
Unfortunately, the novel is Dhalgren.
August 6, 2020
Silver Scream back in print
 Dave Schow’s massive movie-industry-themed 1988 horror anthology Silver Scream has been reprinted by Cimarron Street Books. I have a story in it, so yay!
Dave is credited with inventing the word splatterpunk to describe a movement of younger writers in 80s horror that tended more toward the cinematic than the literary, more punk than progressive, more grindhouse than arthouse. Silver Scream made a splash–nominated for the World Fantasy Award, very favorably reviewed, a core-sampling of the 80s horror landscape, and containing some stories that became much-reprinted classics, such as Joe Lansdale’s “Night They Missed the Horror Show” and Robert McCammon’s “Night Calls the Green Falcon,” not to mention director Mick Garris’ first published short story, “A Life in the Cinema.” It’s generally considered to be one of the two definitive splatterpunk anthologies.

I hadn’t published much that would be considered any type of horror, much less splatterpunk, but I was friends with a whole bunch of horror writers, and I relished the opportunity to hang with them in books, too.
But I knew I couldn’t compete with them in terms of sheer goosh. They were scary and icky for a living. Luckily, I had worked as a word-processing operator (a Brand New Thing back then) for the University of Florida History and English departments, and I typed more academic exegeses than you can imagine. We’re talking books in 12th Century Merovingian Latin (hi, Dr. Geary!), Freudian analysie of horror archetypes as social behavior templates (hi, Dr. Twitchell!), post-structuralist grammatological examinations of lard-and-felt sculptures as illuminations of feminist criticism (you think I’m making this up, don’t you?).
So I was in a perfect position to write a horror story about academic film criticism. “The Answer Tree” is about a film critic at a rare screening of a legendary horror movie so subliminally seductive that it kills people. It’s a serious version of the Monty Python “killer joke” skit performed as a mashup of surrealist biography and iconography involving Cocteau, Bunuel, Dali, Lynch, and others. The challenge wasn’t to move the plot toward some Big Reveal about the movie killing someone, it was to chart the movie’s unfolding, supplemented with excerpts from fictitious academic works about the director, in a way that showed you how that process might happen.
“The Answer Tree” created an entirely fictitious film career and oeuvre that seemed genuine. I’m gauchely proud of it, and very glad it’s back ain print.
I’ve been very lucky regarding anthologies. I haven’t published in many, but some of them have been considered influential, even landmarks. Silver Scream was one.
My novella “Like Pavlov’s Dogs” was included in the other definitive splatterpunk anthology, John Skipp & Craig Spector’s very loud, gooshy, popular, and influential 1989 Book of the Dead. It was the first zombie anthology, a shared-world anthology that takes place in George Romero’s zombie universe (with an an intro from Romero). It’s been credited with playing a role in the, um, rebirth of the modern zombie genre (unbelievably still, um, alive).
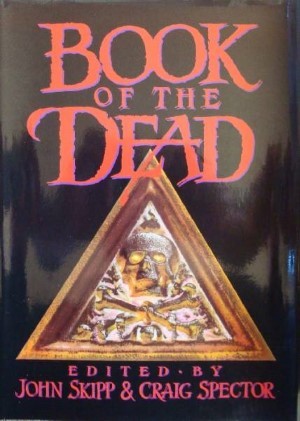
BotD was a cross-section of 80s horror writers, and I was delighted when John Skipp invited me to write something for it. Given the company I was keeping, I was thrilled when John told me he thought that the violence and death in “Pavlov” was very disturbing because it was so personal.
Though it was commercially and critically popular, BotD has a checkered history. Skipp and Specter’s agent sold its foreign rights and never paid anyone a dime, then made off with a not-insubstantial amount of royalties. Despite the book being something of a landmark, no one in it made a dime in royalties. I’ve never even seen one of the foreign editions. And Craig Spector tried to sell a reprint to White Wolf Press under another title without even notifying the contributors, much less paying us, which initiated some very colorful letters (this was before email) and threats of grievous bodily harm. I remain mystified why anyone chooses writing as a career. But I’m still delighted to have been a part of BotD.
My novella “Prodigy” was the lead story in Terri Windling’s 1986 Borderland anthology, which generally has been regarded as one of the originating examples of what became known as Urban Fantasy (though the perception of Urban Fantasy itself has changed a good bit over time).
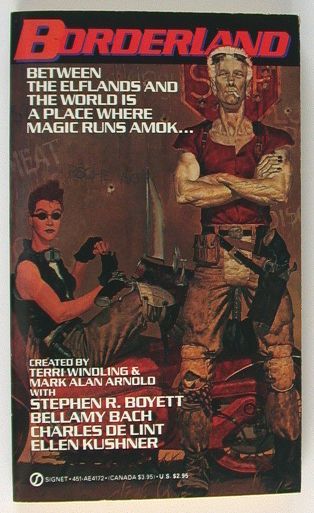
I have to admit that “Prodigy” is an odd fit in the anthology. I think Terri wanted Borderland to have a sort of Manhattan-meets-Faerie feel, and I set my story in a fantasy-postapocalyptic Los Angeles that seems to better fit the Change milieu of my novels Ariel and Elegy Beach (so much so that I allude to “Prodigy” in the next Change novel, Avalon Burning).
But I was flattered to be asked to contribute, and glad to be part something so often cited as making an impression on many young readers of fantasy.
Steven R. Boyett's Blog

- Steven R. Boyett's profile
- 111 followers

