
Matte Resist's Blog
May 20, 2022
How to Make Lilac Infused Honey

A few years back a friend of mine who was out of the town for the glorious Minnesota lilac season asked if anybody could make her some lilac honey. There’s just nothing like the smell of fresh bloomed lilacs, and they only last for about a week. There’s no artificial scent that smells anything like them, and there’s really no way to preserve the smell. Her thought was that lilac infused honey was about as close as she was going to get. I’d never heard of it, but I LOVE flowers so it sounded like something I would be interested in. I did a little research and figured out how to make it. I figured as long as I was making her a jar, I might as well make a few more. I kept one for us, and sold a few to a friends. There was a ton of demand so the next year I made even more honey, and the following year I made even more. It doesn’t take very long to make a jar or two, but making a few dozen jars ended up taking a good part of a day which I don’t want to do this year, so I’m just going to share the “recipe” and you can make it yourself if you’d like. It’s incredibly easy.
Folks will tell you to find out if the flowers have been sprayed. Who sprays lilacs? Maybe they do in the rich suburbs, but I ain’t never seen anybody spray ANYTHING in my neighborhood. I do try to avoid bushes next to busy roads. I’d prefer my honey to not taste like car exhaust. Folks will also tell you not to steal your neighbors’ flowers. I have my own elaborate set of self-imposed rules about flowers. You’ll have to figure out for yourself what you’re comfortable with.
In the past I used to mix my stories and opinions in with the step-by-step. I’ve since learned that people don’t like that, and in fact will gripe about my little story time introduction. Know what though? Those ungrateful fucks can go buy their flower honey at a farmer’s market or something.
Step-by-Step
Make sure you have raw honey and clean jars on hand before you start picking flowers. You want the flowers to be as fresh as possible.
Pick bunches of lilacs that are fully opened, but not yet turning brown. The best looking (and smelling) flowers make the best tasting honey.
 These are a little wilted… but it was the best picture I could find right now.
Next remove the flowers from the stem. Some of the articles I read suggested cutting them off with a scissors. I found that pulling the flowers off by hand went quicker and left less stem.
Fill your jar to the top with flowers. (I’ve used 4oz up to 1qt jars with success) You can have them sit loosely or pack them down a bit. You don’t want them packed tight, but the more flowers you get in your jar, the more of the flower essence you’ll have in your honey.


Pour honey over the flowers almost to the top of the jar. Let sit for a few minutes so the air in the flowers can bubble to the top, then add more honey if needed to fill the jar and screw the cap on.

The flowers will float to the top of the jar, eventually forming just a thin mat of flowers at the top of the honey. The honey should sit for a least 7 days before being used. For the first few days I like to turn the jar upside down once a day to let the flowers float up and mix with the honey a bit.

When you’re ready to use the honey, you scan scoop out the flowers if you’d like, or leave them in. They’re edible. If you use a good quality honey, it will keep for months. I’ve opened up a jar that was sitting in the cupboard for a year, and the honey was still perfect.
Use as you would any other honey, but it’s especially good in tea or mixed drinks. Throw some in season (and edible) flowers on top of your drinks to really fancy it up!


September 14, 2018
Saving worn out bungee cords with bicycle tubes
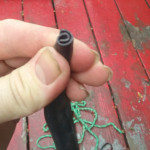
For years I’ve had a bucket of tie-down straps, ropes & bungee cords. It mostly sat in the back of the truck, out in the elements getting more disorganized, dirty and disgusting as time went on. I recently decided that I was going to get it all cleaned up and organized. As I was going through it I found that most of the bungee cords had deteriorated from being outside. For years I’ve always salvaged my bungee cords by cutting off the hooks and using bicycle tubes to rebuild them. It’s super simple, but most people don’t think about it, so I figured I would share the idea.
All you do is cut the bungee cord so you can slide the hooks off.
[image error]
Cut a bicycle tube to the length of bungee cord you want. Roll up one end and twist it into the end of the hook.
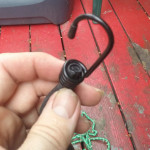
It can be a little tricky to get it started, but once you do just pull it far enough through to tie a tight knot at the end. Trim off the excess and pull it back into the hook.
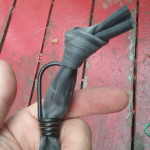
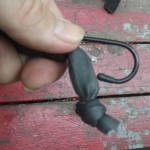
Do the same at the other end of the bike tube and you’ve got bungee cords that will probably last longer than the originals.
[image error]
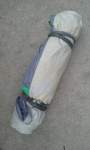
When they do wear out, just repeat the process. I used a couple of the ones I just made to roll up our tent for a camping trip to South Dakota, since the original tent bag fell apart.
February 7, 2017
A new light & coat rack for the rear entryway
This rear entryway was my big project this last weekend. When we moved into our house, the kitchen was tiny and had no cupboard space. So we put a cabinet I had fixed up to use as a linen closet in the kitchen to use as a pantry. The landlord had our kitchen remodeled shortly after we moved in, but even with the extra cupboard space we decided that we wanted to keep the pantry. With 5 adults living in the house, we figured it would be helpful to have some extra storage space for canned & dry goods. There wasn’t a good place for it in the kitchen, but in the rear entryway it would fit in the “coat closet” which was just a nook with a hanger bar and a high shelf.
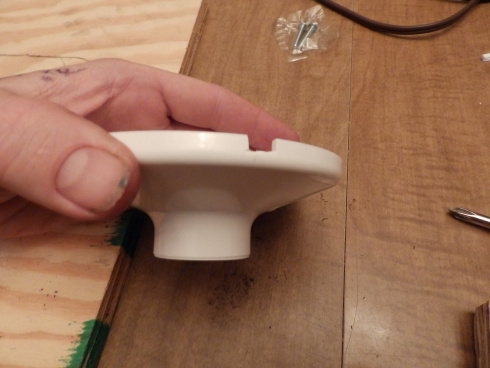
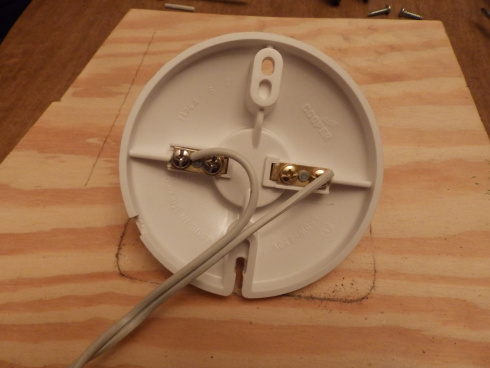
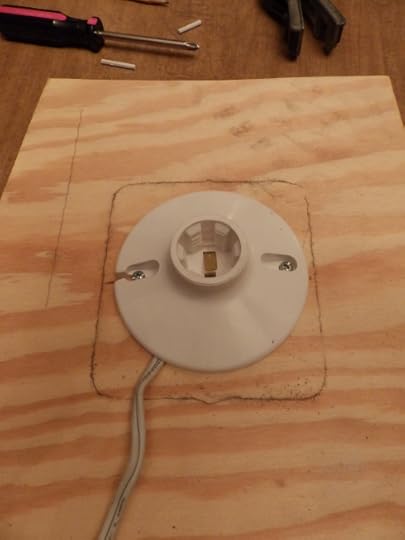
This left us with a couple issues. There was no light in the rear entry way, and now no place to hang coats. Since I build both of those, I wanted to make a really rad industrial looking light and a rad coat rack made from bike parts and scrap metal pieces. Well I ended up using a light fixture that was given to me in a tub of scrap metal. It just seemed like the perfect light for that space. Even the colors matched.
[image error]
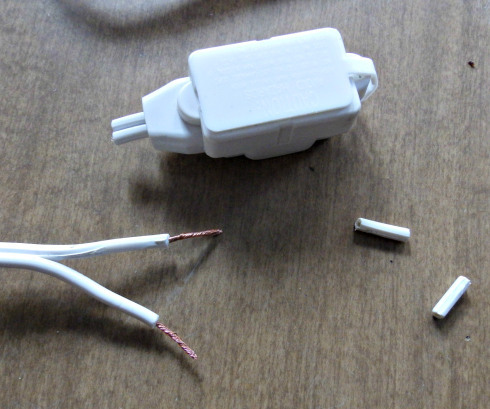
I’ve made a few switch boxes. When I want to put up a light fixture that you’d normally wire into the wall, but I can’t wire into the wall (because I’m a renter), I add a power cord with a switch box that can be mounted to the wall. If you don’t mind some exposed cord or a switch box on (instead of in) the wall, you can put a light fixture just about anywhere like this.
[image error]
In the rear entryway there is only one outlet that I use for the battery charger for my drill. Since I would be using that outlet for my light and I still wanted to plug in my charger, I added an outlet to the switch box. The only real issue with this was that the box I picked up at the thrift store to use for this purpose was quite brittle. It looked pretty sturdy, but the wood split really easily. The entire top broke apart when I tried to drill a hole for the outlet, so I had to make some alterations to the original plan. It didn’t go together as easily as I expected, but I got it figured out. I just ran a sturdy lamp cord from there to where the light would be, holding it to the wall and ceiling with wire clips. Then I attached and hung the light fixture. Voila! We now had light for our pantry and I still had a place to plug in my charger.
[image error]
I really wanted to make some fancy coat racks, but it was just too easy to grab the hooks I’d salvaged from somewhere, screw them to the boards I’d salvaged from somewhere else and screw them to the wall. It kind of fits with the saying, “The cobbler’s kids have no shoes.” I always have all these ideas to make these fantastic things for our house, but when it comes time to actually build something for the house, I often end up making something pretty basic and utilitarian while I sell the coolest stuff I make.


February 5, 2017
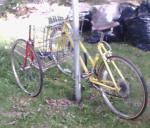
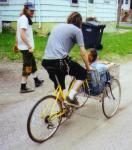
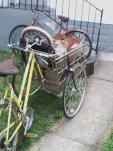
How to Build a Cartbike
(From Resist Zine #42)
I wrote this article many years ago, and to be perfectly honest… this isn’t the best cargo bike design. However, this is one of the most popular articles I’ve ever written, so I thought I’d copy it here before I let the website where it is hosted die. Also, although it’s not the best designs, I’ve never seen another bike like this that can be built without welding which is a HUGE thing for someone without access to a welder.
For months Dan, Gus, Ben, Lisa & myself have been talking about building bicycles. I’ve mentioned before about me & Ben’s obsession with High Wheeler/Penny Farthing bikes. But neither of us knew how to weld, and we were having trouble figuring out all the details. So gradually, our focus shifted towards more utilitarian bicycles. Mostly pickup/truck bikes and cart bikes. We still were planning on doing welding though. Two people offered their assistance. Since Gus was as excited about the prospects as we were, it seemed like things would work. Once problem still remained. Gus didn’t have equipment, and the equipment at the community house where Dan lives was frozen in the garage. (The garage door couldn’t be moved for at least a month due to inches of ice around it) And we didn’t even know if we had the right equipment, because the only person who ever used it was gone for 5 months or more.
[image error]But when I ran across plans for a bicycle cart with no need for welding, ideas started churning. I didn’t like the plans, and they were kind of incomplete besides. But the basic idea that I latched onto was the use of U-clamps. A lot could be accomplished with those little wonders. The plans I found (they were either in Seedhead, Luddite Tech Zine or How 2 Zine.) suggested U-clamping forks to the side of a cart. We thought they’d move around too much and decided to try an axle (still using u-clamps to attach everything.) Their plans also called for some weird bent pipe contraption for steering. We decided to clamp the forks directly to the cart. This of course was all before we even had a cart in our possession. So it was all just speculation. Then we got our hands on some carts & Monday, got together for our first building session.
Gus towed a cart I’d left in Ben’s backyard over to my garage where we had plenty of parts and tools. We set about to finding pieces to put it together. We wanted a girls frame, so it’d be easy to get on and off. I didn’t have many, but we found a nice yellow one with no wheels or handlebars (or neck.) We found a back wheel and a couple front ones and started piecing it together It was about 4 hours that night, and mostly we just learned what wouldn’t work The allthread axle wasn’t the same thread as bicycle axles, so we had to jerry-rig it. I’ll save you the boring details of how that worked, because it ended up that the axle was too flimsy anyway. We tried to clamp the forks to the cart & had trouble there too. First we clamped it too low so that the pedals hit the ground, and we didn’t clamp it to main braces, so it broke the little welds on the cart. We had a brain storming session and put the parts away for the night.
[image error](Left:Picture from before brakes, & shifters were hooked up)I had to work the next day, so I gave Ben the key to the garage and showed him where the tools were. When I got home, they were putting the finishing touches on the basic design. I’ll give details on it’s assembly later. We took it for a test drive, and it was hella hard to drive! Wow! It took muscle to steer, and if you steered too sharp, it would tip over. And when you started to steer, it would pull even harder in that direction, so that you had to hold it back. At this point it had no brakes or gears. We had Lisa sit in it, since she was smallest. With a load, it was much easier to drive. We each took turns in it, and even with 165 pounds, it held up and drove fine. So then we brought it back to the garage and put a neck on it, which we clamped to the grocery cart for extra support and to attach the gear shifters to. (You should definitely have some gears on a cart bike.) We hooked up a back brake, which was also attached to the handle.
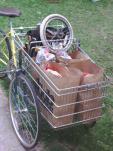
[image error]
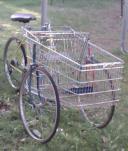
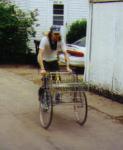
HOW TO BUILD YOUR OWN CARTBIKE
[image error]Okay, the first thing you’re going to have to do is get your hands on a cart. Metal ones are the only ones worth grabbing. I say, grab the biggest one you can find (but then I’ve never tried a small one.) Once you have that, you just grab yourself a hacksaw, and cut the basket off the bottom half of the cart. Just cut the four legs as close as you can to the basket. We also took the plastic handle off the cart, so that whoever originally owned the cart wouldn’t come after us trying to get it back. Take off any identifying marks, even if you dumpstered the thing. (rather than finding it on the side of the road or in a vacant lot or something.)
Next you’re going to need an adult sized bike to attach the cart to. I would highly suggest a women’s bike, since they’re much easier to get on and off of. I would also highly suggest that it be a 10 speed, since you’ll be happy to have the extra gears when you’re trying to pedal a basket full of groceries (or bricks, or people, or whatever) uphill.
Here’s a list of other things you’ll need to complete this project:
6 or more small U-clamps (about an inch across)
1 large U-clamp (big enough to fit around the head tube of your bike)
2 matching front wheels & coinciding forks. (I would suggest at least 26inch wheels)
2-4 hose clamps
1 tin can
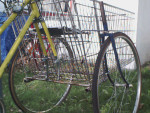
[image error]Take the forks and wheels and position them on the sides of the cart. You can screw around with this and try to figure out where they work best, but we found that the forks should stick past the bottom of the cart a couple inches, and should be pretty close to the back. One reason for this is that most of a cart is composed of weak little bars. If you attach the forks to those, the little welds will break, and it won’t be very strong. There are only a few strong bars that forks should be attached to. We chose a point near the back where some of the main supports are. Two of these strong bars crossed each other, and we put the U-clamps there. Put the U-clamps on, and tighten them down a bit. Make sure the cart sits level, and then tighten everything up. (I’ve highlighted the strong bars red, so they’re more visible in the picture. Notice the clamps (circled in yellow) are all attached to at least one of these.)
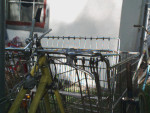
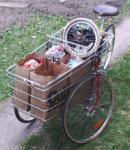
[image error]Now, pull the front wheel off your bike. Remove the front brake, and both the brake handles. Now spread open the neck and remove your handlebars. (You’ll want to leave the neck, as you’ll be using it later. Also, using the handlebars to spread the neck open will make the job easier later on.)
[image error][image error]We tried to file the dropouts on the fork wide enough to accept the bar that runs across the bottom of the back of the basket, but gave up as we were in such a hurry to get the thing done. It evidently didn’t need to be done, but I think it might be a good idea anyway. So then you just turn the forks around, so they’re backwards and center them on the bar that runs across the bottom of the back of the cart. Use a U-clamp on each side of the fork near the bottom to attach it to a strong part of the back of the cart. Then use your big U-clamp to attach the neck to the back part of the cart. To make the attachment just a little more secure, we spread open the neck, and twisted the two pieces of the handle with a channel locks so they would slide into it, then tightened it up. To get a really tight fit, we would have needed some old tubing or tin can strips or something, but we left it as is. We also attached our gear shift levers to the neck. Because the backs of most carts flap open, you’ll need to use a few hose clamps to hold it shut. We put a couple on the bottom, and a couple on the sides.
Now you’ve kind of got a choice with the brakes. You can just leave off the front one, and attach the back handle to the cart like we did. Or you can put brakes on both the forks attached to the cart, and have them up in front where all the stopping power is. This is what I would have done, but the bike I was using didn’t have any brakes, and I had trouble scrounging up even one. This is where that tin can will come in handy. You’ll have to cut strips of it to wrap around the cart handle, so you can tightly attach the brake handles. In the pictures, it looks like we duct taped ours on, but that’s just there to cover the edges of the tin can. Some grips would make the handle a bit more comfortable. (maybe some of those foam 10 speed ones or something)
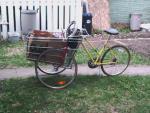
I haven’t gone into every single detail about putting one of these together, because every single bike/cart combination is going to be different. With each you’ll encounter your own special brand of problems along the way. If you’ve never worked on a bike before, this might not be the project for you. Probably learning to adjust your brakes & gears, and change your tires is a good place to start. If you’ve done some work on bikes, this should come pretty easy for you. The hardest part for us was coming up with the basic design, and doing it without any welds. We’ve fixed that problem for you. Now go to it!
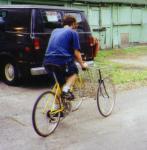
[image error]Just to let you know, our concern about the forks moving was well founded. Our forks do move a bit, but if the bike is moving forward, and especially with a load, the problem is self-correcting. It has yet to be a real problem. These things are pretty difficult to drive. I found that it’s much easier to steer by leaning, than by trying to turn the cart. The problem is that you have to shift your weight the opposite of the way you want to go. It’s sort of difficult to explain, but once you have yours built, you’ll see what I mean. It’s definitely not built for speed. In order to keep control, you have to move sort of slow. It’s good for getting loads of stuff (like groceries) but I wouldn’t want to use it as an every day bike (unless I was hauling a lot of stuff every day, and then I would build a trailer.)
Build it and they will…
ride it, and they will…


CRASH IT!


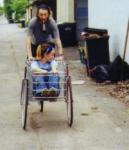
Then Bring it to the Grocery Store and Load it up


February 2, 2017
Fixing A Cabinet
I’m not really sure why I wrote this up, other than the fact that I like to work on stuff and I like to write about it. It’s just a little project I did recently. It’s nothing super fancy. I didn’t take a cabinet and turn it into a magic wardrobe or anything but I did take a crapped out piece of furniture and make it usable.
While dropping off my friend David at his house, I saw a shelf sitting in the garbage. I’d been thinking about how I could use some more shelving in the garage, and I’d just recently purchased a truck so I had plenty of room to haul it home. I asked David if he would help me load it up. When we got over there, it turned out to be a cabinet, not a shelf. We had been looking at the back side of it.
[image error]
It wasn’t in particularly good shape when I got it. The shelves were sitting at the bottom of the cabinet because they’d been held up by shelf brackets that were falling off. The hardboard back was in pretty sad shape too. The shell and doors were in decent shape though. I changed my mind about using it in the garage when I found out it was a cabinet. The bathroom in our basement, where our bedroom is, had no shelves and there wasn’t really any closet space down there at all. We needed a place to keep towels and bedding and this seemed like it might just do the job.
[image error]
The first thing was those shelf brackets needed to come out. They’d been screwed to the back of the cabinet which was mostly dilapidated hardboard. The upper screws went all the way into the braces on the back, but the bottoms were pretty much swinging free. Most of the screws easily turned out by hand.
[image error]
Next I had to do something about that hardboard on the back. It was warped, water stained, and had holes poked through it. I took off the door handles, which I wanted to replace anyway, and laid the cabinet face down in the driveway. I used a pry bar to remove the braces on the back side, then pulled the nails so I could reuse them. Next the actual hardboard came off. I just tipped the cabinet on its side and pushed off the hardboard from the inside. It was in such sad shape that most of the nails just popped right through and I ended up going back and having to remove them all with a little nail puller. Then I had to turn it face down again and trim away the paint along the edges with a utility knife.
[image error]
Once it was off, I was trying to find a piece of plywood or something that I could put on the back. I wasn’t really having much luck finding anything in garage. Then I noticed the fake wood paneling I had sitting around. It’s kind of embarrassing really. When I bought a house with my ex-wife about 10 years ago, I put up a wall in the basement to separate the laundry/utility room from the rest of the basement. Since I was going to hang cupboards anyway, I just used paneling. Well, these were scraps I’d been saving for 10 years! I have used quite a few of those scraps and think I’m actually reaching the end of my stockpile, but it’s pretty silly that I’ve held onto it for that long! I asked Jodi if she was okay with the wood paneling, and of course she didn’t care. I had two panels and they were somehow nearly a perfect fit. I think I trimmed the end off one piece.
[image error]
Jodi had bought me a finishing nailer shortly before I started this project, so when it came time to nail those pieces on, I plugged it in and just kept pulling the trigger. That made super quick work of putting the back on. I could have done it with the nails that I saved, but this helped me get things done before the sun went down. Next I put the braces back on, using the nails that I saved when I pulled them off.
[image error]
[image error]
When I originally thought about using this cabinet for our bathroom, I thought about a spot in the actual bathroom where I thought it would fit. Then I looked and realized that cabinet was way too wide for it. Then I thought of the space in front of the ‘closet’ I’d just made. (Really just an open space between the bathroom and bedroom walls where I’d added some shelves.) If I put wheels on the cabinet, we could put it there and it would hide the shelves and be right outside the bathroom door. In order to add wheels to it, I had to add something to the bottom to screw them too. A couple little pieces of scrap 2×4 were cut to length, nailed together and screwed to the base on either side. Then I screwed on some industrial metal rollers I’d saved from this weird contraption I found in the alley one day. Yes, yet another thing I’d held onto for way too long. Well as it turned out, after doing all that, the shelf didn’t quite fit the way I’d hoped so I ended up taking the wheels off and putting it some place more permanent.
[image error]
At this point, it was getting dark and I was ready to call it a night, so I had Jodi help me carry it downstairs. That turned out to be a really silly thing to do, because downstairs away from my tools it took me weeks to get around to finishing it up. Today I finally got around to installing the shelves. It consisted of cutting a piece of scrap wood into 11 inch lengths, sanding them and painting them white. I didn’t HAVE to paint them white, but most of the cabinet was, so I figured I might as well since I had a can of white spray paint handy. Waiting for the paint to dry was probably the longest part of this part. I predrilled them and then some quick work with a tape measure, a square and an electric driver had the supports attached to the sides of the shelf.
[image error]
I threw in the shelves that came with it, and it was good to go. I looked for something to replace the handles with, but I didn’t want to just throw on some cupboard handles or drawer pulls or something. I want to make something custom, so the handles will wait until I get that figured out.
[image error]
Until then, here it is holding the towels and blankets that used to be strewn around our bedroom.


December 27, 2015
DIY Chicken Water Heater
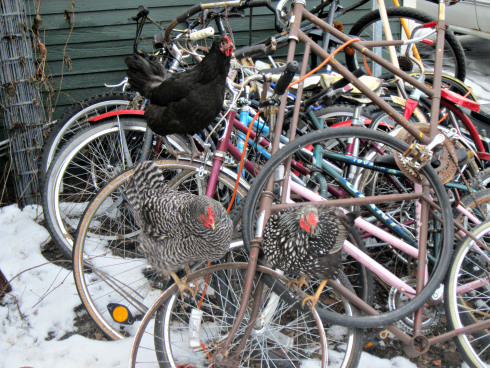
The ladies have NO interest in getting their feet in the snow
We’ve been flying by the seat of our pants pretty much from the get-go with our chickens. We’d been trying to get chickens for a couple years, but things just kept falling through. We finally decided that we’d just order them even though we had to move again, and they were going to show up a few days after we moved. We were tired of waiting for the perfect timing; we’d just pull the trigger and make the timing work. Still neck deep in boxes, we picked up our day old chicks. Fortunately, that meant we had plenty of boxes to make our brooder out of. We’d read far enough into our chicken books to know what we needed to do.
We did plan ahead for some things; others caught us a bit off guard. One of those was a water heater. We live in Minnesota, so we knew that we were eventually going to need something to keep the water from freezing in the winter, but we’d purchased the chicks in the spring so it wasn’t at the top of our priority list. We started talking about it again as the weather got cool, but fall lasted surprisingly long for Minnesota. All of a sudden we were hit with a cold snap, and their water started freezing. It wasn’t freezing solid, but freezing enough around the edges that we had to go out once or twice a day to make sure that they still had liquid water. The heated version of our water font ran about $50, and of course money was tight when the cold snap hit, so we were figuring out who got paid next so we could purchase it. In the meantime I started trying to think up my own system for keeping the water from freezing. I came up with an idea, but I wanted to make sure that it was a viable option before I did it so I went online to check it out. Why I didn’t immediately look online for “DIY chicken water heaters” is beyond me. I guess I’m still of the mindset that I need to figure it out for myself. I ended up finding a water heater idea that I liked better than mine and changing it a bit to fit the materials I had on hand, and to make it a bit safer. I had all of the materials on hand, but it probably would have run $5 if I had to purchase the items.
Here’s what you’ll need to make one:
1 lamp holder
Scrap of wood (about 10×10”)
extension cord
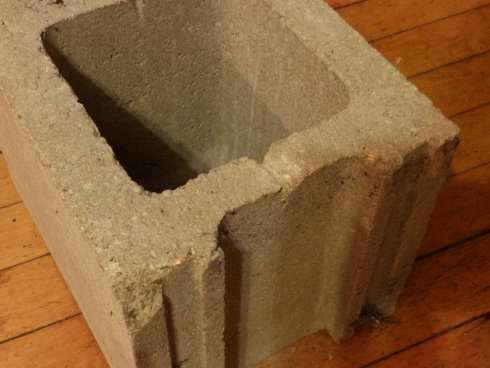
8x8x8 concrete block
2 wood screws
Light bulb (about 60w)
Center your concrete block on your scrap of wood and trace the opening onto the wood. (My concrete block isn’t an 8x8x8″ block. It was actually a leftover piece from building this shelf: /building-a-custom-cinder-block-shelf/)
Cut the receptacle end off your extension cord leaving the plug and about 6 feet of cord. Separate the cord sides of the last 2 – 3inches of cord. You can use a sharp knife if you need to, but make sure not to expose the wire inside. Strip the covering from the last half inch of wire.
Cut a groove in the bottom of your lamp holder for the cord to pass through. I cut 2 slits with a saw and then broke the piece out using pliers.
Attach the wire to your lamp holder. This is as simple as loosening the screws on the bottom, wrapping the wire around them, and then retightening them.
Once your cord is securely attached, you can attach your lamp holder to the wooden base with your wood screws.
Your concrete block should already have a little grove, but you’ll need to make it a little bigger so the wire can pass through it. My daughter did this part with a hammer and chisel in about a minute.
All there is left is to set the block over the lamp holder, making sure the wire passes through the groove. Insert a light bulb, and plug it in.
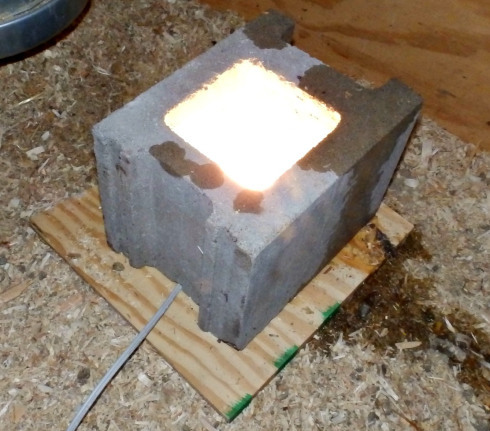
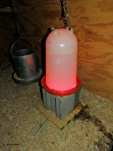
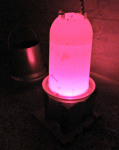
The water font sits on top of the brick, and although we have yet to get any of our really brutal 30 below zero days, so far this has always kept the water from freezing.
When I originally made this I ran a drop cord under the door to plug it in. Since then I’ve used added an outlet to the chicken coop, and used wire clips to attach the cord to the base of the heater as well as the wall. I didn’t want loose wires dangling around in there.


June 1, 2015
Make Cheap Clamps from PVC Pipe
I really don’t like PVC. I’ve gone over the reasons for this in How and Why: A Do-it-yourself Guide, but suffice it to say that it’s anything but environmentally friendly. However, when we moved into our new house there was a bunch of PVC in the garage. Yesterday we were going to do some truck camping, but our truck doesn’t have a window on the topper so I wanted a way to cover the opening in case in rained. (Or as it happened, in case it was windy and cold) I grabbed a tarp, but I needed a way to hold it on so I made up these PVC clips in about 2 minutes.
How to Make a PVC Clip
1. Cut a section of PVC pipe about 2 inches wide
2. Cut the PVC so that the circle opens
These work great for holding tarps on cars, or tablecloths on picnic tables, holding things while glue dries, or any number of things. They’re really handy to have in your trunk or in your camping box.
I hate to encourage anybody to buy new PVC but if you’ve got some sitting around or pull some out of a dumpster, this is a really handy thing to make out of it.


March 11, 2015
Seating A Tubeless (cart) Tire
Here���s a quick little trick for you. (If you don’t want to read the whole story, skip to the step by step below)
I found this 2 wheel cart in the garbage at one point.�� The only thing that seemed to be wrong with it was that it was missing a wheel.�� I figured it was about a $70 or $80 cart that probably needed a $5 or 10 wheel and tire, so I brought it home.�� It sat for years.�� I brought it with when I moved.�� It sat for another year until I was about to move again and I thought, ���This would come in handy when we move.����� So I went to Home Depot to buy a wheel & tire.�� I didn���t think they would have it, but they did!�� What they did NOT have was the compression nut that holds the wheel on.�� The guy I asked about it (who inconsequentially was me 20 years ago, except he had a bit more swagger) actually KNEW something! I HATE going to Home Depot, but for a year it was about a mile from my house and the only ���hardware��� store in NE Minneapolis. I go to hardware stores a LOT, so I ended up at Home Depot quite a bit.�� Anyway, unlike most of the employees whose method of helping is to blindly search with you, this guy actually knew where the item was SUPPOSED to be, but informed me that they���d removed a whole drawer from the hardware section.�� Yet another reason to hate Home Despot.�� They carry the wheel to fix a cart, but not the nut to the hold the wheel on! Awesome! Later in the week I went to Menards and found the wheel/tire assembly AND the nut.
I got home and it took longer to remove the packaging than to actually install the wheel.�� The only thing left to do was pump up the other tire, which I decided to do this morning when I got out the pump for my bicycle.�� I started to pump and realized there was no tube and the tire was completely unseated from the rim.�� I���ve had this happen before with wheelbarrow and other tires, and it can be nearly impossible to get the tire to reseat.�� When I was trying to reseat the wheelbarrow tire, I tried something I���d seen on a video.�� You spray starter fluid inside the tire and then light it.�� When it lights it quickly expands seating the tire.�� I could never get that to work, and I���ve tried it on a few different tire/rim combos.
When I was a kid my dad taught me how to seat my own car tires.�� I had a 77 Dodge van that was perpetually getting flats for a while.�� We thought someone in our townhouse complex didn���t like my eyesore of a van and kept letting the air out.�� After spending $10 a half a dozen times or so to have a shop reseat the tire, my dad told me that I could reseat it myself with dish soap and an air compressor.�� You just squirt dish soap along the bead of the tire and then with a good quick compressor, inflate the tire.�� If the compressor is strong enough (like a gas station compressor), the tire will balloon out against the rim and seal.�� Later I ended up having to bring my wheel in again and the new guy who worked on it told me, ���Your rim was so rusty I���m surprised it held air at all!�� I cleaned it up for you and it should be fine now.����� Yeah, so thanks to the guy who fixed my flat tire half a dozen times or more but never fixed the actual problem!
This might work with a wheelbarrow or cart wheel, but they also usually unseat on both sides of the wheel rather than just one like my van tires.�� Today I took the advice from my dad and combined it with something I saw my ex-father-in-law do once.�� He was trying it on a motorcycle tire and I���m not sure if it worked for him, but it worked for me.
Okay, I���m done with story-time, here���s the
Step by Step
Clean the outside of the bead (the bead is the raised section at the center of the tire)
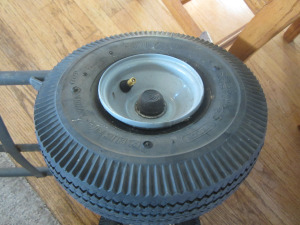
Squirt a decent amount of dish soap along the top of the bead. (make sure that it���s coated all the way around)

Do the other side if necessary
Wrap a ratcheting strap around the tire (I wrapped it 3 times)

Attach the hooks together and start to tighten the strap with the ratchet until the center of the tire starts to depress. At that point, both of the beads should be in contact with rim.�� If not, tighten it a bit more.
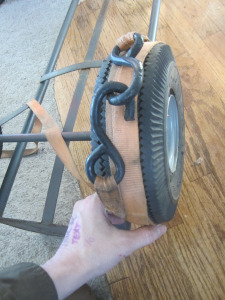
Once the tire is contacting the rim on both sides, pump it up.

Remove the strap and you���re ready to go

It seems really simple, but it worked and it saved me from having to buy anything else.�� And I didn���t need to go find a compressor either.


December 9, 2014
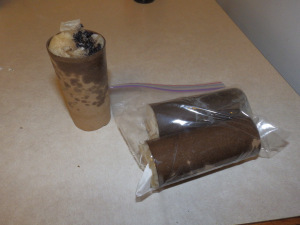
Charcoal (Grill) or Bon-Fire Starters

So I���ve seen these firestarters around that are half a toilet paper tube stuffed with shredded paper and wax.�� I���ve never actually used one, but I���ve seen them at military surplus stores and the like.�� I came up with one that I feel is even better, mostly because it uses things that you probably already have and throw away.�� I mean you could make the traditional ones by shredding junk mail and melting old candles, but wax is messy to work with and these ones practically make themselves.
We don���t eat a ton of bacon at our house, but we do have some every week or two.�� We also don���t use a lot of paper towels, but this is one thing we use them for.�� We put down a couple squares on a plate to soak up the grease.�� I got the idea for these from using those paper towels as fire starters.�� Then I got the idea to make something you could easily store and transport.�� The thing that really pushed me to try this was a friend who hates using lighter fluid when cooking with charcoal because it flavors the food.
These are pretty much one of the simplest things ever to make.�� When you���re done making bacon:
Stuff the grease soaked paper towels in a toilet paper tube (or a section of paper towel tube). 2 towels is a pretty perfect fit.
Pour liquid��grease in both ends of the tube until the paper towel is soaked. (In my experience �� pound of cooked bacon yields enough grease for 2-3 tubes
Set somewhere and allow to cool.
There���s not much more to it than the normal clean-up after making bacon.
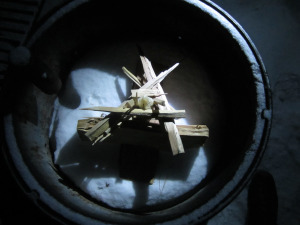
The thing I really like about these is that you can use them to start charcoal without using lighter fluid.�� The first time I tried one of these was when we barbecued with my friend who hates lighter fluid.�� Just pull a bit of paper towel out the end of the tube so you have something to light.�� Set it on a piece of charcoal (so when the grease starts to run out, it doesn���t just drip into the bottom of the grill) and then just build up a pyramid of coal around it and light it.�� This doesn���t light quite as fast as lighter fluid, but it doesn���t impart any chemical taste to your food.
If you���re using it to light a bon fire, it works pretty much the same.�� Put it on top of a larger piece of wood then put smaller pieces of wood around it.�� It���ll get your fire going pretty darn quick.


November 13, 2014
Installing an Exterior Spigot
(From Resist Zine #47)
I’m more of a story-teller than a straight up DIY guy. When I wrote How & Why that kind of came back to bite me in the ass. I was asked to write it in ‘my style’ which pretty obviously is storytelling, but when I got done and sent it in, they cut 100 pages trying to turn it into a step-by-step guide. Articles came back split up into steps and had to be re-reedited in order to make any sense at all. I’ve had people claim that my projects are just ‘contraptions’ and that I admit as much. I don’t know about that. What I do admit is that I make mistakes and that sometimes in the middle of something I think of a better way of doing it. And I am admitting right now that I am a story-teller. I COULD sit down and write step-by-step do it yourself instructions but that’s not what I like to do. I like to tell stories. I think it’s more interesting when you get to read about how I completely screwed something up and then had to go back and fix it, or the thought process I had to go through to get it right. On top of that, I think stories tend to seal things in our memory and keep us from making those same mistakes.
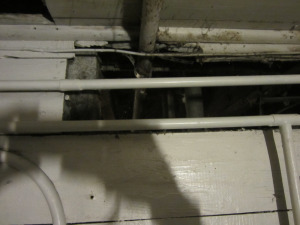
So that said, here is how installing that exterior spigot worked out for me. First off, the perfect place I found, with the valves already installed and ready for me to add a spigot… Well, after moving our garden to the front of the house, having a spigot on the back of the house didn’t seem like the best idea. So I started looking for options along the front of the house. The fact that all the windows in the basement had been boarded shut made running a spigot to the outside of the house a bit easier since I didn’t have to bust/drill through the masonry block, I could just drill through a half-inch piece of plywood. Then it was just a matter of finding a place to tie into the existing plumbing. A laundry sink near the front of the house made that easy too.
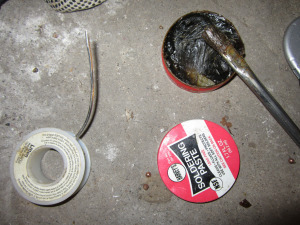
I picked up all the pieces I thought I would need: a T fitting for connecting to the existing line, an exterior spigot, 10 feet of copper tubing, a valve and a few 45 and 90 degree elbows. I don’t think plumbing is as complicated as most people make it out to be, especially if you’re dealing with copper tubing. (The old iron pipe on the other hand can be a huge pain in the ass) It seems like you always end up having to make one extra run to the store, or running into one thing you didn’t really expect, but I’ve always been able to finish what I’ve started.
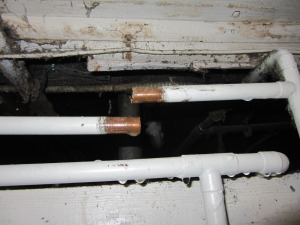
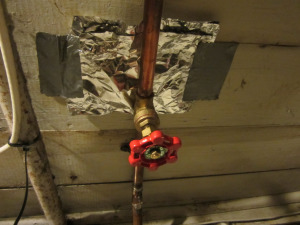
The first thing I did was solder about a foot of copper tubing to the spigot. Then I got worried because that particular spigot had a rubber seal and I was worried that I had melted it by not taking it out when I soldered the two together. But I took it apart and it was just fine. Then I drilled a hole in the plywood, slipped the tube in and screwed the spigot to the wood. I had planned to squirt some caulking behind it, to seal it, but I couldn’t find my caulking gun. Plus if you had seen our basement you would realize that it probably wasn’t going to make one bit of difference anyway.
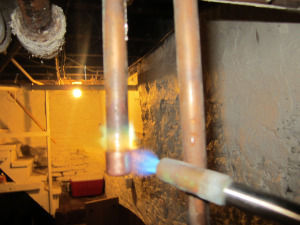
Then I went to work inside, and this is where the trouble started. Now when you’re soldering pipe, you can’t solder wet pipe so you have to get it and keep it dry. So I turned off the water and turned on all the faucets so that the lines could drain. One thing I didn’t realize is that the upstairs and downstairs were on the same meter, so I was turning off the water to the whole house (including the upstairs neighbor) and draining his lines too. Fortunately I had run into him in the front yard with my supplies and told him I was about to do some plumbing, so he wasn’t shocked to find the water temporarily shut off. I cut the supply line to the cold water on the sink and used my plumbers brush (same as a battery terminal cleaner) to remove the paint from the outside of the tubing. Then I dry fit parts as far as the valve, which basically means that you cut your pieces and put them all together to see if they’re going to fit. Then I soldered the valve, elbow and couple pieces of tubing together before slipping the assembly into the T fitting and screwing it to the ceiling with a pipe strap. This would hold the T fitting at exactly the right angle while I soldered it. If I had soldered it first and gotten the angle wrong, it could have been a lot of work to get it right.
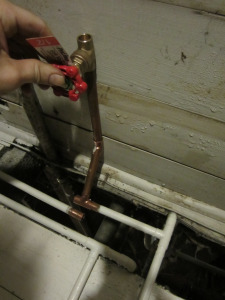
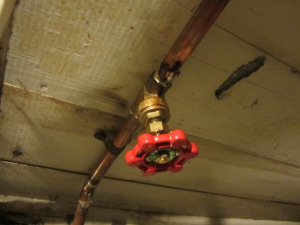
HOW TO SOLDER COPPER TUBING
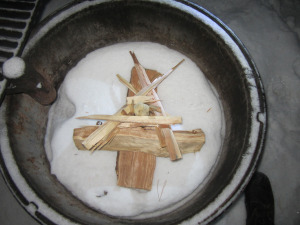
Soldering (or ‘sweating’) copper tubing is pretty easy. You’ll want to rough up both surfaces that will be in contact. The easiest way to do this is with a plumbing brush. Just twist it around the outside of the tubing, and then inside of the fitting. Wipe off any grit with a rag. Brush plumbing flux on both surfaces and assemble the pieces. Next you want to heat up the joint evenly. I like MAPP gas because it burns hotter than propane, so it heats up the joint quicker. Move the flame around the joint until the flux starts to sizzle. At this point, the solder should melt when you touch it to the joint. Move the flame away, and start applying solder at the bottom of the joint, working all the way around it. I usually wipe it off with a rag while it’s still warm.
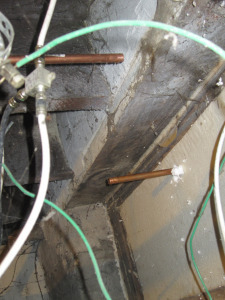
Now because there was still some water dripping through the tube, I had to do something to keep it from running up to the joint where I was working. I had done this before, but it had been well over 10 years so I forgot exactly how it worked. I knew you had to put something in the tube to absorb the moisture, but I forgot was it was. Actually it wasn’t so much that I forgot, as that I remembered incorrectly. I remembered it as being plugs of paper towel. I didn’t stop to think about it, I just slipped some into the tubing on either side of the joint, soldered it, and then turned the water back on. This is why I always add valves when I’m doing plumbing. If you have a valve, you can cut off water to just the spot you’re working without turning off the water to the whole house. Now I could turn on the water and finish the job. So I turned on the water and all my joints held fine, but the cold water in the kitchen was no longer working. That paper towel had clogged it up.
I ran to the computer to figure out what the heck I had done wrong. I typed “how to solder wet tubing” in the search engine, and watched a video of a guy putting BREAD in the tube. BREAD! That’s what it was. Not paper towels, BREAD! To be fair, paper towels do work if the other end of the pipe is open. Toilet paper would probably work even better because it deteriorates. Either probably would have come out of the laundry faucet, but it certainly wasn’t coming out of the kitchen faucet!
I’m ashamed to say I actually got the outside spigot going before I got the cold water in the kitchen working again. We went months without it. I tried disconnecting the faucet and opening up the valve, but that didn’t work. The bathroom sink was 2 steps away so it was easy to just step over there if you needed cold water. We got used to only having hot in the kitchen. (Better than only having cold) In the end I had to add a valve to that cold water supply so I could turn it off, cut it after that point, and then connect the hot water supply to the cold water supply (under the sink) and run the hot water backwards through the cold water pipe to flush the paper towel back out where I had cut it. Then of course I had to reconnect the pipe I’d cut to turn the cold water back on. This time I used bread instead of paper towels when soldering the wet pipes!
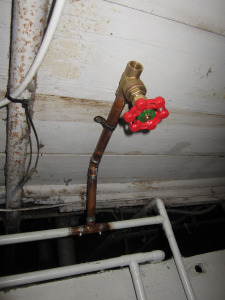
Finishing up the exterior spigot was easy. All I had to do was finish running the copper tubing from the valve to the tube I had left sticking out of the wall. I dry fit the whole thing, and soldered it up. Because none of this pipe had ever had water in it, it was a super easy job.

We got to use it for one whole summer of watering the garden and slip-n-slide before we were run out of the house by the new management company’s incompetence and money grubbing


