Marie Bostwick's Blog
April 20, 2026
Low-Carb Taco Board


This Low-Carb Taco Board is a tasty solution for low-stress entertaining! With a delicious array of toppings, guests can take what they love and skip what they don’t. Perfect for families and picky eaters!
Why Boards Are the Perfect Solution for Picky Eaters and Easy EntertainingOh, how I wish boards had been a thing when my kids were little!
Seems every family has at least one picky eater, don’t they? I had three boys, and two of them had very distinct opinions about what they would and wouldn’t eat.
Naturally, each child’s “won’t eat” list was completely different. So, no matter what I served, somebody was going to end up very unhappy – including me! Boards like my Low-Carb Taco Board are an ideal dinnertime solution for families with picky eaters.
Really, boards are a good option for anyone, especially if you’re looking for a fun, low-stress way to entertain. Once you’ve assembled and arranged the ingredients, you just walk away and let folks serve themselves. That means you’ll have more time to enjoy your guests!
I’ve shared a few boards on the blog before, including my Grilled Romaine Salad Board and a really yummy Brunch Board.
But I just came up with a new one that I think you’re going to love – especially if you’re trying to cut down on carbs.
Low-Carb Tacos: The Lettuce Cup Swap That Actually Works

Like a lot of people, I’ve been trying to cut down on carbs.
Recently, I ate at a Thai restaurant and had some chicken lettuce cups. They were just delish and pretty low in carbs. That gave me an idea – why not do the same thing with tacos?
This concept is super simple. If you replace the taco shells with lettuce leaves, you’ll have a taco with pretty close to zero carbohydrates.
Heart of romaine is the perfect lettuce cup for these tacos. They’ve got a nice deep pocket to hold lots of toppings. The leaves hold together without spilling the fillings, and they’ve got a nice crunch.
And the best part? Tacos in lettuce leaves taste just as good as regular tacos – especially if you pile on your favorite toppings!
What You Need to Make a Low-Carb Taco Board
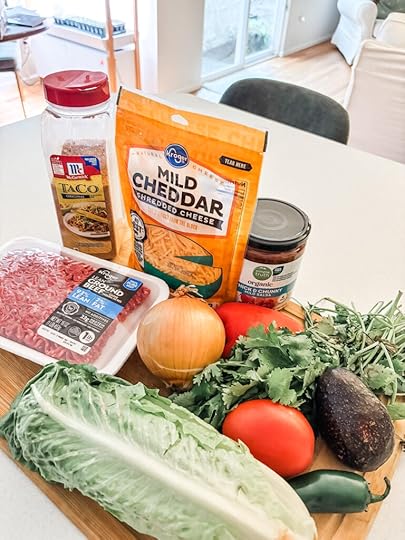
I’ve got a list of the ingredients I used on my board below. However, deciding what to serve on your taco board is really up to you! You can use my suggestions, or add your own.
Also, I’ve made my board low-carb by using lettuce cups instead of tortillas or taco shells. But if you really want regular tacos, go ahead and add some to your board. Low-carb or regular tacos, it’s all going to taste great!
The ProteinGround Beef – You can always use ground chicken or turkey, if you prefer. Shredded pork or chicken would work great, too!Taco seasoning – I like McCormick’s taco seasoning. It just makes everything simple. You could also use a blend of your own spices.OnionThe Best Lettuce for Taco CupsHeart of Romaine lettuce leaves – use a small to medium-sized leaf with a nice, firm pocket in the center


Something I love about this board is that there is very little cooking involved!
The only thing you need to cook is the ground beef. I cooked mine on the stovetop with a little oil, onion, taco seasoning, and water. That’s it!
Apart from that, you just put the other ingredients into small serving bowls and arrange them on the board with the taco meat. The last step? Ring the dinner bell and let everybody dig in!
(One thing to note. If you put any of the ingredients directly on the board instead of into serving bowls, either use a food-safe board or line the board with parchment paper.)
Print Low-Carb Taco Board Author: Marie Bostwick
  Yield: 4 servings 1x
  Print Recipe [image error] Pin Recipe Ingredients 1 T oil½ large onion, chopped1lb ground beef (can sub chicken or turkey)3 T McCormicks Taco Seasoning¾ cup water8 to 12 Heart of Romaine Lettuce Leaves, separated with stem trimmed off1-2 Roma Tomatoes, seeded and diced1 jalapeno pepper, seeded and minced1 avocado, seeded and diced½ cup salsa1/2 cup sour cream1 cup shredded cheese (your choice of flavor)2 scallions, white and pale green parts, sliced½ cup red bell pepper, seeded and diced2 T chopped fresh cilantroOptional – taco shells, taco chips, other ingredients of your choice Cook Mode Prevent your screen from going dark Instructions Place oil in saucepan over medium heat, cook onion until soft and translucent. Add ground beef to cooked onion, cook until no pink remains, breaking meat up into small pieces with wooden spoon or spatula.Sprinkle taco seasoning over cooked meat, add water and stir. Allow taco mixture to simmer for 5 to 7 minutes, until liquid is reduced and sauce is thickened.Place prepared taco meat into a bowl. Place all the other ingredients – except lettuce leaves (or taco shells) into individual bowls.Arrange the ingredient bowls on the board, along with the Romaine leaves (or regular taco shells, if using). If you’d like you can use fill the empty spaces between bowls with tortilla chips.Place serving spoons in bowls and enjoy!
  Did you make this recipe?
 Share a photo and tag us — we can't wait to see what you've made!


April 13, 2026
Sausage Rolls with Date and Rosemary

Traditional English snack gets a makeover! Savory sausage plus sweet dates, fresh rosemary, and spices in flaky pastry. My Sausage Rolls with Date and Rosemary will be the star of your next party!
A Delicious Twist on a Classic English SnackIf you’ve spent any time in the UK, chances are good that you’ve had a chance to enjoy some sausage rolls, a traditional English snack.
Just in case you haven’t had the pleasure, sausage rolls are basically tubes of baked puff pastry with a yummy sausage filling. The filling should be flavorful, savory, and not too greasy. Sausage rolls that are too greasy can result in the dreaded “soggy bottom”.

These simple but satisfying handheld snacks are pretty darned good as is. However, I love experimenting with ways to make good things even better. That’s exactly what’s going on in my recipe for Sausage Rolls with Date and Rosemary.
What You Need to Make Sausage Rolls with Date and Rosemary
Sweet, chewy dates, fragrant fresh rosemary, and a touch of extra spice make this recipe an even better version of a classic English snack. And that’s not just me talking!
I made a double recipe for the Easter potluck at my church. Not only were they one of the first things to disappear from the table, I also got several requests for the recipe! Now I’m sharing it with you, too.
Let’s get to it and start talking about ingredients.
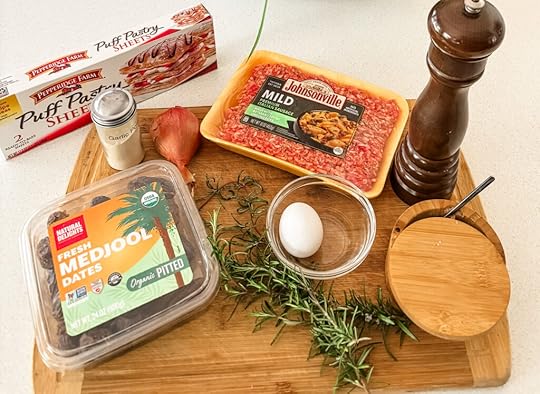
Choosing the Right SausageSausage – Use good-quality, mild or sweet Italian bulk sausage. My favorite brand for this is Johnsonville. Whatever brand you use, make sure it is 80/20 sausage. That means it contains no more than 20% fat. Using a sausage with too much fat will give you a roll that’s greasy and might have a “soggy bottom”. Nobody wants that!Why Medjool Dates Work BestMedjool Dates – Medjools are best for this recipe. They’re large and sweet, soft but chewy. Other varieties are generally smaller, so if you do decide to use another type, then double the number of dates.Rosemary – Fresh rosemary has a lovely fragrance and a resiny, slightly bitter taste that complements the sweetness of the dates and lifts the savory flavor of the sausage.Shallots – I like the mild flavor of shallots for this recipe, but you could sub yellow or white onions.Optional: Ground red pepper flakes – A few grinds can give the filling a wonderful touch of heat. However, if you’re feeding kids or people who don’t like spice, skip that part.Garlic powder – Kosher salt – Most bulk sausage already includes some salt, so you don’t need to add much. But I think a little extra enhances the flavor.Fresh ground pepperTips for Working with Puff PastryPuff pastry – You can find frozen puff pastry sheets in any supermarket. My favorite brand is Pepperidge Farms. Take the pastry out of the freezer to thaw for at least 40 but no more than 60 minutes before handling. Handle too soon, and the pastry sheets will break. Leave it out too long, and the pastry will turn gummy during baking.Egg yolk – you’ll whisk the egg yolk with water to create an egg wash. This will serve as a kind of “glue” to seal the pastry rolls. It will also be painted on the outside to give it a beautiful, appetizing golden color when baked.How to Prepare Sausage Rolls with Date and RosemaryOne of the best things about sausage rolls, besides the taste, is how easy they are to make!
For the filling, just mix the dates, rosemary, shallots, and spices into the sausage. My preference is to mix the ingredients with my hands, to make sure they’re evenly distributed. However, a wooden spoon or spatula could also work.

The next step is preparing the pastry. (Be sure to read my notes above about thawing the puff pastry before you handle it!)
You’ll use one sheet of pastry, cut in half, and then rolled with rolling pin on a lightly floured surface to about 5 x 12 inches. The filling will be halved, shaped into approximately 12-inch logs, then placed on a pastry sheet. You’ll repeat the process with the remaining pastry sheet and sausage.

Next, you’ll whisk the egg yolk with a little water to create a wash. Paint a stripe of egg wash along one long edge of the pastry. Roll the pastry over the sausage, toward the egg-washed edge, and press gently to seal.
Place the sausage rolls on a baking sheet lined with parchment. Brush the egg wash over the top and sides of the roll. This will give it a beautiful golden color after baking.
When you’re finished, cover the baking pan with plastic wrap or a tea towel and refrigerate it for about an hour.
Baking, Serving, and Freezing Your Sausage Rolls

Be sure to preheat your oven before you take the sausage rolls out of the fridge. A nice, hot oven is necessary to achieve a flaky, golden-brown pastry.
The reason we refrigerated the rolls is to make cutting easier. I cut my rolls into two-inch pieces; it’s a great size for an appetizer. You could also go a bit smaller, say an inch and a half, if you wanted.
The puff pastry will rise, so leave a little room between the pieces. Be sure to rotate the pan halfway through baking. This will make sure that all the rolls are evenly baked and browned, not burned.
Remove from the oven. The sausage filling can be a little hot, so it’s a good idea to let it cool for a couple of minutes before serving.
Sausage rolls are terrific as make-ahead treats that be stored in the freezer and baked as needed.
If you’re going to freeze, DO NOT brush on the egg wash until just before baking. (Frozen egg wash is safe to eat, but it could make the pastry gummy during baking.)
Instead, cut the pieces into the desired size, then place the unbaked sausage rolls onto a pan and place in the freezer for two hours, until completely frozen. Store the frozen rolls in a plastic freezer bag for up to three months.
Brush the egg wash onto each piece just before baking. Frozen sausage rolls will require more time to bake, so add two to four minutes to the bake time. If rolls begin to get too brown, place a piece of foil loosely over the top.
Print Sausage Rolls with Date and Rosemary Author: Marie Bostwick Yield: Makes about 12 appetized-sized sausage rolls 1x Print Recipe [image error] Pin Recipe Ingredients 1 sheet puff pastry dough, left out of freezer to thaw for about 40-60 minutes1lb 80/20 sweet bulk Italian sausage4 large Medjool dates, diced very small3 T chopped fresh rosemary3 T minced shallots½ tsp garlic powder½ tsp Kosher salt¼ tsp fresh ground pepperDash of ground red pepper flakes – optional1 egg1 tsp waterFlour for rolling dough Cook Mode Prevent your screen from going dark Instructions Remove puff pastry from freezer. Allow to thaw on counter for 40 minutes to one hour prior to handling. Place sausage into medium sized bowl. Add dates, rosemary, shallots, garlic powder, Kosher salt, and pepper. Mix well to evenly distribute ingredients.On a lightly flour surface, unfold pastry sheet and cut in half lengthwise. (Two pieces, about 4.75 x 9.5 inches). Use a rolling pin to roll each sheet to about 5 x 12 inches.Take half the prepared sausage and form into 12-inch log. Place lengthwise on top of prepared pastry sheet. Repeat with remaining sausage and pastry sheet.Whisk together egg and water to make an egg wash. Paint a 1-inch wide stripe of the egg wash along one long edge of the each pastry sheet. Roll the sausage tightly up in the pastry, pressing the egg washed edge down gently to seal.Line rimmed baking sheet with parchment paper. Place sausage rolls on baking sheet. Paint egg wash over all visible sides of sausage rolls. Refrigerate for about an hour.Preheat oven to 400 degrees. Remove pan from refrigerator. Slice the rolls crossways into pieces about 2-inches long. Place pieces on baking sheet with space between.Bake sausage rolls in preheated oven for 20-22 minutes, rotating pan halfway through. Did you make this recipe?
 Share a photo and tag us — we can't wait to see what you've made!
April 6, 2026
Garage to Sewing Room Conversion


Our cute but compact house had no space for a sewing studio, but it did have three garages! When it came to looking for a corner for a sewing studio, one of those provided ample space for a new garage-to-sewing-room conversion, giving me a bright and airy sewing studio with tons of storage space!
No Space for a Sewing Room? Consider a Garage Sewing StudioThere was nothing wrong with our old house. In fact, we’d put in a lot of effort and remodeling to transform a seventies-era rancher into a home we really enjoyed.
But as time passed, we realized how much walkability mattered to us. Since we couldn’t pick up the house and drop it into a neighborhood with sidewalks, we decided to move.
Our new neighborhood is less than a mile from restaurants, stores, and the movie theater. The house has wonderful windows that let in lots of light, plus room for my piano, and a layout we love.
It’s cute as can be but compact, with zero space for a sewing room. As much as I liked the house and neighborhood, that was almost a deal-breaker for me.
Quilting and sewing are my favorite hobbies. I wasn’t about to give it up, not even for a cute house in a friendly, walkable neighborhood.
When I explained that to my husband, pointing out that there was no place to keep my sewing machine, let alone my vast fabric collection, he just shrugged.
“Well, what about the garage?”
He had a point. The house had three garages, and we only have two cars. At twenty by ten feet, the smallest of the garages could give me plenty of space for all my sewing projects.
We bought the house, called our remodeler, and started making plans.
Creating the Shell: Walls, Floors, Ceiling, and ElectricalWallsThough I didn’t want to sink a ton of money into my garage to sewing room conversion, I did want a bright, comfortable space that I’d enjoy spending time in.
And although I planned to use the space for sewing and quilting, a nicely finished room could do double-duty as a guest room, workout space, or home office. That would be an attractive feature for buyers, should we ever sell in the future.
Also, finishing the shell to a level similar to the rest of the house would make it more pleasant to spend time in. That’s an investment that pays off in a more personal way!
The walls were easy to frame, insulate, sheetrock, and paint. We added some basic trim, too, so it would look similar to the rest of the house.


Figuring out what to do with the floor was a little tricky and required a few decisions.
The cheapest option would have been to just put some basic foam floor tiles directly onto the concrete. However, winters can get chilly in here in the Pacific Northwest. Also, like most garage floors, ours was graded to allow for drainage. Walking around on cold, tilted floors didn’t sound like fun.
In the end, we decided to frame, raise, and level the floor. Though this meant I would have to step up to enter the room, the airspace below made the floor warmer – and level. My contractor found beautiful LVP flooring for just $4.35 a square foot!

Because I hope to have friends come over for sew days, I made sure we had lots of wall outlets, and another in the middle of the floor. Between sewing machines and irons, quilters need lots of places to plug in!
Good lighting is essential for sewing, so we put in six recessed “can” lights. I love them! The room is bright and cheery, even on the gloomiest of days.

Heating and cooling were the next things I had to think about.
In the end, a Cadet wall heater seemed to offer the best balance between comfort and budget. Honestly, I wasn’t too sure about it at first. However, I’ve been using it for several weeks now and like it a lot.
For cooling, we just decided to go with a ceiling fan for now. This garage does have a window, so we can always add a portable AC unit later if needed. But I really doubt it will be necessary.
Some garage conversions involve turning the garage into an actual room by removing the garage door. For a couple of reasons, I decided against that.
First, removing the door and adding a full wall and exterior siding would have added a lot to the construction budget. Second, a future buyer might want that third garage. If that were so, all they’d need to do is take out the floor.
So, leaving the garage door in made a lot of sense. But there were a couple of tradeoffs involved.

The garage door let in the cold. Also, it was ugly.
Inserting rigid insulation panels in the garage door definitely helped keep out the cold. But even with the shiny foil insulation panels installed, it was something of an eyesore.
Still, the basic sewing room was finished, and looking pretty good!
Storage Solutions for a Sewing Room That Actually WorksThe contractors were gone! It was time to move in!
But I quickly realized that the drawers and shelves from my old sewing room didn’t provide nearly enough storage for all my fabric, tools, and sewing notions. Not to mention my space for my yarn and other crafting supplies.
How was I going to store all my stuff? And in a manner that was attractive, efficient, and organized?
IKEA had the answers.
IKEA Cabinets, Tables & More: How I Furnished My Sewing StudioIKEA BESTA Cabinets for Fabric and Supplies
These attractive BESTA storage cabinets have given me tons and tons of storage!

I went with white stained oak effect cabinets and upgraded to high-gloss white doors. I love the sleek, modern look. But there are 38 different options for door color, styles, and finishes. Choosing a different door can increase or lower the price.
Considering how much storage this gave me, these cabinets were a pretty affordable option. ALL my fabric and sewing supplies fit inside. And building a whole “wall” of storage was a great way to camouflage the ugly garage door!
The interior shelving is movable. I used the two upper cabinets of each unit for fabric. I left the lower cabinet without shelving so I could store fabric bolts, boxes, and other larger items.
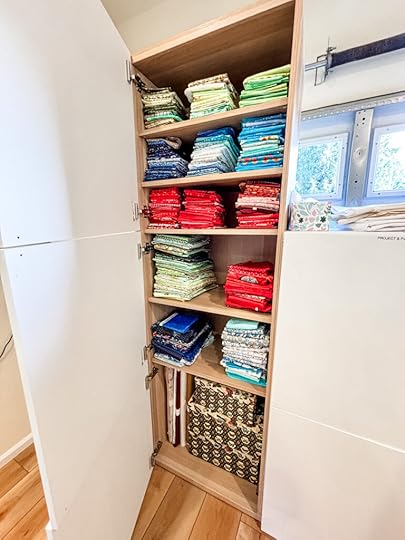
Shelves that I didn’t need for the lower cabinets went into the two-level unit in the center. The extra shelves gave me a place to keep the plastic boxes that contain my projects in progress. It’s so easy to see everything and keep myself organized!
IKEA MILSBO Glass Cabinet for Finished Quilts

Another great find on IKEA was this glass MILSBO display cabinet. It’s the perfect spot to store and show off my finished quilts, while keeping them free of dust.
My older cabinets and shelving are used to store my yarn, crafting, and art supplies. There’s so much space now that I can actually keep books and a few keepsakes on the shelves.


A final purchase was the drop-leaf table that I found Amazon.With stores neatly against the wall when the leaves are down, right under the design wall I made a while back.
But with one or two leaves raised, it’s a great place to cut fabric. Plenty of room here to cut out an entire quilt.
Something else I love about this table is the legs. They’re adjustable! If I invite friends for a sewing day, I can decrease the height and turn it into a sewing table that’s big enough for two.
Now that the conversion is done, I’m so happy with my new sewing room! It’s a bright, cheery, efficient, and all-around wonderful place for stitching and all my creative hobbies.
Thanks for letting me show it to you!

March 30, 2026
Triple Ginger Molasses Cookies

Sweet, caramelly molasses and three different types of ginger give these yummy cookies more of the flavors we love! The perfect sweet treat to enjoy with a cup of tea. So good! SO gingery!
Why You’ll Love This Triple Ginger Molasses Cookie Recipe – A Gourmet Grocery Treat Made at HomeIf I had to pick only one cookie to eat for the rest of my life, I’d definitely pick ginger molasses. That sweet but spicy combination is one I never tire of.
A few months back, I was picking up a few specialty items in my local fancy-schmancy gourmet grocery store and spotted a package of triple ginger molasses cookies.
The twelve-dollar price tag definitely gave me pause. But I ended up buying them anyway. They just sounded too delish to miss.
And boy, oh boy! Were they ever!

Caramelly and sweet, but not too sweet, with plenty of ginger flavor and some surprising chewy little bite of caramelized ginger. It was one of the best cookies I’d ever eaten!
This, of course, presented a problem.
Twelve-dollar packages of cookies is just not something I want to buy on a regular basis. The solution?
Start baking my own Triple Ginger Molasses Cookies!
And if I can do it, so can you! It all starts with the ingredients.
What Makes These Cookies So Gingery

The ingredient list for these terrific cookies isn’t all that different from those used in the standard molasses cookie recipe. You’ll need sugars, molasses, butter, eggs, assorted spices, flour, salt, and baking soda.
It’s a good list that will result in a yummy cookie. However, what makes these cookies especially delicious is the three different types of ginger.
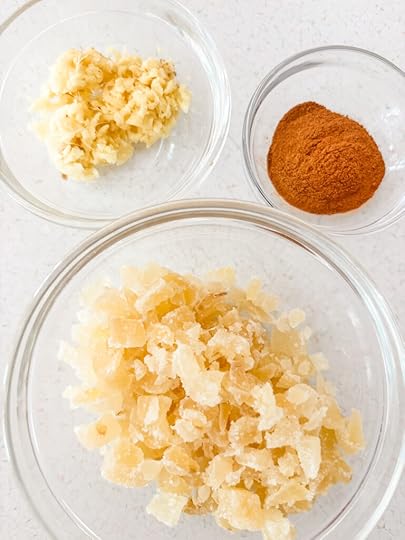
If you do any baking, you’ve probably got a jar of powdered ginger in your pantry already. Any brand of powdered ginger will do for this recipe. Jarred spices tend to lose flavor after a year, so make sure your ginger powder is fresh.
Crystallized Ginger RootCrystalized ginger root may be less familiar.
This is fresh ginger root that has been boiled in sugar syrup, then partially dried and coated with sugar. It’s sweet, chewy, wonderfully gingery – almost like ginger candy.
I use diced crystallized ginger in my recipe, then cut it up into even smaller pieces. The flavor is wonderfully gingery but strong, so you wouldn’t want to bite into too big a piece.
Fresh Ginger RootThe last variety of ginger we’ll use is fresh ginger root (and you can even try incorporating any leftover ginger into a homemade syrup!).
You can find ginger root in any supermarket. You won’t need more than a couple of inches, but you’ll want to choose a root that’s fairly thick.
Ginger root needs to be peeled and grated.
Print Triple Ginger Molasses Cookies Author: Marie Bostwick Yield: Makes about 3 dozen cookies 1x Print Recipe [image error] Pin Recipe Ingredients ½ cup butter, softened½ cup white sugar (plus extra for rolling cookies)½ cup brown sugar¼ cup molasses1 egg2 ½ tsp fresh ginger root, peeled and grated (about 1 to 1.5 inch piece of ginger root)1 ½ tsp ground ginger powder1 tsp cinnamon½ tsp Kosher salt1 ½ tsp baking soda2 cups flour3 oz crystalized ginger, diced (about ¼ to 1/3 cup after dicing) Cook Mode Prevent your screen from going dark Instructions Preheat oven to 350 degrees. Line rimmed cookie sheet with baking parchment.Cream butter and sugars together in a stand mixer or deep mixing bowl with hand-mixer, until light and fluffy. Scrape down sides of bowl as needed.Add eggs, molasses, and fresh grated ginger to the bowl, mix to combine. Add ground ginger, cinnamon, baking soda, salt, and baking soda to bowl, mix to combine.Blend flour into mixture, a half cup at a time, until just combined. Using a wooden spoon or spatula, stir in crystalized ginger until fairly evenly distributed through the dough.Roll tablespoons of dough into balls. Roll each dough ball in granulated sugar and place on the lined baking sheets, leaving two or three inches between.Bake cookies in preheated oven for 9 to 11 minutes. (For a crisper cookie, increase baking time to 12-14 minutes. Did you make this recipe? Share a photo and tag us — we can't wait to see what you've made!

March 16, 2026
Creamy Tomato Tortellini Soup (NYT 5-Star Recipe)

Plenty of fresh veggies and store-bought tortellini swimming in a bright, creamy tomato base. Creamy Tomato Tortellini Soup is a delicious, easy-to-make meal in a bowl. No wonder this NYT recipe rates five-stars!
Why Creamy Tomato Tortellini Soup Is a Meal in a BowlMost of the time, I like creating my own recipes. But when I see a recipe in the New York Times that gets a five-star rating with thousands of reviews, I definitely want to try it out.
The NYT Creamy Tomato Soup did not disappoint! It’s not often that I refer to soup as a showstopper, but this one truly is.
The creamy tomato base is a terrific soup all on its own. The combination of tomato puree and stock is made even brighter with a little lemon juice, then mellowed and enriched by the silky and satisfying addition of cream.
Adding plenty of fragrant, flavorful basil, greens, and spices makes it even better.
But the thing that takes this soup from good to great is the Italian sausage and ready-made cheese tortellini. It’s a soup that really is a meal – hearty and filling and absolutely divine!

I tried creamy tomato and tortellini soup for the first time less than three months ago, and I’ve already made it three times. That should tell you a lot about how truly terrific this soup is!
Though I discovered this wonderful recipe in the NYT, I did make a few adjustments based on my personal preference and to make ingredient sourcing a little easier.
Before we talk about ingredients; you’ll notice there are quite a few on the list. Please don’t let that intimidate you!
This soup really is easy to make. And though it has a few more ingredients than some soup recipes, remember that it truly is a meal in a bowl.
You could serve it with some nice, crusty bread if you like, and maybe a green salad. But you absolutely don’t need to. A bowl of creamy tomato tortellini soup is deliciously filling and satisfying all by itself!
Ingredients for Creamy Tomato Tortellini Soup
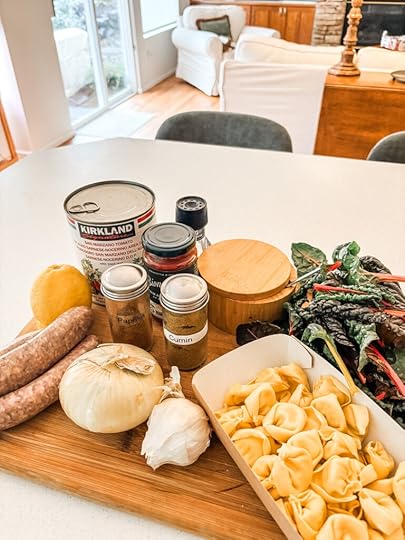
With one exception, making this recipe is a fairly straightforward process.
You’ll start by cooking the sausage. Then you’ll add the onions, garlic, and spices and cook until the onion is soft. After that, you’ll add and cook the tomato paste, then add the tomato puree and stock. After adding the tortellini, you’ll toss in the chard and basil and cook. Simple.
But the next step can be a little tricky, or at least require a little explanation.
Tomato has quite a bit of acid. The first time I made this soup, the half-and-half curdled. It tasted fine but it didn’t look very appetizing. The solution to this is to temper the half and half before adding it to the soup.
How do you do that? Glad you asked!

Take the soup pot off the burner. Don’t just turn off the heat, you need to actually move the pot. Pour the half and half in a good-sized bowl, then add tablespoon or two of the soup and stir. You’ll keep repeating this process, adding a little more soup every time.
This will slowly raise the temperature of the mixture until it’s fairly warm. At that point, you can stir the mixture into the remaining soup without danger of curdling or separation.
The final step will be to add the lemon juice and serve. If you need to reheat the soup, do so slowly over a low heat. Like all soups that use cream or milk, this should not be frozen. Refrigerate any leftovers and eat within 2-3 days.
Creamy tomato tortellini soup really is a 5-star recipe. Give it a try soon!
Print Creamy Tomato Tortellini Soup (NYT 5-Star Recipe) Author: Marie Bostwick Yield: 6-8 servings 1x Print Recipe [image error] Pin Recipe Ingredients 1 T olive oil1lb bulk sweet Italian sausage1 medium onion, yellow or white, diced6 garlic cloves, minced1 tsp paprika1 tsp Kosher salt½ tsp fresh ground black pepper¼ tsp red pepper flakes, crushed2 T tomato paste1 (28-ounce) can tomato purée8 cups vegetable or chicken stock10 oz package refrigerated or frozen cheese tortellini1¼ cup half and half (can sub cream or whole milk)1 bunch fresh chard, leaves stripped and chopped½ cup fresh basil, chopped1 lemon, juicedGrated Parmesan, optional for serving Cook Mode Prevent your screen from going dark Instructions Heat oil over medium high heat in large, heavy bottomed soup pot. Add the sausage and cook, breaking up with a wooden spoon as you do, until no pink remains. Drain all but 2 T of grease from the pot.Lower heat to medium. Add the onions, garlic, paprika, salt, pepper, and crushed red pepper to the pot. Cook until onions are soft and just beginning to turn golden brown, about 4-5 minutes.Add tomato paste and cook until it darkens, about 3 minutes. Add tomato puree, and stock. Raise heat to bring soup to a boil, then lower so soup is simmering. Add tortellini and cook for 3 minutes. Add chard and basil, cook for two more minutes. Taste and adjust seasonings.Remove pot from the burner. Place the half and half in a medium-sized bowl. Temper it by stirring 2-3 tablespoons of the soup into half and half. Repeat this process until the mixture if fairly warm. Pour the warm mixture into the soup. (See post for information about tempering.)Stir lemon juice into the pot and stir. Serve immediately, with a little grated Parmesan if using.If you need to reheat the soup, do so slowly over a low heat. Like all soups that use cream or milk, this should not be frozen. Refrigerate any leftover and eat within 2-3 days. Did you make this recipe?
 Share a photo and tag us — we can't wait to see what you've made!

March 9, 2026
11 Irish Recipes for St. Patrick’s Day Dinner

St. Patrick’s Day is about more than shamrocks and green beer—it’s a chance to enjoy delicious traditional Irish food with family and friends. Whether you’re planning a complete Irish dinner or just want to add a few festive dishes to your table, these St. Patrick’s Day recipes will help you create an authentic feast.
From hearty main dishes like corned beef and shepherd’s pie to classic sides and sweet Irish desserts, you’ll find everything you need for a memorable celebration. And the best part? You don’t even have to be Irish to join in the fun!
Traditional Main Course St. Patrick’s Day RecipesThey say everybody’s Irish on St. Patrick’s Day, and there’s a lot of truth to that! In the last dull days of winter, St. Patrick’s Day is a fun, low-stress holiday and a chance to enjoy a festive meal with family or friends.
A hearty and satisfying main dish is the centerpiece of any St. Patrick’s Day dinner. Here are a few of my favorite, Irish-themed, can’t-miss recipes!
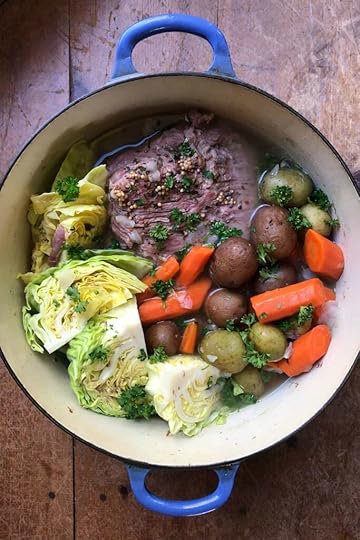
Corned Beef and CabbageReluctant Entertainer is one of my favorite food bloggers. She’s married to a first-generation Irish-American, and it shows in her delicious St. Patrick’s Day recipes – including a recipe for classic Corned Beef and Cabbage!
Courtesy of the Reluctant Entertainer
Roast Beef TopsideA good roast is the star of the show at many an Irish family dinner, and roast would be a terrific main dish for St. Patrick’s Day. This gorgeous recipe for Roast Beef Topside (we’d call it a top round roast in the US) from The Irishman’s Wife uses rosemary and red wine to add layers of flavor.

Courtesy of the Irishman’s Wife
Lamb Stew
Lamb is a traditional favorite in Ireland, and something my Irish-descended family looked forward to in the spring. Lamb can be a bit pricey, but this tasty lamb stew makes the most of a small amount of lamb. The bacon and Guinness add even more Irish-inspired flavor!

When it comes to Irish dishes, it’s hard to beat a good Shepherd’s Pie. This terrific recipe for The Modern Proper blog is loaded with tasty beef and veggies, and capped with a topping of buttery mashed potatoes. Sprinkle on a little Irish cheddar for even more flavor!

Courtesy of the Modern Proper
Irish Side Dishes to Round Out Your St. Patrick’s Day MealI know I’m not the only one who likes the side dishes just as much as the main course. Here are a few truly scrumptious sides to help round out your St. Patrick’s Day feast!
Irish Soda BreadSoda bread was a must-make St. Patrick’s Day recipe when I was growing up. Since there’s no yeast involved and no proving or rising time, even novice bakers can produce a beautiful, crusty loaf with the easy recipe. It’s a perfect accompaniment to any Irish-inspired main dish.

This gorgeous, fresh spinach salad with pears, oranges, and tangy homemade dressing features all the colors of the Irish flag. It’s a wonderful accompaniment to any St. Paddy’s Day meal.

Courtesy of the Reluctant Entertainer
ColcannonWhoever said that there’s no problem on earth that some form of potato can’t make better must have been Irish. One of the best forms of potato for St. Patrick’s Day is traditional colcannon, a combination of rich, buttery mashed potatoes with cabbage. Delish! And so very, very Irish!

Give your St. Patrick’s Day dinner a sweet finish with one of these delectable, Irish-inspired desserts. Your friends and family will thank you!
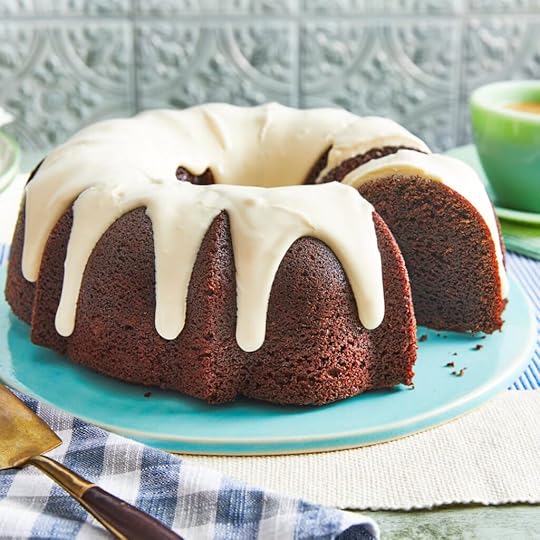
Chocolate Guinness CakeIf chocolate and dessert are practically the same word in your house, the Pioneer Woman’s scrumptious Chocolate Guinness Cake is the ideal way to finish your St. Patrick’s Day dinner. The icing is spiked with Irish Crème. Yum!
Courtesy of The Pioneer Woman
Banoffee PieMade with bananas and a rich toffee sauce, Banoffee Pie is a beloved traditional Irish and British recipe, and worth the trouble it takes to make it. This version from the Life, Love, and Sugar is a winner!

Courtesy of Life, Love, and Sugar
Easy Banoffee CakeIf you don’t have the time, patience, or expertise to make a banoffee pie, try my recipe for easy banoffee cake, inspired by the flavors of the classic dessert.

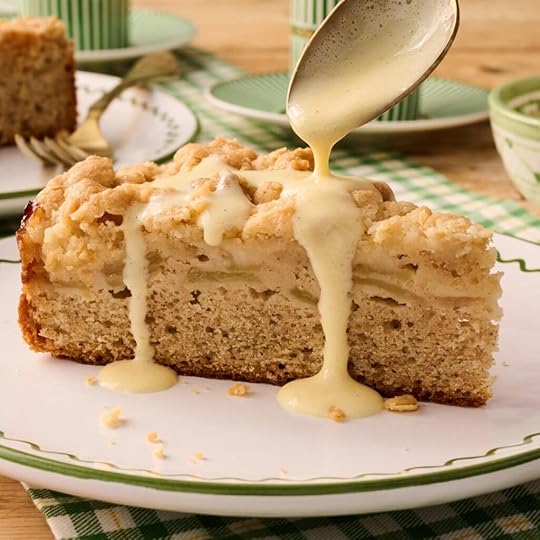
This rich, sweet apple cake from The Pioneer Woman is just as good as any that you’d find in Ireland. Don’t skip the vanilla custard sauce!
Courtesy of the Pioneer Woman
March 2, 2026
Easy White Bean Chicken Chili – Ready in 45 Minutes


Hearty, healthy, and quick to cook, this White Bean and Chicken Chili is a perfect late winter meal. Tender white beans and ground chicken with tomatoes, and green chilis in a savory broth, with choose-your-own-adventure spice level.
Why You’ll Love This White Bean and Chicken ChiliIn my part of the world, late February to early March is always a season of transition. It’s too warm for parkas and long johns, but too cold for shorts and t-shirts.
I feel like that same “in between” feeling applies in the kitchen as well.
The red-meat-heavy meals I craved in the depths of winter feel a little too heavy now. At the same time, salads and other light springtime fare aren’t quite enough to satisfy.
But this White Bean and Chicken Chili is a Goldilocks recipe for late winter – not too much and not too little. This “just right” dish is hearty enough to fill you up, but not so heavy that it’ll slow you down.
Also, it tastes terrific, is pantry-friendly, and super simple to make.
White Bean Chicken Chili Ingredients

One of the great things about this recipe is that most of the ingredients are things you probably already have in the pantry. So, it’s a great dish to make for last-minute guests, or when you don’t feel like making a trip to the store.
Here’s what you’ll need…
Canned white beans – I like navy beans because they’re small. But cannellini or Great Northern beans are fine tooGround chickenOnion – white or yellowOilChicken brothCanned diced green chiles – Here’s where you can choose your own spice adventure. Choose mild, medium, or hot. The fire-roasted type adds a subtle smoky flavor.Canned diced tomatoes – This is optional, but I like to drain the juice from the tomatoes and rinse them. That way, I get the taste of the tomato, but the broth for the chili stays lighter in color.Ground cuminGround Chili PowderSaltPepperGround Cayenne is optional if you want to kick up the heat a few notchesHow to Make White Bean Chicken Chili (Step-by-Step)This is a great weeknight or last-minute recipe, because you can make it in forty-five minutes, and probably even less.
Start by cooking the onions in oil on the stovetop in a deep pot. Then you’ll add the ground chicken to the pot, breaking it up with a wooden spoon and cooking it thoroughly.
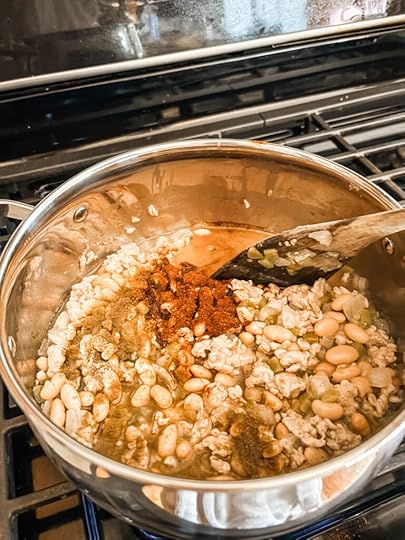
Once that’s done, you just add beans, chilis, tomatoes, cumin, chili powder, and broth to the pot and simmer for about fifteen minutes.
That’s all there is to it!
Best Toppings and Sides for White Bean Chicken ChiliWhite Bean Chicken Chili is really good as it is. It’s hearty and satisfying. However, the creamy flavor of white beans and the mild taste of the ground chicken are more subtle than a standard beef and pinto bean chili. That makes it a perfect base for all kinds of different condiments and toppings.
Some of my favorite toppings are all kinds of shredded cheese, avocado, chopped fresh cilantro, sliced green onions, minced jalapeno, sour cream, Tabasco, or Cholula sauce.
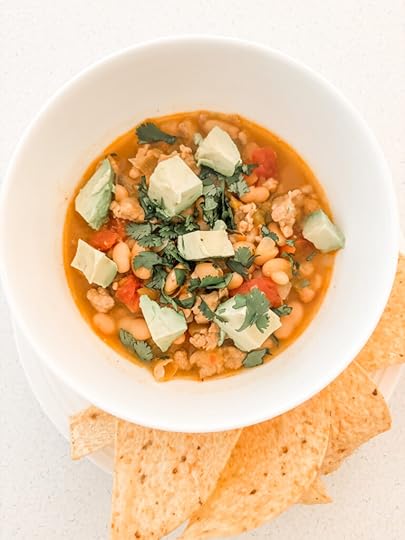
It’s great served with tortilla chips or corn bread on the side, or over a scoop of steamed rice. Add a simple green salad, and you’ve got a complete meal.
Give White Bean and Chicken Chili a try soon!
Print Easy White Bean Chicken Chili – Ready in 45 Minutes Author: Marie Bostwick Print Recipe [image error] Pin Recipe Ingredients Medium onion, diced1.5 T oil1 lb ground chicken1 T ground cumin1 T chili powder (if you want lighter colored broth, replace chili powder w/ extra 1.5 tsp cumin)½ tsp Kosher salt½ ground pepperOptional – 1/8 tsp cayenne (if you want extra spicy chili!)2 cups low-salt chicken broth 3 – 15oz. cans of navy beans (can sub cannellini or Great Northern beans), drained7oz can diced green chilis, drained – mild, medium, or hot, according to your preference1 15 oz. can diced tomatoes, drained and rinsed in a colander Cook Mode Prevent your screen from going dark Instructions Heat the oil in a deep pot over medium-high heat until shimmering. Add diced onions and cook, stirring often, for 3-4 minutes, until soft and translucent.Add ground chicken to pot. Sprinkle chicken with salt and pepper. Cook chicken until there is no pink left, breaking it up into small pieces with the back of a wooden spoon.Add broth, drained canned beans, canned chilis, cumin, chili powder, and drained and rinsed tomatoes to the pot. Bring chili to a boil, then lower heat and simmer chili for 15-20 minutes.Serve chili as is, or add toppings such as shredded cheese, avocado, sour cream, green onions, etc. (See post for more serving suggestions.) Did you make this recipe?
 Share a photo and tag us — we can't wait to see what you've made!
February 23, 2026
Banoffee Cake – Easy Banana Toffee Sheet Cake with Cream Cheese Frosting

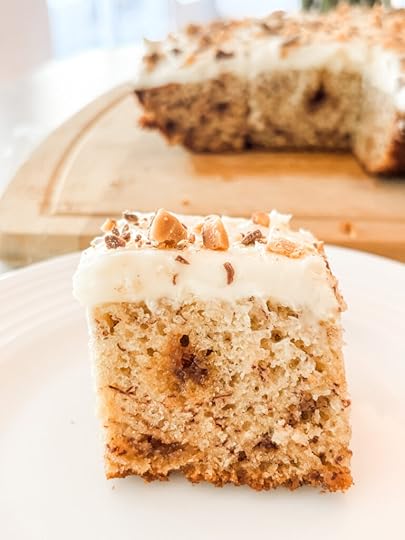
Bananas, toffee, a touch of chocolate, and rich cream cheese icing with crunchy toffee topping. Inspired by the classic British dessert, this scrumptious and simple-to-bake Banoffee Cake is a sweet treat the whole family will love.
What Is Banoffee Cake?If you’re anything like me, the sight of past-their-prime bananas immediately compels you to pull out your mixing bowls and get baking. My usual go-tos for overripe bananas are either banana bread or one of the wide varieties of my healthy, tasty Miracle Muffins.
However, with two of our grandsons visiting over their winter break, I wanted to bake something a little more special. Banana cake came immediately to mind. It’s always a crowd pleaser, especially when topped with a rich, sweet cream cheese frosting.
But I decided I wanted to get a little more creative, and come up with a cake that would inspire a second helping, and maybe even a third. After all, those granddarlings aren’t going to spoil themselves, are they?
After considering a few options, Banoffee pie, a classic British dessert, came to mind.
In case you’ve never had it before, Banoffee pie features a filling of bananas and toffee-flavored caramel, often topped with chocolate shavings. It’s an absolutely divine dessert that you won’t often see on restaurant menus because making it takes a long, long time.
However, my recipe for Banoffee Cake includes the delicious flavors of the original dessert in a simple-to-bake and simply delicious cake.
Here’s what you’ll need to make it.
Ingredients for Banoffee Cake
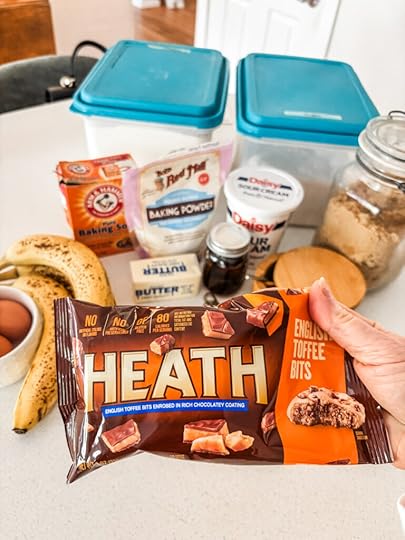
The recipe includes the kind of standard ingredients you’ll need to make most any cake, plus an extra mix-in that adds crunch and toffee-flavored goodness to this scrumptious dessert.
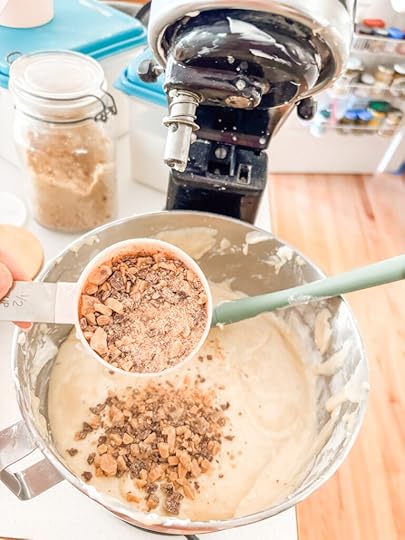
BananasFlourBaking powderBaking sodaSaltButterEggsSour creamWhite, brown, and powdered sugarsVanillaCream cheeseHeath English Toffee BitsHeath English Toffee Bits are exactly what they sound like – little bits of crunchy toffee coated with chocolate. Stirring them into the cake batter adds toffee-flavored wow to the cake. Sprinkling them onto the frosting adds even more flavor and a wonderful crunch to this scrumptious cake.
I was able to locate Heath English Toffee Bits at my local market, next to the chocolate chips. You can also just chop up some Heath candy bars, either by hand or in the food processor.
How to Make Banoffee Cake Step by StepIf you’ve ever made a cake, the process for making Banoffee Cake will be familiar to you.
The first step is to mash the bananas, which should be very ripe with brown spots showing on the skin. For muffins and banana bread, I normally just mash the bananas with a fork. But for a cake, you want a smooth texture, so use a stand or hand mixer to puree the bananas.
You’ll whisk the dry ingredients together in a separate bowl, then set them aside.
Creaming the butter, white and brown sugar, vanilla, and eggs together is the next step. Pro tip: Make sure the butter and eggs are at room temperature before you begin. Not only will it make the mixing easier, but it will also help give the cake a lighter, fluffier texture.
After adding the banana puree to the bowl, it’s time to alternately add the dry ingredients and the sour cream in three rounds.
Sour cream is perfect in a banana-based cake. The slight acidity in the sour cream is a perfect tangy complement to the sweetness of the bananas. It also adds moisture and richness to the cake, and gives it a light texture and tender crumb.
The last step before baking is to mix in the Heath bits. The crunch toffee will melt during baking, but the flavor will infuse every bite of the cake.
After the Banoffee cake is baked and thoroughly cooled, you’ll make a simple cream cheese frosting. Again, using room temperature butter and cream cheese will make mixing easier and give you a light, fluffy frosting.
Once the cooled cake is frosted, you’ll sprinkle more Heath bits on the top. Those lovely little bits of toffee will add a satisfying crunch to the cake, and even more toffee flavor. Heaven!
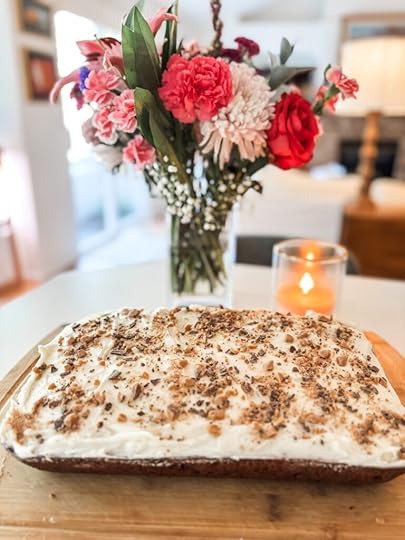
Give this scrumptious Banoffee Cake a try the next time you’ve got overripe bananas. Your friends and family will thank you. And probably ask for the recipe!
Print Banoffee Cake – Easy Banana Toffee Sheet Cake with Cream Cheese Frosting Author: Marie Bostwick Yield: Makes 1 9x13 sheet cake 1x Print Recipe [image error] Pin Recipe Ingredients
 For the cake:
3 large, very ripe bananas, enough for 1.5 cups of banana puree3 cups flour1 tsp baking powder1 tsp baking soda½ tsp salt½ cup unsalted butter – at room temperature1 cup white sugar½ cup brown sugar2 tsp vanilla extract3 eggs – at room temperature1 lb sour cream3/4 cup Heath English Toffee Bits (or an equal amount of chopped Heath candy bars)For the Frosting:
8 oz cream cheese, soften to room temperature½ cup unsalted butter, soften to room temperature3 cup powdered sugar1 tsp vanilla extractPinch of salt¼ cup Heath English Toffee Bits (or equal amount of chopped Heath candy bars) Cook Mode Prevent your screen from going dark InstructionsFor the Cake:
Preheat the oven to 350 degrees. Spray a 9×13 cake pan with cooking spray.Peel the bananas and place in bowl, Use a stand mixer or hand beaters to puree. Set aside.In a separate bowl, whisk together flour, baking powder, baking soda, and salt. Set aside.Place butter in a large, deep mixing bowl. Cream butter with the white and brown sugars and vanilla extract for two to three minutes, until light and fluffy. Add eggs on at a time, mixing between additions.Add one third of the dry ingredients to the bowl and mix until well combined. Add one third of the sour cream and mix to combine. Repeat twice more. Take care not to overmix the batter.Stir in the Heath toffee bits by hand, with a spatula.Pour the cake batter into the prepared baking pan. Bake in the preheated oven for 50-60 minutes, until a toothpick inserted in the cake comes out clean.Remove cake from oven. Allow to cool completely (about an hour) before frosting the cake.For the Frosting:
Place the softened cream cheese, butter, and vanilla extract in a deep mixing bowl. Cream together with electric beaters or stand mixer.Add the powdered sugar, one cup at a time, mixing at a low speed.Ice the cake, using all of the cream cheese frosting. Evenly sprinkle the Heath toffee bits over the top of the cake. Did you make this recipe? Share a photo and tag us — we can't wait to see what you've made!
February 16, 2026
How to Make Embroidered Felt Ornaments: A Beginner’s Guide to Handmade Gifts


Looking for a fun, easy-to-make craft for gifts or holiday celebrations? Make an embroidered felt ornament! With countless themes and patterns, you’re sure to find one that’s perfect for you or your special someone.
Why Embroidered Felt Ornaments Make Perfect Handmade GiftsThis post is for the crafty people. You know who you are, right?
We’re people who never leave the house without a half-done project in our bag, in case of traffic jams or long waits at the doctor’s office. We’re the people who take joy in making gifts by hand. Especially if the gift we are making matches the interests, profession, or color scheme of the person who receives it.
Last year, I made a couple of embroidered felt ornaments for Christmas gifts. Since then, I’ve become obsessed with them!
Why? Glad you asked!
To start with, you truly can find a felt ornament pattern or theme that’s perfect for every holiday, occasion, or person.
Want to make a St. Patrick’s Day felt ornament? Etsy has hundreds of patterns, everything from shamrocks to pots of gold and to leprechauns. Have a friend who really loves bunnies, like I do?

I made these two cuties for a Christmas gift, and dressed them in holiday scarves. With a little change in colors, these happy little floofs would be terrific Valentine’s or Easter presents for your favorite bunny lover.
Also, there is a huge range of options when it comes to levels of difficulty. Beginning stitchers will have no trouble finding cute, frustration-free projects. Advanced embroiderers can likewise find satisfying projects to challenge their skills, !
Because they’re small and hand-stitched, felt ornaments are portable projects you can work on just about anywhere. They’re perfect when you want to do something creative but don’t have time, energy, or space for a bigger project.
Essential Supplies for Making Felt OrnamentsYou only need a few basic supplies to make most embroidered felt ornaments.
Sewing needlesScissors – regular for cutting the paper pattern, fabric scissors for cutting feltMarking pencil – for tracing patterns or pattern markingPoly-fil – for stuffing the ornamentAssorted colors of embroidery flossAssorted color feltThere are two types of felt.
Standard craft felt is made with a blend of synthetic polyester and acrylic. It’s affordable, available at almost any craft store, comes in a huge range of colors, and has a bit of a sheen. Craft felt can be a good choice for many projects.
Wool felt is made from either from 100% wool or a wool blend. It’s thick and durable with a matte finish. It looks and is more expensive than craft felt. However, I prefer to use it for an embroidered felt ornament. If I’m going to put time and effort into making a gift, I’d rather use the best possible materials.

Your local quilt or fabric stores may carry wool felt. You can also buy collections it online. Here are some I’ve purchased recently.
Benzie Design Wool Felt in Autumn ColorsBenzie Design Wool Felt in Holiday ColorsOver the River Felt Skintastic CollectionAnd of course, unless you want to make your own, you’ll also need a pattern.
Where to Find the Best Felt Ornament Patterns (Etsy & More)The best place to purchase felt ornament patterns is Etsy. Prices can range from less than five dollars to thirteen and up. More expensive patterns usually include several different variations.
Etsy patterns are usually digital, so they are available to download almost instantly. However, you will need to print them out yourself. These digital patterns generally include an easy to cut out shape or shapes for your project, as well as simple to follow instructions, and an illustrated tutorial of the embroidery stitches you’ll use.
You find patterns for almost any holiday, occasion, animal, bird, hobby, or theme. Just type a few words in the search bar, and you’ll likely come up with all kinds of options.

My most recent finish was these “three French hens” I made as a Christmas gift for a friend who loves chickens. She loves them and said she’s going to display them all year round.
Who knows? Maybe someday I’ll up my skills to the point where I can tackle this intricate and challenging (and expensive) .
But one thing is sure, I’m going to keep making embroidered felt ornaments. They’re a fun and creative way to create a special keepsake for yourself or a friend.
February 9, 2026
Oven Baked Chicken Wings – No Baking Powder


These meaty, crispy, flavorful Oven Baked Wings are the perfect snack for movie nights, game days, and family get-togethers. A tasty, simple recipe with NO baking powder! And NO metallic aftertaste!
Crispy, Tasty Oven Baked Wings – No Baking Powder RecipeA couple of weeks ago, I was considering my Super Bowl snack menu and decided to audition some recipes for wings.
Though I had my own thoughts about spice and flavor profiles, I’d never made wings before. A little online sleuthing showed me that baking powder appears in most recipes for oven baked in wings. So, that’s what I used in my first attempt.
And, let me tell you, I just hated them!
The wings that came out of my oven looked gorgeous. However, even though I used no aluminum baking powder, they had a distinct metallic aftertaste that was just awful. I ended up tossing the whole batch.
A little more internet research told me I wasn’t the only person who couldn’t abide the taste of baking powder in wings. Even so, I saw almost no recipes for oven baked wings with no baking powder.
Clearly, it was time to do something about that!

After a little trial and error, I came up with a truly tasty recipe for meaty, crispy, flavorful oven baked wings with no baking powder. (And no icky aftertaste!)
It requires just three simple ingredients – wings, butter, and spices – plus time. But more about that later.
For now, let’s talk about the most important ingredient.
Oven Baked Wings – Prepping The WingsInstead of a whole chicken wing, we’ll be cooking and serving individual sections of the wings, sometimes called “party wings.”
Buying prepared “party wings” at the market might save you a little time. But my recommendation is to only buy fresh party wings if you can find them. The frozen variety is usually packaged in a “salt solution” that’s too salty.
Buying whole, fresh wings tends to be a lot cheaper than pre-prepped wings. Cutting them into party wings is simple and doesn’t take much time.
Here’s how to do it.
Whole chicken wings have three sections and two joints, one much larger than the other.
The first thing to do is bend the wing to find the joints, and then cut through each one using a sharp knife or poultry shears.
This will give you three sections of wing. Save the two meaty parts – the drumette and the wingette (sometimes called the flat because of its shape). These are the sections we’ll use to make our oven baked wings.

The skinny wing tips don’t have much meat, so we won’t use them for our wings. But they’d be great for making soup or stock. So, you may want to save them to freeze them for that purpose.
Once the wings are prepped, we’re ready to get cooking!
The Secret To Terrific Oven Baked Wings – Seasoning And TimeAs I said above, almost all the oven baked wing recipes I’ve seen online use baking powder. The reason? It’s supposed to make the wings crispy.
And it does, to a degree. But the trade-off in taste isn’t worth it to me.
Also, let’s just say it up front, oven baked wings will never be as crispy as fried wings. But it’s still possible to make tasty, pretty darned crispy wings in the oven and with no baking powder.
My secret employs the same method I use when roasting a whole chicken, seasoning plus time.
After patting the wings with paper towels to blot away any liquid, I rub them all over with a blend of kosher salt and fresh ground pepper.
Then I place the seasoned wings on a rack and let them sit uncovered in the refrigerator for at least four hours and up to twenty-four hours.
The salt helps draw moisture out of the wings, as well as season them. So, the longer you can let the seasoned wings rest, the crispier the skin will be once they’re baked.

Once the wings have rested, I brush them all over with a blend of melted butter and spices.
The butter adds a little extra fat and flavor that I like. Also, it still lets you cook the wings at a pretty high temperature without burning. Cooking in a very hot oven is going to make them crispier.
Another option would be to use a neutral, high smoke point oil – such as avocado, vegetable, or grapeseed oil. Please note that extra virgin olive oil is not a good option here as it will burn at high temperatures.
When it comes to spices, you could just bake these wings with salt and pepper. However, I love adding some extra, no-salt spices to the melted butter.
I made three flavors of oven baked wings – lemon pepper (with a no-salt lemon pepper seasoning), smoked paprika with a little ground chipotle pepper, and Chinese five-spice.
But when it comes to spice, it’s fine to choose your own adventure!
Use whatever no-salt spice you like in a ratio of about three teaspoons of ground spice to four tablespoons of melted butter. That will be enough for about four pounds of wings.
If you want to make a variety of wing flavors, just reduce the amounts. That’s what I did, making 3 flavors, in 3 separate are little bowls. Here’s how the math would work for 4 pound of wings –
2 flavors – 2 T butter and 1.5 tsp spice
3 flavors – 4 tsp butter and 1 tsp spice
4 flavors – 1 T butter and 3/4 tsp spice

Serving wings with a really yummy dipping sauce is part of the fun.
I paired my lemon pepper wings with blue cheese dressing, used classic ranch for the smoked paprika wings, and sweet chile sauce for the Chinese five-spice flavors.
Don’t be afraid to experiment with your own sauce and spice combos!
Buffalo sauce is always a crowd pleaser. A thick teriyaki sauce, like Yoshida’s, would be great with Asian flavored wings. Just about any flavor of store-bought Bitchin’ Sauce would taste terrific with wings.
However you decide to spice ‘em up and sauce ‘em up, your friends and family will love these Oven Baked Wings. Make some soon!
Print Oven Baked Wings – No Baking Powder Author: Marie Bostwick Print Recipe [image error] Pin Recipe Ingredients 4 lbs of chicken wings, cut into “party wings” (see post for prep instructions)2.5 tsp kosher salt½ tsp fresh ground pepper4 T butter (Can sub high smoke point oils such as grapeseed, avocado, vegetable.)3 tsp no-salt seasoning (optional – see post for suggestions)Dipping sauce of choice (optional – see post for suggestions) Cook Mode Prevent your screen from going dark Instructions Line a rimmed baking sheet with foil or baking parchment. Place a baking rack in the rimmed baking sheet.Rinse the “party wing” sections with cool water and pat completely dry with paper towels. In a small bowl, mix together the Kosher salt and fresh ground pepper. Rub the salt mixture onto the wings, on all sides.Place wings on the baking rack. Let the wings rest, uncovered, in the refrigerator for at least 4 and up to 24 hours.When ready to cook, preheat the oven to 425 degrees. Melt the butter with the no-salt spice of your choice. (If making salt and pepper wings, leave out no-salt spices.) Brush the wings on all side with the melted butter and spice mix.Place prepared wings on the rack. Bake in preheated oven for 25-30 minutes, turning wings over halfway through. Serve oven baked wings alone or with your favorite dipping sauce. Did you make this recipe?
 Share a photo and tag us — we can't wait to see what you've made!