A guide to making fried shallots
Welcome to Singapore Noodles, a celebration of Asian culinary traditions and food cultures. Every week, you’ll receive historical tidbits, personal stories, and recipes delivered straight to your inbox. Archived recipes and other content can be found on the index. My cookbooks, Wet Market to Table and PlantAsia, are available for purchase here and here respectively.
 The new edition of PlantAsia, hitting shelves in October 2025.
HOMEMADE FRIED SHALLOTS
Fried shallots are a common pantry staples in Asia, and if you’ve never had homemade ones, you’re missing out. Think of them as having the intense, sweet-savoury flavour of caramelised onions, but with a delicate crunch. Although most Asian supermarkets stock fried shallots affordably, making your own yields a far superior flavour—and a bonus: infused shallot oil. Frying shallots can be tricky, but here are some principles I follow:
Use a mandoline to slice your shallots: In Asia, small purple shallots are traditional, but if you only have access to Western shallots, which are longer and tapered, that’s no issue (in fact, that’s what I use here in the Netherlands). A knife will do the job, but a mandoline makes quick work of it and gives you thinner, more consistent slices that fry evenly. I use a Japanese mandoline, but small, palm-sized mandolines are inexpensive and easy enough to find.
![slicing.mp4 [video-to-gif output image]](https://substackcdn.com/image/fetch/%24s_!Q-BG!,f_auto,q_auto:good,fl_progressive:steep/https%3A%2F%2Fsubstack-post-media.s3.amazonaws.com%2Fpublic%2Fimages%2F6c5c1641-b836-4491-b635-2b028dd0a5a9_476x560.gif)
Use room temperature oil: When you deep-fry something at high temperature, it crisps and browns the exterior while keeping the interior moist—this moisture is the enemy of crispy fried shallots. Starting with cold oil allows the moisture in the shallots to cook out before they begin to brown and crisp, avoiding a soggy end-product.
Use a good amount of oil: The oil-to-shallot ratio is a big factor in whether the fried shallots turn out crisp or mushy. Sufficient oil ensures that all the shallots can float and freely circulate for even cooking, and avoids overcrowding which can result in the shallots softening and steaming instead of crisping.
![oil.mp4 [video-to-gif output image]](https://substackcdn.com/image/fetch/%24s_!IaRm!,f_auto,q_auto:good,fl_progressive:steep/https%3A%2F%2Fsubstack-post-media.s3.amazonaws.com%2Fpublic%2Fimages%2F684d3394-3005-40aa-8b2c-053a8468b6ed_476x476.gif)
Cook on low heat: When the oil and shallots are first heated, there’s a lot of bubbling as moisture escapes from the shallots. I cook the shallots on low heat so that this moisture has enough time to cook out before the shallots brown.
![bubbling.mp4 [video-to-gif output image]](https://substackcdn.com/image/fetch/%24s_!_AWi!,f_auto,q_auto:good,fl_progressive:steep/https%3A%2F%2Fsubstack-post-media.s3.amazonaws.com%2Fpublic%2Fimages%2F3001e2f3-a961-41b1-900a-a824a92a2123_478x478.gif)
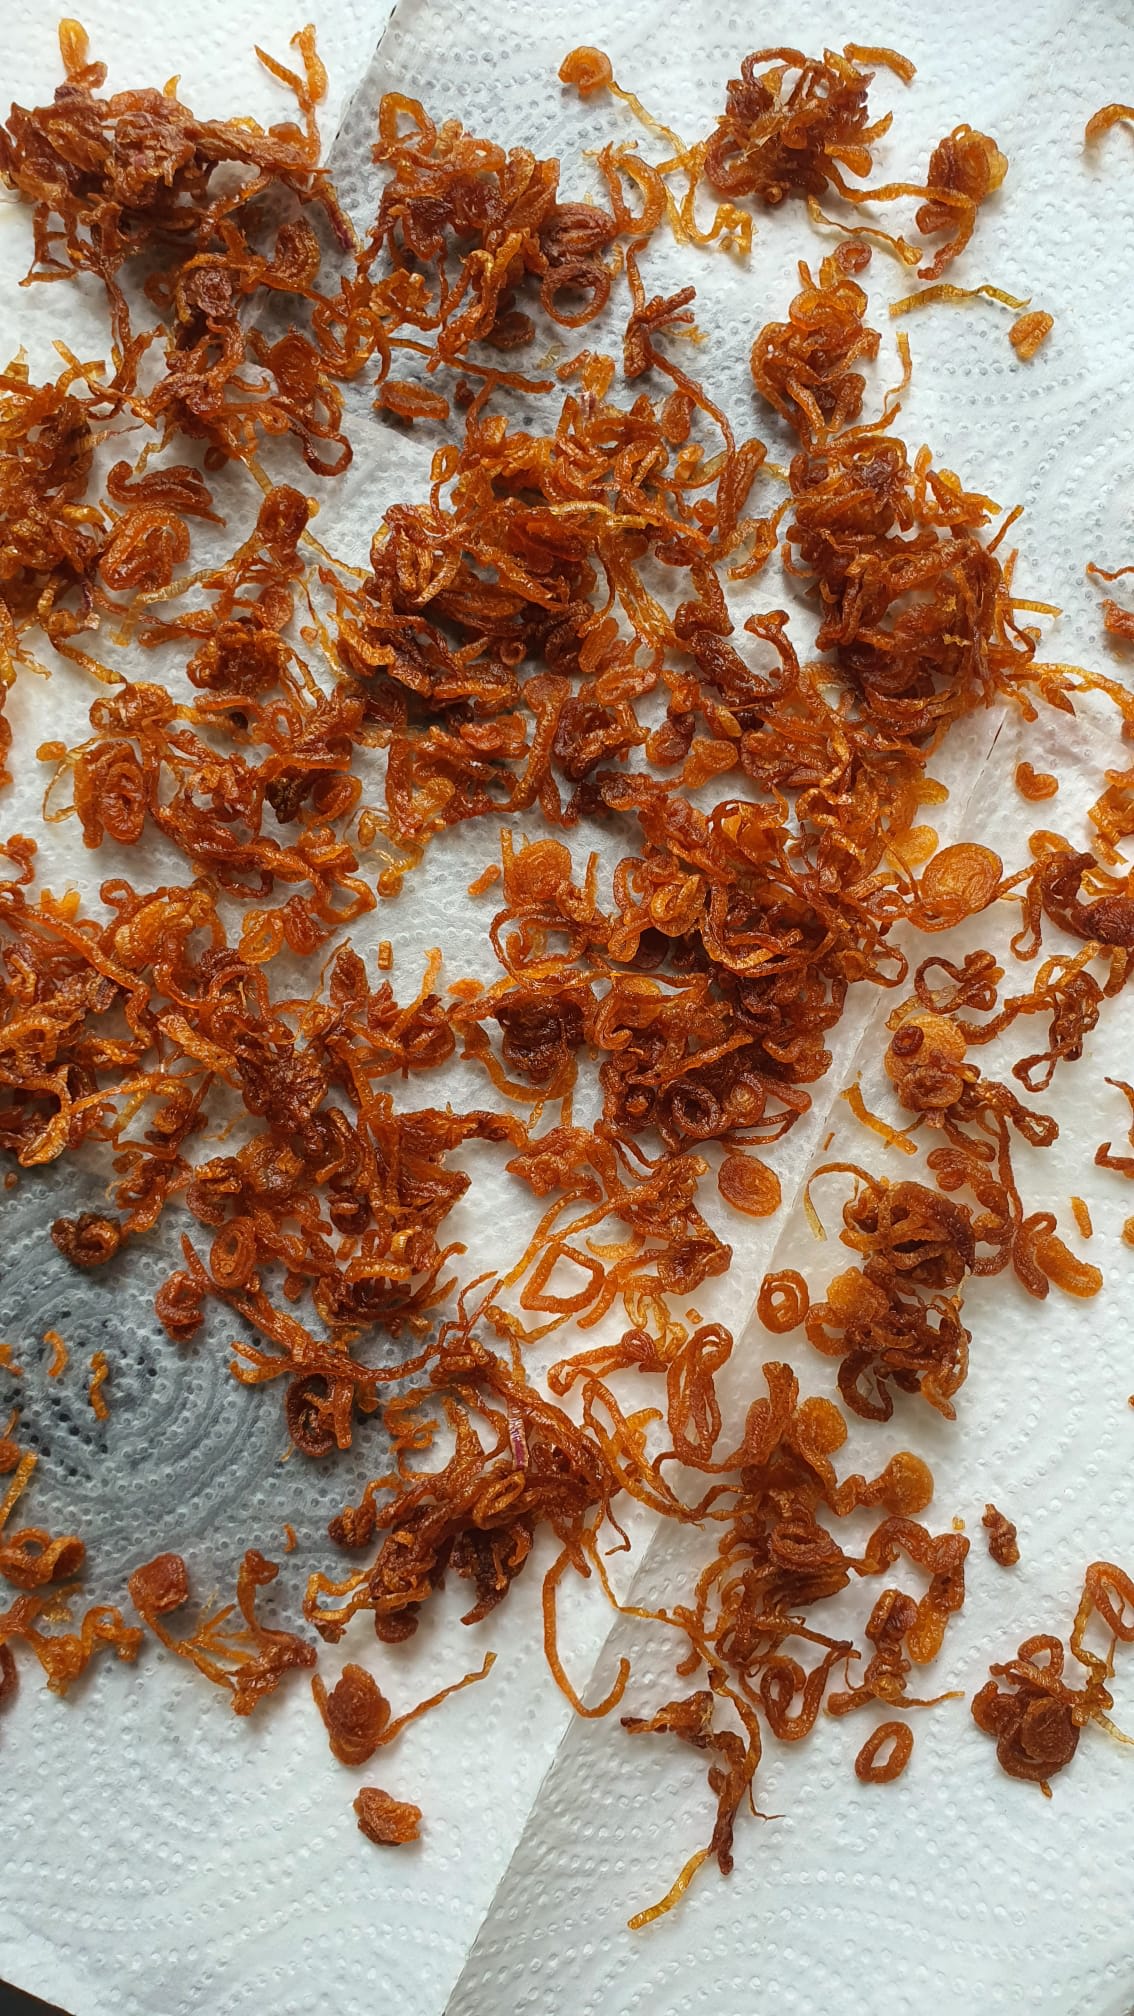
Pull them out early: As the moisture inside the shallots evaporates and the oil reaches frying temperature, the shallots begin to fry and the sugars caramelise. Don’t let the shallots get to a deep golden brown because the shallots will continue to brown from the residual heat—pull them from the oil a little before they look right to you (light golden brown is ideal). Always have your paper towel-lined sheet tray and spider ready well in advance because the difference between perfect and burnt is seconds.
![WhatsApp Video 2025-08-31 at 19.19.20.mp4 [video-to-gif output image]](https://substackcdn.com/image/fetch/%24s_!82zO!,f_auto,q_auto:good,fl_progressive:steep/https%3A%2F%2Fsubstack-post-media.s3.amazonaws.com%2Fpublic%2Fimages%2F94b945bd-9b59-4a8e-81fd-3d521985819a_478x478.gif)
Cooling and storing: The crispness of the fried shallots isn’t coming from flour or starches being fried but from caramelised sugars. When you first pull them from the oil, the shallots will feel somewhat limp—this is to be expected as the sugars are molten. However, as the shallots cool to room temperature, these sugars harden and the structure stabilises, producing that brittle, crunchy texture. Spread the fried shallots in a thin layer immediately after frying. Use your hands or chopsticks to separate any clumps to help any trapped steam to escape. Once cool, you can transfer the fried shallots to an airtight container or jar. Silica packets can extend shelf life, especially in humid climates. Otherwise, a quick flash in a hot oven before use can refresh them.
![WhatsApp Video 2025-08-31 at 22.53.20.mp4 [video-to-gif output image]](https://substackcdn.com/image/fetch/%24s_!3d4F!,f_auto,q_auto:good,fl_progressive:steep/https%3A%2F%2Fsubstack-post-media.s3.amazonaws.com%2Fpublic%2Fimages%2Fca8e0f0a-2bc3-4241-a5e6-7de32651923a_478x478.gif)
Two internet hacks, tested
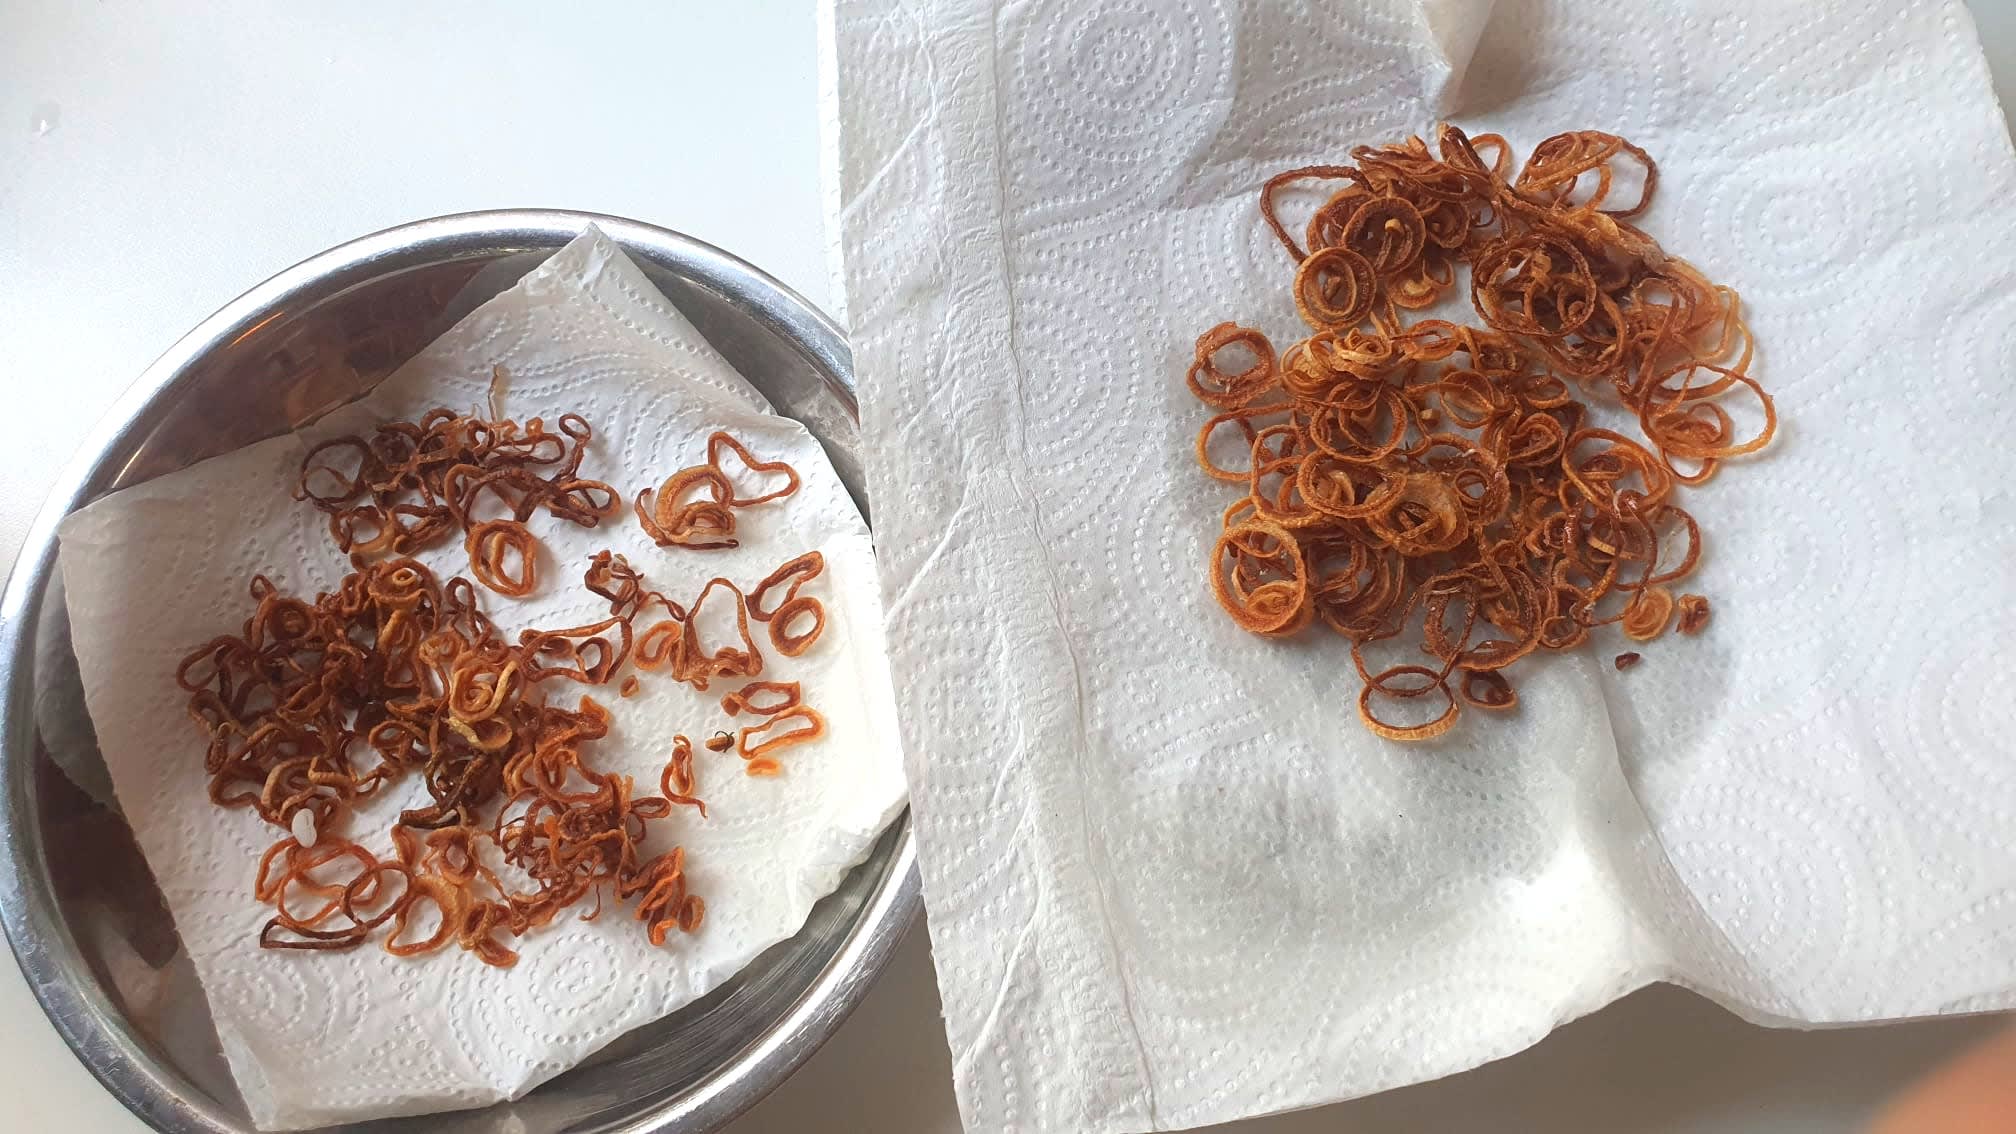 Left: shallots that were salted before frying; Right: shallots that were tossed in cornstarch before frying.
- Salted fried shallots (left in photo): While fried shallots are traditionally not salted, some cooks salt their shallots before frying to draw out moisture. In theory, this should help the shallots dry faster and crisp more evenly in the oil. However, there are real downsides to this method. The main one is that it is hard to control saltiness; too little salt does nothing, too much makes the finished shallots unpleasantly salty. Depending on how evenly the salt was distributed, the frying of the shallots could also end up uneven. The other thing I noticed was how dull and matte the salted fried shallots looked. When you salt shallots, the sugar-rich juice gets pulled out of the cells, leading to less sweetness and caramelisation in the finished fried shallots.
- Cornstarch-tossed fried shallots (right in photo): Tossing shallots in cornstarch before frying is another “hack” I read about. The starch coating helps to absorb moisture, and gave the shallots a crunchier, potato chip-like texture. The shallots also had a more “separate” texture—you almost feel each individual ring of shallot. Apart from enhancing crisp, the starch coating also doubles up as a thin protective barrier around the fried shallots, reducing the shallots’ exposure to humidity, thus extending shelf life. In fact, commercial fried shallots are often lightly coated with starch or flour before frying. However, the problem with using cornstarch is that the starch coating interferes with sugar caramelisation. This means that you get more matte-looking shallots, compared to the glossy, golden ones fried without starch. Since the caramelisation is limited, the flavour leans towards a neutral, muted flavour rather than a deeper, sweet-savoury note of pure fried shallots.
Using fried shallots and shallot oil
![WhatsApp Video 2025-08-31 at 23.01.56.mp4 [video-to-gif output image]](https://substackcdn.com/image/fetch/%24s_!2zsI!,f_auto,q_auto:good,fl_progressive:steep/https%3A%2F%2Fsubstack-post-media.s3.amazonaws.com%2Fpublic%2Fimages%2F8afd74d7-f5d0-4cfe-9b87-145e768acbea_476x476.gif)
Fried shallots are perfect as a garnish or flavourful, crunchy element in porridge, noodle soups, cold noodle dishes, salads, sandwiches, biryani—really, anything you can think of would be improved by it. The oil left over after frying is intensely flavoured and has as many uses for it as garlic butter. Fry eggs in it, make fried rice, drizzle over noodles, or make a salad dressing with it. It is also excellent as a base for chilli oil or mayonnaise.
Fried shallots
Makes 1 jam jar’s worth | Vegan